Operating Instructions
Page 4
... 12 Rear/Right Side/Bottom 12 Control Panel 13 Connector Panel 14 Remote Commander 15 Presentation Tool 17 Setting Up and Projecting Installing the Projector 19 Connecting the Projector 20 Connecting with a Computer ..... 20 Connecting with a VCR 22 Projecting 23 Turning Off the Power 25 Convenient Function Selecting the Menu Language .......... 26...
... 12 Rear/Right Side/Bottom 12 Control Panel 13 Connector Panel 14 Remote Commander 15 Presentation Tool 17 Setting Up and Projecting Installing the Projector 19 Connecting the Projector 20 Connecting with a Computer ..... 20 Connecting with a VCR 22 Projecting 23 Turning Off the Power 25 Convenient Function Selecting the Menu Language .......... 26...
Operating Instructions
Page 6
... damage the cabinet. • Avoid touching the lens. Never use strong solvents, such as it out by the plug. On LCD data projector • The LCD data projector is in a room where floor and walls are of reflecting material, it with a mild detergent solution. The air coming out ...the lens, use a damp cloth, detergent solution, or thinner. • Clean the filter at regular intervals. To remove dust on the LCD data projector. The powered tilt adjuster of the manufacturing process and does not indicate a malfunction. This is a normal result of this unit automatically extends...
... damage the cabinet. • Avoid touching the lens. Never use strong solvents, such as it out by the plug. On LCD data projector • The LCD data projector is in a room where floor and walls are of reflecting material, it with a mild detergent solution. The air coming out ...the lens, use a damp cloth, detergent solution, or thinner. • Clean the filter at regular intervals. To remove dust on the LCD data projector. The powered tilt adjuster of the manufacturing process and does not indicate a malfunction. This is a normal result of this unit automatically extends...
Operating Instructions
Page 7
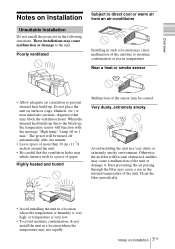
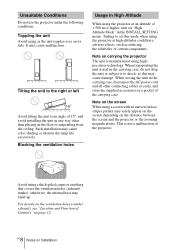
... the ventilation holes. Very dusty, extremely smoky Avoid installing the unit in the following situations. Overview Notes on Installation Unsuitable Installation Do not install the projector in a very dusty or extremely smoky environment.
... the ventilation holes. Very dusty, extremely smoky Avoid installing the unit in the following situations. Overview Notes on Installation Unsuitable Installation Do not install the projector in a very dusty or extremely smoky environment.
Operating Instructions
Page 8
...transporting the unit stored in any way other connecting cables or cards, and store the supplied accessories in High Altitude When using the projector at an altitude of certain components. It may build up. This is manufactured using a screen with an uneven surface, stripes ... shorten the lamp life excessively. Blocking the ventilation holes Usage in a pocket of the projector. Unsuitable Conditions Do not use the projector under the following conditions. Note on carrying the projector The unit is not a malfunction of the carrying case. Note on the distance between ...
...transporting the unit stored in any way other connecting cables or cards, and store the supplied accessories in High Altitude When using the projector at an altitude of certain components. It may build up. This is manufactured using a screen with an uneven surface, stripes ... shorten the lamp life excessively. Blocking the ventilation holes Usage in a pocket of the projector. Unsuitable Conditions Do not use the projector under the following conditions. Note on carrying the projector The unit is not a malfunction of the carrying case. Note on the distance between ...
Operating Instructions
Page 9
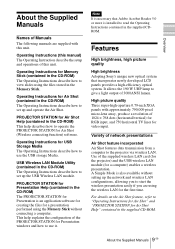
... presentations Air Shot feature incorporated Air Shot features data transmission from a computer to the projector via wireless LAN. High picture quality Three super-high-aperture 0.79-inch XGA panels with this unit. Operating Instructions for Air Shot (Wireless connecting function) software. ... the Supplied Manuals GB Features High brightness, high picture quality High brightness Adopting Sony's unique new optical system that Adobe Acrobat Reader 5.0 or more is necessary that incorporates newly developed LCD panels provides a high-efficiency optical system. For details on the Air Shot...
... presentations Air Shot feature incorporated Air Shot features data transmission from a computer to the projector via wireless LAN. High picture quality Three super-high-aperture 0.79-inch XGA panels with this unit. Operating Instructions for Air Shot (Wireless connecting function) software. ... the Supplied Manuals GB Features High brightness, high picture quality High brightness Adopting Sony's unique new optical system that Adobe Acrobat Reader 5.0 or more is necessary that incorporates newly developed LCD panels provides a high-efficiency optical system. For details on the Air Shot...
Operating Instructions
Page 10
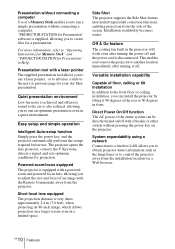
... capability Capable of floor, ceiling or tilt installation In addition to the front floor or ceiling installation, you to move the projector to another location immediately after turning the power off and the power cord is disconnected. Direct Power On/Off function The AC...supplied presentation tool allows you to use . Short focal lens equipped The projection distance is equipped with the Remote Commander away from the projector. Installation availability becomes wider. This enables you can be directly turned on/off . System expandability using a network Connection to a ...
... capability Capable of floor, ceiling or tilt installation In addition to the front floor or ceiling installation, you to move the projector to another location immediately after turning the power off and the power cord is disconnected. Direct Power On/Off function The AC...supplied presentation tool allows you to use . Short focal lens equipped The projection distance is equipped with the Remote Commander away from the projector. Installation availability becomes wider. This enables you can be directly turned on/off . System expandability using a network Connection to a ...
Operating Instructions
Page 11
...makes it possible to project no picture on the screen unless the required password is entered when the projector is trademark of Sony Corporation. This prevents the projector from operating incorrectly. ... • Adobe Acrobat Reader is a trademark of Adobe Systems Incorporated. •...; Windows is a registered trademark of Microsoft Corporation in the United States and/or other countries. • VGA, SVGA, XGA and ...
...makes it possible to project no picture on the screen unless the required password is entered when the projector is trademark of Sony Corporation. This prevents the projector from operating incorrectly. ... • Adobe Acrobat Reader is a trademark of Adobe Systems Incorporated. •...; Windows is a registered trademark of Microsoft Corporation in the United States and/or other countries. • VGA, SVGA, XGA and ...
Operating Instructions
Page 12
... card slot The supplied wireless LAN card can be inserted. Notes Remove the wireless LAN card from the wireless LAN card slot when storing the projector in the CD-ROM). qf Ventilation holes (intake)/Lamp cover qg Ventilation holes (intake)/Air filter cover Notes • Do not place anything other than...
... card slot The supplied wireless LAN card can be inserted. Notes Remove the wireless LAN card from the wireless LAN card slot when storing the projector in the CD-ROM). qf Ventilation holes (intake)/Lamp cover qg Ventilation holes (intake)/Air filter cover Notes • Do not place anything other than...
Operating Instructions
Page 13
... around the I / 1 key lights in green when the power is turned on. 2 ON/STANDBY indicator (located around the I / 1 (on/standby) key Turns on the projector when the projector is in standby mode. Control Panel 1 2 3 INPUT 4 5 TILT MENU PUSH ENTER 6 Overview FOCUS ZOOM SIDE SHOT POWER STANDBY TEMP/FAN LAMP/COVER 7 8 9 0 1 I / 1 key) Lights...Connector/Connector Panel For details, see "Cleaning the Air Filter" on page 14. Lights in red when an AC power cord is turned on the projector with the I / 1 key. - Lights in green when the power is plugged into a wall outlet.
... around the I / 1 key lights in green when the power is turned on. 2 ON/STANDBY indicator (located around the I / 1 (on/standby) key Turns on the projector when the projector is in standby mode. Control Panel 1 2 3 INPUT 4 5 TILT MENU PUSH ENTER 6 Overview FOCUS ZOOM SIDE SHOT POWER STANDBY TEMP/FAN LAMP/COVER 7 8 9 0 1 I / 1 key) Lights...Connector/Connector Panel For details, see "Cleaning the Air Filter" on page 14. Lights in red when an AC power cord is turned on the projector with the I / 1 key. - Lights in green when the power is plugged into a wall outlet.
Operating Instructions
Page 14
... in the menu system. For details on page 60. q; Lights when the temperature inside the projector becomes unusually high. - Flashes when the lamp cover or air filter cover is broken. Flashes when the fan is not secured firmly. Lights when the ...
... in the menu system. For details on page 60. q; Lights when the temperature inside the projector becomes unusually high. - Flashes when the lamp cover or air filter cover is broken. Flashes when the fan is not secured firmly. Lights when the ...
Operating Instructions
Page 15
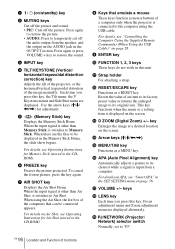
... to the USB connector of a computer using an optional cable. 7 RS-232C connector (D-sub 9pin, female) Connects to a computer to operate the projector from the INPUT A or INPUT B. • AUDIO (stereo minijack): Connects to external active speakers. When VIDEO or S VIDEO is selected, the ... VOLUME MENU/ TAB AIR SHOT FREEZE 1 2 3 4 5 6 7 8a 8b qd qs ENTER R CLICK D ZOOM RESET/ ESCAPE 1 3 2 FUNCTION RM-PJM15 PROJECTOR RM-PJM17 8c 9 q; Connects to the monitor output of a computer. 2 AC IN socket Connects the supplied AC power cord. 3 AUDIO (stereo minijack) connector (common...
... to the USB connector of a computer using an optional cable. 7 RS-232C connector (D-sub 9pin, female) Connects to a computer to operate the projector from the INPUT A or INPUT B. • AUDIO (stereo minijack): Connects to external active speakers. When VIDEO or S VIDEO is selected, the ... VOLUME MENU/ TAB AIR SHOT FREEZE 1 2 3 4 5 6 7 8a 8b qd qs ENTER R CLICK D ZOOM RESET/ ESCAPE 1 3 2 FUNCTION RM-PJM15 PROJECTOR RM-PJM17 8c 9 q; Connects to the monitor output of a computer. 2 AC IN socket Connects the supplied AC power cord. 3 AUDIO (stereo minijack) connector (common...
Operating Instructions
Page 16
... restore the picture. • AUDIO: Press to restore the sound. 3 INPUT key 4 TILT/KEYSTONE (Vertical/ horizontal trapezoidal distortion correction) key Adjusts the tilt of the projector, or the horizonal/vertical trapezoidal distortion of the image manually. Use the arrow keys (M/m/ 1 I / 1 (on the AUDIO jack in the OUTPUT section.
... restore the picture. • AUDIO: Press to restore the sound. 3 INPUT key 4 TILT/KEYSTONE (Vertical/ horizontal trapezoidal distortion correction) key Adjusts the tilt of the projector, or the horizonal/vertical trapezoidal distortion of the image manually. Use the arrow keys (M/m/ 1 I / 1 (on the AUDIO jack in the OUTPUT section.
Operating Instructions
Page 18
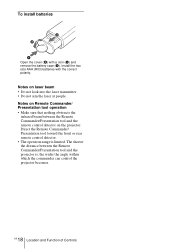
... Remote Commander/ Presentation tool operation • Make sure that nothing obstructs the infrared beam between the Remote Commander/Presentation tool and the projector is limited. Direct the Remote Commander/ Presentation tool toward the front or rear remote control detector. • The operation range is ..., the wider the angle within which the commander can control the projector becomes. 18 GB Location and Function of Controls Install the two size AAA (R03) batteries with a coin (1) and remove the battery case...
... Remote Commander/ Presentation tool operation • Make sure that nothing obstructs the infrared beam between the Remote Commander/Presentation tool and the projector is limited. Direct the Remote Commander/ Presentation tool toward the front or rear remote control detector. • The operation range is ..., the wider the angle within which the commander can control the projector becomes. 18 GB Location and Function of Controls Install the two size AAA (R03) batteries with a coin (1) and remove the battery case...
Operating Instructions
Page 19
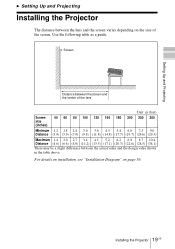
Setting Up and Projecting B Setting Up and Projecting Installing the Projector The distance between the actual value and the design value shown in the table above. Use the following table as a guide. Screen Distance between the ....2) (13.5) (17.1) (20.3) (22.6) (28.5) (34.1) There may be a slight difference between the lens and the screen varies depending on page 56. 19 Installing the Projector GB For details on installation, see "Installation Diagram" on the size of the screen.
Setting Up and Projecting B Setting Up and Projecting Installing the Projector The distance between the actual value and the design value shown in the table above. Use the following table as a guide. Screen Distance between the ....2) (13.5) (17.1) (20.3) (22.6) (28.5) (34.1) There may be a slight difference between the lens and the screen varies depending on page 56. 19 Installing the Projector GB For details on installation, see "Installation Diagram" on the size of the screen.
Operating Instructions
Page 20
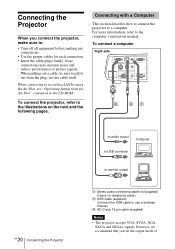
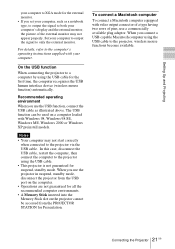
...a Computer This section describes how to connect the projector to use a wireless mouse.) 3 HD D-sub 15-pin cable (supplied) Notes • The projector accepts VGA, SVGA, XGA, SXGA and SXGA+ signals. However, we recommend that you connect the projector, make sure to a wireless LAN by using the... (not supplied) (Use a no-resistance cable.) 2 USB cable (supplied) (Connect the USB cable to a computer. To connect the projector, refer to the computer's instruction manual. For more information, refer to the illustrations on the next and the following pages. loose connections may...
...a Computer This section describes how to connect the projector to use a wireless mouse.) 3 HD D-sub 15-pin cable (supplied) Notes • The projector accepts VGA, SVGA, XGA, SXGA and SXGA+ signals. However, we recommend that you connect the projector, make sure to a wireless LAN by using the... (not supplied) (Use a no-resistance cable.) 2 USB cable (supplied) (Connect the USB cable to a computer. To connect the projector, refer to the computer's instruction manual. For more information, refer to the illustrations on the next and the following pages. loose connections may...
Operating Instructions
Page 21
...the computer recognizes the USB human interface device (wireless mouse function) automatically. When you use the projector in suspend, standby mode, disconnect the projector from the PROJECTOR STATION for suspend, standby mode. To connect a Macintosh computer To connect a Macintosh computer equipped... with your computer. Setting Up and Projecting your computer to XGA mode for the external monitor. • If ...
...the computer recognizes the USB human interface device (wireless mouse function) automatically. When you use the projector in suspend, standby mode, disconnect the projector from the PROJECTOR STATION for suspend, standby mode. To connect a Macintosh computer To connect a Macintosh computer equipped... with your computer. Setting Up and Projecting your computer to XGA mode for the external monitor. • If ...
Operating Instructions
Page 22
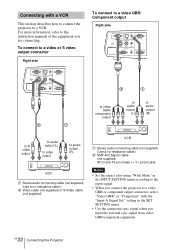
... jack Notes • Set the aspect ratio using "Wide Mode" in the SET SETTING menu. • Use the composite sync signal when you connect the projector to a video GBR or component output connector, select "Video GBR" or "Component" with a VCR This section describes how to connect the...
... jack Notes • Set the aspect ratio using "Wide Mode" in the SET SETTING menu. • Use the composite sync signal when you connect the projector to a video GBR or component output connector, select "Video GBR" or "Component" with a VCR This section describes how to connect the...
Operating Instructions
Page 23
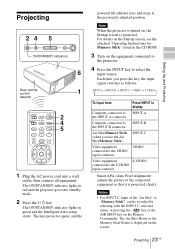
... attached "Operating Instructions for Memory Stick" stored in the CD-ROM. 3 Turn on , the Startup screen is turned on the equipment connected to the projector. 4 Press the INPUT key to the S VIDEO input connector Smart APA (Auto Pixel Alignment) adjusts the picture of the "Air Shot" or "Memory...key or the AIR SHOT key on the screen. The ON/STANDBY indicator lights in red and the projector goes into a wall outlet, then connect all equipment. Note When the projector is projected. The lens protector opens, and the powered tilt adjuster rises and stops at the previously ...
... attached "Operating Instructions for Memory Stick" stored in the CD-ROM. 3 Turn on , the Startup screen is turned on the equipment connected to the projector. 4 Press the INPUT key to the S VIDEO input connector Smart APA (Auto Pixel Alignment) adjusts the picture of the "Air Shot" or "Memory...key or the AIR SHOT key on the screen. The ON/STANDBY indicator lights in red and the projector goes into a wall outlet, then connect all equipment. Note When the projector is projected. The lens protector opens, and the powered tilt adjuster rises and stops at the previously ...
Operating Instructions
Page 24
... control panel Press f or F of the TILT key to the projector by pressing certain keys (e.g., / LCD VGA , / , etc.), or by changing your computer's settings. For details, see "Auto Input Search" on page 37. • The Smart APA is set to "On," the projector searches for the signals from a computer only. 5 Switch the equipment...
... control panel Press f or F of the TILT key to the projector by pressing certain keys (e.g., / LCD VGA , / , etc.), or by changing your computer's settings. For details, see "Auto Input Search" on page 37. • The Smart APA is set to "On," the projector searches for the signals from a computer only. 5 Switch the equipment...
Operating Instructions
Page 25
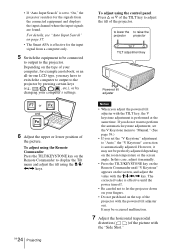
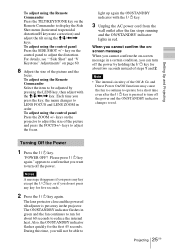
Setting Up and Projecting To adjust using the Remote Commander Press the TILT/KEYSTONE key on the Remote Commander to display the Side Shot menu (horizontal trapezoidal distortion/H keystone correction) and adjust the tilt using the M/m/
Setting Up and Projecting To adjust using the Remote Commander Press the TILT/KEYSTONE key on the Remote Commander to display the Side Shot menu (horizontal trapezoidal distortion/H keystone correction) and adjust the tilt using the M/m/


