Operating Instructions
Page 6
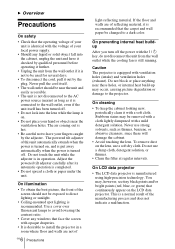
... walls are not of 6 GB Precautions light-reflecting material. Caution The projector is recommended that the carpet and wall paper be near the ventilation holes. On LCD data projector • The LCD data projector is turned off the power with the I / 1 key, do not disconnect the unit from ...Do not use a soft dry cloth. To remove dust on the LCD data projector. You may be used for several days. • To disconnect the cord, pull it with a mild detergent solution. Adjust the powered tilt adjuster carefully after its automatic operation is still running. On illumination ...
... walls are not of 6 GB Precautions light-reflecting material. Caution The projector is recommended that the carpet and wall paper be near the ventilation holes. On LCD data projector • The LCD data projector is turned off the power with the I / 1 key, do not disconnect the unit from ...Do not use a soft dry cloth. To remove dust on the LCD data projector. You may be used for several days. • To disconnect the cord, pull it with a mild detergent solution. Adjust the powered tilt adjuster carefully after its automatic operation is still running. On illumination ...
Operating Instructions
Page 7
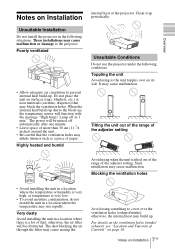
... on surfaces (rugs, blankets, etc.) or near materials (curtains, draperies) that the ventilation holes may block the ventilation holes. The power will be obstructed. The dust blocking the air through the filter may cause malfunction. When the internal heat builds up . Tilting the unit... Avoid using as the unit topples over the ventilation holes (exhaust/intake); Highly heated and humid Unsuitable Conditions Do not use the projector under the following situations. Toppling the unit Avoid using when the unit is a lot of the adjuster setting. Blocking the ventilation ...
... on surfaces (rugs, blankets, etc.) or near materials (curtains, draperies) that the ventilation holes may block the ventilation holes. The power will be obstructed. The dust blocking the air through the filter may cause malfunction. When the internal heat builds up . Tilting the unit... Avoid using as the unit topples over the ventilation holes (exhaust/intake); Highly heated and humid Unsuitable Conditions Do not use the projector under the following situations. Toppling the unit Avoid using when the unit is a lot of the adjuster setting. Blocking the ventilation ...
Operating Instructions
Page 8
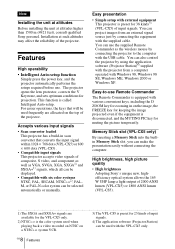
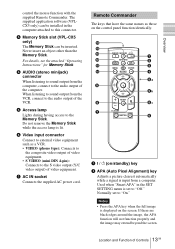
...Sony personel. Memory Stick slot (VPL-CX5 only) By inserting a Memory Stick into the builtin Memory Stick slot, you can project images from a computer operated with Windows 98, Windows 98 SE, Windows ME, Windows 2000 or Windows XP. Features High operability • Intelligent Auto-setup function Simply press the power key, and the projector...(VPL-CX5) or 1800 ANSI lumen (VPL-CS5). ... 1) The SXGA and SXGA+ signals are allocated on can use the supplied Remote Commander as VGA, SVGA, XGA, SXGA1) and SXGA+1) signals, which all can be used when 4) The application software (Projector ...
...Sony personel. Memory Stick slot (VPL-CX5 only) By inserting a Memory Stick into the builtin Memory Stick slot, you can project images from a computer operated with Windows 98, Windows 98 SE, Windows ME, Windows 2000 or Windows XP. Features High operability • Intelligent Auto-setup function Simply press the power key, and the projector...(VPL-CX5) or 1800 ANSI lumen (VPL-CS5). ... 1) The SXGA and SXGA+ signals are allocated on can use the supplied Remote Commander as VGA, SVGA, XGA, SXGA1) and SXGA+1) signals, which all can be used when 4) The application software (Projector ...
Operating Instructions
Page 10
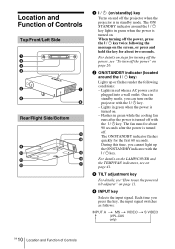
... VIDEO (VPL-CX5 only) 10 GB Location and Function of Controls Top/Front/Left Side 1 TILT 2 3 4 5 7 6 8 Rear/Right Side/Bottom qd qf 9 0 qg qa qh qs qj t 1 I / 1 (on/standby) key Turns on and off the power, press the I / 1 key. - When turning off the projector when the projector is plugged... into a wall outlet. The ON/STANDBY indicator flashes quickly for about 90 seconds after the power is turned on. Once in green while the ...
... VIDEO (VPL-CX5 only) 10 GB Location and Function of Controls Top/Front/Left Side 1 TILT 2 3 4 5 7 6 8 Rear/Right Side/Bottom qd qf 9 0 qg qa qh qs qj t 1 I / 1 (on/standby) key Turns on and off the power, press the I / 1 key. - When turning off the projector when the projector is plugged... into a wall outlet. The ON/STANDBY indicator flashes quickly for about 90 seconds after the power is turned on. Once in green while the ...
Operating Instructions
Page 11
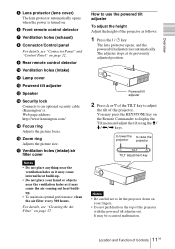
...9 Rear remote control detector 0 Ventilation holes (intake) qa Lamp cover qs Powered tilt adjuster qd Speaker qf Security lock Connects to use the powered tilt adjuster To adjust the height Adjust the height of the projector. qh Zoom ring Adjusts the picture size. Overview 5 Lens protector (lens... cover) The lens protector automatically opens when the power is turned on. 6 Front remote control...
...9 Rear remote control detector 0 Ventilation holes (intake) qa Lamp cover qs Powered tilt adjuster qd Speaker qf Security lock Connects to use the powered tilt adjuster To adjust the height Adjust the height of the projector. qh Zoom ring Adjusts the picture size. Overview 5 Lens protector (lens... cover) The lens protector automatically opens when the power is turned on. 6 Front remote control...
Operating Instructions
Page 12
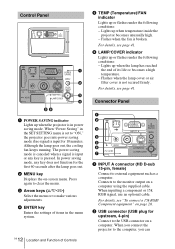
... or air filter cover is input for upstream, 4-pin) Connect to "ON," the projector goes into power saving mode if no signal is not secured firmly. Connector Panel 1 2 3 4 5 ACCESS AUDIO 6 7 INPUT A POWER SAVING MENU VIDEO S VIDEO TEMP/FAN PUSH ENTER LAMP/COVER 1 INPUT A connector (...a computer. Connects to make various adjustments. 4 ENTER key Enters the settings of items in power saving mode. For details, see page 41. Lights up when temperature inside the projector becomes unusually high. - When inputting a component or 15k RGB signal, use an optional cable...
... or air filter cover is input for upstream, 4-pin) Connect to "ON," the projector goes into power saving mode if no signal is not secured firmly. Connector Panel 1 2 3 4 5 ACCESS AUDIO 6 7 INPUT A POWER SAVING MENU VIDEO S VIDEO TEMP/FAN PUSH ENTER LAMP/COVER 1 INPUT A connector (...a computer. Connects to make various adjustments. 4 ENTER key Enters the settings of items in power saving mode. For details, see page 41. Lights up when temperature inside the projector becomes unusually high. - When inputting a component or 15k RGB signal, use an optional cable...
Operating Instructions
Page 13
... the screen. 13 Location and Function of video equipment. 7 AC IN socket Connects the supplied AC power cord. Do not remove the Memory Stick while the access lamp is set to this connector. 3 Memory Stick slot (VPL-CX5 only) The Memory Stick can be installed in the SET SETTING menu is lit. 6 Video...
... the screen. 13 Location and Function of video equipment. 7 AC IN socket Connects the supplied AC power cord. Do not remove the Memory Stick while the access lamp is set to this connector. 3 Memory Stick slot (VPL-CX5 only) The Memory Stick can be installed in the SET SETTING menu is lit. 6 Video...
Operating Instructions
Page 18
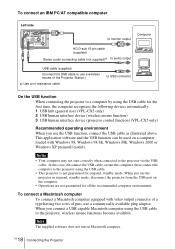
...ME, Windows 2000 or Windows XP preinstall models. To connect an IBM PC/AT compatible computer Left side ACCESS AUDIO INPUT A POWER SAVING MENU VIDEO S VIDEO TEMP/FAN PUSH ENTER LAMP/COVER to monitor output HD D-sub 15-pin cable (supplied) Stereo...time, the computer recognizes the following devices automatically. 1 USB hub (general use) (VPL-CX5 only) 2 USB human interface device (wireless mouse function) 3 USB human interface device (projector control function) (VPL-CX5 only) Recommended operating environment When you use a commercially available plug adaptor. This application ...
...ME, Windows 2000 or Windows XP preinstall models. To connect an IBM PC/AT compatible computer Left side ACCESS AUDIO INPUT A POWER SAVING MENU VIDEO S VIDEO TEMP/FAN PUSH ENTER LAMP/COVER to monitor output HD D-sub 15-pin cable (supplied) Stereo...time, the computer recognizes the following devices automatically. 1 USB hub (general use) (VPL-CX5 only) 2 USB human interface device (wireless mouse function) 3 USB human interface device (projector control function) (VPL-CX5 only) Recommended operating environment When you use a commercially available plug adaptor. This application ...
Operating Instructions
Page 19
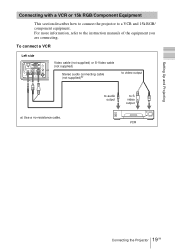
.... Setting Up and Projecting Connecting with a VCR or 15k RGB/Component Equipment This section describes how to connect the projector to S video output VCR 19 Connecting the Projector GB For more information, refer to video output a) Use a no-resistance cable. To connect a VCR Left side... ACCESS AUDIO INPUT A POWER SAVING MENU VIDEO S VIDEO TEMP/FAN PUSH ENTER LAMP/COVER Video cable (not supplied) or S-Video cable (not...
.... Setting Up and Projecting Connecting with a VCR or 15k RGB/Component Equipment This section describes how to connect the projector to S video output VCR 19 Connecting the Projector GB For more information, refer to video output a) Use a no-resistance cable. To connect a VCR Left side... ACCESS AUDIO INPUT A POWER SAVING MENU VIDEO S VIDEO TEMP/FAN PUSH ENTER LAMP/COVER Video cable (not supplied) or S-Video cable (not...

Operating Instructions
Page 20
To connect a 15k RGB/Component equipment Left side ACCESS AUDIO INPUT A POWER SAVING MENU VIDEO S VIDEO TEMP/FAN PUSH ENTER LAMP/COVER SMF-402 Signal Cable (not supplied) HD D-sub 15-pin (male) ↔ 3 × phono jack ... INPUT SETTING menu according to the input signal. • When you input the external sync signal from 15k RGB/component equipment. 20 GB Connecting the Projector
To connect a 15k RGB/Component equipment Left side ACCESS AUDIO INPUT A POWER SAVING MENU VIDEO S VIDEO TEMP/FAN PUSH ENTER LAMP/COVER SMF-402 Signal Cable (not supplied) HD D-sub 15-pin (male) ↔ 3 × phono jack ... INPUT SETTING menu according to the input signal. • When you input the external sync signal from 15k RGB/component equipment. 20 GB Connecting the Projector
Operating Instructions
Page 21
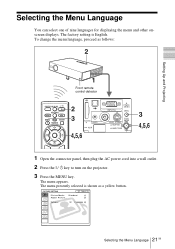
... MENU VIDEO S VIDEO TEMP/FAN PUSH ENTER LAMP/COVER 1 Open the connector panel, then plug the AC power cord into a wall outlet. 2 Press the I / 1 key to turn on the projector. 3 Press the MENU key. To change the menu language, proceed as a yellow button. Selecting the Menu Language You can select one of...
... MENU VIDEO S VIDEO TEMP/FAN PUSH ENTER LAMP/COVER 1 Open the connector panel, then plug the AC power cord into a wall outlet. 2 Press the I / 1 key to turn on the projector. 3 Press the MENU key. To change the menu language, proceed as a yellow button. Selecting the Menu Language You can select one of...
Operating Instructions
Page 23
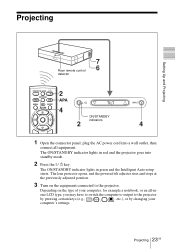
...indicator lights in red and the projector goes into standby mode. 2 Press the I / 1 KEYSTONE INPUT APA MENU PIC ENTER MUTING TILT ON/STANDBY indicators 2 4 1 Open the connector panel, plug the AC power cord into a wall outlet, then connect all -inone LCD type, you may have to switch... the computer to output to the projector. Projecting 23 GB Projecting Setting Up and Projecting 7 Rear remote control 6 detector ...
...indicator lights in red and the projector goes into standby mode. 2 Press the I / 1 KEYSTONE INPUT APA MENU PIC ENTER MUTING TILT ON/STANDBY indicators 2 4 1 Open the connector panel, plug the AC power cord into a wall outlet, then connect all -inone LCD type, you may have to switch... the computer to output to the projector. Projecting 23 GB Projecting Setting Up and Projecting 7 Rear remote control 6 detector ...
Operating Instructions
Page 24
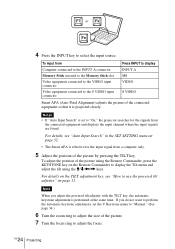
... Video equipment connected to display the Tilt menu and adjust the tilt using the M/m/ F7 or Fx Fn 4 Press the INPUT key to "On," the projector searches for the input signal from the connected equipment and displays the input channel where the input signals are found.
... Video equipment connected to display the Tilt menu and adjust the tilt using the M/m/ F7 or Fx Fn 4 Press the INPUT key to "On," the projector searches for the input signal from the connected equipment and displays the input channel where the input signals are found.
Operating Instructions
Page 25
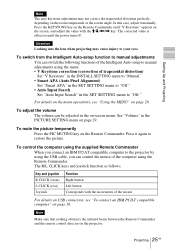
Press the KEYSTONE key on the Remote Commander until "V Keystone" appears on the room temperature or the screen angle. In this case, adjust it manually. Setting Up and Projecting Note The auto keystone adjustment may not correct the trapezoidal distortion perfectly, depending on the screen, and adjust the value with the M/m/
Press the KEYSTONE key on the Remote Commander until "V Keystone" appears on the room temperature or the screen angle. In this case, adjust it manually. Setting Up and Projecting Note The auto keystone adjustment may not correct the trapezoidal distortion perfectly, depending on the screen, and adjust the value with the M/m/
Operating Instructions
Page 26
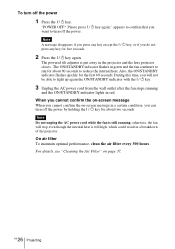
...60 seconds. When you cannot confirm the on-screen message When you can turn off the power by holding the I / 1 key again. The powered tilt adjuster is still high, which could result in a breakdown of the projector. Also, the ON/STANDBY indicator flashes quickly for about two seconds. otherwise, the fan..., you cannot confirm the on page 37. Note Do not unplug the AC power cord while the fan is still running and the ON/STANDBY indicator lights in the projector and the lens protector closes. To turn off the power 1 Press the I / 1 key again." During this time, you want to ...
...60 seconds. When you cannot confirm the on-screen message When you can turn off the power by holding the I / 1 key again. The powered tilt adjuster is still high, which could result in a breakdown of the projector. Also, the ON/STANDBY indicator flashes quickly for about two seconds. otherwise, the fan..., you cannot confirm the on page 37. Note Do not unplug the AC power cord while the fan is still running and the ON/STANDBY indicator lights in the projector and the lens protector closes. To turn off the power 1 Press the I / 1 key again." During this time, you want to ...
Operating Instructions
Page 28
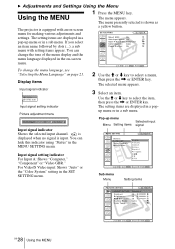
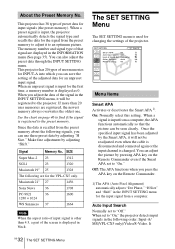
...or the "Color System" setting in the on-screen menu. 1 Press the MENU key. B Adjustments and Settings Using the Menu Using the MENU The projector is equipped with setting items appear. x is displayed when no signal is shown as a yellow button. If you select an item name followed by dots..., then press the , or ENTER key. SET SETTING Input A S m a r t A PA : On Auto Input Search: Off Input-A Signal Sel.: Computer Color System: Auto Power Saving: On To change the tone of the menu display and the menu language displayed in the SET SETTING menu. Pop-up menu or in...
...or the "Color System" setting in the on-screen menu. 1 Press the MENU key. B Adjustments and Settings Using the Menu Using the MENU The projector is equipped with setting items appear. x is displayed when no signal is shown as a yellow button. If you select an item name followed by dots..., then press the , or ENTER key. SET SETTING Input A S m a r t A PA : On Auto Input Search: Off Input-A Signal Sel.: Computer Color System: Auto Power Saving: On To change the tone of the menu display and the menu language displayed in the SET SETTING menu. Pop-up menu or in...
Operating Instructions
Page 32
...the INPUT SETTING menu for the signal from a computer. Macintosh 21" 27 1456 Sony News 36 1708 PC-9821 36 1280 × 1024 1600 WS Sunmicro 37 1664... signal from the preset memory to adjust it to "On," the projector detects input signals in the following order: Input-A/ MS(VPL-CX5 only)/Video/S-Video. When set to an optimum picture. It GB 32... S m a r t A PA : On Auto Input Search: Off Input-A Signal Sel.: Computer Color System: Auto Power Saving: On Menu Items Smart APA Activates or deactivates the Smart APA 1). On: Normally select this setting. The memory number ...
...the INPUT SETTING menu for the signal from a computer. Macintosh 21" 27 1456 Sony News 36 1708 PC-9821 36 1280 × 1024 1600 WS Sunmicro 37 1664... signal from the preset memory to adjust it to "On," the projector detects input signals in the following order: Input-A/ MS(VPL-CX5 only)/Video/S-Video. When set to an optimum picture. It GB 32... S m a r t A PA : On Auto Input Search: Off Input-A Signal Sel.: Computer Color System: Auto Power Saving: On Menu Items Smart APA Activates or deactivates the Smart APA 1). On: Normally select this setting. The memory number ...
Operating Instructions
Page 33
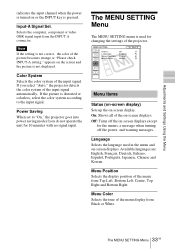
..., select the color system according to "On," the projector goes into power saving mode if you select "Auto," the projector detects the color system of the input signal automatically. On: Shows all of the projector. Off: Turns off the power, and warning messages. Language Selects the language used for... Italiano, Español, Português, Japanese, Chinese and Korean. Adjustments and Settings Using the Menu indicates the input channel when the power is turned on or the INPUT key is not displayed. Selects the computer, component or video GBR signal input from Top Left, Bottom ...
..., select the color system according to "On," the projector goes into power saving mode if you select "Auto," the projector detects the color system of the input signal automatically. On: Shows all of the projector. Off: Turns off the power, and warning messages. Language Selects the language used for... Italiano, Español, Português, Japanese, Chinese and Korean. Adjustments and Settings Using the Menu indicates the input channel when the power is turned on or the INPUT key is not displayed. Selects the computer, component or video GBR signal input from Top Left, Bottom ...
Operating Instructions
Page 34
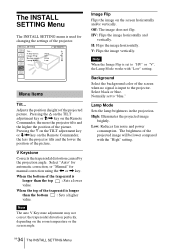
... the F on the TILT adjustment key or m/< key on the Remote Commander, the more the projector tilts and the higher the position of the projector. Select "Auto" for automatic correction, or "Manual" for changing the settings of the picture. Note... projection. Pressing the f on the TILT adjustment key or M/, key on the Remote Commander, the less the projector tilts and the lower the position of the screen when no signal is input to "blue." Note The auto ... SETTING Menu Off: The image does not flip. Low: Reduces fan noise and power consumption. INSTALL SETTING Tilt...
... the F on the TILT adjustment key or m/< key on the Remote Commander, the more the projector tilts and the higher the position of the projector. Select "Auto" for automatic correction, or "Manual" for changing the settings of the picture. Note... projection. Pressing the f on the TILT adjustment key or M/, key on the Remote Commander, the less the projector tilts and the lower the position of the screen when no signal is input to "blue." Note The auto ... SETTING Menu Off: The image does not flip. Low: Reduces fan noise and power consumption. INSTALL SETTING Tilt...
Operating Instructions
Page 36
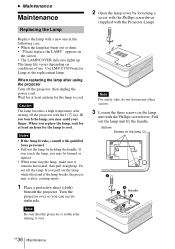
B Maintenance Maintenance Replacing the Lamp Replace the lamp with qualified Sony personnel. • Pull out the lamp by holding the handle. When replacing the lamp after using the projector Turn off the projector with the I / 1 key. Caution The lamp becomes a high temperature after turning it remains... its underside. Bottom Screws on the lamp unit with the Projector Lamp). Note Be sure that the projector is stable after turning off the projector, then unplug the power cord. appears on conditions of use. Turn the projector over so you may be burned or injured. • ...
B Maintenance Maintenance Replacing the Lamp Replace the lamp with qualified Sony personnel. • Pull out the lamp by holding the handle. When replacing the lamp after using the projector Turn off the projector with the I / 1 key. Caution The lamp becomes a high temperature after turning it remains... its underside. Bottom Screws on the lamp unit with the Projector Lamp). Note Be sure that the projector is stable after turning off the projector, then unplug the power cord. appears on conditions of use. Turn the projector over so you may be burned or injured. • ...


