
Operating Instructions
Page 1
3-211-166-11 (1) Data Projector Operating Instructions VPL-CX100 VPL-CX120/CX125 VPL-CX150/CX155 © 2007 Sony Corporation
3-211-166-11 (1) Data Projector Operating Instructions VPL-CX100 VPL-CX120/CX125 VPL-CX150/CX155 © 2007 Sony Corporation

Operating Instructions
Page 4
...of Controls (Main Unit 13 Top/Front/Side 13 Rear/Side/Bottom 13 Control Panel 15 Connector Panel 16 Remote Commander 17 VPL-CX125/CX155 17 VPL-CX100/CX120/CX150 ...... 19 Effective Tools for Your Presentation 31 Controlling the Computer Using a Presentation Tool, RM-PJPK1 (not supplied...37 The Function Menu 38 The Installation Menu 40 The Setup Menu 42 The Information Menu 43 Projecting the Picture Installing the Projector 21 Connecting the Projector 22 Connecting a Computer 22 Connecting a VCR 23 Projecting 25 Turning Off the Power 27 Convenient Functions Selecting the Menu ...
...of Controls (Main Unit 13 Top/Front/Side 13 Rear/Side/Bottom 13 Control Panel 15 Connector Panel 16 Remote Commander 17 VPL-CX125/CX155 17 VPL-CX100/CX120/CX150 ...... 19 Effective Tools for Your Presentation 31 Controlling the Computer Using a Presentation Tool, RM-PJPK1 (not supplied...37 The Function Menu 38 The Installation Menu 40 The Setup Menu 42 The Information Menu 43 Projecting the Picture Installing the Projector 21 Connecting the Projector 22 Connecting a Computer 22 Connecting a VCR 23 Projecting 25 Turning Off the Power 27 Convenient Functions Selecting the Menu ...

Operating Instructions
Page 6
...itself. • The wall outlet should not be used for several days. • To disconnect the cord, pull it out by qualified Sony personnel before operating it further. • Unplug the unit from the wall outlet while the cooling fan is still running. Do not push ... a cover over fluorescent lamps to the unit. To remove dust on the lens, use a soft dry cloth. On LCD projector • The LCD projector is equipped with qualified Sony personnel. • Should any windows that the operating voltage of your local power supply. If voltage adaptation is required, consult with ...
...itself. • The wall outlet should not be used for several days. • To disconnect the cord, pull it out by qualified Sony personnel before operating it further. • Unplug the unit from the wall outlet while the cooling fan is still running. Do not push ... a cover over fluorescent lamps to the unit. To remove dust on the lens, use a soft dry cloth. On LCD projector • The LCD projector is equipped with qualified Sony personnel. • Should any windows that the operating voltage of your local power supply. If voltage adaptation is required, consult with ...
Operating Instructions
Page 9
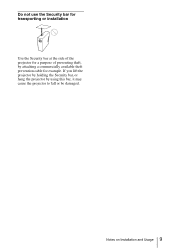
If you lift the projector by holding the Security bar, or hang the projector by attaching a commercially available theft prevention cable for example. Notes on Installation and Usage 9 Do not use the Security bar for transporting or installation Use the Security bar at the side of the projector for a purpose of preventing theft, by using this bar, it may cause the projector to fall or be damaged.
If you lift the projector by holding the Security bar, or hang the projector by attaching a commercially available theft prevention cable for example. Notes on Installation and Usage 9 Do not use the Security bar for transporting or installation Use the Security bar at the side of the projector for a purpose of preventing theft, by using this bar, it may cause the projector to fall or be damaged.

Operating Instructions
Page 10
...for explanation of this projector. On Macintosh system, you can read the Operating Instructions stored on the CD-ROM) This Operating Instructions describes how to which you have to the model. 10 About the Supplied Manuals Be aware that the VPL-CX155 is not ...displayed due to pay attention when handling and using this projector. Quick Reference Manual (separately printed manual) This manual describes basic operations for the VPL-CX100, VPL-CX120, VPL-CX125, VPL-CX150 and VPL-CX155 all together.
...for explanation of this projector. On Macintosh system, you can read the Operating Instructions stored on the CD-ROM) This Operating Instructions describes how to which you have to the model. 10 About the Supplied Manuals Be aware that the VPL-CX155 is not ...displayed due to pay attention when handling and using this projector. Quick Reference Manual (separately printed manual) This manual describes basic operations for the VPL-CX100, VPL-CX120, VPL-CX125, VPL-CX150 and VPL-CX155 all together.
Operating Instructions
Page 11
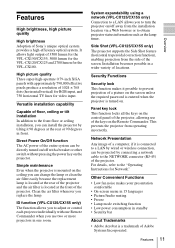
... pixels produce a resolution of locations. Panel key lock This function locks all the keys on the projector. High picture quality Three super-high-aperture 0.79-inch XGA panels with a breaker or other switch without pressing the power key on the control panel of the...lamp is located at the rear of the projector and the air filter is a trademark of the screen. This prevents the projector from the side of Adobe Systems Incorporated. Features 11 Overview Side Shot (VPL-CX125/CX155 only) The projector supports the Side Shot feature (horizontal trapezoidal correction...
... pixels produce a resolution of locations. Panel key lock This function locks all the keys on the projector. High picture quality Three super-high-aperture 0.79-inch XGA panels with a breaker or other switch without pressing the power key on the control panel of the...lamp is located at the rear of the projector and the air filter is a trademark of the screen. This prevents the projector from the side of Adobe Systems Incorporated. Features 11 Overview Side Shot (VPL-CX125/CX155 only) The projector supports the Side Shot feature (horizontal trapezoidal correction...

Operating Instructions
Page 15
... by the v/V/b/B key. Use the arrow keys (v/V/b/ B) for about 60 seconds after the power is turned off . - Once the projector is in green while the cooling fan is running after the power is turned off with the ?/1 key. - To turn it is ready...electrical system has failed. - Pressing this key, V KEYSTONE (Vertical trapezoidal distortion correction) adjustment menu is ready to operate. In the case of models VPL-CX125/ CX155, Side Shot (Horizontal trapezoid distortion correction) can turn off the power, press the ?/1 key twice according to operate. - Control Panel 123456...
... by the v/V/b/B key. Use the arrow keys (v/V/b/ B) for about 60 seconds after the power is turned off . - Once the projector is in green while the cooling fan is running after the power is turned off with the ?/1 key. - To turn it is ready...electrical system has failed. - Pressing this key, V KEYSTONE (Vertical trapezoidal distortion correction) adjustment menu is ready to operate. In the case of models VPL-CX125/ CX155, Side Shot (Horizontal trapezoid distortion correction) can turn off the power, press the ?/1 key twice according to operate. - Control Panel 123456...

Operating Instructions
Page 17
...keys on the control panel function identically. When VIDEO or S VIDEO is output. Refer to the AUDIO input connector of the monitor. VPL-CX125/CX155 The keys that have the same names as those on the Remote Commander. ql qk qj qh qg qf qd wa COMMAND OFF ...g REMOTE RS-232C connector (D-sub 9-pin, female) Connects to a computer to external active speakers. VPL-CX125/CX155: Page 17. Remote Commander 17 Overview AUDIO jack (stereo minijack) Connects to operate the projector from the computer. AUDIO jack Connect to the video input connector of VIDEO IN is selected, the ...
...keys on the control panel function identically. When VIDEO or S VIDEO is output. Refer to the AUDIO input connector of the monitor. VPL-CX125/CX155 The keys that have the same names as those on the Remote Commander. ql qk qj qh qg qf qd wa COMMAND OFF ...g REMOTE RS-232C connector (D-sub 9-pin, female) Connects to a computer to external active speakers. VPL-CX125/CX155: Page 17. Remote Commander 17 Overview AUDIO jack (stereo minijack) Connects to operate the projector from the computer. AUDIO jack Connect to the video input connector of VIDEO IN is selected, the ...

Operating Instructions
Page 18
..., see "Smart APA" in one room. Press again, or press the VOLUME+ key to its clearest while a signal is not provided in this projector. p FOCUS +/- keys This function is input from the speaker. Press again to restore the picture. • AUDIO: Press to its original size.... displayed on page 38. This key functions when the menu or a setting item is input. keys This function is not provided in this projector. For details, see Operating Instructions for Network (stored on the screen. g KEYSTONE (Trapezoidal distortion correction) key h ASPECT key Select the...
..., see "Smart APA" in one room. Press again, or press the VOLUME+ key to its clearest while a signal is not provided in this projector. p FOCUS +/- keys This function is input from the speaker. Press again to restore the picture. • AUDIO: Press to its original size.... displayed on page 38. This key functions when the menu or a setting item is input. keys This function is not provided in this projector. For details, see Operating Instructions for Network (stored on the screen. g KEYSTONE (Trapezoidal distortion correction) key h ASPECT key Select the...

Operating Instructions
Page 19
... 38. Remote Commander 19 For details, see "Smart APA" in this projector. This function is available when the PC signal is , the wider the angle within which the commander can control the projector becomes. VPL-CX100/CX120/CX150 The keys that nothing obstructs the infrared beam between the... Remote Commander and the projector is input. Be sure to its factory preset value or returns the enlarged image...
... 38. Remote Commander 19 For details, see "Smart APA" in this projector. This function is available when the PC signal is , the wider the angle within which the commander can control the projector becomes. VPL-CX100/CX120/CX150 The keys that nothing obstructs the infrared beam between the... Remote Commander and the projector is input. Be sure to its factory preset value or returns the enlarged image...
Operating Instructions
Page 20
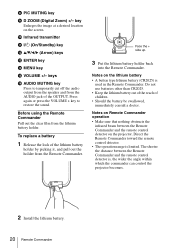
key Enlarges the image at a desired location on the projector. Face the + side up. 3 Put the lithium battery holder back into the Remote Commander. Notes on Remote Commander operation • Make sure that nothing obstructs ...the infrared beam between the Remote Commander and the remote control detector is, the wider the angle within which the commander can control the projector becomes. 2 Install the lithium battery. 20 Remote Commander Press again or press the VOLUME + key to temporarily cut off the audio output from the speaker...
key Enlarges the image at a desired location on the projector. Face the + side up. 3 Put the lithium battery holder back into the Remote Commander. Notes on Remote Commander operation • Make sure that nothing obstructs ...the infrared beam between the Remote Commander and the remote control detector is, the wider the angle within which the commander can control the projector becomes. 2 Install the lithium battery. 20 Remote Commander Press again or press the VOLUME + key to temporarily cut off the audio output from the speaker...
Operating Instructions
Page 21
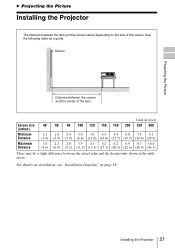
Installing the Projector 21 For details on installation, see "Installation Diagram" on the size of the lens Screen size (inches) Minimum Distance Maximum Distance Unit: m (feet) 40 60 ....5) (34.1) There may be a slight difference between the lens and the screen varies depending on page 58. Projecting the Picture B Projecting the Picture Installing the Projector The distance between the actual value and the design value shown in the table above. Screen Distance between the screen and the center of the...
Installing the Projector 21 For details on installation, see "Installation Diagram" on the size of the lens Screen size (inches) Minimum Distance Maximum Distance Unit: m (feet) 40 60 ....5) (34.1) There may be a slight difference between the lens and the screen varies depending on page 58. Projecting the Picture B Projecting the Picture Installing the Projector The distance between the actual value and the design value shown in the table above. Screen Distance between the screen and the center of the...

Operating Instructions
Page 22
...picture signals. For VPL-CX125/CX155, when connecting to a LAN using a LAN cable, see "Operating Instructions for each connection. • Insert the cable plugs firmly; For more information, refer to a computer. Connecting a Computer This section describes how to connect the projector to the computer's ...any connections. • Use the proper cables for Network" stored on the CDROM. However, we recommend that you connect the projector, make sure to XGA mode for the external monitor. When pulling out a cable, be sure to monitor output A Stereo audio connecting cable (not supplied...
...picture signals. For VPL-CX125/CX155, when connecting to a LAN using a LAN cable, see "Operating Instructions for each connection. • Insert the cable plugs firmly; For more information, refer to a computer. Connecting a Computer This section describes how to connect the projector to the computer's ...any connections. • Use the proper cables for Network" stored on the CDROM. However, we recommend that you connect the projector, make sure to XGA mode for the external monitor. When pulling out a cable, be sure to monitor output A Stereo audio connecting cable (not supplied...
Operating Instructions
Page 23
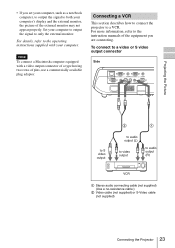
Connecting a VCR This section describes how to connect the projector to both your computer. • If you are connecting. To connect to a video or S video output connector Side NETWORK INPUT C RGB AUDIO INPUT A RGB AUDIO ... to audio output (R) VCR A Stereo audio connecting cable (not supplied) (Use a no-resistance cable.) B Video cable (not supplied) or S-Video cable (not supplied) Connecting the Projector 23 Set your computer, such as a notebook computer, to output the signal to a VCR. Note To connect a Macintosh computer equipped with your computer's display and...
Connecting a VCR This section describes how to connect the projector to both your computer. • If you are connecting. To connect to a video or S video output connector Side NETWORK INPUT C RGB AUDIO INPUT A RGB AUDIO ... to audio output (R) VCR A Stereo audio connecting cable (not supplied) (Use a no-resistance cable.) B Video cable (not supplied) or S-Video cable (not supplied) Connecting the Projector 23 Set your computer, such as a notebook computer, to output the signal to a VCR. Note To connect a Macintosh computer equipped with your computer's display and...
Operating Instructions
Page 24
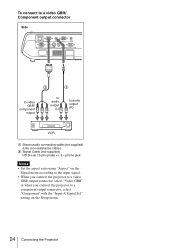
... aspect ratio using "Aspect" on the Setup menu. 24 Connecting the Projector setting on the Signal menu according to the input signal. • When you connect the projector to a video GBR output connector, select "Video GBR" or when you connect the projector to a component output connector, select "Component" with the "Input-A Signal Sel...
... aspect ratio using "Aspect" on the Setup menu. 24 Connecting the Projector setting on the Signal menu according to the input signal. • When you connect the projector to a video GBR output connector, select "Video GBR" or when you connect the projector to a component output connector, select "Component" with the "Input-A Signal Sel...
Operating Instructions
Page 25
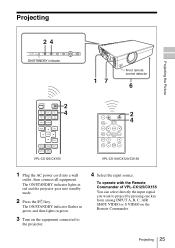
... 6 COMMAND OFF ON INPUT A INPUT D INPUT B INPUT E INPUT C AIR SHOT VIDEO S VIDEO 2 4 MENU APA ENTER RESET FOCUS ZOOM SHIFT ASPECT KEY STONE VPL-CX125/CX155 APA INPUT KEY STONE /TILT LENS ENTER AUTO FOCUS RESET MENU FREEZE PIC MUTING D ZOOM AUDIO MUTING VOLUME...cord into standby mode. 2 Press the ?/1 key. To operate with the Remote Commander of VPL-CX125/CX155 You can select directly the input signal you want to project by pressing one key from among INPUT A, B, C, AIR SHOT, VIDEO or S VIDEO on the equipment connected to the projector. 4 Select the input source.
... 6 COMMAND OFF ON INPUT A INPUT D INPUT B INPUT E INPUT C AIR SHOT VIDEO S VIDEO 2 4 MENU APA ENTER RESET FOCUS ZOOM SHIFT ASPECT KEY STONE VPL-CX125/CX155 APA INPUT KEY STONE /TILT LENS ENTER AUTO FOCUS RESET MENU FREEZE PIC MUTING D ZOOM AUDIO MUTING VOLUME...cord into standby mode. 2 Press the ?/1 key. To operate with the Remote Commander of VPL-CX125/CX155 You can select directly the input signal you want to project by pressing one key from among INPUT A, B, C, AIR SHOT, VIDEO or S VIDEO on the equipment connected to the projector. 4 Select the input source.

Operating Instructions
Page 26
...keys (e.g., , etc.), or by changing your computer, for example a notebook, or an all-in-one LCD type, you adjust the tilt of the projector with the Control Panel or the Remote Commander of the projector. 3 Release the Adjuster adjustment button. 4 When fine-tuning is selected. For details, see "Auto ... used for the signals from Press INPUT to the VPLCX125/CX155, "Input-C" is necessary, turn the Adjuster right and left. or and * VPL-CX125/CX155 only To input from the connected equipment and displays the input channel where the input signals are found. • When the no signal ...
...keys (e.g., , etc.), or by changing your computer, for example a notebook, or an all-in-one LCD type, you adjust the tilt of the projector with the Control Panel or the Remote Commander of the projector. 3 Release the Adjuster adjustment button. 4 When fine-tuning is selected. For details, see "Auto ... used for the signals from Press INPUT to the VPLCX125/CX155, "Input-C" is necessary, turn the Adjuster right and left. or and * VPL-CX125/CX155 only To input from the connected equipment and displays the input channel where the input signals are found. • When the no signal ...
Operating Instructions
Page 27
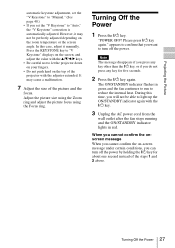
... depending on the top of the picture and the focus. During this case, adjust it may cause a malfunction. 7 Adjust the size of the projector with the ?/1 key. 3 Unplug the AC power cord from the wall outlet after the fan stops running and the ON/STANDBY indicator lights in ..."V Keystone" correction is automatically adjusted. The ON/STANDBY indicator flashes in red. Please press ?/1 key again." In this time, you want to let the projector down on your fingers. • Do not push hard on the room temperature or the screen angle. Adjust the picture size using the Zoom ring...
... depending on the top of the picture and the focus. During this case, adjust it may cause a malfunction. 7 Adjust the size of the projector with the ?/1 key. 3 Unplug the AC power cord from the wall outlet after the fan stops running and the ON/STANDBY indicator lights in ..."V Keystone" correction is automatically adjusted. The ON/STANDBY indicator flashes in red. Please press ?/1 key again." In this time, you want to let the projector down on your fingers. • Do not push hard on the room temperature or the screen angle. Adjust the picture size using the Zoom ring...

Operating Instructions
Page 28
...INPUT E INPUT C AIR SHOT VIDEO S VIDEO MENU APA ENTER 2 3 4,5,6 RESET FOCUS ZOOM SHIFT ASPECT KEY STONE VPL-CX125/CX155 MPUITICNG PEUNSTHER MENU KEYSTONE INPUT SOTNA/NDBY LACMOPV/ER NEINTPWUOTRCK RGB MONITOR INPUT A AUDIO OUTPUT AUDIO S VIDEO RGB ...INPUT KEY STONE /TILT LENS ENTER AUTO FOCUS RESET MENU FREEZE PIC MUTING D ZOOM AUDIO MUTING VOLUME 2 4,5,6 3 VPL-CX100/CX120/CX150 1 Plug the AC power cord into a wall outlet. 2 Press the ?/1 key to select the...languages for displaying the menu and other on the projector. The menu currently selected is English.
...INPUT E INPUT C AIR SHOT VIDEO S VIDEO MENU APA ENTER 2 3 4,5,6 RESET FOCUS ZOOM SHIFT ASPECT KEY STONE VPL-CX125/CX155 MPUITICNG PEUNSTHER MENU KEYSTONE INPUT SOTNA/NDBY LACMOPV/ER NEINTPWUOTRCK RGB MONITOR INPUT A AUDIO OUTPUT AUDIO S VIDEO RGB ...INPUT KEY STONE /TILT LENS ENTER AUTO FOCUS RESET MENU FREEZE PIC MUTING D ZOOM AUDIO MUTING VOLUME 2 4,5,6 3 VPL-CX100/CX120/CX150 1 Plug the AC power cord into a wall outlet. 2 Press the ?/1 key to select the...languages for displaying the menu and other on the projector. The menu currently selected is English.
Operating Instructions
Page 29
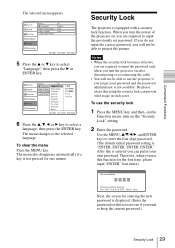
...picture. Therefore, when you can prevent valid usage in your password and the password administrator is equipped with a security lock function. To use the projector if you want to input the previously set password. After this function for the first time, please input "ENTER" four times.) Next, the ...screen for one minute. Security Lock The projector is not available. If you do not input the correct password, you will not be able to enter the four-digit password. (The default ...
...picture. Therefore, when you can prevent valid usage in your password and the password administrator is equipped with a security lock function. To use the projector if you want to input the previously set password. After this function for the first time, please input "ENTER" four times.) Next, the ...screen for one minute. Security Lock The projector is not available. If you do not input the correct password, you will not be able to enter the four-digit password. (The default ...


