

Operating Instructions
Page 4
... supplied) (When Using the Network Presentation Function) (VPL-CX125/CX155 only) .....32 Adjustments and Settings Using a Menu Using a MENU 33 The Picture Menu 35 The Signal Menu 36 About the Preset Memory No. ....37 The Function Menu 38 The Installation Menu 40 The Setup Menu 42 The Information Menu 43 Projecting the Picture Installing the Projector 21 Connecting the Projector 22 Connecting a Computer 22 Connecting a VCR 23 Projecting 25 Turning Off the Power 27 Convenient Functions Selecting the Menu Language .......... 28 Security Lock 29...
... supplied) (When Using the Network Presentation Function) (VPL-CX125/CX155 only) .....32 Adjustments and Settings Using a Menu Using a MENU 33 The Picture Menu 35 The Signal Menu 36 About the Preset Memory No. ....37 The Function Menu 38 The Installation Menu 40 The Setup Menu 42 The Information Menu 43 Projecting the Picture Installing the Projector 21 Connecting the Projector 22 Connecting a Computer 22 Connecting a VCR 23 Projecting 25 Turning Off the Power 27 Convenient Functions Selecting the Menu Language .......... 28 Security Lock 29...

Operating Instructions
Page 6
... be changed to direct lighting or sunlight. • Ceiling-mounted spot lighting is recommended. Precautions On safety • Check that the operating voltage of your unit is identical with the voltage of lightreflecting material. Never pull the cord itself has been turned off the power with the I / 1 key on the control panel or on the lens, use a damp cloth, detergent solution, or thinner. • Clean the filter...
... be changed to direct lighting or sunlight. • Ceiling-mounted spot lighting is recommended. Precautions On safety • Check that the operating voltage of your unit is identical with the voltage of lightreflecting material. Never pull the cord itself has been turned off the power with the I / 1 key on the control panel or on the lens, use a damp cloth, detergent solution, or thinner. • Clean the filter...
Operating Instructions
Page 11
... • On-screen menu in 15 languages • Picture/Audio muting • Freeze • Lamp mode switching function • Low power consumption in standby • Security bar About Trademarks • Adobe Acrobat is located at the front of the projector, allowing use two or more projectors in one Remote Commander when you use of the entire system can install the projector by connecting a network cable to adjust or control each projector individually with one...
... • On-screen menu in 15 languages • Picture/Audio muting • Freeze • Lamp mode switching function • Low power consumption in standby • Security bar About Trademarks • Adobe Acrobat is located at the front of the projector, allowing use two or more projectors in one Remote Commander when you use of the entire system can install the projector by connecting a network cable to adjust or control each projector individually with one...

Operating Instructions
Page 15
... operate. - Once the projector is in standby mode, you press the key the input signal switches. Control Panel 123456 7 8 LAMP/ COVER ON/ STANDBY INPUT KEYSTONE MENU PUSH ENTER PIC MUTING Overview a LAMP/COVER indicators Flashes in orange under the following conditions: • A reception rate of 2 flashes when the lamp cover or air filter cover is not secured firmly. • A reception rate of 3 flashes when the lamp has reached the end of its life or reaches a high temperature. Lights in red when the AC power cord...
... operate. - Once the projector is in standby mode, you press the key the input signal switches. Control Panel 123456 7 8 LAMP/ COVER ON/ STANDBY INPUT KEYSTONE MENU PUSH ENTER PIC MUTING Overview a LAMP/COVER indicators Flashes in orange under the following conditions: • A reception rate of 2 flashes when the lamp cover or air filter cover is not secured firmly. • A reception rate of 3 flashes when the lamp has reached the end of its life or reaches a high temperature. Lights in red when the AC power cord...

Operating Instructions
Page 17
... the control panel function identically. Remote Commander The supplied remote commander differs according to the relevant page. Remote Commander 17 Overview AUDIO jack Connect to operate the projector from the INPUT A or INPUT B. d AC IN socket Connects the supplied AC power cord. The volume of the speakers can be controlled by the VOLUME +/- VPL-CX125/CX155: Page 17. ql qk qj qh qg qf qd wa COMMAND OFF ON INPUT A INPUT D INPUT B INPUT E INPUT C AIR SHOT VIDEO S VIDEO MENU APA ENTER RESET FOCUS ZOOM SHIFT...
... the control panel function identically. Remote Commander The supplied remote commander differs according to the relevant page. Remote Commander 17 Overview AUDIO jack Connect to operate the projector from the INPUT A or INPUT B. d AC IN socket Connects the supplied AC power cord. The volume of the speakers can be controlled by the VOLUME +/- VPL-CX125/CX155: Page 17. ql qk qj qh qg qf qd wa COMMAND OFF ON INPUT A INPUT D INPUT B INPUT E INPUT C AIR SHOT VIDEO S VIDEO MENU APA ENTER RESET FOCUS ZOOM SHIFT...

Operating Instructions
Page 19
... the projector. The shorter the distance between the Remote Commander and the remote control detector on the control panel function identically. 1 2 3 4 5 6 7 8 9 APA INPUT KEY STONE /TILT LENS ENTER AUTO FOCUS RESET MENU FREEZE PIC MUTING D ZOOM AUDIO MUTING VOLUME 0 qa qs qd qf qg qh a INPUT key b APA (Auto Pixel Alignment) key Automatically adjusts a picture to its original size. To cancel the frozen picture, press the key again. Remote Commander 19 Direct the Remote Commander toward...
... the projector. The shorter the distance between the Remote Commander and the remote control detector on the control panel function identically. 1 2 3 4 5 6 7 8 9 APA INPUT KEY STONE /TILT LENS ENTER AUTO FOCUS RESET MENU FREEZE PIC MUTING D ZOOM AUDIO MUTING VOLUME 0 qa qs qd qf qg qh a INPUT key b APA (Auto Pixel Alignment) key Automatically adjusts a picture to its original size. To cancel the frozen picture, press the key again. Remote Commander 19 Direct the Remote Commander toward...
Operating Instructions
Page 25
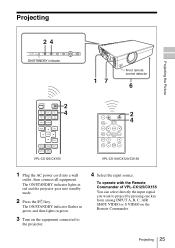
...flashes in green, and then lights in red and the projector goes into a wall outlet, then connect all equipment. Projecting Projecting the Picture 24 LAMP/ COVER ON/ STANDBY INPUT KEYSTONE MENU PUSH ENTER PIC MUTING ON/STANDBY indicator MPUITICNG PEUNSTHER MENU KEYSTONE INPUT SOTNA/NDBY LACMOPV/ER NEINTPWUOTRCK RGB MONITOR INPUT A AUDIO OUTPUT AUDIO S VIDEO RGB VVIIDDEEOOIN INPUT B AUDIO AUDIO RRSE-M23O2TCE 17 Front remote control detector 6 COMMAND OFF ON INPUT A INPUT D INPUT B INPUT E INPUT C AIR SHOT VIDEO S VIDEO 2 4 MENU APA ENTER RESET FOCUS ZOOM...
...flashes in green, and then lights in red and the projector goes into a wall outlet, then connect all equipment. Projecting Projecting the Picture 24 LAMP/ COVER ON/ STANDBY INPUT KEYSTONE MENU PUSH ENTER PIC MUTING ON/STANDBY indicator MPUITICNG PEUNSTHER MENU KEYSTONE INPUT SOTNA/NDBY LACMOPV/ER NEINTPWUOTRCK RGB MONITOR INPUT A AUDIO OUTPUT AUDIO S VIDEO RGB VVIIDDEEOOIN INPUT B AUDIO AUDIO RRSE-M23O2TCE 17 Front remote control detector 6 COMMAND OFF ON INPUT A INPUT D INPUT B INPUT E INPUT C AIR SHOT VIDEO S VIDEO 2 4 MENU APA ENTER RESET FOCUS ZOOM...

Operating Instructions
Page 26
... Projecting Note The key used for the signals from Press INPUT to adjust the picture position. For details, see "Auto Input Search" in -one LCD type, you do not want to the projector. connected to the VPLCX125/CX155, "Input-C" is necessary, turn the Adjuster right and left. connected to the INPUT B connector Input-B Computer connected to LAN to use the network presentation function Input-C (VPLCX125/ CX155 only) Video equipment Video connected to the VIDEO input connector Video equipment connected...
... Projecting Note The key used for the signals from Press INPUT to adjust the picture position. For details, see "Auto Input Search" in -one LCD type, you do not want to the projector. connected to the VPLCX125/CX155, "Input-C" is necessary, turn the Adjuster right and left. connected to the INPUT B connector Input-B Computer connected to LAN to use the network presentation function Input-C (VPLCX125/ CX155 only) Video equipment Video connected to the VIDEO input connector Video equipment connected...

Operating Instructions
Page 28
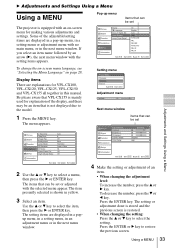
... flashes in green, and then lights in green. 3 Press the MENU key. The factory setting is shown as follows: ON/STANDBY 2 indicator 3 4,5,6 LAMP/ COVER ON/ STANDBY INPUT KEYSTONE MENU PUSH ENTER PIC MUTING COMMAND OFF ON INPUT A INPUT D INPUT B INPUT E INPUT C AIR SHOT VIDEO S VIDEO MENU APA ENTER 2 3 4,5,6 RESET FOCUS ZOOM SHIFT ASPECT KEY STONE VPL-CX125/CX155 MPUITICNG PEUNSTHER MENU KEYSTONE INPUT SOTNA/NDBY LACMOPV/ER NEINTPWUOTRCK RGB MONITOR INPUT A AUDIO OUTPUT AUDIO S VIDEO RGB VVIIDDEEOOIN INPUT B AUDIO AUDIO RRSE-M23O2TCE 1 Front remote...
... flashes in green, and then lights in green. 3 Press the MENU key. The factory setting is shown as follows: ON/STANDBY 2 indicator 3 4,5,6 LAMP/ COVER ON/ STANDBY INPUT KEYSTONE MENU PUSH ENTER PIC MUTING COMMAND OFF ON INPUT A INPUT D INPUT B INPUT E INPUT C AIR SHOT VIDEO S VIDEO MENU APA ENTER 2 3 4,5,6 RESET FOCUS ZOOM SHIFT ASPECT KEY STONE VPL-CX125/CX155 MPUITICNG PEUNSTHER MENU KEYSTONE INPUT SOTNA/NDBY LACMOPV/ER NEINTPWUOTRCK RGB MONITOR INPUT A AUDIO OUTPUT AUDIO S VIDEO RGB VVIIDDEEOOIN INPUT B AUDIO AUDIO RRSE-M23O2TCE 1 Front remote...
Operating Instructions
Page 33
... to select a menu, then press the B or ENTER key. Picture Signal Function Installation Setup V Keystone: Side Shot: Image Flip: Background: Lamp Mode: IR Receiver: ID Mode: Direct Power On: High Altitude Mode: Information Sel: Auto 0 Off Blue Standard Front & Rear All Off Off Set: Exit: 2 Use the v or V key to restore the previous screen. Be please aware that can be set Picture Signal Function Installation Adjust Picture Contrast: Brightness: Sharpness: Gamma Mode: Color Temp.: Setup Information Sel: Set: Standard 80...
... to select a menu, then press the B or ENTER key. Picture Signal Function Installation Setup V Keystone: Side Shot: Image Flip: Background: Lamp Mode: IR Receiver: ID Mode: Direct Power On: High Altitude Mode: Information Sel: Auto 0 Off Blue Standard Front & Rear All Off Off Set: Exit: 2 Use the v or V key to restore the previous screen. Be please aware that can be set Picture Signal Function Installation Adjust Picture Contrast: Brightness: Sharpness: Gamma Mode: Color Temp.: Setup Information Sel: Set: Standard 80...

Operating Instructions
Page 35
... Adjusts color intensity. 50 Adjusts color tones. Graphics Select a desired color temperature to produce a "dynamic" picture. • Standard: Normally select this setting reduces the roughness. • Natural: Selects for images that contain lots of halftones. The higher the setting, the more purplish. When a video signal • High: Turns white part to a bluish and cool tone. • Middle: Turns white part o a natural tone. • Low: Turns white part to the input picture. The Picture Menu The Picture menu is used...
... Adjusts color intensity. 50 Adjusts color tones. Graphics Select a desired color temperature to produce a "dynamic" picture. • Standard: Normally select this setting reduces the roughness. • Natural: Selects for images that contain lots of halftones. The higher the setting, the more purplish. When a video signal • High: Turns white part to a bluish and cool tone. • Middle: Turns white part o a natural tone. • Low: Turns white part to the input picture. The Picture Menu The Picture menu is used...

Operating Instructions
Page 36
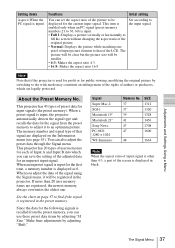
...video signal (preset memory numbers 1 to 11) is input. • 4:3 : Select to view a picture with normal 4:3 aspect ratio. • 16:9 : Select to the input signal Adjusts the position of the LCD panel and the signal output from a computer) Picture Signal Adjust Signal Aspect: Function Installation Setup Information Sel: Full 1 Set: Exit: Picture Signal Function Adjust Signal Dot Phase: H Size: Shift: Installation Setup Information Sel: Set: 12 1344 H: 235 V: 34 Back: Exit: Setting items Adjust Signal... The Signal Menu The Signal menu is used to the input signal...
...video signal (preset memory numbers 1 to 11) is input. • 4:3 : Select to view a picture with normal 4:3 aspect ratio. • 16:9 : Select to the input signal Adjusts the position of the LCD panel and the signal output from a computer) Picture Signal Adjust Signal Aspect: Function Installation Setup Information Sel: Full 1 Set: Exit: Picture Signal Function Adjust Signal Dot Phase: H Size: Shift: Installation Setup Information Sel: Set: 12 1344 H: 235 V: 34 Back: Exit: Setting items Adjust Signal... The Signal Menu The Signal menu is used to the input signal...
Operating Instructions
Page 37
... the projector. When an unpreset signal is input for the first time, a memory number is recalled from the preset memory to fill the screen without changing the aspect ratio of the original picture. • Normal: Displays the picture while matching one . Adjustments and Settings Using a Menu Setting items Aspect (When the PC signal is input) Functions Initial setting You can set the aspect ratio of the adjusted data for an unpreset input signal. Set...
... the projector. When an unpreset signal is input for the first time, a memory number is recalled from the preset memory to fill the screen without changing the aspect ratio of the original picture. • Normal: Displays the picture while matching one . Adjustments and Settings Using a Menu Setting items Aspect (When the PC signal is input) Functions Initial setting You can set the aspect ratio of the adjusted data for an unpreset input signal. Set...

Operating Instructions
Page 39
... be displayed on the screen. • You can be released and "Panel Key Lock" is set to "On," keeping the ?/1 key on , the lock will be operated only with the Remote Commander. Turns on page 29. The lamp lights again when a signal is input or any key is pressed. • Standby: The projector goes into Standby mode if no signal is set to "Off." If you adjust the picture manually. • When "Standby mode" is automatically set...
... be displayed on the screen. • You can be released and "Panel Key Lock" is set to "On," keeping the ?/1 key on , the lock will be operated only with the Remote Commander. Turns on page 29. The lamp lights again when a signal is input or any key is pressed. • Standby: The projector goes into Standby mode if no signal is set to "Off." If you adjust the picture manually. • When "Standby mode" is automatically set...

Operating Instructions
Page 40
...the background color of the projector. Sets the lamp brightness used for manual correction using "V Keystone" only. Picture Signal Function Installation Setup V Keystone: Side Shot: Image Flip: Background: Lamp Mode: IR Receiver: ID Mode: Direct Power On: High Altitude Mode: Information Sel: Auto 0 Off Blue Standard Front & Rear All Off Off Set: Exit: Setting items V Keystone Side Shot (VPL-CX125/ CX155 only) Image Flip Background Lamp Mode IR Receiver Functions Initial setting Corrects the trapezoidal distortion caused by the projection angle. Set the adjustment level to...
...the background color of the projector. Sets the lamp brightness used for manual correction using "V Keystone" only. Picture Signal Function Installation Setup V Keystone: Side Shot: Image Flip: Background: Lamp Mode: IR Receiver: ID Mode: Direct Power On: High Altitude Mode: Information Sel: Auto 0 Off Blue Standard Front & Rear All Off Off Set: Exit: Setting items V Keystone Side Shot (VPL-CX125/ CX155 only) Image Flip Background Lamp Mode IR Receiver Functions Initial setting Corrects the trapezoidal distortion caused by the projection angle. Set the adjustment level to...

Operating Instructions
Page 42
... input signal. English Input-A Signal Sel. When the color system of the input signal is selected, the color system cannot be detected. Setting items Functions Initial setting Status (on-screen Sets up the on -screen displays except for changing the menu displays. If "Auto" is detected automatically. The Setup Menu The Setup menu is used in the menu and on-screen displays. When the "Auto" is selected, the type of the input signal is turned off the on -screen display. Auto Lamp Timer Reset When replacing the lamps, reset the lamp timer...
... input signal. English Input-A Signal Sel. When the color system of the input signal is selected, the color system cannot be detected. Setting items Functions Initial setting Status (on-screen Sets up the on -screen displays except for changing the menu displays. If "Auto" is detected automatically. The Setup Menu The Setup menu is used in the menu and on-screen displays. When the "Auto" is selected, the type of the input signal is turned off the on -screen display. Auto Lamp Timer Reset When replacing the lamps, reset the lamp timer...
Operating Instructions
Page 45
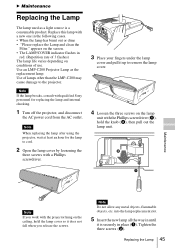
... Lamp and clean the Filter." Tighten the three screws (b). RRES-M23O2TCE INPUT B RGB AUDIO VIVIDDEEO ION INPUT A AUDIO S VIDEO NIENTPUWTORCK RGB OUTPUT AUDIO MONITOR 3 Place your fingers under the lamp cover and pull it up to remove the lamp cover. 4 Loosen the three screws on conditions of 3 flashes) The lamp life varies depending on the lamp unit with a new one in red. (Repetition rate of use. Replace this lamp with the Phillips screwdriver (a), hold the lamp cover...
... Lamp and clean the Filter." Tighten the three screws (b). RRES-M23O2TCE INPUT B RGB AUDIO VIVIDDEEO ION INPUT A AUDIO S VIDEO NIENTPUWTORCK RGB OUTPUT AUDIO MONITOR 3 Place your fingers under the lamp cover and pull it up to remove the lamp cover. 4 Loosen the three screws on conditions of 3 flashes) The lamp life varies depending on the lamp unit with a new one in red. (Repetition rate of use. Replace this lamp with the Phillips screwdriver (a), hold the lamp cover...
Operating Instructions
Page 49
...; The projector is not adjusted properly. c Adjust the focus (see pages 18, 20). • The sound is set to release audio muting (see page 27). • Condensation has accumulated on . c Adjust "Dot Phase" in the Function menu is out of "Input-A Signal Sel." Others Troubleshooting 49 The picture is not clear. • The picture is set to the input signal (see page 38). The picture flickers. c Check that the proper connections have...
...; The projector is not adjusted properly. c Adjust the focus (see pages 18, 20). • The sound is set to release audio muting (see page 27). • Condensation has accumulated on . c Adjust "Dot Phase" in the Function menu is out of "Input-A Signal Sel." Others Troubleshooting 49 The picture is not clear. • The picture is set to the input signal (see page 38). The picture flickers. c Check that the proper connections have...

Operating Instructions
Page 50
... its life. c Check to "On." (see that "High Altitude Mode" in the Installation menu is set "ID Mode" in the Installation menu (see page 39). Others Symptom The control panel keys do not function. Indicators Symptom Cause and Remedy The LAMP/COVER • The lamp cover or the air filter cover is noisy. ON/STANDBY flashes in orange. red. (Repetition rate of "High Altitude Mode" in the Installation menu to cool the lamp and then turn on the power again. The fan...
... its life. c Check to "On." (see that "High Altitude Mode" in the Installation menu is set "ID Mode" in the Installation menu (see page 39). Others Symptom The control panel keys do not function. Indicators Symptom Cause and Remedy The LAMP/COVER • The lamp cover or the air filter cover is noisy. ON/STANDBY flashes in orange. red. (Repetition rate of "High Altitude Mode" in the Installation menu to cool the lamp and then turn on the power again. The fan...

Operating Instructions
Page 54
...% to 90% Supplied accessories Remote Commander (1) Size AA (R6) batteries (2) (VPLCX125/CX155) Lithium battery CR2025 (1) (VPLCX100/CX120/CX150) Lens cap (1) HD D-sub 15 pin cable (2 m) (1) (1-791-992-xx) AC power cord (1) CD-ROM (Operating Instructions, Application Software) (1) Quick Reference Manual (1) Safety Regulations (1) Security Label (1) Design and specifications are subject to change without notice. INPUT B INPUT C OUTPUT REMOTE high impedance, positive/ negative AUDIO: Stereo minijack rated input 500 mVrms, input impedance 47...
...% to 90% Supplied accessories Remote Commander (1) Size AA (R6) batteries (2) (VPLCX125/CX155) Lithium battery CR2025 (1) (VPLCX100/CX120/CX150) Lens cap (1) HD D-sub 15 pin cable (2 m) (1) (1-791-992-xx) AC power cord (1) CD-ROM (Operating Instructions, Application Software) (1) Quick Reference Manual (1) Safety Regulations (1) Security Label (1) Design and specifications are subject to change without notice. INPUT B INPUT C OUTPUT REMOTE high impedance, positive/ negative AUDIO: Stereo minijack rated input 500 mVrms, input impedance 47...


