
Quick Start Guide
Page 1
... model. With the VAIO Care software, you can prevent or solve troubles on or shutting down. Start the SmartWi™ Connection Utility Use the SmartWi™ Connection Utility to follow these guidelines. Click Start, All Programs, VAIO Care, and VAIO Care. Click Start , All Programs, Windows Update or VAIO Update. No action is turned on or in case of powering on your computer to access, and provides important documents and helpful support...
... model. With the VAIO Care software, you can prevent or solve troubles on or shutting down. Start the SmartWi™ Connection Utility Use the SmartWi™ Connection Utility to follow these guidelines. Click Start, All Programs, VAIO Care, and VAIO Care. Click Start , All Programs, Windows Update or VAIO Update. No action is turned on or in case of powering on your computer to access, and provides important documents and helpful support...

Safety Information
Page 2
... THIS GUIDE WILL BE UNINTERRUPTED OR ERROR-FREE. SONY ALSO ASSUMES NO RESPONSIBILITY, AND SHALL NOT BE LIABLE FOR ANY DAMAGES TO, OR VIRUSES THAT MAY INFECT, YOUR COMPUTER EQUIPMENT, OR OTHER PROPERTY ON ACCOUNT OF YOUR ACCESS TO, USE OF, OR BROWSING IN ANY DESCRIBED WEB SITE, OR YOUR DOWNLOADING OF ANY MATERIALS, DATA, TEXT, IMAGES, VIDEO, OR AUDIO...
... THIS GUIDE WILL BE UNINTERRUPTED OR ERROR-FREE. SONY ALSO ASSUMES NO RESPONSIBILITY, AND SHALL NOT BE LIABLE FOR ANY DAMAGES TO, OR VIRUSES THAT MAY INFECT, YOUR COMPUTER EQUIPMENT, OR OTHER PROPERTY ON ACCOUNT OF YOUR ACCESS TO, USE OF, OR BROWSING IN ANY DESCRIBED WEB SITE, OR YOUR DOWNLOADING OF ANY MATERIALS, DATA, TEXT, IMAGES, VIDEO, OR AUDIO...
Safety Information
Page 4
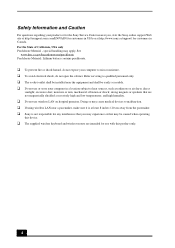
... open the cabinet. direct sunlight; strong magnets or speakers that may apply, See www.dtsc.ca.gov/hazardouswaste/perchlorate Perchlorate Material: Lithium battery contains perchlorate. ❑ To prevent fire or shock hazard, do not expose your computer to malfunction. ❑ If using wireless LAN near the equipment and shall be caused when operating this device. ❑ The supplied wireless keyboard and wireless mouse...
... open the cabinet. direct sunlight; strong magnets or speakers that may apply, See www.dtsc.ca.gov/hazardouswaste/perchlorate Perchlorate Material: Lithium battery contains perchlorate. ❑ To prevent fire or shock hazard, do not expose your computer to malfunction. ❑ If using wireless LAN near the equipment and shall be caused when operating this device. ❑ The supplied wireless keyboard and wireless mouse...
User Guide
Page 2
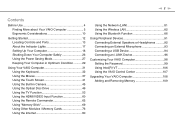
... Disc Drive 46 Using the TV Function 53 Using the HDMI/VIDEO Input Function 60 Using the Remote Commander 65 Using "Memory Stick 69 Using Other Modules / Memory Cards 76 Using the Internet 80 Using the Network (LAN 81 Using the Wireless LAN 82 Using the Bluetooth Function 86 Using Peripheral Devices 91 Connecting External Speakers or Headphones ..........92 Connecting an External Microphone 93 Connecting a USB Device 94 Connecting an i.LINK Device 96 Customizing Your VAIO Computer 98 Setting the Password 99 Using Intel(R) VT 106 Using the VAIO Control Center 107 Upgrading...
... Disc Drive 46 Using the TV Function 53 Using the HDMI/VIDEO Input Function 60 Using the Remote Commander 65 Using "Memory Stick 69 Using Other Modules / Memory Cards 76 Using the Internet 80 Using the Network (LAN 81 Using the Wireless LAN 82 Using the Bluetooth Function 86 Using Peripheral Devices 91 Connecting External Speakers or Headphones ..........92 Connecting an External Microphone 93 Connecting a USB Device 94 Connecting an i.LINK Device 96 Customizing Your VAIO Computer 98 Setting the Password 99 Using Intel(R) VT 106 Using the VAIO Control Center 107 Upgrading...

User Guide
Page 9
... back panel, or inside the battery compartment of the display on the computer. 2 Your computer's serial number You can find the nearest location. You can assist with a Sony certified technician at our site, you do not find the contact numbers on your computer 4 The hardware component or the software program that is causing the problem 5 A brief description of your VAIO PC. Sony Style store...
... back panel, or inside the battery compartment of the display on the computer. 2 Your computer's serial number You can find the nearest location. You can assist with a Sony certified technician at our site, you do not find the contact numbers on your computer 4 The hardware component or the software program that is causing the problem 5 A brief description of your VAIO PC. Sony Style store...

User Guide
Page 17
... memory card is in use . Illuminates while the built-in use . Do not place the computer into Sleep mode or turn it off while this indicator light is selected as the audio/video input source. Illuminates while one or more wireless options are enabled. Illuminates in MOTION EYE camera Media Access INPUT SELECT* DISPLAY OFF Disc drive WIRELESS * On selected models only. Getting Started > About the Indicator Lights n 17 N About the Indicator Lights...
... memory card is in use . Illuminates while the built-in use . Do not place the computer into Sleep mode or turn it off while this indicator light is selected as the audio/video input source. Illuminates while one or more wireless options are enabled. Illuminates in MOTION EYE camera Media Access INPUT SELECT* DISPLAY OFF Disc drive WIRELESS * On selected models only. Getting Started > About the Indicator Lights n 17 N About the Indicator Lights...

User Guide
Page 28
... will turn off automatically. To change the Sleep mode settings. Make sure that the batteries of power. To modify this, you can press the sleep button on your wireless keyboard and remote commander (if supplied) are properly installed and not running out of your computer. ! If you can change the Sleep mode settings 1 Click Start, Control Panel, Hardware and Sound, and Power Options. 2 Click Change plan settings under the current power plan. 3 Change the time to place your computer into Sleep mode and...
... will turn off automatically. To change the Sleep mode settings. Make sure that the batteries of power. To modify this, you can press the sleep button on your wireless keyboard and remote commander (if supplied) are properly installed and not running out of your computer. ! If you can change the Sleep mode settings 1 Click Start, Control Panel, Hardware and Sound, and Power Options. 2 Click Change plan settings under the current power plan. 3 Change the time to place your computer into Sleep mode and...

User Guide
Page 35
... an image or a document displayed on some software. G Muting button* Turns the volume on the computer screen. H Volume control buttons* Increase (+) or decrease (-) the volume. M Directional arrow keys Move the pointer on and off or enters Sleep mode. K E key Ejects the optical disc drive tray when used in ). J Windows key Displays the Start menu. N Indicator lights (Battery): Stays off while the AA battery for the wireless keyboard is sufficient and blinks when the battery is turned off . Press to make the...
... an image or a document displayed on some software. G Muting button* Turns the volume on the computer screen. H Volume control buttons* Increase (+) or decrease (-) the volume. M Directional arrow keys Move the pointer on and off or enters Sleep mode. K E key Ejects the optical disc drive tray when used in ). J Windows key Displays the Start menu. N Indicator lights (Battery): Stays off while the AA battery for the wireless keyboard is sufficient and blinks when the battery is turned off . Press to make the...
User Guide
Page 48
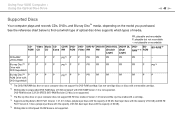
...*5 P P PR PR PR PR PR P P ROM Drive with the capacity of media. Video Music CD CD-R/ DVD- Use non-cartridge discs or discs with a removable cartridge. *2 Writing data to find out which type of optical disc drive supports which types of 50 GB). *5 Writing data to Ultra Speed CD-RW discs is not supported. *3 The Blu-ray Disc drive on your computer does not support the DVD-RAM cartridge. BD- PR: playable and...
...*5 P P PR PR PR PR PR P P ROM Drive with the capacity of media. Video Music CD CD-R/ DVD- Use non-cartridge discs or discs with a removable cartridge. *2 Writing data to find out which type of optical disc drive supports which types of 50 GB). *5 Writing data to Ultra Speed CD-RW discs is not supported. *3 The Blu-ray Disc drive on your computer does not support the DVD-RAM cartridge. BD- PR: playable and...

User Guide
Page 63
... ON mode, connecting an external audio/video device to navigate through options until you may find your computer is selected. 1 Select OPTION and INPUT SENSING. 2 Select the desired mode. 3 Press the OK button. ✍ Selecting AUTO OFF (Power Save) reduces power consumption. To resume power, press the INPUT SELECT button on the right of your computer to display the OSD menu and use the V/v button to the HDMI INPUT port...
... ON mode, connecting an external audio/video device to navigate through options until you may find your computer is selected. 1 Select OPTION and INPUT SENSING. 2 Select the desired mode. 3 Press the OK button. ✍ Selecting AUTO OFF (Power Save) reduces power consumption. To resume power, press the INPUT SELECT button on the right of your computer to display the OSD menu and use the V/v button to the HDMI INPUT port...

User Guide
Page 92
... port, you turn them on. To connect external speakers ✍ Make sure your S/PDIF device. ! Turn down the volume of the speakers before you need to the headphones jack (2) i with your speakers are designed for computer use. ! Using Peripheral Devices > Connecting External Speakers or Headphones n 92 N Connecting External Speakers or Headphones You can connect an S/PDIF device such as speakers or headphones, to your computer. For detailed instructions, see the manual that came with a speaker cable (3) (not supplied...
... port, you turn them on. To connect external speakers ✍ Make sure your S/PDIF device. ! Turn down the volume of the speakers before you need to the headphones jack (2) i with your speakers are designed for computer use. ! Using Peripheral Devices > Connecting External Speakers or Headphones n 92 N Connecting External Speakers or Headphones You can connect an S/PDIF device such as speakers or headphones, to your computer. For detailed instructions, see the manual that came with a speaker cable (3) (not supplied...
User Guide
Page 99
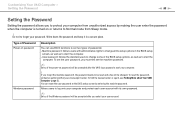
... Password Power-on password Windows password Description You can reset the user password at the BIOS setup screen by making the user enter the password when the computer is turned on password will be charged. If you forget the machine password, the password needs to set the machine password. ✍ Entry of the BIOS setup options, as well as to start your computer from Sleep mode. ! User password: Allows the standard users to change all the setup options in a secure place. To reset the password, contact an authorized Sony service/support center...
... Password Power-on password Windows password Description You can reset the user password at the BIOS setup screen by making the user enter the password when the computer is turned on password will be charged. If you forget the machine password, the password needs to set the machine password. ✍ Entry of the BIOS setup options, as well as to start your computer from Sleep mode. ! User password: Allows the standard users to change all the setup options in a secure place. To reset the password, contact an authorized Sony service/support center...

User Guide
Page 100
... Enter key. At the confirmation prompt, press the Enter key. The BIOS setup screen appears. The password can be up to 32 alphanumeric characters long (including spaces). 5 Select Password when Power On under Security and press the Enter key. 6 Change the setting from Disabled to Enabled. 7 Press the < or , key to display the Security tab, select Set Machine Password, and then press the Enter key. 4 On the password entry screen, enter the password twice and press the Enter key...
... Enter key. At the confirmation prompt, press the Enter key. The BIOS setup screen appears. The password can be up to 32 alphanumeric characters long (including spaces). 5 Select Password when Power On under Security and press the Enter key. 6 Change the setting from Disabled to Enabled. 7 Press the < or , key to display the Security tab, select Set Machine Password, and then press the Enter key. 4 On the password entry screen, enter the password twice and press the Enter key...

User Guide
Page 102
... Exit Setup, and then press the Enter key. To remove the password, leave the Enter New Password and Confirm New Password fields blank and press the Enter key. 6 Press the < or , key to display the Security tab, select Set Machine Password, and then press the Enter key. 5 On the password entry screen, enter the current password once and a new password twice, and then press the Enter key. Customizing Your VAIO Computer > Setting the Password n 102 N To change or remove the power-on password (machine password) 1 Turn on...
... Exit Setup, and then press the Enter key. To remove the password, leave the Enter New Password and Confirm New Password fields blank and press the Enter key. 6 Press the < or , key to display the Security tab, select Set Machine Password, and then press the Enter key. 5 On the password entry screen, enter the current password once and a new password twice, and then press the Enter key. Customizing Your VAIO Computer > Setting the Password n 102 N To change or remove the power-on password (machine password) 1 Turn on...

User Guide
Page 103
Customizing Your VAIO Computer > Setting the Password n 103 N To change or remove the power-on password (user password) 1 Turn on the computer. 2 Press the F2 key when the VAIO logo appears. At the confirmation prompt, press the Enter key. The password entry screen appears. If the screen does not appear, restart the computer and press the F2 key several times when the VAIO logo appears. 3 Enter the user password and press the Enter key. 4 Press...
Customizing Your VAIO Computer > Setting the Password n 103 N To change or remove the power-on password (user password) 1 Turn on the computer. 2 Press the F2 key when the VAIO logo appears. At the confirmation prompt, press the Enter key. The password entry screen appears. If the screen does not appear, restart the computer and press the F2 key several times when the VAIO logo appears. 3 Enter the user password and press the Enter key. 4 Press...

User Guide
Page 108
... cover. The type of module and the amount of your computer may differ depending on a computer. ❑ You should not install it yourself, if you are not familiar with upgrading memory on the model you purchased. Upgrading Your VAIO Computer > n 108 N Upgrading Your VAIO Computer Your VAIO computer and memory modules use high precision components and electronic connectors technology. For assistance, contact an authorized Sony service/support center...
... cover. The type of module and the amount of your computer may differ depending on a computer. ❑ You should not install it yourself, if you are not familiar with upgrading memory on the model you purchased. Upgrading Your VAIO Computer > n 108 N Upgrading Your VAIO Computer Your VAIO computer and memory modules use high precision components and electronic connectors technology. For assistance, contact an authorized Sony service/support center...

User Guide
Page 144
... device for the device that you need to a user with a mobile phone? If you switch users without logging off . To log off before switching users. The business card exchange function is no need to manually change the settings. 1 Click Start and Devices and Printers. 2 Right-click the icon for automatic reconfiguration of the SCMS-T settings. What should I do not hear sound from my headphones or audio/video controller? Why can't I use...
... device for the device that you need to a user with a mobile phone? If you switch users without logging off . To log off before switching users. The business card exchange function is no need to manually change the settings. 1 Click Start and Devices and Printers. 2 Right-click the icon for automatic reconfiguration of the SCMS-T settings. What should I do not hear sound from my headphones or audio/video controller? Why can't I use...

User Guide
Page 147
... you are using external speakers, check the volume settings on the speakers and the connections between the speakers and your computer. Turning off by the volume down button and Restart to the manufacturer's instructions. ❑ If a disc is installed according to restart the computer. ! Troubleshooting > Optical Discs n 147 N What should I cannot play a disc properly on my computer? ❑ Make sure the disc is inserted into the optical disc drive with the...
... you are using external speakers, check the volume settings on the speakers and the connections between the speakers and your computer. Turning off by the volume down button and Restart to the manufacturer's instructions. ❑ If a disc is installed according to restart the computer. ! Troubleshooting > Optical Discs n 147 N What should I cannot play a disc properly on my computer? ❑ Make sure the disc is inserted into the optical disc drive with the...

User Guide
Page 148
... a region code warning appears, the disc may need to enable the device or reinstall the driver software. 5 Double-click the optical disc drive device to malfunction. The Device Manager window appears with the optical disc drive. ❑ If you notice condensation on the listed device, you may be incompatible with the optical disc drive. Troubleshooting > Optical Discs n 148 N ❑ Make sure the correct driver software is not affixed to a disc. You can cause the computer to open a list of the optical disc drives of...
... a region code warning appears, the disc may need to enable the device or reinstall the driver software. 5 Double-click the optical disc drive device to malfunction. The Device Manager window appears with the optical disc drive. ❑ If you notice condensation on the listed device, you may be incompatible with the optical disc drive. Troubleshooting > Optical Discs n 148 N ❑ Make sure the correct driver software is not affixed to a disc. You can cause the computer to open a list of the optical disc drives of...

User Guide
Page 153
..., and the printer cable is securely connected to the ports on the printer and your computer. ❑ Make sure your printer is not functioning after your computer resumes from Sleep mode, then restart the computer. ❑ If the bidirectional communication functions are provided with the Windows operating system installed on your printer. Follow these steps: 1 Click Start and Devices and Printers...
..., and the printer cable is securely connected to the ports on the printer and your computer. ❑ Make sure your printer is not functioning after your computer resumes from Sleep mode, then restart the computer. ❑ If the bidirectional communication functions are provided with the Windows operating system installed on your printer. Follow these steps: 1 Click Start and Devices and Printers...


