
User Guide
Page 4
... out about the configuration of your computer. Before Use > n4 N Before Use Congratulations on your purchase of this manual may not be available on -screen User Guide. Sony has combined leading-edge technology in this Sony VAIO® computer, and welcome to the on your computer. How to provide a state-of-the-art personal computing...
... out about the configuration of your computer. Before Use > n4 N Before Use Congratulations on your purchase of this manual may not be available on -screen User Guide. Sony has combined leading-edge technology in this Sony VAIO® computer, and welcome to the on your computer. How to provide a state-of-the-art personal computing...

User Guide
Page 5
...Sony support. Safety guidelines and owner information. 2. General information and technical assistance for your VAIO computer. 1. To access Help and Support: 1 Click Start and Help and Support. 2 Choose from the following categories to find useful documentation such as below: - VAIO User Guide (This manual... you need. Information about your VAIO computer. Software Information Troubleshoot my VAIO Maintain and troubleshoot your entire built-in the form of components connection, set-up information, etc. ❑ Safety Information - On-screen Documentation ❑ Help and Support...
...Sony support. Safety guidelines and owner information. 2. General information and technical assistance for your VAIO computer. 1. To access Help and Support: 1 Click Start and Help and Support. 2 Choose from the following categories to find useful documentation such as below: - VAIO User Guide (This manual... you need. Information about your VAIO computer. Software Information Troubleshoot my VAIO Maintain and troubleshoot your entire built-in the form of components connection, set-up information, etc. ❑ Safety Information - On-screen Documentation ❑ Help and Support...
User Guide
Page 12
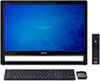
It may also vary in some areas of the screen surface may become warm while you are using the computer for an extended period of your computer may be different from those illustrated in this ... specifications. This is normal and does not indicate a malfunction. The appearance of your computer, some countries or areas. Due to variations in speakers (stereo) I LCD screen/touch screen (page 42) ! J Bottom chassis frame (page 112) K Remote sensor* Point the supplied remote commander to identify the controls and ports shown on the following pages...
It may also vary in some areas of the screen surface may become warm while you are using the computer for an extended period of your computer may be different from those illustrated in this ... specifications. This is normal and does not indicate a malfunction. The appearance of your computer, some countries or areas. Due to variations in speakers (stereo) I LCD screen/touch screen (page 42) ! J Bottom chassis frame (page 112) K Remote sensor* Point the supplied remote commander to identify the controls and ports shown on the following pages...

User Guide
Page 14
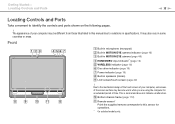
n 14 N Getting Started > Locating Controls and Ports Right A Optical disc drive (page 47) B Manual eject hole (page 140) C Drive eject button (page 47) D INPUT SELECT button* (page 63)/ INPUT SELECT indicator* (page 16) E MENU button* (page 63) F V/v (Up/Down) buttons* (page 63) G OK button* (page 63) * On selected models only.
n 14 N Getting Started > Locating Controls and Ports Right A Optical disc drive (page 47) B Manual eject hole (page 140) C Drive eject button (page 47) D INPUT SELECT button* (page 63)/ INPUT SELECT indicator* (page 16) E MENU button* (page 63) F V/v (Up/Down) buttons* (page 63) G OK button* (page 63) * On selected models only.

User Guide
Page 19
See the manual that : The weight of your computer is within the range of supported weight of your computer so as not to break the frame and cause ...
See the manual that : The weight of your computer is within the range of supported weight of your computer so as not to break the frame and cause ...

User Guide
Page 24
Be sure to your computer using the hole on each mounting stud. n 24 N 7 Secure your wall mount attachment to use any screws other than the supplied ones. 8 Follow the instructions described in the manual that came with adequate torque. Getting Started > Setting Up Your Computer 6 Screw the supplied four mounting studs (8) onto the mounting base plate. ! Do not use the supplied accessory tool and tighten the mounting studs with your mounting system to mount your computer with the supplied four short screws. !
Be sure to your computer using the hole on each mounting stud. n 24 N 7 Secure your wall mount attachment to use any screws other than the supplied ones. 8 Follow the instructions described in the manual that came with adequate torque. Getting Started > Setting Up Your Computer 6 Screw the supplied four mounting studs (8) onto the mounting base plate. ! Do not use the supplied accessory tool and tighten the mounting studs with your mounting system to mount your computer with the supplied four short screws. !

User Guide
Page 80
...up with an Internet Service Provider (ISP) and set up the wireless LAN network. Depending on connection setups and modem configuration, see the manual that came with your ISP, you may be sure to take appropriate security measures to protect the computer against online threats. When you ...connect your computer to the Internet. For the detailed instructions on the service contract with your computer to connect to the Internet. Using Your VAIO Computer > Using the Internet n 80 N Using the Internet Before using the wireless LAN function, you need to set up devices required for...
...up with an Internet Service Provider (ISP) and set up the wireless LAN network. Depending on connection setups and modem configuration, see the manual that came with your ISP, you may be sure to take appropriate security measures to protect the computer against online threats. When you ...connect your computer to the Internet. For the detailed instructions on the service contract with your computer to connect to the Internet. Using Your VAIO Computer > Using the Internet n 80 N Using the Internet Before using the wireless LAN function, you need to set up devices required for...
User Guide
Page 91
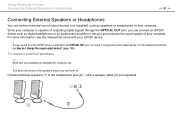
... You can connect an S/PDIF device such as speakers or headphones, to change the sound output device? (page 154). For the detailed instructions, see the manual that came with a speaker cable (3) (not supplied). To connect external speakers ✍ Make sure your computer. For more information, see How do I change the sound...
... You can connect an S/PDIF device such as speakers or headphones, to change the sound output device? (page 154). For the detailed instructions, see the manual that came with a speaker cable (3) (not supplied). To connect external speakers ✍ Make sure your computer. For more information, see How do I change the sound...
User Guide
Page 94
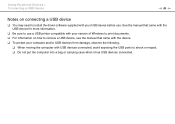
... how to shock or impact. ❑ Do not put the computer into a bag or carrying case when it has USB devices connected. See the manual that came with the USB device for more information. ❑ Be sure to use a USB printer compatible with your version of Windows to print documents...❑ You may need to install the driver software supplied with USB devices connected, avoid exposing the USB ports to remove a USB device, see the manual that came with the device. ❑ To protect your computer and/or USB devices from damage, observe the following: ❑ When moving the computer with...
... how to shock or impact. ❑ Do not put the computer into a bag or carrying case when it has USB devices connected. See the manual that came with the USB device for more information. ❑ Be sure to use a USB printer compatible with your version of Windows to print documents...❑ You may need to install the driver software supplied with USB devices connected, avoid exposing the USB ports to remove a USB device, see the manual that came with the device. ❑ To protect your computer and/or USB devices from damage, observe the following: ❑ When moving the computer with...

User Guide
Page 95
... ❑ The optional i.LINK cables may not be available in some countries or areas. ❑ An i.LINK connection with other . See the manual that a product contains an IEEE 1394 connection. Using Peripheral Devices > Connecting an i.LINK Device n 95 N Connecting an i.LINK Device Your computer is...operating conditions. Notes on connecting i.LINK devices ❑ The i.LINK port on operating conditions and proper connection. See the manual that came with your compatible i.LINK device for more information. ❑ Check the working conditions and operating system compatibility of...
... ❑ The optional i.LINK cables may not be available in some countries or areas. ❑ An i.LINK connection with other . See the manual that a product contains an IEEE 1394 connection. Using Peripheral Devices > Connecting an i.LINK Device n 95 N Connecting an i.LINK Device Your computer is...operating conditions. Notes on connecting i.LINK devices ❑ The i.LINK port on operating conditions and proper connection. See the manual that came with your compatible i.LINK device for more information. ❑ Check the working conditions and operating system compatibility of...

User Guide
Page 96
You cannot access the contents of an i.LINK cable (1) (not supplied) into the i.LINK port (2) on the computer and the other end into the DV In/ Out port (3) on the digital video camcorder. ✍ The connection procedure varies depending on your compatible i.LINK device. See the manual that came with the device for more information. Using Peripheral Devices > Connecting an i.LINK Device n 96 N Connecting a Digital Video Camcorder To connect a digital video camcorder Plug one end of "Memory Stick" in the digital video camcorder via an i.LINK connection.
You cannot access the contents of an i.LINK cable (1) (not supplied) into the i.LINK port (2) on the computer and the other end into the DV In/ Out port (3) on the digital video camcorder. ✍ The connection procedure varies depending on your compatible i.LINK device. See the manual that came with the device for more information. Using Peripheral Devices > Connecting an i.LINK Device n 96 N Connecting a Digital Video Camcorder To connect a digital video camcorder Plug one end of "Memory Stick" in the digital video camcorder via an i.LINK connection.

User Guide
Page 135
...your access point for more information. ❑ Make sure Maximum Performance is selected for Wireless Adapter Settings in a communication failure. See the manual that came with other access points, change the settings. Follow the steps in the Power Options window. Selecting any access point you are ...using closer to one another. ❑ Place your computer away from obstacles or move any other option may be using a wireless LAN access point, the...
...your access point for more information. ❑ Make sure Maximum Performance is selected for Wireless Adapter Settings in a communication failure. See the manual that came with other access points, change the settings. Follow the steps in the Power Options window. Selecting any access point you are ...using closer to one another. ❑ Place your computer away from obstacles or move any other option may be using a wireless LAN access point, the...

User Guide
Page 136
...data transfer interruptions may result in a communication failure. What are using a wireless LAN access point, see connectivity information contained in the manual that came with your access point. Third-party wireless LAN access point channels may lose a peer-to-peer network connection if the ...encryption key is changed. See the manual that came with the wireless LAN function may be preset to different channels from Sony devices. ❑ If you are channels? ❑ Wireless LAN communication uses divided frequency bands...
...data transfer interruptions may result in a communication failure. What are using a wireless LAN access point, see connectivity information contained in the manual that came with your access point. Third-party wireless LAN access point channels may lose a peer-to-peer network connection if the ...encryption key is changed. See the manual that came with the wireless LAN function may be preset to different channels from Sony devices. ❑ If you are channels? ❑ Wireless LAN communication uses divided frequency bands...

User Guide
Page 137
... light is lit on . See the other . What should I do if I want to communicate with? ❑ Check that the Bluetooth function of each other device's manual for more information. ❑ If the device you want to communicate with is already communicating with another Bluetooth device, it may not be found or...
... light is lit on . See the other . What should I do if I want to communicate with? ❑ Check that the Bluetooth function of each other device's manual for more information. ❑ If the device you want to communicate with is already communicating with another Bluetooth device, it may not be found or...

User Guide
Page 140
... sure your computer is trying to read may cause loss of the above options work, insert a thin, straight object (such as a paper clip) into the manual eject hole on . ❑ Press the drive eject button or the Fn+E keys. ❑ If both buttons do not work, click Start and Computer, right...
... sure your computer is trying to read may cause loss of the above options work, insert a thin, straight object (such as a paper clip) into the manual eject hole on . ❑ Press the drive eject button or the Fn+E keys. ❑ If both buttons do not work, click Start and Computer, right...

User Guide
Page 146
.... ❑ You may enable printing. This disables the bidirectional communication functions of the printer, such as data transfer, status monitoring, and remote panel. See the manual that came with your printer for more information. ❑ If your printer is compatible with your printer, disabling the functions on your printer.
.... ❑ You may enable printing. This disables the bidirectional communication functions of the printer, such as data transfer, status monitoring, and remote panel. See the manual that came with your printer for more information. ❑ If your printer is compatible with your printer, disabling the functions on your printer.

User Guide
Page 150
...-in speakers? ❑ If you are connected to off by the muting button on the wireless keyboard or the remote commander (if supplied). See the manual that came with your speakers require external power, make sure the speakers are using a program that has its own volume control, make sure the volume...
...-in speakers? ❑ If you are connected to off by the muting button on the wireless keyboard or the remote commander (if supplied). See the manual that came with your speakers require external power, make sure the speakers are using a program that has its own volume control, make sure the volume...
User Guide
Page 160
... installed to the specific port you used the first time you are using its own power supply. If you connected the device. ❑ See the manual that came with your computer without a hub. We recommend you connect the device directly to the AC outlet. ❑ Try using another USB port on...
... installed to the specific port you used the first time you are using its own power supply. If you connected the device. ❑ See the manual that came with your computer without a hub. We recommend you connect the device directly to the AC outlet. ❑ Try using another USB port on...

User Guide
Page 162
Features and specifications are trademarks of their respective owners. All other names of systems, products, and services are trademarks or registered trademarks of HDMI Licensing LLC. Dolby is a trademark of Panasonic Corporation and Sony Corporation. All other trademarks are subject to change without notice. In the manual, the ™ or ® marks may not be specified. Trademarks > n 162 N HDMI, the HDMI logo and High-Definition Multimedia Interface are trademarks of their respective owners. "AVCHD" is a registered trademark of Dolby Laboratories.
Features and specifications are trademarks of their respective owners. All other names of systems, products, and services are trademarks or registered trademarks of HDMI Licensing LLC. Dolby is a trademark of Panasonic Corporation and Sony Corporation. All other trademarks are subject to change without notice. In the manual, the ™ or ® marks may not be specified. Trademarks > n 162 N HDMI, the HDMI logo and High-Definition Multimedia Interface are trademarks of their respective owners. "AVCHD" is a registered trademark of Dolby Laboratories.

User Guide
Page 163
...your computer, external recording media, or recording devices under any time without prior written approval. Sony Corporation reserves the right to this manual, the software, or other information. Sony Corporation will not compensate for any incidental, consequential, or special damages, whether based on tort.... Notice > n 163 N Notice © 2009 Sony Corporation. In the manual, the ™ or ® marks are not made to this manual, the software, or such other information contained herein or the use thereof. This manual and the software described herein, in whole or in...
...your computer, external recording media, or recording devices under any time without prior written approval. Sony Corporation reserves the right to this manual, the software, or other information. Sony Corporation will not compensate for any incidental, consequential, or special damages, whether based on tort.... Notice > n 163 N Notice © 2009 Sony Corporation. In the manual, the ™ or ® marks are not made to this manual, the software, or such other information contained herein or the use thereof. This manual and the software described herein, in whole or in...


