
User Guide
Page 2
... Connecting an i.LINK Device 95 Customizing Your VAIO Computer 97 Setting the Password 98 Using the VAIO Control Center 103 Upgrading Your VAIO Computer 104 Adding and Removing Memory 105 Precautions 111 Safety Information 112 Care and Maintenance Information 114 Handling Your Computer 115 Handling the LCD Screen/Touch Screen 117 Using the Power Source 118 Handling...
... Connecting an i.LINK Device 95 Customizing Your VAIO Computer 97 Setting the Password 98 Using the VAIO Control Center 103 Upgrading Your VAIO Computer 104 Adding and Removing Memory 105 Precautions 111 Safety Information 112 Care and Maintenance Information 114 Handling Your Computer 115 Handling the LCD Screen/Touch Screen 117 Using the Power Source 118 Handling...

User Guide
Page 3
Troubleshooting 123 Computer 125 System Security 131 Built-in Camera 132 Networking 134 Bluetooth Technology 137 Optical Discs 140 Display 144 Printing 146 Microphone 147 Mouse 148 Speakers 150 Touch Screen 151 Keyboard 152 Floppy Disks 153 Audio/Video 154 HDMI/VIDEO Input Function 157 "Memory Stick 159 Peripherals 160 Trademarks 161 Notice 163 n3 N
Troubleshooting 123 Computer 125 System Security 131 Built-in Camera 132 Networking 134 Bluetooth Technology 137 Optical Discs 140 Display 144 Printing 146 Microphone 147 Mouse 148 Speakers 150 Touch Screen 151 Keyboard 152 Floppy Disks 153 Audio/Video 154 HDMI/VIDEO Input Function 157 "Memory Stick 159 Peripherals 160 Trademarks 161 Notice 163 n3 N
User Guide
Page 13
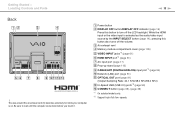
... audio/video input source by the INPUT SELECT button (page 14), pressing this button to wait until the computer cools down before you touch it. C Air exhaust vent D Memory module compartment cover (page 105) E VIDEO INPUT jacks*1 (page 61) F HDMI INPUT port*1 (page 61) G AC input port (page 17) H Prop-up stand...
... audio/video input source by the INPUT SELECT button (page 14), pressing this button to wait until the computer cools down before you touch it. C Air exhaust vent D Memory module compartment cover (page 105) E VIDEO INPUT jacks*1 (page 61) F HDMI INPUT port*1 (page 61) G AC input port (page 17) H Prop-up stand...

User Guide
Page 15
speeds. Getting Started > Locating Controls and Ports Left n 15 N A "Memory Stick Duo" slot*1 (page 70) B Media Access indicator (page 16) C SD memory card slot (page 76) D i.LINK 4-pin (S400) port (page 95) E Hi-Speed USB (USB 2.0) ports*2 (page 93) F Headphones jack (page 91) G Microphone jack (page 92) H Line In jack Connect an external audio device to receive audio signals. *1 Your computer supports only Duo-size "Memory Stick". *2 Support high-/full-/low-
speeds. Getting Started > Locating Controls and Ports Left n 15 N A "Memory Stick Duo" slot*1 (page 70) B Media Access indicator (page 16) C SD memory card slot (page 76) D i.LINK 4-pin (S400) port (page 95) E Hi-Speed USB (USB 2.0) ports*2 (page 93) F Headphones jack (page 91) G Microphone jack (page 92) H Line In jack Connect an external audio device to receive audio signals. *1 Your computer supports only Duo-size "Memory Stick". *2 Support high-/full-/low-
User Guide
Page 16
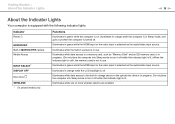
Illuminates while one or more wireless options are enabled. Illuminates while the built-in camera is in use . ... not place the computer into Sleep mode or turn it off . Illuminates while data access to a memory card, such as the audio/video input source. Illuminates in green while the HDMI input or the video input is selected... as "Memory Stick" and an SD memory card, is in progress. Illuminates in MOTION EYE camera Media Access INPUT SELECT* DISPLAY OFF Disc drive WIRELESS * ...
Illuminates while one or more wireless options are enabled. Illuminates while the built-in camera is in use . ... not place the computer into Sleep mode or turn it off . Illuminates while data access to a memory card, such as the audio/video input source. Illuminates in green while the HDMI input or the video input is selected... as "Memory Stick" and an SD memory card, is in progress. Illuminates in MOTION EYE camera Media Access INPUT SELECT* DISPLAY OFF Disc drive WIRELESS * ...
User Guide
Page 29
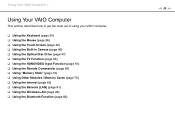
... This section describes how to get the most out of using your VAIO computer. ❑ Using the Keyboard (page 30) ❑ Using the Mouse (page 36) ❑ Using the Touch Screen (page 42) ❑ Using the Built-in Camera (page 46) ❑ Using the Optical Disc Drive (page 47) ❑...(page 54) ❑ Using the HDMI/VIDEO Input Function (page 61) ❑ Using the Remote Commander (page 66) ❑ Using "Memory Stick" (page 70) ❑ Using Other Modules / Memory Cards (page 76) ❑ Using the Internet (page 80) ❑ Using the Network (LAN) (page 81) ❑ Using the ...
... This section describes how to get the most out of using your VAIO computer. ❑ Using the Keyboard (page 30) ❑ Using the Mouse (page 36) ❑ Using the Touch Screen (page 42) ❑ Using the Built-in Camera (page 46) ❑ Using the Optical Disc Drive (page 47) ❑...(page 54) ❑ Using the HDMI/VIDEO Input Function (page 61) ❑ Using the Remote Commander (page 66) ❑ Using "Memory Stick" (page 70) ❑ Using Other Modules / Memory Cards (page 76) ❑ Using the Internet (page 80) ❑ Using the Network (LAN) (page 81) ❑ Using the ...

User Guide
Page 50
...and some contents of DVD and BD-ROM Disc media. USING NON-COMPLIANT DISCS CAN CAUSE FATAL DAMAGE TO YOUR VAIO PC OR CREATE SOFTWARE CONFLICTS AND CAUSE SYSTEM HANGING. Sony does NOT guarantee the compatibility of the recordable disc. ✍ 8 cm disc writing is designed to standard definition ... protection technologies do not conform to read the notices on packaged media recorded in AVC or VC1 formats at high bit rates. Exit all memory-resident utility software before playing or writing a disc as an HDMI connection or a DVI connection, it may not be sure to the ...
...and some contents of DVD and BD-ROM Disc media. USING NON-COMPLIANT DISCS CAN CAUSE FATAL DAMAGE TO YOUR VAIO PC OR CREATE SOFTWARE CONFLICTS AND CAUSE SYSTEM HANGING. Sony does NOT guarantee the compatibility of the recordable disc. ✍ 8 cm disc writing is designed to standard definition ... protection technologies do not conform to read the notices on packaged media recorded in AVC or VC1 formats at high bit rates. Exit all memory-resident utility software before playing or writing a disc as an HDMI connection or a DVI connection, it may not be sure to the ...

User Guide
Page 70
... be used for exchanging and sharing digital data with compatible products, such as digital cameras, mobile phones, and other devices. Using Your VAIO Computer > Using "Memory Stick" n 70 N Using "Memory Stick" "Memory Stick" is removable, it is a compact, portable, and versatile IC recording media especially designed for external data storage. Because it can accommodate...
... be used for exchanging and sharing digital data with compatible products, such as digital cameras, mobile phones, and other devices. Using Your VAIO Computer > Using "Memory Stick" n 70 N Using "Memory Stick" "Memory Stick" is removable, it is a compact, portable, and versatile IC recording media especially designed for external data storage. Because it can accommodate...

User Guide
Page 71
... desktop, click Start, Computer, and double-click the "Memory Stick" icon. Using Your VAIO Computer > Using "Memory Stick" n 71 N Inserting and Removing "Memory Stick" To insert "Memory Stick" 1 Locate the "Memory Stick Duo" slot (page 15). 2 Hold "Memory Stick" with the arrow pointing toward the slot. 3 Carefully slide "Memory Stick" into the slot until it clicks into the...
... desktop, click Start, Computer, and double-click the "Memory Stick" icon. Using Your VAIO Computer > Using "Memory Stick" n 71 N Inserting and Removing "Memory Stick" To insert "Memory Stick" 1 Locate the "Memory Stick Duo" slot (page 15). 2 Hold "Memory Stick" with the arrow pointing toward the slot. 3 Carefully slide "Memory Stick" into the slot until it clicks into the...

User Guide
Page 72
Using Your VAIO Computer > Using "Memory Stick" n 72 N ! "Memory Stick" ejects. 4 Pull "Memory Stick" out of data may not be sure to insert it into the slot. Do not remove "Memory Stick" while the Media Access indicator light is unlit. 3 Push in the correct direction as you may pop out unexpectedly.... Large volumes of the slot. ! Be sure to load, so make sure the indicator light is unlit before removing "Memory Stick". 1 Locate the "Memory Stick Duo" slot (page 15). 2 Check that the Media Access indicator light is lit. If you insert the media directly ...
Using Your VAIO Computer > Using "Memory Stick" n 72 N ! "Memory Stick" ejects. 4 Pull "Memory Stick" out of data may not be sure to insert it into the slot. Do not remove "Memory Stick" while the Media Access indicator light is unlit. 3 Push in the correct direction as you may pop out unexpectedly.... Large volumes of the slot. ! Be sure to load, so make sure the indicator light is unlit before removing "Memory Stick". 1 Locate the "Memory Stick Duo" slot (page 15). 2 Check that the Media Access indicator light is lit. If you insert the media directly ...

User Guide
Page 73
Using Your VAIO Computer > Using "Memory Stick" n 73 N Formatting "Memory Stick" To format "Memory Stick" "Memory Stick" has been formatted by default and is designed to format the media and supports "Memory Stick" when formatting the media. If you select Quick Format in Format options. The size of the allocation ...the media with your valuable data. Do not select NTFS from the slot while formatting. Formatting "Memory Stick" erases the entire data stored on the media. Do not remove "Memory Stick" from the File system drop-down list as it clicks into place. 3 Click Start...
Using Your VAIO Computer > Using "Memory Stick" n 73 N Formatting "Memory Stick" To format "Memory Stick" "Memory Stick" has been formatted by default and is designed to format the media and supports "Memory Stick" when formatting the media. If you select Quick Format in Format options. The size of the allocation ...the media with your valuable data. Do not select NTFS from the slot while formatting. Formatting "Memory Stick" erases the entire data stored on the media. Do not remove "Memory Stick" from the File system drop-down list as it clicks into place. 3 Click Start...

User Guide
Page 74
It may take time to format "Memory Stick" depending on -screen instructions. ! n 74 N Using Your VAIO Computer > Using "Memory Stick" 6 Click Start. 7 Follow the on the media type.
It may take time to format "Memory Stick" depending on -screen instructions. ! n 74 N Using Your VAIO Computer > Using "Memory Stick" 6 Click Start. 7 Follow the on the media type.

User Guide
Page 75
...VAIO Computer > Using "Memory Stick" n 75 N Notes on Using "Memory Stick" ❑ Your computer has been tested and found compatible with Sony branded "Memory Stick" with capacity of up to 16 GB that are guaranteed of compatibility. ❑ Inserting "Memory...However, not all "Memory Stick" are available as of the copyright protection technology developed by Sony. Improper insertion of this... technology. ❑ Except for your personal use any audio and/or image data you recorded without prior consent from the respective copyright holders. Use "Memory...
...VAIO Computer > Using "Memory Stick" n 75 N Notes on Using "Memory Stick" ❑ Your computer has been tested and found compatible with Sony branded "Memory Stick" with capacity of up to 16 GB that are guaranteed of compatibility. ❑ Inserting "Memory...However, not all "Memory Stick" are available as of the copyright protection technology developed by Sony. Improper insertion of this... technology. ❑ Except for your personal use any audio and/or image data you recorded without prior consent from the respective copyright holders. Use "Memory...

User Guide
Page 76
... the appropriate support web site. You can use the SD memory card The SD memory card slot on your computer supports the following memory cards: ❑ SD memory card ❑ SDHC memory card For the latest information on compatible memory cards, see Finding More about Your VAIO Computer (page 5) to transfer data among digital cameras, camcorders, music...
... the appropriate support web site. You can use the SD memory card The SD memory card slot on your computer supports the following memory cards: ❑ SD memory card ❑ SDHC memory card For the latest information on compatible memory cards, see Finding More about Your VAIO Computer (page 5) to transfer data among digital cameras, camcorders, music...

User Guide
Page 77
Do not force the card into place. The SD memory card icon will appear in the proper direction. Using Your VAIO Computer > Using Other Modules / Memory Cards To insert an SD memory card 1 Locate the SD memory card slot (page 15). 2 Hold the SD memory card with the arrow pointing toward the slot. 3 Carefully slide the SD memory card into the slot until it in the Computer window after you insert the card into the slot. n 77 N ✍ If the SD memory card does not go into the slot easily, remove it gently and verify you are inserting it clicks into the slot.
Do not force the card into place. The SD memory card icon will appear in the proper direction. Using Your VAIO Computer > Using Other Modules / Memory Cards To insert an SD memory card 1 Locate the SD memory card slot (page 15). 2 Hold the SD memory card with the arrow pointing toward the slot. 3 Carefully slide the SD memory card into the slot until it in the Computer window after you insert the card into the slot. n 77 N ✍ If the SD memory card does not go into the slot easily, remove it gently and verify you are inserting it clicks into the slot.

User Guide
Page 78
Using Your VAIO Computer > Using Other Modules / Memory Cards To remove an SD memory card 1 Locate the SD memory card slot (page 15). 2 Check that the Media Access indicator light is unlit. 3 Push in the SD memory card toward the computer and release. The SD memory card ejects. 4 Pull the SD memory card out of the slot. n 78 N
Using Your VAIO Computer > Using Other Modules / Memory Cards To remove an SD memory card 1 Locate the SD memory card slot (page 15). 2 Check that the Media Access indicator light is unlit. 3 Push in the SD memory card toward the computer and release. The SD memory card ejects. 4 Pull the SD memory card out of the slot. n 78 N

User Guide
Page 79
... cannot insert it into the memory card slot. Notes on your computer does not support the high-speed data transfer feature of the SD memory card and the SDHC memory card. Using Your VAIO Computer > Using Other Modules / Memory Cards n 79 N Notes on Using Memory Cards General notes on using... the SD memory card ❑ Your computer has been tested and found compatible ...
... cannot insert it into the memory card slot. Notes on your computer does not support the high-speed data transfer feature of the SD memory card and the SDHC memory card. Using Your VAIO Computer > Using Other Modules / Memory Cards n 79 N Notes on Using Memory Cards General notes on using... the SD memory card ❑ Your computer has been tested and found compatible ...

User Guide
Page 96
You cannot access the contents of an i.LINK cable (1) (not supplied) into the i.LINK port (2) on the computer and the other end into the DV In/ Out port (3) on the digital video camcorder. ✍ The connection procedure varies depending on your compatible i.LINK device. Using Peripheral Devices > Connecting an i.LINK Device n 96 N Connecting a Digital Video Camcorder To connect a digital video camcorder Plug one end of "Memory Stick" in the digital video camcorder via an i.LINK connection. See the manual that came with the device for more information.
You cannot access the contents of an i.LINK cable (1) (not supplied) into the i.LINK port (2) on the computer and the other end into the DV In/ Out port (3) on the digital video camcorder. ✍ The connection procedure varies depending on your compatible i.LINK device. Using Peripheral Devices > Connecting an i.LINK Device n 96 N Connecting a Digital Video Camcorder To connect a digital video camcorder Plug one end of "Memory Stick" in the digital video camcorder via an i.LINK connection. See the manual that came with the device for more information.

User Guide
Page 104
... of your product warranty period, we recommend that: ❑ You should not touch the connectors or open the memory module compartment cover. For assistance, contact an authorized Sony Service Center. Upgrading Your VAIO Computer > n 104 N Upgrading Your VAIO Computer Your VAIO computer and memory modules use high precision components and electronic connectors technology. To avoid invalidation of...
... of your product warranty period, we recommend that: ❑ You should not touch the connectors or open the memory module compartment cover. For assistance, contact an authorized Sony Service Center. Upgrading Your VAIO Computer > n 104 N Upgrading Your VAIO Computer Your VAIO computer and memory modules use high precision components and electronic connectors technology. To avoid invalidation of...

User Guide
Page 105
... or panel from ESD. The package protects the module from the computer. Ground yourself by installing optional memory modules. Before touching a memory module, ensure the following pages. Upgrading Your VAIO Computer > Adding and Removing Memory n 105 N Adding and Removing Memory If you want to expand the functionality of your computer, you can increase the amount of...
... or panel from ESD. The package protects the module from the computer. Ground yourself by installing optional memory modules. Before touching a memory module, ensure the following pages. Upgrading Your VAIO Computer > Adding and Removing Memory n 105 N Adding and Removing Memory If you want to expand the functionality of your computer, you can increase the amount of...


