Quick Start Guide
Page 2
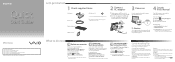
VPCJ1 Series VAIO Support Homepage http://esupport.sony.com/EN/VAIO/ (USA) http://www.sony.ca/support/ (Canada) http://esupport.sony.com/ES/VAIO/LA/ (Latin American area) http://esupport.sony.com/PT/VAIO/BR/ (Brazil) Features and specifications may make scratches on hard surfaces, such as setup tools, tutorials, ...change without notice. For details, refer to VAIO General User Guide or VAIO Care Rescue User Guide under Use my VAIO in hard disk drive, avoid moving your computer, and then press the button to do next Update your computer Keep your computer updated by downloading updates...
VPCJ1 Series VAIO Support Homepage http://esupport.sony.com/EN/VAIO/ (USA) http://www.sony.ca/support/ (Canada) http://esupport.sony.com/ES/VAIO/LA/ (Latin American area) http://esupport.sony.com/PT/VAIO/BR/ (Brazil) Features and specifications may make scratches on hard surfaces, such as setup tools, tutorials, ...change without notice. For details, refer to VAIO General User Guide or VAIO Care Rescue User Guide under Use my VAIO in hard disk drive, avoid moving your computer, and then press the button to do next Update your computer Keep your computer updated by downloading updates...
User Guide
Page 3
Troubleshooting 110 Computer Operations 112 System Update / Security 117 Recovery 119 Built-in Camera 121 Networking (LAN/Wireless LAN 122 Bluetooth Technology 125 Optical Discs 129 Display 133 Printing 135 Microphone 136 Mouse 137 Speakers 139 Touch Screen 141 Keyboard 142 Floppy Disks 143 Audio/Video 144 "Memory Stick 147 Peripherals 148 Trademarks 149 Notice 151 n3 N
Troubleshooting 110 Computer Operations 112 System Update / Security 117 Recovery 119 Built-in Camera 121 Networking (LAN/Wireless LAN 122 Bluetooth Technology 125 Optical Discs 129 Display 133 Printing 135 Microphone 136 Mouse 137 Speakers 139 Touch Screen 141 Keyboard 142 Floppy Disks 143 Audio/Video 144 "Memory Stick 147 Peripherals 148 Trademarks 149 Notice 151 n3 N

User Guide
Page 11
Before starting your computer for example, a printer, an external hard disk drive, a scanner, and so on) at a time, following the manufacturer's instructions. ❑ Locating Controls and Ports (page 12) ❑ About the Indicator Lights (page 16) &#...
Before starting your computer for example, a printer, an external hard disk drive, a scanner, and so on) at a time, following the manufacturer's instructions. ❑ Locating Controls and Ports (page 12) ❑ About the Indicator Lights (page 16) &#...
User Guide
Page 32
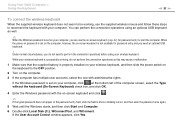
... to show a blinking cursor, and then enter the password once again. 5 Wait until the Windows starts, and then click Start and Computer. 6 Double-click Local Disk (C:), WConnectTool, and WConnect. You can use the supplied wireless mouse and follow these steps to reconnect the keyboard with your computer, click at the bottom...
... to show a blinking cursor, and then enter the password once again. 5 Wait until the Windows starts, and then click Start and Computer. 6 Double-click Local Disk (C:), WConnectTool, and WConnect. You can use the supplied wireless mouse and follow these steps to reconnect the keyboard with your computer, click at the bottom...

User Guide
Page 76
To connect a USB device 1 Choose the USB port (1) you prefer to your computer. Using Peripheral Devices > Connecting a USB Device n 76 N Connecting a USB Device You can connect a Universal Serial Bus (USB) device, such as a mouse, a floppy disk drive, a speaker, or a printer, to use. 2 Plug the USB device cable (2) into the USB port.
To connect a USB device 1 Choose the USB port (1) you prefer to your computer. Using Peripheral Devices > Connecting a USB Device n 76 N Connecting a USB Device You can connect a Universal Serial Bus (USB) device, such as a mouse, a floppy disk drive, a speaker, or a printer, to use. 2 Plug the USB device cable (2) into the USB port.

User Guide
Page 78
...(for example, an HDD or a CD-RW drive) before you use to connect an i.LINK device, such as a CD-RW or hard disk drive, confirm their operating system compatibility and required operating conditions. If the external device requires external power, be available depending on a software application, ...See the manual that came with your software for more information. ❑ Check the working conditions and operating system compatibility of Sony Corporation used only to establish an i.LINK connection may vary, depending on the software applications, operating system, and i.LINK-
...(for example, an HDD or a CD-RW drive) before you use to connect an i.LINK device, such as a CD-RW or hard disk drive, confirm their operating system compatibility and required operating conditions. If the external device requires external power, be available depending on a software application, ...See the manual that came with your software for more information. ❑ Check the working conditions and operating system compatibility of Sony Corporation used only to establish an i.LINK connection may vary, depending on the software applications, operating system, and i.LINK-

User Guide
Page 109
... and options in a short time. Precautions > Handling the Built-in Storage Device n 109 N Handling the Built-in Storage Device The built-in storage device (hard disk drive or solid state drive) has a high storage density and reads or writes data in this section may not be available on your computer.
... and options in a short time. Precautions > Handling the Built-in Storage Device n 109 N Handling the Built-in Storage Device The built-in storage device (hard disk drive or solid state drive) has a high storage density and reads or writes data in this section may not be available on your computer.

User Guide
Page 111
Troubleshooting > ❑ Optical Discs (page 129) ❑ Display (page 133) ❑ Printing (page 135) ❑ Microphone (page 136) ❑ Mouse (page 137) ❑ Speakers (page 139) ❑ Touch Screen (page 141) ❑ Keyboard (page 142) ❑ Floppy Disks (page 143) ❑ Audio/Video (page 144) ❑ "Memory Stick" (page 147) ❑ Peripherals (page 148) n 111 N
Troubleshooting > ❑ Optical Discs (page 129) ❑ Display (page 133) ❑ Printing (page 135) ❑ Microphone (page 136) ❑ Mouse (page 137) ❑ Speakers (page 139) ❑ Touch Screen (page 141) ❑ Keyboard (page 142) ❑ Floppy Disks (page 143) ❑ Audio/Video (page 144) ❑ "Memory Stick" (page 147) ❑ Peripherals (page 148) n 111 N
User Guide
Page 116
... prompt, press the Enter key. How can use one of your computer from the USB floppy disk drive connected to change the boot device order. You can I cannot boot my computer from the USB floppy disk drive, you want to assign the priority and press the Enter key. 6 Press the < or , key...
... prompt, press the Enter key. How can use one of your computer from the USB floppy disk drive connected to change the boot device order. You can I cannot boot my computer from the USB floppy disk drive, you want to assign the priority and press the Enter key. 6 Press the < or , key...

User Guide
Page 120
To check the volume of the C drive are displayed in the Disk 0 row in the center pane. The volume of the recovery area and the total volume of the recovery area, follow these steps: 1 Click Start, right-click Computer, and select Manage. 2 Click Disk Management under Storage in storage device contains the recovery area where the data for the system recovery is stored. Troubleshooting > Recovery n 120 N How do I check the volume of the recovery area? Your built-in the left pane.
To check the volume of the C drive are displayed in the Disk 0 row in the center pane. The volume of the recovery area and the total volume of the recovery area, follow these steps: 1 Click Start, right-click Computer, and select Manage. 2 Click Disk Management under Storage in storage device contains the recovery area where the data for the system recovery is stored. Troubleshooting > Recovery n 120 N How do I check the volume of the recovery area? Your built-in the left pane.

User Guide
Page 143
... write-protected or disable the write-protect feature. You can either use a floppy disk that are still unable to write data to it, the disk may be full or write-protected. If you are accessing the floppy disk drive. 2 Wait until the indicator light on the taskbar when the drive is ... doesn't the Safely Remove Hardware and Eject Media icon appear on the floppy disk drive turns off. 3 Push the eject button to remove the disk, and unplug the USB floppy disk drive from your computer. 4 Reconnect the floppy disk drive by plugging the USB cable into the USB port. 5 Restart the computer by...
... write-protected or disable the write-protect feature. You can either use a floppy disk that are still unable to write data to it, the disk may be full or write-protected. If you are accessing the floppy disk drive. 2 Wait until the indicator light on the taskbar when the drive is ... doesn't the Safely Remove Hardware and Eject Media icon appear on the floppy disk drive turns off. 3 Push the eject button to remove the disk, and unplug the USB floppy disk drive from your computer. 4 Reconnect the floppy disk drive by plugging the USB cable into the USB port. 5 Restart the computer by...

VPCJ1 Series Hard Disk Drive Replacement Instructions
Page 1
..., and the AC Adapter is not responsible for damage caused by the edges, away from the components shipped. VPCJ1 Series Hard Disk Drive Replacement Instructions IMPORTANT! o Do not walk around excessively as this promotes static build-up. Failure to do so can result...upwards to the computer's case.* Follow the ESD (Electrostatic Discharge) damage prevention instructions: o Hold parts by incorrect handling of these instructions. * Sony is disconnected. Stand Hard Drive Removal (Steps 2-6) Step 2. Place the computer upside down Put aside the Stand Screws to re- PLEASE READ...
..., and the AC Adapter is not responsible for damage caused by the edges, away from the components shipped. VPCJ1 Series Hard Disk Drive Replacement Instructions IMPORTANT! o Do not walk around excessively as this promotes static build-up. Failure to do so can result...upwards to the computer's case.* Follow the ESD (Electrostatic Discharge) damage prevention instructions: o Hold parts by incorrect handling of these instructions. * Sony is disconnected. Stand Hard Drive Removal (Steps 2-6) Step 2. Place the computer upside down Put aside the Stand Screws to re- PLEASE READ...

VPCJ1 Series Hard Disk Drive Replacement Instructions
Page 2
VPCJ1 Series Hard Disk Drive Replacement Instructions Lift To Remove Step 4. These screws can not be completely removed. They will stay enclosed in the procedure. To release the Power ...
VPCJ1 Series Hard Disk Drive Replacement Instructions Lift To Remove Step 4. These screws can not be completely removed. They will stay enclosed in the procedure. To release the Power ...

VPCJ1 Series Hard Disk Drive Replacement Instructions
Page 3
Reconnect the AC Adaptor. Verify the Step 17. Hold the Hard Drive on the back of the recovery disk's case. Power on your computer and continue with the recovery process by following the instructions described on the sides to secure the stand. Re... Screws holding the Hard Drive Assembly in place. Re-install the stand. Step 15. Return the old Hard Drive to Sony using the included shipping instructions. installation. VPCJ1 Series Hard Disk Drive Replacement Instructions Hard Drive Reinstallation (Steps 14-18) Step 13. Carefully turn the Hard Drive Assembly over, and insert...
Reconnect the AC Adaptor. Verify the Step 17. Hold the Hard Drive on the back of the recovery disk's case. Power on your computer and continue with the recovery process by following the instructions described on the sides to secure the stand. Re... Screws holding the Hard Drive Assembly in place. Re-install the stand. Step 15. Return the old Hard Drive to Sony using the included shipping instructions. installation. VPCJ1 Series Hard Disk Drive Replacement Instructions Hard Drive Reinstallation (Steps 14-18) Step 13. Carefully turn the Hard Drive Assembly over, and insert...

VPCJ1 Series Optical Disk Drive Replacement Instructions
Page 1
...may be wearing to prevent scratches to the surface of your computer on , eject the Optical Disk Drive (ODD). This slight difference does not affect the accuracy of these instructions. * Sony is located on a protected surface with the front edge facing you through the replacement process.... The Optical Disk Drive is not responsible for damage caused by the edges, away from the components shipped...
...may be wearing to prevent scratches to the surface of your computer on , eject the Optical Disk Drive (ODD). This slight difference does not affect the accuracy of these instructions. * Sony is located on a protected surface with the front edge facing you through the replacement process.... The Optical Disk Drive is not responsible for damage caused by the edges, away from the components shipped...

VPCJ1 Series Optical Disk Drive Replacement Instructions
Page 2
.... Move your fingers down to remove the entire Assembly. Step 9. Position the new ODD (Label side down ) and slide into the computer. VPCJ1 Series Optical Disk Drive Replacement Instructions Step 4. Using the ODD Screws, install NOTE: After installation, all brackets the ODD Brackets onto the new ODD. Align the ODD assembly...
.... Move your fingers down to remove the entire Assembly. Step 9. Position the new ODD (Label side down ) and slide into the computer. VPCJ1 Series Optical Disk Drive Replacement Instructions Step 4. Using the ODD Screws, install NOTE: After installation, all brackets the ODD Brackets onto the new ODD. Align the ODD assembly...

VPCJ1 Series Optical Disk Drive Replacement Instructions
Page 3
B 3/3 P/N 989201985 Rev. Reinstall the two (2) ODD Assembly screws to Sony following the included shipping instructions Step 12. Return the old ODD to secure the ODD Assembly. Snap the the new ODD Bezel on the edge of the computer. Step 13. Make sure the new ODD is seated flush on to the ODD Assembly to install. VPCJ1 Series Optical Disk Drive Replacement Instructions Reconnect the AC Adaptor.
B 3/3 P/N 989201985 Rev. Reinstall the two (2) ODD Assembly screws to Sony following the included shipping instructions Step 12. Return the old ODD to secure the ODD Assembly. Snap the the new ODD Bezel on the edge of the computer. Step 13. Make sure the new ODD is seated flush on to the ODD Assembly to install. VPCJ1 Series Optical Disk Drive Replacement Instructions Reconnect the AC Adaptor.


