VAIO User Guide
Page 3
... ...84 Connecting an i.LINK Device ...85 Connecting to a Network (LAN) ...87 Customizing Your VAIO Computer ...89 Setting the Password ...90 Setting Up Your Computer with VAIO Control Center...92 Using the Power Saving Modes ...93 Upgrading Your VAIO Computer...97 Adding and Removing Memory...98 Precautions ...109 On Handling the LCD Screen...110 On Using the Power Source...
... ...84 Connecting an i.LINK Device ...85 Connecting to a Network (LAN) ...87 Customizing Your VAIO Computer ...89 Setting the Password ...90 Setting Up Your Computer with VAIO Control Center...92 Using the Power Saving Modes ...93 Upgrading Your VAIO Computer...97 Adding and Removing Memory...98 Precautions ...109 On Handling the LCD Screen...110 On Using the Power Source...
VAIO User Guide
Page 97
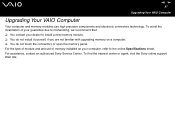
... nearest center or agent, visit the Sony online support Web site. nN 97 Upgrading Your VAIO Computer Upgrading Your VAIO Computer Your computer and memory modules use high precision components and electronic connectors technology. To avoid the invalidation of memory installed on your dealer to the online Specifications sheet. For assistance, contact an authorized Sony Service Center. For the type of...
... nearest center or agent, visit the Sony online support Web site. nN 97 Upgrading Your VAIO Computer Upgrading Your VAIO Computer Your computer and memory modules use high precision components and electronic connectors technology. To avoid the invalidation of memory installed on your dealer to the online Specifications sheet. For assistance, contact an authorized Sony Service Center. For the type of...
VAIO User Guide
Page 98
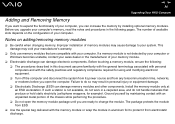
... workstation. The package protects the module from electrostatic discharge. Notes on the configuration of your computer. nN 98 Upgrading Your VAIO Computer Adding and Removing Memory If you want to expand the functionality of your computer, you can increase the memory by maintaining contact with an unpainted metal portion of the chassis while performing the procedure. ❑...
... workstation. The package protects the module from electrostatic discharge. Notes on the configuration of your computer. nN 98 Upgrading Your VAIO Computer Adding and Removing Memory If you want to expand the functionality of your computer, you can increase the memory by maintaining contact with an unpainted metal portion of the chassis while performing the procedure. ❑...
VAIO User Guide
Page 99
... ❑ Ambient temperature of the components and circuit boards inside your computer. nN 99 Upgrading Your VAIO Computer ❑ Introducing any liquids or any foreign substances or objects into the memory slots, or other internal components of the computer, will result in damage to the computer and any repair costs will not be covered by the warranty...
... ❑ Ambient temperature of the components and circuit boards inside your computer. nN 99 Upgrading Your VAIO Computer ❑ Introducing any liquids or any foreign substances or objects into the memory slots, or other internal components of the computer, will result in damage to the computer and any repair costs will not be covered by the warranty...
VAIO User Guide
Page 100
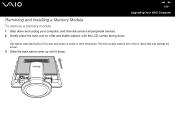
The work surface must be free of dirt or debris that may damage the screen. 3 Slide the back panel cover up until it stops. nN 100 Upgrading Your VAIO Computer Removing and Installing a Memory Module To remove a memory module 1 Shut down . ! Use caution when placing the LCD screen face-down on a flat and stable surface, with the LCD screen facing down and unplug your computer, and then disconnect all peripheral devices. 2 Gently place the main unit on a table or other flat surface.
The work surface must be free of dirt or debris that may damage the screen. 3 Slide the back panel cover up until it stops. nN 100 Upgrading Your VAIO Computer Removing and Installing a Memory Module To remove a memory module 1 Shut down . ! Use caution when placing the LCD screen face-down on a flat and stable surface, with the LCD screen facing down and unplug your computer, and then disconnect all peripheral devices. 2 Gently place the main unit on a table or other flat surface.

VAIO User Guide
Page 102
5 Lift the back panel cover away from the unit to remove. nN 102 Upgrading Your VAIO Computer 6 Remove the screws on the memory cover (1).
5 Lift the back panel cover away from the unit to remove. nN 102 Upgrading Your VAIO Computer 6 Remove the screws on the memory cover (1).

VAIO User Guide
Page 103
nN 103 Upgrading Your VAIO Computer 7 Disengage the memory cover tabs from the slots on the computer by lifting the edge of the memory cover, and then remove the memory cover. 8 Locate the memory module(s) you wish to remove. 9 Push down on the latches (1), located on both sides of the module, to gently eject it from the slot.
nN 103 Upgrading Your VAIO Computer 7 Disengage the memory cover tabs from the slots on the computer by lifting the edge of the memory cover, and then remove the memory cover. 8 Locate the memory module(s) you wish to remove. 9 Push down on the latches (1), located on both sides of the module, to gently eject it from the slot.

VAIO User Guide
Page 104
Store the module in a static-free bag. nN 104 Upgrading Your VAIO Computer 10 Grasp the memory module by the sides and remove from the main unit.
Store the module in a static-free bag. nN 104 Upgrading Your VAIO Computer 10 Grasp the memory module by the sides and remove from the main unit.

VAIO User Guide
Page 105
nN 105 Upgrading Your VAIO Computer To install a memory module 1 Remove the memory module from its anti-static package, handling it by the edges. 2 Locate the center notch (1) on the bottom edge of the module (2) into the slot ... is properly inserted when the side latches click into position, holding the memory module in the open module slot. 3 Firmly insert the lower edge of the memory module and align it to relieve pressure. To avoid damaging a memory module or the memory module slot, move the side latches slightly outward to the center notch...
nN 105 Upgrading Your VAIO Computer To install a memory module 1 Remove the memory module from its anti-static package, handling it by the edges. 2 Locate the center notch (1) on the bottom edge of the module (2) into the slot ... is properly inserted when the side latches click into position, holding the memory module in the open module slot. 3 Firmly insert the lower edge of the memory module and align it to relieve pressure. To avoid damaging a memory module or the memory module slot, move the side latches slightly outward to the center notch...

VAIO User Guide
Page 106
nN 106 Upgrading Your VAIO Computer 5 Align the memory cover tabs to the slots on the computer and gently press down on the cover until it snaps into place. 6 Replace the screws in the memory cover. 7 Place the back panel cover against the computer, aligning it to the tracks on each side (1).
nN 106 Upgrading Your VAIO Computer 5 Align the memory cover tabs to the slots on the computer and gently press down on the cover until it snaps into place. 6 Replace the screws in the memory cover. 7 Place the back panel cover against the computer, aligning it to the tracks on each side (1).

VAIO User Guide
Page 108
If the additional memory does not appear, repeat the whole procedure and restart the computer. nN 108 Upgrading Your VAIO Computer Viewing the Amount of Memory To view the amount of system memory. You can view the amount of memory 1 Turn on the computer. 2 Click Start, point to All Programs, and click VAIO Control Center. 3 Double-click the System Information folder in the VAIO Control Center window. 4 Double-click the System Information icon in the System Information folder.
If the additional memory does not appear, repeat the whole procedure and restart the computer. nN 108 Upgrading Your VAIO Computer Viewing the Amount of Memory To view the amount of system memory. You can view the amount of memory 1 Turn on the computer. 2 Click Start, point to All Programs, and click VAIO Control Center. 3 Double-click the System Information folder in the VAIO Control Center window. 4 Double-click the System Information icon in the System Information folder.
Marketing Specifications
Page 2
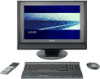
...• www.sony.com Last Updated 2005-04-06 ® Sony hereby disclaims any representations or warranty that a product contains an IEEE 1394 connector. Simulated graphic shown on hardware options. Intel and Pentium are trademarks of Intel Corporation. VGC-V617G VAIO® V ...Sony, i.LINK, VAIO Zone SonicStage, Memory Stick, Memory Stick PRO, Memory Stick Duo, DVgate Plus, PictureGear Studio, Giga Pocket, VAIO Media, Motion Reality, XBRITE, Click to vary or waive this product is compatible with any particular software packages and/or non-Sony add-on the Sony Desktop Computer...
...• www.sony.com Last Updated 2005-04-06 ® Sony hereby disclaims any representations or warranty that a product contains an IEEE 1394 connector. Simulated graphic shown on hardware options. Intel and Pentium are trademarks of Intel Corporation. VGC-V617G VAIO® V ...Sony, i.LINK, VAIO Zone SonicStage, Memory Stick, Memory Stick PRO, Memory Stick Duo, DVgate Plus, PictureGear Studio, Giga Pocket, VAIO Media, Motion Reality, XBRITE, Click to vary or waive this product is compatible with any particular software packages and/or non-Sony add-on the Sony Desktop Computer...


