User Guide
Page 3
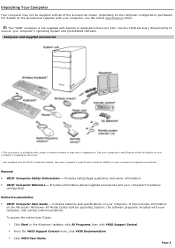
... c omputer's s pec ific ation s heet for details on the Microsoft® Windows® XP Media Center Edition operating system1, the software programs included with your computer, and solving common problems. To access the online User Guide: 1. Online Documentation VAIO® Com puter User Guide - Provides information about supplied accessories and your computer's supplied accessories. Click VAIO User Guide. Click Start in appearanc e. For details on your computer's hardware configuration.
... c omputer's s pec ific ation s heet for details on the Microsoft® Windows® XP Media Center Edition operating system1, the software programs included with your computer, and solving common problems. To access the online User Guide: 1. Online Documentation VAIO® Com puter User Guide - Provides information about supplied accessories and your computer's supplied accessories. Click VAIO User Guide. Click Start in appearanc e. For details on your computer's hardware configuration.
User Guide
Page 4
.... From the VAIO Support Central menu, click VAIO Documentation. 3. Click the Manuals/Specs/Warranty button and follow the on your VAIO computer. create ATRAC CDs for slide shows; To access this software information: 1. Other Page 4 To view the online specifications sheet: 1. The online specifications sheet provides information about hard disk drive recovery: 1. Review the specifications sheet to verify supplied accessories and the operating system installed on -screen instructions to the Sony online support Web site...
.... From the VAIO Support Central menu, click VAIO Documentation. 3. Click the Manuals/Specs/Warranty button and follow the on your VAIO computer. create ATRAC CDs for slide shows; To access this software information: 1. Other Page 4 To view the online specifications sheet: 1. The online specifications sheet provides information about hard disk drive recovery: 1. Review the specifications sheet to verify supplied accessories and the operating system installed on -screen instructions to the Sony online support Web site...
User Guide
Page 9
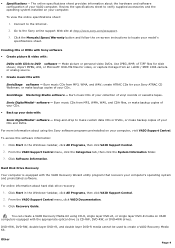
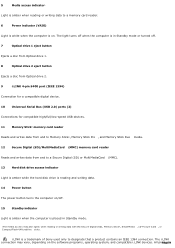
All proPdaugcets9 5 Media access indicator1 Light is amber when reading or writing data to a memory card reader. 6 Power indicator (VAIO) Light is white when the computer is a trademark of Sony used only to a Secure Digital (SD) or MultiMediaCard (MMC). 13 Hard disk drive access indicator Light is amber while the hard disk drive is reading and writing data. 14 Power button The power button turns the computer on the software programs, operating system, and compatible i.LINK devices. i.LINK...
All proPdaugcets9 5 Media access indicator1 Light is amber when reading or writing data to a memory card reader. 6 Power indicator (VAIO) Light is white when the computer is a trademark of Sony used only to a Secure Digital (SD) or MultiMediaCard (MMC). 13 Hard disk drive access indicator Light is amber while the hard disk drive is reading and writing data. 14 Power button The power button turns the computer on the software programs, operating system, and compatible i.LINK devices. i.LINK...
User Guide
Page 12
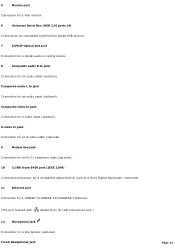
... digital device, such as a Sony Digital Handycam® camcorder. 11 Ethernet port Connection for a 10BASE-T/100BASE-TX/1000BASE-T Ethernet. (The port marked with (Network) is for LAN connections only.) 12 Microphone jack Connection for a video cable (optional). Front/Headphones jack Page 12 Composite video In jack2 Connection for a microphone (optional). 5 Monitor port1 Connection for a VGA monitor. 6 Universal Serial Bus (USB 2.0) ports (4) Connections for compatible high/full/low-speed USB devices. 7 S/PDIF Optical Out port Connection for a digital audio or optical device...
... digital device, such as a Sony Digital Handycam® camcorder. 11 Ethernet port Connection for a 10BASE-T/100BASE-TX/1000BASE-T Ethernet. (The port marked with (Network) is for LAN connections only.) 12 Microphone jack Connection for a video cable (optional). Front/Headphones jack Page 12 Composite video In jack2 Connection for a microphone (optional). 5 Monitor port1 Connection for a VGA monitor. 6 Universal Serial Bus (USB 2.0) ports (4) Connections for compatible high/full/low-speed USB devices. 7 S/PDIF Optical Out port Connection for a digital audio or optical device...
User Guide
Page 16
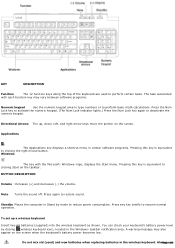
... The task associated with the Microsoft® Windows® logo, displays the Start menu. Mute Turns the sound off. Windows The key with each function key may also appear on the screen when the keyboard's battery power becomes low. Do not mix old (used to deactivate the numeric keypad. KEY DESCRIPTION Function The 12 function keys along the top of the keyboard are used ) and new batteries when replacing batteries in the wireless keyboard.
... The task associated with the Microsoft® Windows® logo, displays the Start menu. Mute Turns the sound off. Windows The key with each function key may also appear on the screen when the keyboard's battery power becomes low. Do not mix old (used to deactivate the numeric keypad. KEY DESCRIPTION Function The 12 function keys along the top of the keyboard are used ) and new batteries when replacing batteries in the wireless keyboard.
User Guide
Page 26
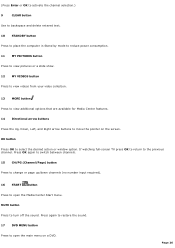
... restore the sound. 17 DVD MENU button Press to open the Media Center Start menu. OK button Press OK to turn off the sound. Press OK again to switch between channels. 15 CH/PG (Channel/Page) button Press to change or page up/down channels (no number input required). 16 START button Press to open the main menu on the screen. MUTE button Press to select the desired action or window option. If watching full-screen...
... restore the sound. 17 DVD MENU button Press to open the Media Center Start menu. OK button Press OK to turn off the sound. Press OK again to switch between channels. 15 CH/PG (Channel/Page) button Press to change or page up/down channels (no number input required). 16 START button Press to open the main menu on the screen. MUTE button Press to select the desired action or window option. If watching full-screen...

User Guide
Page 28
... the i.LINK Port Your VAIO® computer is equipped with a 4-pin and a 6-pin i.LINK® port. Page 28 A 4-pin i.LINK port cannot supply power to locate the i.LINK port on your compatible i.LINK device and on installation and use. The total power supplied by the 6-pin i.LINK port does not exceed 6 watts. See the instructions supplied with your computer. Plug the other end of the cable into this port. 2. Plug the i.LINK cable connector into the...
... the i.LINK Port Your VAIO® computer is equipped with a 4-pin and a 6-pin i.LINK® port. Page 28 A 4-pin i.LINK port cannot supply power to locate the i.LINK port on your compatible i.LINK device and on installation and use. The total power supplied by the 6-pin i.LINK port does not exceed 6 watts. See the instructions supplied with your computer. Plug the other end of the cable into this port. 2. Plug the i.LINK cable connector into the...

User Guide
Page 29
See the online Specifications sheet for your computer's hardware configuration. Connecting a Display (Monitor) Connecting the Radio Frequency Receiver Connecting a Wireless Keyboard Connecting the Wireless Optical Mouse Connecting the Keyboard and Mouse Connecting 5.1 (6-Channel) Speaker Systems Configuring Software for Your Speaker System Configuring Software for Your Speaker System Connecting the Power Cords Turning On Your Computer Page 29 The location of the hardware features described in this ...
See the online Specifications sheet for your computer's hardware configuration. Connecting a Display (Monitor) Connecting the Radio Frequency Receiver Connecting a Wireless Keyboard Connecting the Wireless Optical Mouse Connecting the Keyboard and Mouse Connecting 5.1 (6-Channel) Speaker Systems Configuring Software for Your Speaker System Configuring Software for Your Speaker System Connecting the Power Cords Turning On Your Computer Page 29 The location of the hardware features described in this ...

User Guide
Page 30
Plug the display's cable into the rear of the display. Page 30 To connect a display Install your equipment so that you can easily reach the power outlet in the event of an emergency. If necessary, plug the display's cable into the appropriate monitor port. 2. See the specifications sheet for details about your computer's hardware configuration 1. Connecting a Display (Monitor) The location, availability, and type of the monitor port may vary, depending on the Sony Online Support Web site at http://www.sony.com/pcsupport, for your computer on the model purchased.
Plug the display's cable into the rear of the display. Page 30 To connect a display Install your equipment so that you can easily reach the power outlet in the event of an emergency. If necessary, plug the display's cable into the appropriate monitor port. 2. See the specifications sheet for details about your computer's hardware configuration 1. Connecting a Display (Monitor) The location, availability, and type of the monitor port may vary, depending on the Sony Online Support Web site at http://www.sony.com/pcsupport, for your computer on the model purchased.
User Guide
Page 37
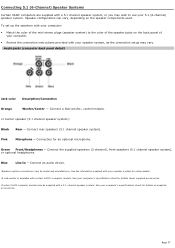
Connect the supplied speakers (2-channel), front speakers (5.1 channel speaker system), or optional headphones. Connect an audio device. 1Speaker s ys tem c onnec tions vary by model and manufac turer. Audio jacks (com puter back panel detail) Jack color Description/Connection Orange Woofer/Center1 - Connect a Sub-woofer2, control module, or Center speaker (5.1 channel speaker system3) Black Rear - Blue Line In - Connection for details on the speaker components used. See your c omputer's s pec ific ation s heet for...
Connect the supplied speakers (2-channel), front speakers (5.1 channel speaker system), or optional headphones. Connect an audio device. 1Speaker s ys tem c onnec tions vary by model and manufac turer. Audio jacks (com puter back panel detail) Jack color Description/Connection Orange Woofer/Center1 - Connect a Sub-woofer2, control module, or Center speaker (5.1 channel speaker system3) Black Rear - Blue Line In - Connection for details on the speaker components used. See your c omputer's s pec ific ation s heet for...

User Guide
Page 44
... 44 Your VAIO® computer is determined by the type of connecting your computer, TV monitor or display, and TV programming access, is supplied with certain video cables. See the online Specifications sheet for your computer. Setting Up TV Connections The best method of cable service connection available in your home. Your computer's hardware configuration may require extra cables, adapters or connection equipment that are optional for details about your computer's hardware configuration.
... 44 Your VAIO® computer is determined by the type of connecting your computer, TV monitor or display, and TV programming access, is supplied with certain video cables. See the online Specifications sheet for your computer. Setting Up TV Connections The best method of cable service connection available in your home. Your computer's hardware configuration may require extra cables, adapters or connection equipment that are optional for details about your computer's hardware configuration.
User Guide
Page 70
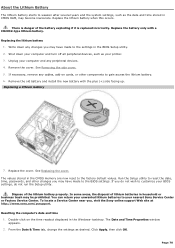
... Removing the side cover. 5. Replace the cover. To locate a Service Center near you may become inaccurate. Click Apply, then click OK. Write down your nearest Sony Service Center or Factory Service Center. Remove the old battery and install the new battery with a CR2032-type lithium battery. The Date and Time Properties window appears. 2. There is replaced incorrectly. Unplug your printer. 3. Remove the cover. Replacing a lithium battery 7. The values stored in the BIOS Setup utility. 2. Run the Setup utility to reset the date, time, passwords...
... Removing the side cover. 5. Replace the cover. To locate a Service Center near you may become inaccurate. Click Apply, then click OK. Write down your nearest Sony Service Center or Factory Service Center. Remove the old battery and install the new battery with a CR2032-type lithium battery. The Date and Time Properties window appears. 2. There is replaced incorrectly. Unplug your printer. 3. Remove the cover. Replacing a lithium battery 7. The values stored in the BIOS Setup utility. 2. Run the Setup utility to reset the date, time, passwords...

User Guide
Page 71
... the new hard disk drive, such as your new hard disk drive before attempting to DVD software program creates the new save files created with your printer. 2. From the Performance and Maintenance window, click VAIO Recovery Wizard. Shut down your computer and turn off all peripheral devices, such as drive E or J, the Click to install it in this section. This new folder is not supplied with open internal bays to access the Sony online support Web...
... the new hard disk drive, such as your new hard disk drive before attempting to DVD software program creates the new save files created with your printer. 2. From the Performance and Maintenance window, click VAIO Recovery Wizard. Shut down your computer and turn off all peripheral devices, such as drive E or J, the Click to install it in this section. This new folder is not supplied with open internal bays to access the Sony online support Web...
User Guide
Page 73
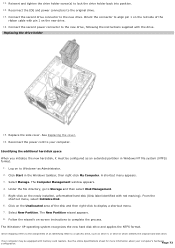
...select Disk Management. 5. Connect the second power connector to your c omputer's hardware c onfiguration. Select New Partition. Replacing the driv e holder 15. Log on the newly installed, unformatted hard disk (Disk label identified with memory c ard readers . Reconnect the IDE and power connectors to Windows® as s ignment of an identifying letter to display a shortcut menu. 7. Reconnect the power cord to the new drive, following the instructions supplied with pin 1 on -screen instructions to the new drive. Identifying the additional hard disk space...
...select Disk Management. 5. Connect the second power connector to your c omputer's hardware c onfiguration. Select New Partition. Replacing the driv e holder 15. Log on the newly installed, unformatted hard disk (Disk label identified with memory c ard readers . Reconnect the IDE and power connectors to Windows® as s ignment of an identifying letter to display a shortcut menu. 7. Reconnect the power cord to the new drive, following the instructions supplied with pin 1 on -screen instructions to the new drive. Identifying the additional hard disk space...
User Guide
Page 97
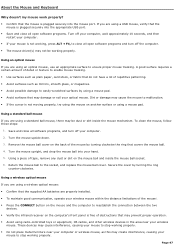
... optical mouse. Using a piece of tape, remove any dust or dirt on the computer's front panel is free of the mouse2. Press the CONNECT button on the mouse and the computer to reestablish the connection between the two devices. Verify the infrared receiver on the mouse ball and inside the mouse mechanism. Using a wireless optical mouse If you are properly installed. To maintain good communication, operate your wireless mouse...
... optical mouse. Using a piece of tape, remove any dust or dirt on the computer's front panel is free of the mouse2. Press the CONNECT button on the mouse and the computer to reestablish the connection between the two devices. Verify the infrared receiver on the mouse ball and inside the mouse mechanism. Using a wireless optical mouse If you are properly installed. To maintain good communication, operate your wireless mouse...

User Guide
Page 99
Using an optical mouse If you are using a USB mouse, verify that the mouse is plugged securely into the mouse port. Remove the mouse ball cover on the computer's front panel is not moving properly, try using the mouse on the mouse ball and inside the mouse mechanism. Using a wireless optical mouse If you are using a standard ball mouse, there may be working properly. Using a standard ball mouse If you are properly installed. To maintain good communication, operate your wireless mouse within...
Using an optical mouse If you are using a USB mouse, verify that the mouse is plugged securely into the mouse port. Remove the mouse ball cover on the computer's front panel is not moving properly, try using the mouse on the mouse ball and inside the mouse mechanism. Using a wireless optical mouse If you are using a standard ball mouse, there may be working properly. Using a standard ball mouse If you are properly installed. To maintain good communication, operate your wireless mouse within...

User Guide
Page 115
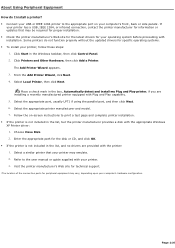
...; Connect your USB or IEEE 1284 printer to the appropriate port on -screen instructions to the user manual or guide supplied with installation. From the Add Printer Wizard, click Next. 4. Select Local Printer, then click Next. Place a check mark in the list, and no drivers are installing a recently manufactured printer equipped with the appropriate Windows XP Printer driver: 1. Visit the printer manufacturer's Web site for technical support. 1T...
...; Connect your USB or IEEE 1284 printer to the appropriate port on -screen instructions to the user manual or guide supplied with installation. From the Add Printer Wizard, click Next. 4. Select Local Printer, then click Next. Place a check mark in the list, and no drivers are installing a recently manufactured printer equipped with the appropriate Windows XP Printer driver: 1. Visit the printer manufacturer's Web site for technical support. 1T...
User Guide
Page 116
... manufacturer's Web site for the latest drivers for your operating system before proceeding with installation. Enter the appropriate path for information or updates that your USB or IEEE 1284 printer to the appropriate port on -screen instructions to the user manual or guide supplied with the appropriate Windows XP Printer driver: 1. If your printer has a USB, IEEE 1284, or infrared connection, contact the printer manufacturer for the...
... manufacturer's Web site for the latest drivers for your operating system before proceeding with installation. Enter the appropriate path for information or updates that your USB or IEEE 1284 printer to the appropriate port on -screen instructions to the user manual or guide supplied with the appropriate Windows XP Printer driver: 1. If your printer has a USB, IEEE 1284, or infrared connection, contact the printer manufacturer for the...
User Guide
Page 126
... button and follow the on-screen instructions to use the software and locate troubleshooting support, should problems occur. The online User Guide provides information about supplied accessories and your computer's hardware configuration. RAID Systems1 - To view the online specifications sheet: 1. From the VAIO Central menu, click the Categories tab, then click the System Information folder. 3. See the online s pec ific ations s heet for Sony® s oftware programs by accessing...
... button and follow the on-screen instructions to use the software and locate troubleshooting support, should problems occur. The online User Guide provides information about supplied accessories and your computer's hardware configuration. RAID Systems1 - To view the online specifications sheet: 1. From the VAIO Central menu, click the Categories tab, then click the System Information folder. 3. See the online s pec ific ations s heet for Sony® s oftware programs by accessing...
User Guide
Page 131
.... VAIO® computer type. 2. Operating system. 5. Sony Customer Information Services Center If other support options do not resolve your issue, you can access the Web site at 1-888-476-6972. 1T he s erial number is loc ated on using your computer's hardware and software features. Links that enable you to: quickly find the nearest Sony service center locations. arrange for repairs or check repair status. review warranty...
.... VAIO® computer type. 2. Operating system. 5. Sony Customer Information Services Center If other support options do not resolve your issue, you can access the Web site at 1-888-476-6972. 1T he s erial number is loc ated on using your computer's hardware and software features. Links that enable you to: quickly find the nearest Sony service center locations. arrange for repairs or check repair status. review warranty...


