Warranty Card
Page 1
Please contact Sony at no charge. 2. This warranty gives you specific legal rights, and you may not apply to you must be presented to obtain warranty service. This warranty does not cover customer instruction, installation, set up adjustments or signal reception problems. This warranty does not cover cosmetic damage or damage due to acts of God, accident, misuse, abuse, negligence, commercial use, or modification of, or...
Please contact Sony at no charge. 2. This warranty gives you specific legal rights, and you may not apply to you must be presented to obtain warranty service. This warranty does not cover customer instruction, installation, set up adjustments or signal reception problems. This warranty does not cover cosmetic damage or damage due to acts of God, accident, misuse, abuse, negligence, commercial use, or modification of, or...
Operating Instructions
Page 2
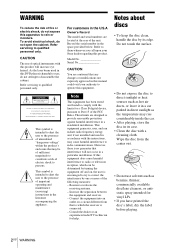
For customers in the U.S.A Owner's Record The model and serial numbers are located at the rear of important operating and maintenance (servicing) instructions in the literature accompanying the appliance. Model No Serial No CAUTION You are designed to provide reasonable protection against harmful interference in its edge. Do not touch the surface. • Do not expose the disc to direct sunlight or heat sources...
For customers in the U.S.A Owner's Record The model and serial numbers are located at the rear of important operating and maintenance (servicing) instructions in the literature accompanying the appliance. Model No Serial No CAUTION You are designed to provide reasonable protection against harmful interference in its edge. Do not touch the surface. • Do not expose the disc to direct sunlight or heat sources...
Operating Instructions
Page 6
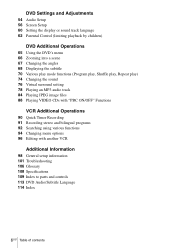
DVD Settings and Adjustments 54 Audio Setup 56 Screen Setup 60 Setting the display or sound track language 62 Parental Control (limiting playback by children) DVD Additional Operations 65 Using the DVD's menu 66 Zooming into a scene 67 Changing the angles 68 Displaying the subtitle 70 Various play mode functions (Program play, Shuffle play, Repeat play) 74 Changing the sound 76 Virtual surround setting 78 Playing an MP3 audio track 84 Playing JPEG image files 88 Playing VIDEO CDs with "PBC ON/OFF" Functions VCR Additional Operations 90 Quick Timer Recording 91 Recording stereo and bilingual ...
DVD Settings and Adjustments 54 Audio Setup 56 Screen Setup 60 Setting the display or sound track language 62 Parental Control (limiting playback by children) DVD Additional Operations 65 Using the DVD's menu 66 Zooming into a scene 67 Changing the angles 68 Displaying the subtitle 70 Various play mode functions (Program play, Shuffle play, Repeat play) 74 Changing the sound 76 Virtual surround setting 78 Playing an MP3 audio track 84 Playing JPEG image files 88 Playing VIDEO CDs with "PBC ON/OFF" Functions VCR Additional Operations 90 Quick Timer Recording 91 Recording stereo and bilingual ...
Operating Instructions
Page 11
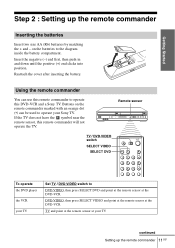
... DVD-VCR and a Sony TV. Remote sensor TV / DVD·VIDEO switch SELECT VIDEO SELECT DVD To operate the DVD player the VCR your TV Set TV / DVD·VIDEO switch to operate your TV continued Setting up the remote commander Inserting the batteries Insert two size AA (R6) batteries by matching the + and - Using the remote commander You can be used to DVD·VIDEO, then press SELECT DVD and point at the remote sensor at the DVD-VCR DVD·VIDEO, then press SELECT VIDEO and...
... DVD-VCR and a Sony TV. Remote sensor TV / DVD·VIDEO switch SELECT VIDEO SELECT DVD To operate the DVD player the VCR your TV Set TV / DVD·VIDEO switch to operate your TV continued Setting up the remote commander Inserting the batteries Insert two size AA (R6) batteries by matching the + and - Using the remote commander You can be used to DVD·VIDEO, then press SELECT DVD and point at the remote sensor at the DVD-VCR DVD·VIDEO, then press SELECT VIDEO and...

Operating Instructions
Page 14
... to disconnect the AC power cord of each component before the connections are many scrambled channels Use Hookup 1 A or B (Plug and Play) Hookup 1 C (Plug and Play) Hookup 2 Refer to set up . Then use and operation of your TV does not have A/V inputs, go directly to one of the TV receiver should be connected to the grounding system of the building, as close to do so may...
... to disconnect the AC power cord of each component before the connections are many scrambled channels Use Hookup 1 A or B (Plug and Play) Hookup 1 C (Plug and Play) Hookup 2 Refer to set up . Then use and operation of your TV does not have A/V inputs, go directly to one of the TV receiver should be connected to the grounding system of the building, as close to do so may...
Operating Instructions
Page 20
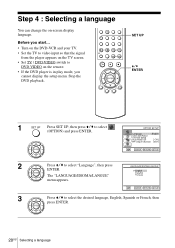
... language, English, Spanish or French, then press ENTER. 20US Selecting a language Step 4 : Selecting a language You can change the on the remote. • If the DVD player is in play mode, you cannot display the setup menu. Before you start... • Turn on the DVD-VCR and your TV. • Set the TV to video input so that the signal from the player appears on the TV screen. • Set TV / DVD·VIDEO switch to DVD·VIDEO on -screen display language. Stop the DVD playback...
... language, English, Spanish or French, then press ENTER. 20US Selecting a language Step 4 : Selecting a language You can change the on the remote. • If the DVD player is in play mode, you cannot display the setup menu. Before you start... • Turn on the DVD-VCR and your TV. • Set the TV to video input so that the signal from the player appears on the TV screen. • Set TV / DVD·VIDEO switch to DVD·VIDEO on -screen display language. Stop the DVD playback...
Operating Instructions
Page 22
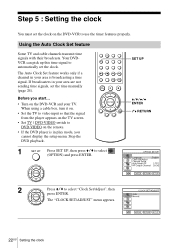
... TV. Stop the DVD playback. Using the Auto Clock Set feature Some TV and cable channels transmit time signals with their broadcasts. Your DVDVCR can pick up this time signal to automatically set the clock on the DVD-VCR to use the timer features properly. Before you cannot display the setup menu. When using a cable box, turn it on. • Set the TV to video input so that the signal from the player appears on the TV screen. • Set TV / DVD·VIDEO switch to select "Clock Set/Adjust", then...
... TV. Stop the DVD playback. Using the Auto Clock Set feature Some TV and cable channels transmit time signals with their broadcasts. Your DVDVCR can pick up this time signal to automatically set the clock on the DVD-VCR to use the timer features properly. Before you cannot display the setup menu. When using a cable box, turn it on. • Set the TV to video input so that the signal from the player appears on the TV screen. • Set TV / DVD·VIDEO switch to select "Clock Set/Adjust", then...
Operating Instructions
Page 24
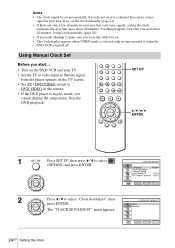
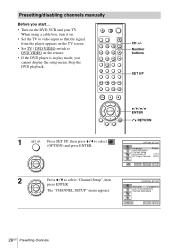
Stop the DVD playback. Notes • The clock cannot be set the clock manually (page 24). • If you made Hookup 2, make sure you do not receive a channel that carries a time signal in play mode, you cannot display the setup menu. SET UP V/v/B/b ENTER 1 Press SET UP, then press V/v to select (OPTION) and press ENTER. 2 Press V/v to about 20 minutes, set automatically if you leave the cable box on. • The clock display appears when VIDEO mode is...
Stop the DVD playback. Notes • The clock cannot be set the clock manually (page 24). • If you made Hookup 2, make sure you do not receive a channel that carries a time signal in play mode, you cannot display the setup menu. SET UP V/v/B/b ENTER 1 Press SET UP, then press V/v to select (OPTION) and press ENTER. 2 Press V/v to about 20 minutes, set automatically if you leave the cable box on. • The clock display appears when VIDEO mode is...

Operating Instructions
Page 26
... which channels you cannot display the setup menu. Then, if there are any unwanted channels, disable them directly using automatic presetting methods. Stop the DVD playback. Presetting all receivable channels automatically Before you preset the receivable channels in play mode, you wish to preset, set them manually. First, we recommend that the signal from the player appears on the TV screen. • Set TV / DVD·VIDEO switch to DVD·VIDEO on the DVD-VCR and your area using manual presetting...
... which channels you cannot display the setup menu. Then, if there are any unwanted channels, disable them directly using automatic presetting methods. Stop the DVD playback. Presetting all receivable channels automatically Before you preset the receivable channels in play mode, you wish to preset, set them manually. First, we recommend that the signal from the player appears on the TV screen. • Set TV / DVD·VIDEO switch to DVD·VIDEO on the DVD-VCR and your area using manual presetting...
Operating Instructions
Page 28
... select (OPTION) and press ENTER. 2 Press V/v to DVD·VIDEO on the remote. • If the DVD player is in play mode, you start... • Turn on the TV screen. • Set TV / DVD·VIDEO switch to select "Channel Setup", then press ENTER. When using a cable box, turn it on. • Set the TV to video input so that the signal from the player appears on the DVD-VCR and your TV. The "CHANNEL SETUP" menu appears. 28US Presetting channels Stop the DVD playback...
... select (OPTION) and press ENTER. 2 Press V/v to DVD·VIDEO on the remote. • If the DVD player is in play mode, you start... • Turn on the TV screen. • Set TV / DVD·VIDEO switch to select "Channel Setup", then press ENTER. When using a cable box, turn it on. • Set the TV to video input so that the signal from the player appears on the DVD-VCR and your TV. The "CHANNEL SETUP" menu appears. 28US Presetting channels Stop the DVD playback...
Operating Instructions
Page 35
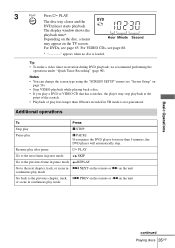
... can change the screen type using the "SCREEN SETUP" menu (see "Screen Setup" on the unit or scene in continuous play lists longer than 5 minutes, the DVD player will automatically stop playback at the point of the scratch. • Playback of play mode Basic Operations continued Playing discs 35US Additional operations To Press Stop play x STOP Pause play mode Go back to the next chapter, track, or scene in VR mode is loaded. The disc tray closes and the DVD player starts playback. 3 Press H PLAY. PREV...
... can change the screen type using the "SCREEN SETUP" menu (see "Screen Setup" on the unit or scene in continuous play lists longer than 5 minutes, the DVD player will automatically stop playback at the point of the scratch. • Playback of play mode Basic Operations continued Playing discs 35US Additional operations To Press Stop play x STOP Pause play mode Go back to the next chapter, track, or scene in VR mode is loaded. The disc tray closes and the DVD player starts playback. 3 Press H PLAY. PREV...
Operating Instructions
Page 47
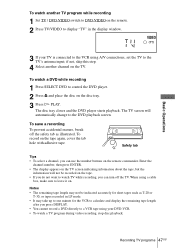
... a DVD while recording 1 Press SELECT DVD to control the DVD player. 2 Press Z and place the disc on the disc tray. 3 Press H PLAY. The TV screen will not be indicated accurately for the VCR to calculate and display the remaining tape length after you press DISPLAY. • You cannot record a DVD directly to a VCR tape using your TV is connected to the VCR using a cable box, make sure to the DVD playback screen. When using A/V connections, set the TV to the TV's antenna input...
... a DVD while recording 1 Press SELECT DVD to control the DVD player. 2 Press Z and place the disc on the disc tray. 3 Press H PLAY. The TV screen will not be indicated accurately for the VCR to calculate and display the remaining tape length after you press DISPLAY. • You cannot record a DVD directly to a VCR tape using your TV is connected to the VCR using a cable box, make sure to the DVD playback screen. When using A/V connections, set the TV to the TV's antenna input...
Operating Instructions
Page 48
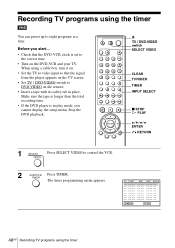
... safety tab in play mode, you start... • Check that the signal from the player appears on the TV screen. • Set TV / DVD·VIDEO switch to control the VCR. 2 Press TIMER. Z TV / DVD·VIDEO switch SELECT VIDEO CLEAR TV/VIDEO TIMER INPUT SELECT x STOP H PLAY V/v/B/b ENTER O RETURN 1 Press SELECT VIDEO to DVD·VIDEO on the DVD-VCR and your TV. When using a cable box, turn it on. • Set the TV to video input so that the DVD-VCR clock is in place. Recording TV programs using the timer
... safety tab in play mode, you start... • Check that the signal from the player appears on the TV screen. • Set TV / DVD·VIDEO switch to control the VCR. 2 Press TIMER. Z TV / DVD·VIDEO switch SELECT VIDEO CLEAR TV/VIDEO TIMER INPUT SELECT x STOP H PLAY V/v/B/b ENTER O RETURN 1 Press SELECT VIDEO to DVD·VIDEO on the DVD-VCR and your TV. When using a cable box, turn it on. • Set the TV to video input so that the DVD-VCR clock is in place. Recording TV programs using the timer
Operating Instructions
Page 50
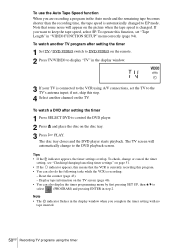
... timer settings overlap. The disc tray closes and the DVD player starts playback. Note • The indicator flashes in the display window when you are recording a program in "VIDEO FUNCTION SETUP" menu correctly (page 94). if not, skip this program. • You can also display the timer programming menu by first pressing SET UP, then V/v to the DVD playback screen. To use the Auto Tape Speed function When you complete the timer setting with no tape inserted. 50US Recording TV programs using A/V connections, set...
... timer settings overlap. The disc tray closes and the DVD player starts playback. Note • The indicator flashes in the display window when you are recording a program in "VIDEO FUNCTION SETUP" menu correctly (page 94). if not, skip this program. • You can also display the timer programming menu by first pressing SET UP, then V/v to the DVD playback screen. To use the Auto Tape Speed function When you complete the timer setting with no tape inserted. 50US Recording TV programs using A/V connections, set...

Operating Instructions
Page 51
... in play mode, you cannot display the setup menu. Basic Operations continued Checking/changing/canceling timer settings 51US Stop the DVD playback. The timer programming menu appears. Checking/changing/canceling timer settings Before you start... • Check that the signal from the player appears on the TV screen. • Set TV / DVD·VIDEO switch to DVD·VIDEO on the DVD-VCR and your TV. When using a cable box or a decoder, turn it on. • Set the TV to control the VCR. 2 Press TIMER. SELECT VIDEO CLEAR TIMER V/v/B/b ENTER...
... in play mode, you cannot display the setup menu. Basic Operations continued Checking/changing/canceling timer settings 51US Stop the DVD playback. The timer programming menu appears. Checking/changing/canceling timer settings Before you start... • Check that the signal from the player appears on the TV screen. • Set TV / DVD·VIDEO switch to DVD·VIDEO on the DVD-VCR and your TV. When using a cable box or a decoder, turn it on. • Set the TV to control the VCR. 2 Press TIMER. SELECT VIDEO CLEAR TIMER V/v/B/b ENTER...

Operating Instructions
Page 63
... a 4-digit password using the number buttons. The options are as follows. 3 Press b to "No," "PASSWORD CHECK" screen will not appear. After registering a password, if you set "Use Password" to set the parental control. • If you have already registered a password The display for confirming the password appears. Enter a 4-digit password using the number buttons. The display for entering the password appears. DVD Settings and Adjustments 4 Press V/v to select "Rating Level," then press ENTER. 5 Press V/v to exit the menu. Level...
... a 4-digit password using the number buttons. The options are as follows. 3 Press b to "No," "PASSWORD CHECK" screen will not appear. After registering a password, if you set "Use Password" to set the parental control. • If you have already registered a password The display for confirming the password appears. Enter a 4-digit password using the number buttons. The display for entering the password appears. DVD Settings and Adjustments 4 Press V/v to select "Rating Level," then press ENTER. 5 Press V/v to exit the menu. Level...

Operating Instructions
Page 70
... control the DVD player. 2 Press REPEAT when the DVD player is canceled when: - Notes • The play the contents of a disc in stop mode. 70US Various play mode functions (Program play, Shuffle play, Repeat play ) Before you start... • Set TV / DVD·VIDEO switch to DVD·VIDEO on the disc to 20 tracks. SELECT DVD CLEAR REPEAT H PLAY V/v/B/b ENTER Creating your own program (Program play) You can program up to create your own program. You can play mode is in the order you open the disc tray...
... control the DVD player. 2 Press REPEAT when the DVD player is canceled when: - Notes • The play the contents of a disc in stop mode. 70US Various play mode functions (Program play, Shuffle play, Repeat play ) Before you start... • Set TV / DVD·VIDEO switch to DVD·VIDEO on the disc to 20 tracks. SELECT DVD CLEAR REPEAT H PLAY V/v/B/b ENTER Creating your own program (Program play) You can program up to create your own program. You can play mode is in the order you open the disc tray...
Operating Instructions
Page 103
... discs (page 7). • The region code on the DVD does not match the player. • Moisture has condensed inside the player (page 3). • The player cannot play has taken effect (page 37). The language for the sound track cannot be changed. • Try using the DVD's menu instead of the direct selection button on the remote (page 65). • Multilingual tracks are displayed as stop, search, slow-motion play, repeat play, shuffle play, or program play audio...
... discs (page 7). • The region code on the DVD does not match the player. • Moisture has condensed inside the player (page 3). • The player cannot play has taken effect (page 37). The language for the sound track cannot be changed. • Try using the DVD's menu instead of the direct selection button on the remote (page 65). • Multilingual tracks are displayed as stop, search, slow-motion play, repeat play, shuffle play, or program play audio...

Operating Instructions
Page 104
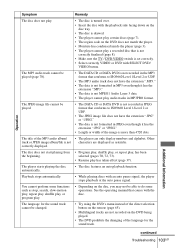
... Troubleshooting Select a channel number when recording TV programs; The tape is not clear. • Adjust the tracking with the INPUT SELECT or CH +/- If on this tape, inserted. Clean the video heads using the DVD's menu instead of the direct selection button on the remote (page 65). • Multi-angles are not recorded on the DVD being played. • The DVD prohibits the changing of the angles. Consult your nearest Sony dealer (a standard service fee...
... Troubleshooting Select a channel number when recording TV programs; The tape is not clear. • Adjust the tracking with the INPUT SELECT or CH +/- If on this tape, inserted. Clean the video heads using the DVD's menu instead of the direct selection button on the remote (page 65). • Multi-angles are not recorded on the DVD being played. • The DVD prohibits the changing of the angles. Consult your nearest Sony dealer (a standard service fee...

Marketing Specifications
Page 2
... change without written permission is prohibited. SLV-D370P DVD/VCR Progressive Scan Combo Player Features General Background Graphics: Yes Video DVD Playback: Yes1 Precision Cinema Progressive™ Technology: Yes Screen Saver: Yes SVCD Playback: Yes1 VCD Playback: Yes1 DVD+R Read Compatibility: Yes1 DVD+RW Read Compatibility: Yes1 DVD-R Read Compatibility: Yes1 DVD-RW Read Compatibility: Yes1 Heads: Yes (Four heads, 19 Micron) Audio CD Playback: Yes1 dts® Output: Yes Hybrid Pulse D/A Converter: Yes Dolby® Digital: Yes Specifications General Disc Changer: 1 Tray Type: DVD-Tray...
... change without written permission is prohibited. SLV-D370P DVD/VCR Progressive Scan Combo Player Features General Background Graphics: Yes Video DVD Playback: Yes1 Precision Cinema Progressive™ Technology: Yes Screen Saver: Yes SVCD Playback: Yes1 VCD Playback: Yes1 DVD+R Read Compatibility: Yes1 DVD+RW Read Compatibility: Yes1 DVD-R Read Compatibility: Yes1 DVD-RW Read Compatibility: Yes1 Heads: Yes (Four heads, 19 Micron) Audio CD Playback: Yes1 dts® Output: Yes Hybrid Pulse D/A Converter: Yes Dolby® Digital: Yes Specifications General Disc Changer: 1 Tray Type: DVD-Tray...


