Operating Instructions (primary manual)
Page 2
... model and serial numbers are cautioned that to which can radiate radio frequency energy and, if not installed and used in accordance with the TCO'95 guidelines. (for the black model) 2 If you have any changes or modifications not expressly approved in the spaces provided below. This monitor complies with the TCO'99 guidelines. (for the white model) This monitor complies with the instructions...
... model and serial numbers are cautioned that to which can radiate radio frequency energy and, if not installed and used in accordance with the TCO'95 guidelines. (for the black model) 2 If you have any changes or modifications not expressly approved in the spaces provided below. This monitor complies with the TCO'99 guidelines. (for the white model) This monitor complies with the instructions...
Operating Instructions (primary manual)
Page 3
... signal (ZOOM) (SDM-S71/S81 only 15 Smoothing the picture (SMOOTHING) (SDM-S71/S81 only) . . . . . 15 Changing the menu's position (MENU POSITION 15 Additional settings 16 Technical Features 17 Power saving function 17 Automatic picture quality adjustment function 17 Troubleshooting 18 On-screen messages 18 Trouble symptoms and remedies 19 Self-diagnosis function 21 Specifications 22 Appendix i Preset mode timing table i 3 Precautions 4 Identifying parts and controls 5 Setup 7 Step 1: Connect the display to your computer 7 Step 2: Connect the power cord...
... signal (ZOOM) (SDM-S71/S81 only 15 Smoothing the picture (SMOOTHING) (SDM-S71/S81 only) . . . . . 15 Changing the menu's position (MENU POSITION 15 Additional settings 16 Technical Features 17 Power saving function 17 Automatic picture quality adjustment function 17 Troubleshooting 18 On-screen messages 18 Trouble symptoms and remedies 19 Self-diagnosis function 21 Specifications 22 Appendix i Preset mode timing table i 3 Precautions 4 Identifying parts and controls 5 Setup 7 Step 1: Connect the display to your computer 7 Step 2: Connect the power cord...
Operating Instructions (primary manual)
Page 4
... setting up temporarily in this may appear on , replace the fluorescent tube with a new one. This is not a malfunction. This may cause the screen to use the monitor in the UK, be sure to inordinate amounts of light (red, blue, or green) may appear constantly on the LCD screen, and irregular colored stripes or brightness may scratch the LCD screen's coating. • Clean the cabinet, panel, and controls...
... setting up temporarily in this may appear on , replace the fluorescent tube with a new one. This is not a malfunction. This may cause the screen to use the monitor in the UK, be sure to inordinate amounts of light (red, blue, or green) may appear constantly on the LCD screen, and irregular colored stripes or brightness may scratch the LCD screen's coating. • Clean the cabinet, panel, and controls...
Operating Instructions (primary manual)
Page 5
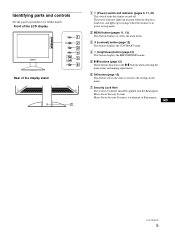
... the display stand OPEN 1 1 (Power) switch and indicator (pages 9, 17, 21) This switch turns the display on and off. Identifying parts and controls See the pages in the menu. 7 Security Lock Hole The security lock hole should be applied with the Kensington Micro Saver Security System. GB (continued) 5 Micro Saver Security System is in power saving mode. 2 MENU button (pages 11, 12) This button displays or closes the main menu. 3 6 (contrast) button (page...
... the display stand OPEN 1 1 (Power) switch and indicator (pages 9, 17, 21) This switch turns the display on and off. Identifying parts and controls See the pages in the menu. 7 Security Lock Hole The security lock hole should be applied with the Kensington Micro Saver Security System. GB (continued) 5 Micro Saver Security System is in power saving mode. 2 MENU button (pages 11, 12) This button displays or closes the main menu. 3 6 (contrast) button (page...
Operating Instructions (primary manual)
Page 6
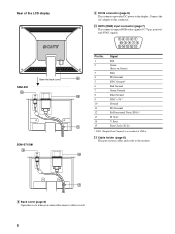
... LCD display OPEN SDM-S51 Open the back cover. q; HD15 (RGB) input connector (page 7) This connector inputs RGB video signals (0.7 Vp-p, positive) and SYNC signals. 54321 10 9 8 7 6 15 14 13 12 11 Pin No. 1 2 3 4 5 6 7 8 9 10 11 12 13 14 15 Signal Red Green (Sync on Green) Blue ID (Ground) DDC Ground* Red Ground Green Ground Blue Ground DDC + 5V* Ground ID (Ground) Bi-Directional Data (SDA)* H. qa Cable holder (page 8) This part secures cables and cords to the display. Rear of VESA. Sync V. SDM-S71...
... LCD display OPEN SDM-S51 Open the back cover. q; HD15 (RGB) input connector (page 7) This connector inputs RGB video signals (0.7 Vp-p, positive) and SYNC signals. 54321 10 9 8 7 6 15 14 13 12 11 Pin No. 1 2 3 4 5 6 7 8 9 10 11 12 13 14 15 Signal Red Green (Sync on Green) Blue ID (Ground) DDC Ground* Red Ground Green Ground Blue Ground DDC + 5V* Ground ID (Ground) Bi-Directional Data (SDA)* H. qa Cable holder (page 8) This part secures cables and cords to the display. Rear of VESA. Sync V. SDM-S71...
Operating Instructions (primary manual)
Page 7
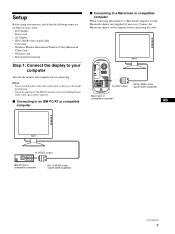
... video signal cable connector. Connect the Macintosh adapter to your carton: • LCD display • Power cord • AC adapter • HD15 (RGB) video signal cable • Cord strap • Windows Monitor Information/Windows Utility/Macintosh Utility Disk • Warranty card • This instruction manual Step 1: Connect the display to the computer before connecting. Setup Before using your monitor, check that the following items are included in your computer Turn off the monitor and computer before connecting the cable. Notes • Do not touch...
... video signal cable connector. Connect the Macintosh adapter to your carton: • LCD display • Power cord • AC adapter • HD15 (RGB) video signal cable • Cord strap • Windows Monitor Information/Windows Utility/Macintosh Utility Disk • Warranty card • This instruction manual Step 1: Connect the display to the computer before connecting. Setup Before using your monitor, check that the following items are included in your computer Turn off the monitor and computer before connecting the cable. Notes • Do not touch...
Operating Instructions (primary manual)
Page 9
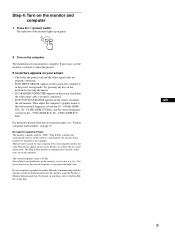
.... You do not need for specific drivers The monitor complies with this monitor, install the information file for this monitor using the Windows Monitor Information Disk. If your screen • Check that you can use the monitor's controls to adjust the picture. The installation of the monitor lights up in the power saving mode. Then adjust the computer's graphic board so that the video input cable is in green. 2 Turn on -screen instructions. Since flickers are properly connected. • If NO INPUT SIGNAL appears on the...
.... You do not need for specific drivers The monitor complies with this monitor, install the information file for this monitor using the Windows Monitor Information Disk. If your screen • Check that you can use the monitor's controls to adjust the picture. The installation of the monitor lights up in the power saving mode. Then adjust the computer's graphic board so that the video input cable is in green. 2 Turn on -screen instructions. Since flickers are properly connected. • If NO INPUT SIGNAL appears on the...
Operating Instructions (primary manual)
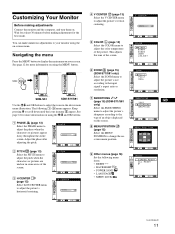
Page 11
... menu Press the MENU button to display the main menu on your monitor using the on using the MENU button. See page 12 for more information on . V CENTER 50 5 COLOR (page 14) Select the COLOR menu to adjust the picture's vertical centering. Keep pressing m to your screen. See page 12 for more information on -screen menu. The following menu items. • RESET 0 • BACKLIGHT • POWER SAVE ZZ... • LANGUAGE • MENU LOCK EX I T RESET 0 S CREEN RESE T AL L RESET EX I T SDM-S71...
... menu Press the MENU button to display the main menu on your monitor using the on using the MENU button. See page 12 for more information on . V CENTER 50 5 COLOR (page 14) Select the COLOR menu to adjust the picture's vertical centering. Keep pressing m to your screen. See page 12 for more information on -screen menu. The following menu items. • RESET 0 • BACKLIGHT • POWER SAVE ZZ... • LANGUAGE • MENU LOCK EX I T RESET 0 S CREEN RESE T AL L RESET EX I T SDM-S71...

Operating Instructions (primary manual)
Page 12
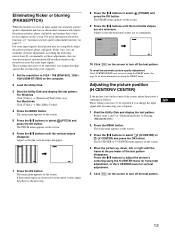
... reset the adjustments using the RESET menu. If the screen is made using a separate CONTRAST menu from the main menu (page 11). 1 Press the 8 (brightness) button. Press the MENU button to adjust the contrast. BR I GHTNESS 50 48 . 4 kHz / 60Hz Horizontal frequency of the current input signal Vertical frequency of an image (BRIGHTNESS) Brightness adjustment is made using a separate BRIGHTNESS menu from the main menu (page 11). 1 Press the 6 (contrast) button. MENU Adjusting the contrast (CONTRAST) Contrast adjustment is too bright Adjust the backlight. Adjusting the black...
... reset the adjustments using the RESET menu. If the screen is made using a separate CONTRAST menu from the main menu (page 11). 1 Press the 8 (brightness) button. Press the MENU button to adjust the contrast. BR I GHTNESS 50 48 . 4 kHz / 60Hz Horizontal frequency of the current input signal Vertical frequency of an image (BRIGHTNESS) Brightness adjustment is made using a separate BRIGHTNESS menu from the main menu (page 11). 1 Press the 6 (contrast) button. MENU Adjusting the contrast (CONTRAST) Contrast adjustment is too bright Adjust the backlight. Adjusting the black...
Operating Instructions (primary manual)
Page 13
... the screen. These settings may have to be repeated if you change the input signal after reconnecting your computer. 1 Set the resolution to 1024 × 768 (SDM-S51), 1280 × 1024 (SDM-S71/S81) on page 17. The PITCH menu appears on the screen. 4 Move the picture up, down, left, or right until the vertical stripes disappear. The main menu appears on using the RESET menu. If horizontal stripes...
... the screen. These settings may have to be repeated if you change the input signal after reconnecting your computer. 1 Set the resolution to 1024 × 768 (SDM-S51), 1280 × 1024 (SDM-S71/S81) on page 17. The PITCH menu appears on the screen. 4 Move the picture up, down, left, or right until the vertical stripes disappear. The main menu appears on using the RESET menu. If horizontal stripes...
Operating Instructions (primary manual)
Page 15
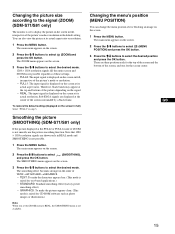
... desired mode. Changing the picture size according to the signal (ZOOM) (SDM-S71/S81 only) The monitor is blocking an image on the screen. 1 Press the MENU button. Therefore, black bands may appear at its actual aspect ratio. There are shown only in the order of the picture depending on the signal. • REAL: The input signal is not smooth, use the picture smoothing function. Smoothing the picture (SMOOTHING) (SDM-S71/S81...
... desired mode. Changing the picture size according to the signal (ZOOM) (SDM-S71/S81 only) The monitor is blocking an image on the screen. 1 Press the MENU button. Therefore, black bands may appear at its actual aspect ratio. There are shown only in the order of the picture depending on the signal. • REAL: The input signal is not smooth, use the picture smoothing function. Smoothing the picture (SMOOTHING) (SDM-S71/S81...
Operating Instructions (primary manual)
Page 16
...; RESET 0 • BACKLIGHT • POWER SAVE ZZ... • LANGUAGE • MENU LOCK 1 Press the MENU button. Then press the M/m buttons to select the desired mode. • SCREEN RESET (Automatic picture quality adjustment function): Adjusts the pictur's appropriate phase, pitch, and holizontal/vertical position automatically for the current input signal and memorizes the adjustment data. • ALL RESET: Resets all settings and adjustment data, except the LANGUAGE menu setting, to select 0 (RESET) and press the OK button. You can adjust the following instructions. Then...
...; RESET 0 • BACKLIGHT • POWER SAVE ZZ... • LANGUAGE • MENU LOCK 1 Press the MENU button. Then press the M/m buttons to select the desired mode. • SCREEN RESET (Automatic picture quality adjustment function): Adjusts the pictur's appropriate phase, pitch, and holizontal/vertical position automatically for the current input signal and memorizes the adjustment data. • ALL RESET: Resets all settings and adjustment data, except the LANGUAGE menu setting, to select 0 (RESET) and press the OK button. You can adjust the following instructions. Then...

Operating Instructions (primary manual)
Page 17
... the factory preset modes.) For input signals that a clear picture appears on the screen for any timing within the monitor's frequency range (horizontal: 28 - 60 kHz (SDM-S51), 28 - 92 kHz (SDM-S71/S81), vertical: 48 - 75 Hz (SDM-S51), 48 - 85 Hz (SDM-S71/S81)). This adjustment data is automatically stored in memory so that next time, the monitor will operate. Technical Features Power saving function This monitor meets the power-saving guidelines set...
... the factory preset modes.) For input signals that a clear picture appears on the screen for any timing within the monitor's frequency range (horizontal: 28 - 60 kHz (SDM-S51), 28 - 92 kHz (SDM-S71/S81), vertical: 48 - 75 Hz (SDM-S51), 48 - 85 Hz (SDM-S71/S81)). This adjustment data is automatically stored in memory so that next time, the monitor will operate. Technical Features Power saving function This monitor meets the power-saving guidelines set...
Operating Instructions (primary manual)
Page 18
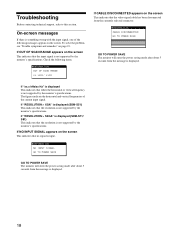
... video signal cable has been disconnected from the currently selected connector. On-screen messages If there is something wrong with the input signal, one of the current input signal. To solve the problem, see "Trouble symptoms and remedies" on the screen This indicates that the resolution is not supported by the monitor's specifications. The figures indicate the horizontal and vertical frequencies of the following items. I NFORMA T I GNA L GO TO POWER SAVE...
... video signal cable has been disconnected from the currently selected connector. On-screen messages If there is something wrong with the input signal, one of the current input signal. To solve the problem, see "Trouble symptoms and remedies" on the screen This indicates that the resolution is not supported by the monitor's specifications. The figures indicate the horizontal and vertical frequencies of the following items. I NFORMA T I GNA L GO TO POWER SAVE...
Operating Instructions (primary manual)
Page 19
... 1 (power) indicator is green or flashing orange • Check that the power cord is properly connected. • Check that the video frequency range is not a malfunction. xProblems caused by the connected computer or other equipment • Check that the 1 (power) switch is in the "Models" list, try "Plug & Play" or install the information file for the monitor to sync correctly. • Adjust the computer's refresh rate (vertical frequency) to the connected equipment's instruction manual. If "SDM-S51" or "SDM-S71"or "SDM...
... 1 (power) indicator is green or flashing orange • Check that the power cord is properly connected. • Check that the video frequency range is not a malfunction. xProblems caused by the connected computer or other equipment • Check that the 1 (power) switch is in the "Models" list, try "Plug & Play" or install the information file for the monitor to sync correctly. • Adjust the computer's refresh rate (vertical frequency) to the connected equipment's instruction manual. If "SDM-S51" or "SDM-S71"or "SDM...
Operating Instructions (primary manual)
Page 20
...; Model name: SDM-S51 or SDM-S71 or SDM-S81 • Serial number • Name and specifications of your computer (SDM-S71/S81). • Eliminate the use of video cable extensions and/or video switch boxes. • Check that some video modes do not operate ( appears on your computer and graphics board. While the monitor is not uniform White does not look white Monitor buttons do not fill the screen to the edges. • Set the...
...; Model name: SDM-S51 or SDM-S71 or SDM-S81 • Serial number • Name and specifications of your computer (SDM-S71/S81). • Eliminate the use of video cable extensions and/or video switch boxes. • Check that some video modes do not operate ( appears on your computer and graphics board. While the monitor is not uniform White does not look white Monitor buttons do not fill the screen to the edges. • Set the...
Operating Instructions (primary manual)
Page 21
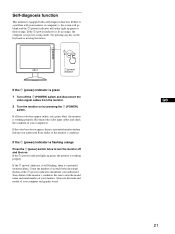
... authorized Sony dealer of your monitor. If the 1 (power) indicator lights up green or flash orange. Be sure to turn the monitor off the 1 (POWER) switch and disconnect the video signal cables from the monitor. 2 Turn the monitor on . Self-diagnosis function This monitor is equipped with your monitor or computer(s), the screen will go blank and the 1 (power) indicator will either light up green, the monitor is working properly. Also note the make and model...
... authorized Sony dealer of your monitor. If the 1 (power) indicator lights up green or flash orange. Be sure to turn the monitor off the 1 (POWER) switch and disconnect the video signal cables from the monitor. 2 Turn the monitor on . Self-diagnosis function This monitor is equipped with your monitor or computer(s), the screen will go blank and the 1 (power) indicator will either light up green, the monitor is working properly. Also note the make and model...
Operating Instructions (primary manual)
Page 22
...change without stand) Plug & Play DDC2B Accessories See page 7. SDM-S71/S81 LCD panel Panel type: a-Si TFT Active Matrix Picture size: 17.0 inch (SDM-S71) Picture size: 18.0 inch (SDM-S81) Input signal format RGB operating frequency* Horizontal: 28 - 92 kHz Vertical: 48 - 85 Hz Resolution Horizontal: Max.1280 dots Vertical: Max.1024 lines Input signal levels RGB video signal 0.7 Vp-p, 75 Ω, positive SYNC signal TTL level, 2.2 kΩ, positive or negative (Separate horizontal and vertical, or composite sync) 0.3 Vp-p, 75Ω, negative (Sync on green) Power...
...change without stand) Plug & Play DDC2B Accessories See page 7. SDM-S71/S81 LCD panel Panel type: a-Si TFT Active Matrix Picture size: 17.0 inch (SDM-S71) Picture size: 18.0 inch (SDM-S81) Input signal format RGB operating frequency* Horizontal: 28 - 92 kHz Vertical: 48 - 85 Hz Resolution Horizontal: Max.1280 dots Vertical: Max.1024 lines Input signal levels RGB video signal 0.7 Vp-p, 75 Ω, positive SYNC signal TTL level, 2.2 kΩ, positive or negative (Separate horizontal and vertical, or composite sync) 0.3 Vp-p, 75Ω, negative (Sync on green) Power...
Marketing Specifications
Page 1
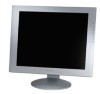
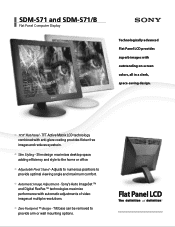
...-saving design. 17.0" Flat Panel - Adjustable Pivot Stand - Zero Footprint ™ design - Slim design maximizes desktop space, adding efficiency and style to provide optimal viewing angle and maximum comfort. Tilt base can be removed to provide arm or wall mounting options. SDM-S71 and SDM-S71/B Flat Panel Computer Display Technologically advanced Flat Panel LCD provides superb images with automatic adjustments of video images at multiple resolutions. Flat Panel LCD TFT Active Matrix LCD technology combined with anti-glare coating provides flicker free images and...
...-saving design. 17.0" Flat Panel - Adjustable Pivot Stand - Zero Footprint ™ design - Slim design maximizes desktop space, adding efficiency and style to provide optimal viewing angle and maximum comfort. Tilt base can be removed to provide arm or wall mounting options. SDM-S71 and SDM-S71/B Flat Panel Computer Display Technologically advanced Flat Panel LCD provides superb images with automatic adjustments of video images at multiple resolutions. Flat Panel LCD TFT Active Matrix LCD technology combined with anti-glare coating provides flicker free images and...
Marketing Specifications
Page 2
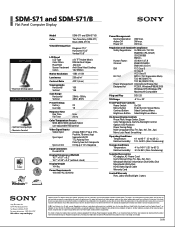
... and software in this disclaimer. SDM-S71 and SDM-S71/B Flat Panel Computer Display Slim Design • Maximize desktop space Adjustable Pivot Stand 4 Port USB Hub • Optimal Viewing Angle • Maximize Comfort Model SDM-S71 and SDM-S71/B Color Two Tone Gray (SDM-S71) Black (SDM-S71/B) Viewable Image Size Diagonal 17.0" Horizontal 13.3" Vertical 10.6" LCD Panel LCD Type Color Filters Pixel Pitch Screen Treatment Colors a-Si TFT Active Matrix RGB Vertical Stripes .264 mm Anti-Glare/Hard Coating 16.2 Million Native Resolution 1280 x 1024 Luminance 250 cd/m2 Contrast...
... and software in this disclaimer. SDM-S71 and SDM-S71/B Flat Panel Computer Display Slim Design • Maximize desktop space Adjustable Pivot Stand 4 Port USB Hub • Optimal Viewing Angle • Maximize Comfort Model SDM-S71 and SDM-S71/B Color Two Tone Gray (SDM-S71) Black (SDM-S71/B) Viewable Image Size Diagonal 17.0" Horizontal 13.3" Vertical 10.6" LCD Panel LCD Type Color Filters Pixel Pitch Screen Treatment Colors a-Si TFT Active Matrix RGB Vertical Stripes .264 mm Anti-Glare/Hard Coating 16.2 Million Native Resolution 1280 x 1024 Luminance 250 cd/m2 Contrast...


