
Operating Instructions (primary manual)
Page 2
... install only a UL LISTED/CSA LABELLED power supply cord meeting the following two conditions: (1) This device may cause harmful interference to comply with the TCO'99 guidelines. Serial No. Do not open...SONY SDM-N80 Sony Electronics Inc. 680 Kinderkamack Road, Oradell, NJ 07649 USA 201-930-6972 This device complies with the instructions, may not cause harmful interference, and (2) this equipment does cause harmful interference to Part 15 of the FCC Rules. This monitor complies with the limits for Metrology (MPR) standards issued in the spaces provided below. Owner...
... install only a UL LISTED/CSA LABELLED power supply cord meeting the following two conditions: (1) This device may cause harmful interference to comply with the TCO'99 guidelines. Serial No. Do not open...SONY SDM-N80 Sony Electronics Inc. 680 Kinderkamack Road, Oradell, NJ 07649 USA 201-930-6972 This device complies with the instructions, may not cause harmful interference, and (2) this equipment does cause harmful interference to Part 15 of the FCC Rules. This monitor complies with the limits for Metrology (MPR) standards issued in the spaces provided below. Owner...
Operating Instructions (primary manual)
Page 3
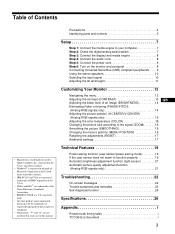
...digital/analog select switch 7 Step 3: Connect the display and media engine 8 Step 4: Connect the audio cord 8 Step 5: Connect the power cord 8 Step 6: Turn on the monitor and computer 8 Connecting Universal Serial Bus (USB) compliant peripherals . . . . 9 Using the stereo speakers 10 Selecting the input signal 10 Adjusting the tilt and height 11 Customizing Your Monitor 12 Navigating the menu 12 Adjusting the contrast (CONTRAST 13 GB Adjusting the black level of an image (BRIGHTNESS 14 Eliminating flicker or blurring (PHASE/PITCH) (Analog RGB signals only 14 Adjusting the picture...
...digital/analog select switch 7 Step 3: Connect the display and media engine 8 Step 4: Connect the audio cord 8 Step 5: Connect the power cord 8 Step 6: Turn on the monitor and computer 8 Connecting Universal Serial Bus (USB) compliant peripherals . . . . 9 Using the stereo speakers 10 Selecting the input signal 10 Adjusting the tilt and height 11 Customizing Your Monitor 12 Navigating the menu 12 Adjusting the contrast (CONTRAST 13 GB Adjusting the black level of an image (BRIGHTNESS 14 Eliminating flicker or blurring (PHASE/PITCH) (Analog RGB signals only 14 Adjusting the picture...
Operating Instructions (primary manual)
Page 4
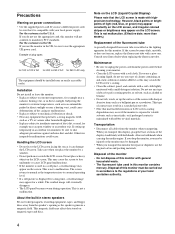
... is not a malfunction. Note on power connections • Use the supplied power cord. This type of your local power supply. Precautions Warning on the LCD (Liquid Crystal Display) Please note that the LCD screen is made with highprecision technology. If you use the monitor in direct sunlight or near an open window or an outdoor exit. Installation Do not install or leave the monitor: • In places subject to...
... is not a malfunction. Note on power connections • Use the supplied power cord. This type of your local power supply. Precautions Warning on the LCD (Liquid Crystal Display) Please note that the LCD screen is made with highprecision technology. If you use the monitor in direct sunlight or near an open window or an outdoor exit. Installation Do not install or leave the monitor: • In places subject to...
Operating Instructions (primary manual)
Page 5
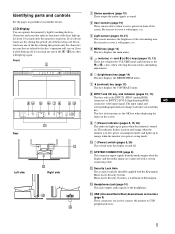
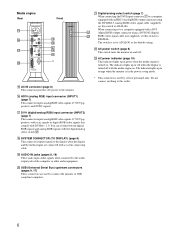
... (DVI-I (digital/analog RGB) connector) video input signal. qs Security Lock Hole The security lock hole should be applied with a system connecting cable. Even if all of Kensington. This key also functions as the OK key when displaying the menu on . qd Headphones jack (page 10) This jack outputs audio signals to USB peripheral devices. 5 GB 9 1 (Power) indicator (pages 8, 19, 26) This indicator lights up for further details. LCD display You...
... (DVI-I (digital/analog RGB) connector) video input signal. qs Security Lock Hole The security lock hole should be applied with a system connecting cable. Even if all of Kensington. This key also functions as the OK key when displaying the menu on . qd Headphones jack (page 10) This jack outputs audio signals to USB peripheral devices. 5 GB 9 1 (Power) indicator (pages 8, 19, 26) This indicator lights up for further details. LCD display You...
Operating Instructions (primary manual)
Page 6
... 7) This connector inputs analog RGB video signals (0.700 Vp-p, positive) with sync signals or digital RGB video signals that comply with an HD15 (analog RGB) output connector using a DVI-DVI (digital RGB) video signal cable (not supplied), set to DIGITAL. ws AC power switch (page 8) This switch turns the monitor on . Do not connect anything to this switch to ANALOG as the default setting. The switch is turned on and off with the digital/analog select switch wa. qk SYSTEM CONNECTOR (TO DISPLAY) (page 8) This connector outputs signals to ANALOG. USB (Universal Serial Bus...
... 7) This connector inputs analog RGB video signals (0.700 Vp-p, positive) with sync signals or digital RGB video signals that comply with an HD15 (analog RGB) output connector using a DVI-DVI (digital RGB) video signal cable (not supplied), set to DIGITAL. ws AC power switch (page 8) This switch turns the monitor on . Do not connect anything to this switch to ANALOG as the default setting. The switch is turned on and off with the digital/analog select switch wa. qk SYSTEM CONNECTOR (TO DISPLAY) (page 8) This connector outputs signals to ANALOG. USB (Universal Serial Bus...
Operating Instructions (primary manual)
Page 7
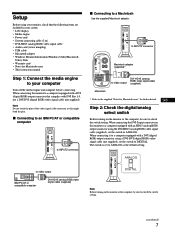
...; LCD display • Media engine • Power cord • System connecting cable (2 m) • DVI-HD15 (analog RGB) video signal cable • Audio cord (stereo miniplug) • USB cable • Macintosh adapter • Windows Monitor Information/Windows Utility/Macintosh Utility Disk • Warranty card • Notes for further details. The switch is set to ANALOG as this might bend the pins. x Connecting to an IBM PC/AT or compatible computer to INPUT2 connector x Connecting to check the switch setting. to INPUT2 connector Macintosh adapter (supplied)* DVI...
...; LCD display • Media engine • Power cord • System connecting cable (2 m) • DVI-HD15 (analog RGB) video signal cable • Audio cord (stereo miniplug) • USB cable • Macintosh adapter • Windows Monitor Information/Windows Utility/Macintosh Utility Disk • Warranty card • Notes for further details. The switch is set to ANALOG as this might bend the pins. x Connecting to an IBM PC/AT or compatible computer to INPUT2 connector x Connecting to check the switch setting. to INPUT2 connector Macintosh adapter (supplied)* DVI...
Operating Instructions (primary manual)
Page 9
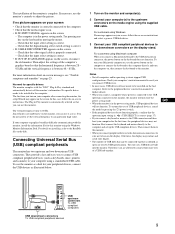
... the power saving mode, USB peripheral devices will not function. Check that the input select setting is correct. • If OUT OF SCAN RANGE appears on the display stand. The vertical frequency turns to the downstream connectors on the screen, reconnect the old monitor. First connect the keyboard and mouse directly to the computer and set the vertical frequency to any key on -screen instructions and select a generic USB hub driver. 3 Connect your computer using a standardized USB cable. Check...
... the power saving mode, USB peripheral devices will not function. Check that the input select setting is correct. • If OUT OF SCAN RANGE appears on the display stand. The vertical frequency turns to the downstream connectors on the screen, reconnect the old monitor. First connect the keyboard and mouse directly to the computer and set the vertical frequency to any key on -screen instructions and select a generic USB hub driver. 3 Connect your computer using a standardized USB cable. Check...
Operating Instructions (primary manual)
Page 10
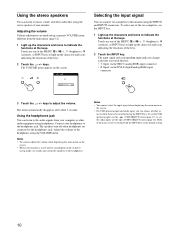
... 8 (brightness), 6 (contrast), or INPUT keys to this key. • 1: Input via the HD15 (analog RGB) input connector • 2: Input via the DVI-I (digital/analog RGB) input connector 40 2 3 Touch the 2 +/- Adjusting the volume Volume adjustments are made using the VOLUME menu. The VOLUME menu appears on the screen. • When your monitor. Notes • You cannot select the input signal when displaying the main menu on the screen. • For USB upstream input and audio input, you touch this monitor using the stereo speaker of them to music, sound, and...
... 8 (brightness), 6 (contrast), or INPUT keys to this key. • 1: Input via the HD15 (analog RGB) input connector • 2: Input via the DVI-I (digital/analog RGB) input connector 40 2 3 Touch the 2 +/- Adjusting the volume Volume adjustments are made using the VOLUME menu. The VOLUME menu appears on the screen. • When your monitor. Notes • You cannot select the input signal when displaying the main menu on the screen. • For USB upstream input and audio input, you touch this monitor using the stereo speaker of them to music, sound, and...

Operating Instructions (primary manual)
Page 12
... adjust other settings listed below: • USB SELECT • AUDIO SELECT • BACKLIGHT • LIGHT SENSOR • USER SENSOR • POWER SAVE • LANGUAGE • MENU LOCK EX I T USB SELECT AUTO I NPUT 1 I NPUT 2 EX I T 12 4 V CENTER (Analog RGB signals only) (page 15) Select the V CENTER menu to adjust the picture's vertical centering. 5 COLOR (page 15) Select the COLOR menu to adjust the color temperature of an object displayed on the screen. 8 MENU POSITION (page 16) Select the MENU POSITION menu to change the on-screen menu position. 9 RESET...
... adjust other settings listed below: • USB SELECT • AUDIO SELECT • BACKLIGHT • LIGHT SENSOR • USER SENSOR • POWER SAVE • LANGUAGE • MENU LOCK EX I T USB SELECT AUTO I NPUT 1 I NPUT 2 EX I T 12 4 V CENTER (Analog RGB signals only) (page 15) Select the V CENTER menu to adjust the picture's vertical centering. 5 COLOR (page 15) Select the COLOR menu to adjust the color temperature of an object displayed on the screen. 8 MENU POSITION (page 16) Select the MENU POSITION menu to change the on-screen menu position. 9 RESET...

Operating Instructions (primary manual)
Page 15
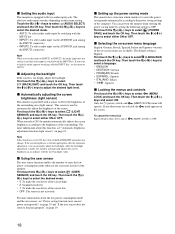
... select R (Red) or B (Blue) and touch the OK key. Note When using the RESET menu. To reset the automatic picture quality adjustment Select SCREEN RESET and activate it using digital RGB signals, you fine tune the color temperature, the new color setting is stored in the center of the screen, adjust the picture's centering as the temperature is 9300K, the whites will change the input signal after reconnecting your computer. 1 Start the Utility Disk and display the...
... select R (Red) or B (Blue) and touch the OK key. Note When using the RESET menu. To reset the automatic picture quality adjustment Select SCREEN RESET and activate it using digital RGB signals, you fine tune the color temperature, the new color setting is stored in the center of the screen, adjust the picture's centering as the temperature is 9300K, the whites will change the input signal after reconnecting your computer. 1 Start the Utility Disk and display the...
Operating Instructions (primary manual)
Page 17
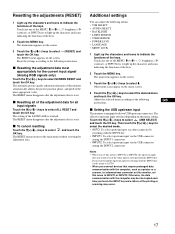
... automatic picture quality adjustment function of the keys. Touch any one of the MENU, M(+)/m(-), 8 (brightness), 6 (contrast), or INPUT keys to light up the characters and icons to indicate the functions of this menu to select SCREEN RESET and touch the OK key. Additional settings You can adjust the following menus: • USB SELECT • AUDIO SELECT • BACKLIGHT • LIGHT SENSOR • USER SENSOR • POWER SAVE • LANGUAGE • MENU LOCK 1 Light up the...
... automatic picture quality adjustment function of the keys. Touch any one of the MENU, M(+)/m(-), 8 (brightness), 6 (contrast), or INPUT keys to light up the characters and icons to indicate the functions of this menu to select SCREEN RESET and touch the OK key. Additional settings You can adjust the following menus: • USB SELECT • AUDIO SELECT • BACKLIGHT • LIGHT SENSOR • USER SENSOR • POWER SAVE • LANGUAGE • MENU LOCK 1 Light up the...
Operating Instructions (primary manual)
Page 18
... select ZZ... (POWER SAVE) and touch the OK key. x Automatically adjusting the screen brightness (light sensor) This monitor is English. When you want to link the audio input to switching with a sensor to select the desired mode. • 3: To make the sensitivity of the sensor high • 2: Standard sensitivity • 1: To make the sensitivity of the surrounding area (light sensor). You can manually adjust the backlight. The default setting is provided...
... select ZZ... (POWER SAVE) and touch the OK key. x Automatically adjusting the screen brightness (light sensor) This monitor is English. When you want to link the audio input to switching with a sensor to select the desired mode. • 3: To make the sensitivity of the sensor high • 2: Standard sensitivity • 1: To make the sensitivity of the surrounding area (light sensor). You can manually adjust the backlight. The default setting is provided...

Operating Instructions (primary manual)
Page 19
... INPUT SIGNAL appears on the screen. The monitor returns to the computer's settings), the power saving mode takes precedence over the low power consumption mode. To return the monitor to the state of supplied sync signals. When your computer enters the power saving mode, the input signal is detected by the user sensor. GB Power saving state active off (deep sleep)* Sync signal state horizontal: off / vertical: off power to all circuitry (except for that is a power saving mode defined by VESA...
... INPUT SIGNAL appears on the screen. The monitor returns to the computer's settings), the power saving mode takes precedence over the low power consumption mode. To return the monitor to the state of supplied sync signals. When your computer enters the power saving mode, the input signal is detected by the user sensor. GB Power saving state active off (deep sleep)* Sync signal state horizontal: off / vertical: off power to all circuitry (except for that is a power saving mode defined by VESA...
Operating Instructions (primary manual)
Page 20
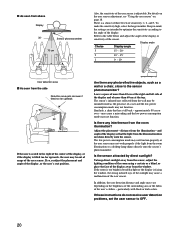
... to optimize the sensitivity according to the right of the center of the display, or if the display is adjustable. If these instructions do not resolve user detection problems, set the user sensor to the sensor phototransmitter? may cause a misreading and the low power consumption mode may cause a malfunction of the user's clothes - To keep direct sunlight away from the sensor, adjust the lighting condition...
... to optimize the sensitivity according to the right of the center of the display, or if the display is adjustable. If these instructions do not resolve user detection problems, set the user sensor to the sensor phototransmitter? may cause a misreading and the low power consumption mode may cause a malfunction of the user's clothes - To keep direct sunlight away from the sensor, adjust the lighting condition...
Operating Instructions (primary manual)
Page 22
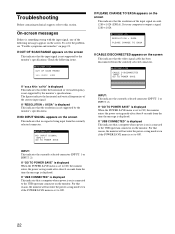
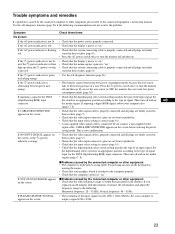
... the power saving mode even if the POWER SAVE menu is displayed. For that reason, the monitor will not enter the power saving mode even if the POWER SAVE menu is displayed. If OUT OF SCAN RANGE appears on the screen This indicates that the video signal cable has been disconnected from the time the message is set to the USB upstream connector on the screen This indicates that the input signal is not supported by the monitor's specifications...
... the power saving mode even if the POWER SAVE menu is displayed. For that reason, the monitor will not enter the power saving mode even if the POWER SAVE menu is displayed. If OUT OF SCAN RANGE appears on the screen This indicates that the video signal cable has been disconnected from the time the message is set to the USB upstream connector on the screen This indicates that the input signal is not supported by the monitor's specifications...
Operating Instructions (primary manual)
Page 23
...; Check that the video signal cable is properly connected and all plugs are firmly seated in their sockets (page 7). • Check that the video input connector's pins are firmly seated in their sockets (page 8). • Press the AC power switch twice to turn the monitor off and on ." • Check that your graphics board is alternating between green and orange If inputting a signal to the DVI-I (digital/analog RGB) input connector. If OUT OF SCAN RANGE...
...; Check that the video signal cable is properly connected and all plugs are firmly seated in their sockets (page 7). • Check that the video input connector's pins are firmly seated in their sockets (page 8). • Press the AC power switch twice to turn the monitor off and on ." • Check that your graphics board is alternating between green and orange If inputting a signal to the DVI-I (digital/analog RGB) input connector. If OUT OF SCAN RANGE...
Operating Instructions (primary manual)
Page 24
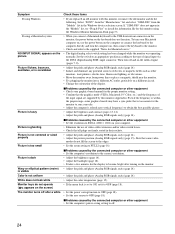
... frequency is within the proper range, some graphics boards may have a sync pulse that some video modes do not fill the screen to the edges. • Set the zoom setting to off. 24 Picture is dark Wavy or elliptical pattern (moire) is visible Color is too narrow for the monitor to sync correctly. • Adjust the computer's refresh rate (vertical frequency) to the type of signal input via the DVI-I (digital/analog RGB) input connector. If "SDM-N80...
... frequency is within the proper range, some graphics boards may have a sync pulse that some video modes do not fill the screen to the edges. • Set the zoom setting to off. 24 Picture is dark Wavy or elliptical pattern (moire) is visible Color is too narrow for the monitor to sync correctly. • Adjust the computer's refresh rate (vertical frequency) to the type of signal input via the DVI-I (digital/analog RGB) input connector. If "SDM-N80...
Operating Instructions (primary manual)
Page 25
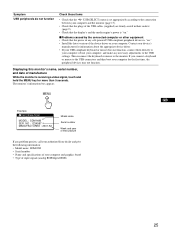
... USB connectors and then boot your computer, and make any problem persists, call your authorized Sony dealer and give the following information: • Model name: SDM-N80 • Serial number • Name and specifications of your computer and graphics board • Type of input signals (analog RGB/digital RGB) 25 NO : 1234567 MANUFACTURED : 2001-52 Model name Serial number Week and year of manufacture While the monitor is receiving a video signal, touch and hold the MENU...
... USB connectors and then boot your computer, and make any problem persists, call your authorized Sony dealer and give the following information: • Model name: SDM-N80 • Serial number • Name and specifications of your computer and graphics board • Type of input signals (analog RGB/digital RGB) 25 NO : 1234567 MANUFACTURED : 2001-52 Model name Serial number Week and year of manufacture While the monitor is receiving a video signal, touch and hold the MENU...

Operating Instructions (primary manual)
Page 26
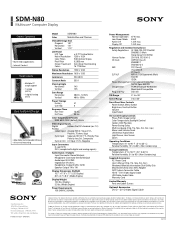
... your computer(s). Specifications LCD panel Input signal format Resolution** Video input connector Input signal levels Audio output Headphones jack AUDIO IN jacks Power requirements Power consumption Operating temperature Dimensions (w/h/d) Mass Plug & Play Accessories Panel type: a-Si TFT Active Matrix Picture size: 18.1 inch (46 cm) RGB operating frequency* Horizontal: 28 - 92 kHz** Vertical: 48 - 85 Hz** Horizontal: Max.1280 dots Vertical: Max.1024 lines Analog RGB: HD15 Digital/analog RGB: DVI-I 29 pins Analog RGB video signal 0.700 Vp-p, 75 Ω, positive SYNC signal TTL level...
... your computer(s). Specifications LCD panel Input signal format Resolution** Video input connector Input signal levels Audio output Headphones jack AUDIO IN jacks Power requirements Power consumption Operating temperature Dimensions (w/h/d) Mass Plug & Play Accessories Panel type: a-Si TFT Active Matrix Picture size: 18.1 inch (46 cm) RGB operating frequency* Horizontal: 28 - 92 kHz** Vertical: 48 - 85 Hz** Horizontal: Max.1280 dots Vertical: Max.1024 lines Analog RGB: HD15 Digital/analog RGB: DVI-I 29 pins Analog RGB video signal 0.700 Vp-p, 75 Ω, positive SYNC signal TTL level...
Marketing Specifications
Page 2
... JEIDA Power Management International Energy Star NUTEK Spec 803299 Designed for PC99, Windows® 95,98,2000 Macintosh® Compatible Plug and Play DDC-2B Tilt Range 0° to +59° Swivel Range 0 to ± 60° Front Panel User Controls Power Switch, Menu Button Brightness, Contrast Button Volume Input Select On Screen Display Controls Phase, Pitch, Image Center Color Temperature, Backlight Control Option (OSD Position) Power Saving Delay Multi-Language (Eng., Fre., Spa., Ital., Ger., Jap.) Menu Lock, Volume, Reset USB Select, Audio Select Light Sensor, User Sensor...
... JEIDA Power Management International Energy Star NUTEK Spec 803299 Designed for PC99, Windows® 95,98,2000 Macintosh® Compatible Plug and Play DDC-2B Tilt Range 0° to +59° Swivel Range 0 to ± 60° Front Panel User Controls Power Switch, Menu Button Brightness, Contrast Button Volume Input Select On Screen Display Controls Phase, Pitch, Image Center Color Temperature, Backlight Control Option (OSD Position) Power Saving Delay Multi-Language (Eng., Fre., Spa., Ital., Ger., Jap.) Menu Lock, Volume, Reset USB Select, Audio Select Light Sensor, User Sensor...


