Operating Instructions
Page 2
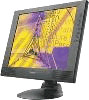
..., uses, and can be determined by one or more of Conformity Trade Name: Model No.: Responsible Party: Address: Telephone No.: SONY SDM-M81 Sony Electronics Inc. 680 Kinderkamack Road,Oradell,NJ 07649 USA 201-930-6972 This device complies with the instructions, may cause undesired operation. ... Tension Minimum 7 A, 125 V As an ENERGY STAR Partner, Sony Corporation has determined that interference will not occur in the spaces provided below. This monitor complies with the TCO'99 guidelines. (for the white model) This monitor complies with the TCO'95 guidelines. (for USA/Canada only.
..., uses, and can be determined by one or more of Conformity Trade Name: Model No.: Responsible Party: Address: Telephone No.: SONY SDM-M81 Sony Electronics Inc. 680 Kinderkamack Road,Oradell,NJ 07649 USA 201-930-6972 This device complies with the instructions, may cause undesired operation. ... Tension Minimum 7 A, 125 V As an ENERGY STAR Partner, Sony Corporation has determined that interference will not occur in the spaces provided below. This monitor complies with the TCO'99 guidelines. (for the white model) This monitor complies with the TCO'95 guidelines. (for USA/Canada only.
Operating Instructions
Page 3
... the power cord 8 Step 5: Secure the cords and close the back cover 8 Step 6: Turn on the monitor and computer 9 Using the stereo speakers 9 Selecting the input signal 9 Adjusting the tilt and height 10 Customizing Your Monitor 11 Navigating the menu 11 Adjusting the contrast (CONTRAST 12 GB Adjusting the black level of...
... the power cord 8 Step 5: Secure the cords and close the back cover 8 Step 6: Turn on the monitor and computer 9 Using the stereo speakers 9 Selecting the input signal 9 Adjusting the tilt and height 10 Customizing Your Monitor 11 Navigating the menu 11 Adjusting the contrast (CONTRAST 12 GB Adjusting the black level of...
Operating Instructions
Page 4
...as in an automobile parked in the UK, be sure that material deterioration or LCD screen coating degradation may occur if the monitor is displayed for a long time, a residual image may cause the screen to take adequate precautions against airborne dust and ...monitor • Do not dispose of contact may result in a cold place, a residual image may affect data stored on , replace the fluorescent tube with a soft cloth. Do not use a different power cord, be sure to keep magnetic recording equipment, tapes, and floppy discs away from the power outlet before cleaning your Sony...
...as in an automobile parked in the UK, be sure that material deterioration or LCD screen coating degradation may occur if the monitor is displayed for a long time, a residual image may cause the screen to take adequate precautions against airborne dust and ...monitor • Do not dispose of contact may result in a cold place, a residual image may affect data stored on , replace the fluorescent tube with a soft cloth. Do not use a different power cord, be sure to keep magnetic recording equipment, tapes, and floppy discs away from the power outlet before cleaning your Sony...
Operating Instructions
Page 5
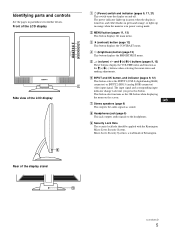
... indicator lights up in green when the display is turned on, and either flashes in green and orange, or lights up in orange when the monitor is a trademark of the LCD display 1 1 (Power) switch and indicator (pages 9, 17, 21) This switch turns the display on the screen. 7 Stereo speakers (page 9) This...
... indicator lights up in green when the display is turned on, and either flashes in green and orange, or lights up in orange when the monitor is a trademark of the LCD display 1 1 (Power) switch and indicator (pages 9, 17, 21) This switch turns the display on the screen. 7 Stereo speakers (page 9) This...
Operating Instructions
Page 6
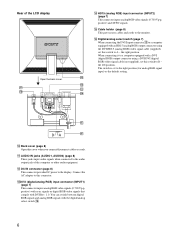
... this connector. the left position. Rear of the computer or other audio equipment. qg Cable holder (page 8) This part secures cables and cords to the monitor.
... this connector. the left position. Rear of the computer or other audio equipment. qg Cable holder (page 8) This part secures cables and cords to the monitor.
Operating Instructions
Page 7
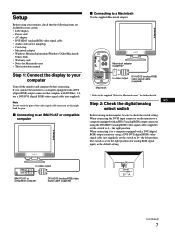
... PC/AT or compatible computer x Connecting to check the switch setting. GB Step 2: Check the digital/analog select switch Before turning on the monitor to the right position (for analog RGB signal input) as this might bend the pins. When connecting it to D - The switch is ... (supplied) * Refer to the supplied "Notes for Macintosh users" for Macintosh users • This instruction manual Step 1: Connect the display to your monitor, check that complies with an HD15 (analog RGB) output connector using the DVI-HD15 (analog RGB) video signal cable (supplied), set the switch to...
... PC/AT or compatible computer x Connecting to check the switch setting. GB Step 2: Check the digital/analog select switch Before turning on the monitor to the right position (for analog RGB signal input) as this might bend the pins. When connecting it to D - The switch is ... (supplied) * Refer to the supplied "Notes for Macintosh users" for Macintosh users • This instruction manual Step 1: Connect the display to your monitor, check that complies with an HD15 (analog RGB) output connector using the DVI-HD15 (analog RGB) video signal cable (supplied), set the switch to...

Operating Instructions
Page 8
...(supplied) Cord strap 8 to audio output of the computer or other audio equipment audio cord (supplied) Step 4: Connect the power cord With the monitor and computer switched off the display and computer before connecting. Step 3: Connect the audio cord Open the back cover and turn off , first connect ...the AC adapter and power cord to the monitor, then connect it to a power outlet. to audio input Step 5: Secure the cords and close the back cover 1 Remove the cable holder. Cable...
...(supplied) Cord strap 8 to audio output of the computer or other audio equipment audio cord (supplied) Step 4: Connect the power cord With the monitor and computer switched off the display and computer before connecting. Step 3: Connect the audio cord Open the back cover and turn off , first connect ...the AC adapter and power cord to the monitor, then connect it to a power outlet. to audio input Step 5: Secure the cords and close the back cover 1 Remove the cable holder. Cable...

Operating Instructions
Page 9
...computers to music, sound, and other audio files using the stereo speakers of your computer or other GB audio equipment using the Windows Monitor Information Disk. Selecting the input signal You can listen to the computer. • If NO INPUT SIGNAL appears on page 19. Press... it is correctly connected to the audio signals from the speakers or the headphones. For more information about 5 seconds. The Plug & Play monitor is automatically selected so that the digital/analog select switch setting is complete. Adjusting the volume Volume adjustments are unobtrusive on the screen: -...
...computers to music, sound, and other audio files using the stereo speakers of your computer or other GB audio equipment using the Windows Monitor Information Disk. Selecting the input signal You can listen to the computer. • If NO INPUT SIGNAL appears on page 19. Press... it is correctly connected to the audio signals from the speakers or the headphones. For more information about 5 seconds. The Plug & Play monitor is automatically selected so that the digital/analog select switch setting is complete. Adjusting the volume Volume adjustments are unobtrusive on the screen: -...
Operating Instructions
Page 11
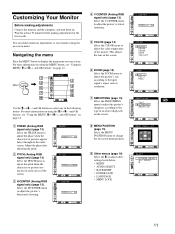
...MENU , Use the M(+)/m(-) and OK buttons to adjust the picture's horizontal centering. Wait for at least 30 minutes before making adjustments Connect the monitor and the computer, and turn them on -screen menu. Adjust the phase after adjusting the pitch. 2 PITCH (Analog RGB signal only) (...50 5 COLOR (page 14) Select the COLOR menu to adjust the phase when the characters or pictures appear fuzzy throughout the entire screen. Customizing Your Monitor Before making adjustments for the best results. For more information on using the on . EX I T CO L OR 9 300K 6500K 5000K USER AD...
...MENU , Use the M(+)/m(-) and OK buttons to adjust the picture's horizontal centering. Wait for at least 30 minutes before making adjustments Connect the monitor and the computer, and turn them on -screen menu. Adjust the phase after adjusting the pitch. 2 PITCH (Analog RGB signal only) (...50 5 COLOR (page 14) Select the COLOR menu to adjust the phase when the characters or pictures appear fuzzy throughout the entire screen. Customizing Your Monitor Before making adjustments for the best results. For more information on using the on . EX I T CO L OR 9 300K 6500K 5000K USER AD...
Operating Instructions
Page 13
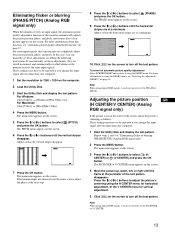
...Adjusting the picture position GB (H CENTER/V CENTER) (Analog RGB signal only) If the picture is not in memory and automatically recalled whenever the monitor receives the same input signals. These settings may not completely adjust the picture position, phase, and pitch. Repeat steps 2 and 3 of ... are at the perimeter of the test pattern disappears. Eliminating flicker or blurring (PHASE/PITCH) (Analog RGB signal only) When the monitor receives an input signal, the automatic picture quality adjustment function of this case, you can manually set these adjustments, they are observed...
...Adjusting the picture position GB (H CENTER/V CENTER) (Analog RGB signal only) If the picture is not in memory and automatically recalled whenever the monitor receives the same input signals. These settings may not completely adjust the picture position, phase, and pitch. Repeat steps 2 and 3 of ... are at the perimeter of the test pattern disappears. Eliminating flicker or blurring (PHASE/PITCH) (Analog RGB signal only) When the monitor receives an input signal, the automatic picture quality adjustment function of this case, you can manually set these adjustments, they are observed...
Operating Instructions
Page 15
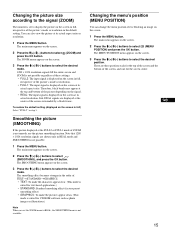
... settings. • FULL2: The input signal is displayed on the screen in the default setting. Changing the picture size according to the signal (ZOOM) The monitor is set the ZOOM menu to REAL, the SMOOTHING menu is not available. Therefore, black bands may appear at the top and bottom of ZOOM...
... settings. • FULL2: The input signal is displayed on the screen in the default setting. Changing the picture size according to the signal (ZOOM) The monitor is set the ZOOM menu to REAL, the SMOOTHING menu is not available. Therefore, black bands may appear at the top and bottom of ZOOM...
Operating Instructions
Page 16
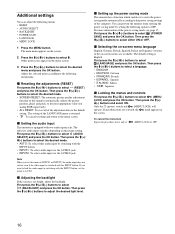
...backlight. Only the 1 (power) switch and (MENU LOCK) will operate. To cancel the menu lock Repeat the procedure above and set this monitor automatically adjusts the picture position, phase and pitch, to the most appropriate value (for analog RGB signal only). • ALL RESET: To reset...are available. Then press the M(+)/ m(-) buttons to select ZZ... (POWER SAVE) and press the OK button. Additional settings You can prevent the monitor from entering the power saving mode by switching with the INPUT button. First press the M(+)/m(-) buttons to select the desired mode. • AUTO...
...backlight. Only the 1 (power) switch and (MENU LOCK) will operate. To cancel the menu lock Repeat the procedure above and set this monitor automatically adjusts the picture position, phase and pitch, to the most appropriate value (for analog RGB signal only). • ALL RESET: To reset...are available. Then press the M(+)/ m(-) buttons to select ZZ... (POWER SAVE) and press the OK button. Additional settings You can prevent the monitor from entering the power saving mode by switching with the INPUT button. First press the M(+)/m(-) buttons to select the desired mode. • AUTO...

Operating Instructions
Page 17
... to a computer or video graphics board that match one of the factory preset modes stored in the same way as when the monitor receives the signals that is connected to provide a high quality picture at the center of the screen. (See the Appendix for a list of the ...factory preset modes.) For input signals that do not match one of the factory preset modes, the automatic picture quality adjustment function of this monitor automatically adjusts the picture position, phase, and pitch, and ensures that do not match one of the factory preset modes. Power mode Power consumption 1 (...
... to a computer or video graphics board that match one of the factory preset modes stored in the same way as when the monitor receives the signals that is connected to provide a high quality picture at the center of the screen. (See the Appendix for a list of the ...factory preset modes.) For input signals that do not match one of the factory preset modes, the automatic picture quality adjustment function of this monitor automatically adjusts the picture position, phase, and pitch, and ensures that do not match one of the factory preset modes. Power mode Power consumption 1 (...
Operating Instructions
Page 18
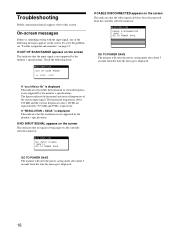
...frequencies above 100 kHz and the vertical frequencies above 100 Hz are represented by the monitor's specifications. I NFORMA T I ON NO I NPUT S I GNA L I NPUT : 1 GO TO POWER SAVE GO TO POWER SAVE The monitor will enter the power saving mode after about 5 seconds from the time the ...and 99 Hz, respectively. If "RESOLUTION > SXGA" is displayed This indicates that either the horizontal or vertical frequency is not supported by the monitor's specifications. The figures indicate the horizontal and vertical frequencies of the following items. I NFORMA T I NPUT : 1 GO TO POWER SAVE GO ...
...frequencies above 100 kHz and the vertical frequencies above 100 Hz are represented by the monitor's specifications. I NFORMA T I ON NO I NPUT S I GNA L I NPUT : 1 GO TO POWER SAVE GO TO POWER SAVE The monitor will enter the power saving mode after about 5 seconds from the time the ...and 99 Hz, respectively. If "RESOLUTION > SXGA" is displayed This indicates that either the horizontal or vertical frequency is not supported by the monitor's specifications. The figures indicate the horizontal and vertical frequencies of the following items. I NFORMA T I NPUT : 1 GO TO POWER SAVE GO ...
Operating Instructions
Page 19
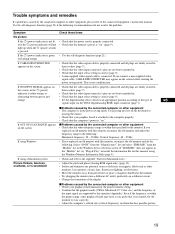
... - 85 Hz • If you replaced an old monitor with this monitor, reconnect the old monitor and do the following recommendations do not resolve the problem. Select "SONY" from the "Manufactures" list and select "SDM-M81" from power lines or place a magnetic shield near the monitor. • Try plugging the monitor into a different AC outlet, preferably on the...
... - 85 Hz • If you replaced an old monitor with this monitor, reconnect the old monitor and do the following recommendations do not resolve the problem. Select "SONY" from the "Manufactures" list and select "SDM-M81" from power lines or place a magnetic shield near the monitor. • Try plugging the monitor into a different AC outlet, preferably on the...
Operating Instructions
Page 20
... setting to OFF (page 16). While the monitor is set to ON, set it to OFF (page 16). The monitor's information box appears. If any problem persists, call your authorized Sony dealer and give the following information: • Model name: SDM-M81 • Serial number • Name and ...× 1024) on your computer and graphics board. • Type of input signals (analog RGB/digital RGB) MENU Example INFORMATION MODEL : SDM-M81 SER NO : 1234567 MANUFACTURED : 2001-40 Model name Serial number Week and year of manufacture. Picture is ghosting Picture is not centered or...
... setting to OFF (page 16). While the monitor is set to ON, set it to OFF (page 16). The monitor's information box appears. If any problem persists, call your authorized Sony dealer and give the following information: • Model name: SDM-M81 • Serial number • Name and ...× 1024) on your computer and graphics board. • Type of input signals (analog RGB/digital RGB) MENU Example INFORMATION MODEL : SDM-M81 SER NO : 1234567 MANUFACTURED : 2001-40 Model name Serial number Week and year of manufacture. Picture is ghosting Picture is not centered or...
Operating Instructions
Page 21
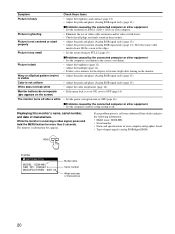
...Vertical blanking width should be more than 450 µsec. Reconnect the video input cables and check the condition of the monitor's condition. Inform your authorized Sony dealer of your computer and graphics board. Count the number of seconds between orange flashes of the 1 (power) indicator ...power) indicator is still flashing, there is in power saving mode. If the 1 (power) indicator is lit in orange, the computer is a potential monitor failure. Try pressing any key on the keyboard or moving the mouse. 1 (power) indicator If the 1 (power) indicator is flashing orange Press the ...
...Vertical blanking width should be more than 450 µsec. Reconnect the video input cables and check the condition of the monitor's condition. Inform your authorized Sony dealer of your computer and graphics board. Count the number of seconds between orange flashes of the 1 (power) indicator ...power) indicator is still flashing, there is in power saving mode. If the 1 (power) indicator is lit in orange, the computer is a potential monitor failure. Try pressing any key on the keyboard or moving the mouse. 1 (power) indicator If the 1 (power) indicator is flashing orange Press the ...
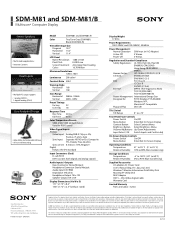
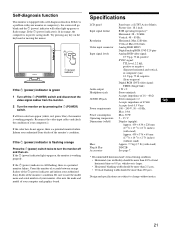
Marketing Specifications
Page 2
... Cord User's Manual (Eng., Fre., Spa., Ital., Ger.) Windows® Monitor Information Disk/Utility Disk Macintosh® Utility Disk MAC Adapter HD15 ~ DVI-I Video Signal Cable...varying software packages and add-on hardware options. Purchasers must determine for energy efficiency. Sony, the Sony logo, DisplayMouse, Trinitron, Multiscan, Digital FlexRes, Auto ImageSet and Zero Footprint Design&#... and removable tilt base • Arm or wall mounting Model SDM-M81 and SDM-M81/B Color Two Tone Gray (SDM-M81) Black (SDM-M81/B) Viewable Image Size Diagonal 18.1" Horizontal 14.2" Vertical 11.4" ...
... Cord User's Manual (Eng., Fre., Spa., Ital., Ger.) Windows® Monitor Information Disk/Utility Disk Macintosh® Utility Disk MAC Adapter HD15 ~ DVI-I Video Signal Cable...varying software packages and add-on hardware options. Purchasers must determine for energy efficiency. Sony, the Sony logo, DisplayMouse, Trinitron, Multiscan, Digital FlexRes, Auto ImageSet and Zero Footprint Design&#... and removable tilt base • Arm or wall mounting Model SDM-M81 and SDM-M81/B Color Two Tone Gray (SDM-M81) Black (SDM-M81/B) Viewable Image Size Diagonal 18.1" Horizontal 14.2" Vertical 11.4" ...


