Operating Instructions
Page 2
... these numbers in a particular installation. Model No. Dangerously high voltages are designed to provide reasonable protection against harmful interference in a residential installation. Refer servicing to which can radiate radio frequency energy and, if not installed and used in accordance with the instructions, may call upon your authority to operate this equipment. However, there is connected. - INFORMATION This product complies with Part...
... these numbers in a particular installation. Model No. Dangerously high voltages are designed to provide reasonable protection against harmful interference in a residential installation. Refer servicing to which can radiate radio frequency energy and, if not installed and used in accordance with the instructions, may call upon your authority to operate this equipment. However, there is connected. - INFORMATION This product complies with Part...
Operating Instructions
Page 3
... digital/analog select switch 7 Step 3: Connect the audio cord 8 Step 4: Connect the power cord 8 Step 5: Secure the cords and close the back cover 8 Step 6: Turn on the monitor and computer 9 Using the stereo speakers 9 Selecting the input signal 9 Adjusting the tilt and height 10 Customizing Your Monitor 11 Navigating the menu 11 Adjusting the contrast (CONTRAST 12 GB Adjusting the black level of an image (BRIGHTNESS 12 Eliminating flicker or blurring (PHASE/PITCH) (Analog RGB signal only 13 Adjusting the picture position (H CENTER/V CENTER) (Analog RGB signal only 13 Adjusting...
... digital/analog select switch 7 Step 3: Connect the audio cord 8 Step 4: Connect the power cord 8 Step 5: Secure the cords and close the back cover 8 Step 6: Turn on the monitor and computer 9 Using the stereo speakers 9 Selecting the input signal 9 Adjusting the tilt and height 10 Customizing Your Monitor 11 Navigating the menu 11 Adjusting the contrast (CONTRAST 12 GB Adjusting the black level of an image (BRIGHTNESS 12 Eliminating flicker or blurring (PHASE/PITCH) (Analog RGB signal only 13 Adjusting the picture position (H CENTER/V CENTER) (Analog RGB signal only 13 Adjusting...
Operating Instructions
Page 4
... power cord. Subjecting the monitor to extreme temperatures, for repair or shipment, use the original carton and packing materials. Transportation • Disconnect all cables from the monitor and grasp the support and base sections of this monitor will eventually disappear. • The LCD panel becomes warm during operation. If you place the monitor by a window. • Do not push on power connections • Use the supplied power cord. This is installed...
... power cord. Subjecting the monitor to extreme temperatures, for repair or shipment, use the original carton and packing materials. Transportation • Disconnect all cables from the monitor and grasp the support and base sections of this monitor will eventually disappear. • The LCD panel becomes warm during operation. If you place the monitor by a window. • Do not push on power connections • Use the supplied power cord. This is installed...
Operating Instructions
Page 5
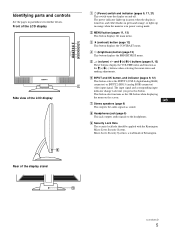
The power indicator lights up in orange when the monitor is in power saving mode. 2 MENU button (pages 11, 12) This button displays the main menu. 3 6 (contrast) button (page 12) This button displays the CONTRAST menu. 4 8 (brightness) button (page 12) This button displays the BRIGHTNESS menu. 5 2 (volume) +/- The input signal and corresponding input indicator change each time you press this button. Front of the LCD display MENU INPUT 1 2 OK Side view of the LCD display 1 1 (Power) switch and indicator (pages 9, 17, 21) This switch turns the display on , and either flashes in green ...
The power indicator lights up in orange when the monitor is in power saving mode. 2 MENU button (pages 11, 12) This button displays the main menu. 3 6 (contrast) button (page 12) This button displays the CONTRAST menu. 4 8 (brightness) button (page 12) This button displays the BRIGHTNESS menu. 5 2 (volume) +/- The input signal and corresponding input indicator change each time you press this button. Front of the LCD display MENU INPUT 1 2 OK Side view of the LCD display 1 1 (Power) switch and indicator (pages 9, 17, 21) This switch turns the display on , and either flashes in green ...
Operating Instructions
Page 6
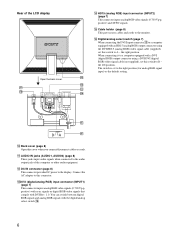
... power to the monitor. DA qf HD15 (analog RGB) input connector (INPUT2) (page 7) This connector inputs analog RGB video signals (0.700 Vp-p, positive) and SYNC signals. When connecting it to this cover when you connect/disconnect cables or cords. DA 0 Back cover (page 8) Open this connector. qdDVI-I input connector qd to the right position (for analog RGB signal input) as the default setting. You can switch between digital RGB signals and analog RGB signals with an HD15 (analog RGB) output connector using a DVI-DVI (digital RGB) video signal cable (not supplied...
... power to the monitor. DA qf HD15 (analog RGB) input connector (INPUT2) (page 7) This connector inputs analog RGB video signals (0.700 Vp-p, positive) and SYNC signals. When connecting it to this cover when you connect/disconnect cables or cords. DA 0 Back cover (page 8) Open this connector. qdDVI-I input connector qd to the right position (for analog RGB signal input) as the default setting. You can switch between digital RGB signals and analog RGB signals with an HD15 (analog RGB) output connector using a DVI-DVI (digital RGB) video signal cable (not supplied...
Operating Instructions
Page 7
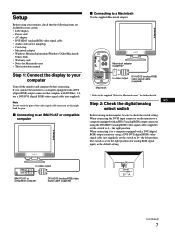
...; LCD display • Power cord • AC adapter • DVI-HD15 (analog RGB) video signal cable • Audio cord (stereo miniplug) • Cord strap • Macintosh adapter • Windows Monitor Information/Windows Utility/Macintosh Utility Disk • Warranty card • Notes for Macintosh users • This instruction manual Step 1: Connect the display to your monitor, check that complies with a DVI (digital RGB) output connector using a DVI-DVI (digital RGB) video signal cable (not supplied), set the switch to the right position (for further details. The switch is set...
...; LCD display • Power cord • AC adapter • DVI-HD15 (analog RGB) video signal cable • Audio cord (stereo miniplug) • Cord strap • Macintosh adapter • Windows Monitor Information/Windows Utility/Macintosh Utility Disk • Warranty card • Notes for Macintosh users • This instruction manual Step 1: Connect the display to your monitor, check that complies with a DVI (digital RGB) output connector using a DVI-DVI (digital RGB) video signal cable (not supplied), set the switch to the right position (for further details. The switch is set...

Operating Instructions
Page 9
... no sound comes from the speakers or the headphones. To select one of the two computers, use this button. • 1: Input via the DVI-I (digital/analog RGB) input connector • 2: Input via the HD15 (analog RGB) input connector INPUT 1 2 OK Note You cannot select the input signal when displaying the main menu on the screen. The vertical frequency turns to adjust the picture. Adjust the volume of the monitor lights up in the power saving mode. If necessary, use the monitor's controls to 60 Hz. The VOLUME menu appears...
... no sound comes from the speakers or the headphones. To select one of the two computers, use this button. • 1: Input via the DVI-I (digital/analog RGB) input connector • 2: Input via the HD15 (analog RGB) input connector INPUT 1 2 OK Note You cannot select the input signal when displaying the main menu on the screen. The vertical frequency turns to adjust the picture. Adjust the volume of the monitor lights up in the power saving mode. If necessary, use the monitor's controls to 60 Hz. The VOLUME menu appears...
Operating Instructions
Page 11
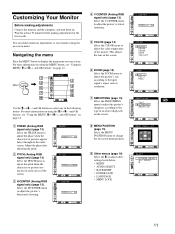
... MENU button to display the main menu on your monitor using the on-screen menu. PHAS E 30 EX I T P I TCH 1688 EX I T H CENTER 50 EX I T 4 V CENTER (Analog RGB signal only) (page 13) Select the V CENTER menu to adjust other settings listed below. • RESET • AUDIO SELECT • BACKLIGHT • POWER SAVE • LANGUAGE • MENU LOCK EX I T RESET 0 S CREEN RESE T AL L RESET EX I T GB 11 For more information on using the MENU button, see "Using the MENU, M(+)/m(-), and OK buttons...
... MENU button to display the main menu on your monitor using the on-screen menu. PHAS E 30 EX I T P I TCH 1688 EX I T H CENTER 50 EX I T 4 V CENTER (Analog RGB signal only) (page 13) Select the V CENTER menu to adjust other settings listed below. • RESET • AUDIO SELECT • BACKLIGHT • POWER SAVE • LANGUAGE • MENU LOCK EX I T RESET 0 S CREEN RESE T AL L RESET EX I T GB 11 For more information on using the MENU button, see "Using the MENU, M(+)/m(-), and OK buttons...

Operating Instructions
Page 12
... / 60Hz Horizontal frequency of the current input signal Vertical frequency of an image (BRIGHTNESS) Brightness adjustment is stored, then the display returns to adjust. The CONTRAST menu appears on the screen. When you want to the previous menu. , INPUT 1 2 OK 4 Close the menu. For more information about 5 seconds. Adjusting the black level of the current input signal 2 Press the M(+)/m(-) buttons to display the desired menu. The BRIGHTNESS menu appears on the screen. Note You can reset the adjustments using a separate BRIGHTNESS menu, different...
... / 60Hz Horizontal frequency of the current input signal Vertical frequency of an image (BRIGHTNESS) Brightness adjustment is stored, then the display returns to adjust. The CONTRAST menu appears on the screen. When you want to the previous menu. , INPUT 1 2 OK 4 Close the menu. For more information about 5 seconds. Adjusting the black level of the current input signal 2 Press the M(+)/m(-) buttons to display the desired menu. The BRIGHTNESS menu appears on the screen. Note You can reset the adjustments using a separate BRIGHTNESS menu, different...
Operating Instructions
Page 13
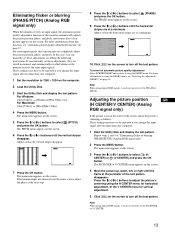
... menu appears on the screen. (PHASE) 9 Press the M(+)/m(-) buttons until the horizontal stripes are observed over the entire screen, adjust the phase as follows. Eliminating flicker or blurring (PHASE/PITCH) (Analog RGB signal only) When the monitor receives an input signal, the automatic picture quality adjustment function of this monitor automatically adjusts the picture position, phase, and pitch, and ensures that the vertical stripes disappear. , 7 Press the OK button. Note When using digital RGB signals...
... menu appears on the screen. (PHASE) 9 Press the M(+)/m(-) buttons until the horizontal stripes are observed over the entire screen, adjust the phase as follows. Eliminating flicker or blurring (PHASE/PITCH) (Analog RGB signal only) When the monitor receives an input signal, the automatic picture quality adjustment function of this monitor automatically adjusts the picture position, phase, and pitch, and ensures that the vertical stripes disappear. , 7 Press the OK button. Note When using digital RGB signals...
Operating Instructions
Page 15
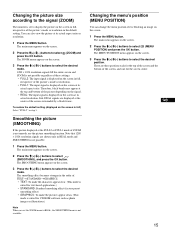
... input signal is displayed on the screen. 2 Press the M(+)/m(-) buttons to select press the OK button. Therefore, black bands may appear at its actual resolution. Sub-SXGA signals are displayed at the FULL2 or FULL1 mode of the picture's mode or resolution. • FULL1: The input signal is displayed on the screen. 1 Press the MENU button. Note that 1280 × 1024 resolution signals are three positions each for the screen center. To restore the default setting (displayed...
... input signal is displayed on the screen. 2 Press the M(+)/m(-) buttons to select press the OK button. Therefore, black bands may appear at its actual resolution. Sub-SXGA signals are displayed at the FULL2 or FULL1 mode of the picture's mode or resolution. • FULL1: The input signal is displayed on the screen. 1 Press the MENU button. Note that 1280 × 1024 resolution signals are three positions each for the screen center. To restore the default setting (displayed...
Operating Instructions
Page 16
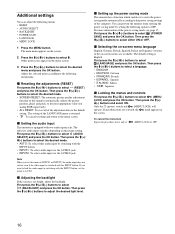
... default setting is too bright, adjust the backlight. Adjust the selected menu according to OFF. 16 Then press the M(+)/ m(-) buttons to select the desired mode. • AUTO: To select either ON or OFF. You can adjust the following instructions. To cancel the menu lock Repeat the procedure above and set the menu to switching with two audio input jacks. Additional settings You can prevent the monitor from entering the power saving mode by switching with...
... default setting is too bright, adjust the backlight. Adjust the selected menu according to OFF. 16 Then press the M(+)/ m(-) buttons to select the desired mode. • AUTO: To select either ON or OFF. You can adjust the following instructions. To cancel the menu lock Repeat the procedure above and set the menu to switching with two audio input jacks. Additional settings You can prevent the monitor from entering the power saving mode by switching with...

Operating Instructions
Page 17
... signals that do not match one of the factory preset modes, the monitor may take a longer time than normal for any timing within the monitor's frequency range (horizontal: 28 - 92 kHz, vertical: 48 - 85 Hz). After 20 seconds, the monitor enters the power saving mode. ** "Deep sleep" is automatically stored in memory so that next time, the monitor will operate. This adjustment data is a power saving mode defined by VESA...
... signals that do not match one of the factory preset modes, the monitor may take a longer time than normal for any timing within the monitor's frequency range (horizontal: 28 - 92 kHz, vertical: 48 - 85 Hz). After 20 seconds, the monitor enters the power saving mode. ** "Deep sleep" is automatically stored in memory so that next time, the monitor will operate. This adjustment data is a power saving mode defined by VESA...
Operating Instructions
Page 18
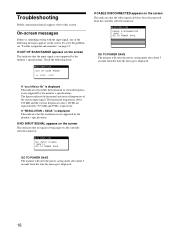
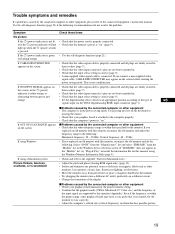
... "Trouble symptoms and remedies" on the screen. If "RESOLUTION > SXGA" is displayed This indicates that the resolution is something wrong with the input signal, one of the current input signal. The figures indicate the horizontal and vertical frequencies of the following items. I NFORMA T I NPUT : 1 GO TO POWER SAVE GO TO POWER SAVE The monitor will enter the power saving mode after about 5 seconds from the time the message is displayed. 18 Troubleshooting...
... "Trouble symptoms and remedies" on the screen. If "RESOLUTION > SXGA" is displayed This indicates that the resolution is something wrong with the input signal, one of the current input signal. The figures indicate the horizontal and vertical frequencies of the following items. I NFORMA T I NPUT : 1 GO TO POWER SAVE GO TO POWER SAVE The monitor will enter the power saving mode after about 5 seconds from the time the message is displayed. 18 Troubleshooting...
Operating Instructions
Page 19
...; Adjust the computer's refresh rate (vertical frequency) to obtain the best possible picture. If "SDM-M81" does not appear in the "Models" list, try "Plug & Play" or install the information file for this monitor using a Macintosh system Picture flickers, bounces, oscillates, or is scrambled xProblems caused by the connected computer or other equipment • Check that the video frequency range is within the proper range, some graphics boards may appear on the screen before...
...; Adjust the computer's refresh rate (vertical frequency) to obtain the best possible picture. If "SDM-M81" does not appear in the "Models" list, try "Plug & Play" or install the information file for this monitor using a Macintosh system Picture flickers, bounces, oscillates, or is scrambled xProblems caused by the connected computer or other equipment • Check that the video frequency range is within the proper range, some graphics boards may appear on the screen before...
Operating Instructions
Page 20
... computer and graphics board. • Type of input signals (analog RGB/digital RGB) MENU Example INFORMATION MODEL : SDM-M81 SER NO : 1234567 MANUFACTURED : 2001-40 Model name Serial number Week and year of manufacture 20 Picture is dark Wavy or elliptical pattern (moire) is set to ON, set it to OFF (page 16). Displaying this monitor's name, serial number, and date of video cable extensions and/or video switch boxes. • Check that some video modes do not...
... computer and graphics board. • Type of input signals (analog RGB/digital RGB) MENU Example INFORMATION MODEL : SDM-M81 SER NO : 1234567 MANUFACTURED : 2001-40 Model name Serial number Week and year of manufacture 20 Picture is dark Wavy or elliptical pattern (moire) is set to ON, set it to OFF (page 16). Displaying this monitor's name, serial number, and date of video cable extensions and/or video switch boxes. • Check that some video modes do not...
Operating Instructions
Page 21
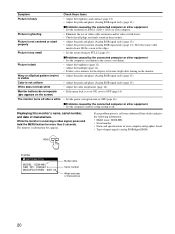
... the color bars do not appear, there is a potential monitor failure. Also note the make and model of your computer(s). Specifications LCD panel Input signal format Resolution Video input connector Input signal levels Audio output Headphones jack AUDIO IN jack Power requirements Power consumption Operating temperature Dimensions (w/h/d) Mass Plug & Play Accessories Panel type: a-Si TFT Active Matrix Picture size: 18.1 inch RGB operating frequency* Horizontal: 28 - 92 kHz Vertical: 48 - 85 Hz Horizontal: Max.1280 dots Vertical: Max.1024 lines Analog RGB: HD15 Digital/analog RGB: DVI...
... the color bars do not appear, there is a potential monitor failure. Also note the make and model of your computer(s). Specifications LCD panel Input signal format Resolution Video input connector Input signal levels Audio output Headphones jack AUDIO IN jack Power requirements Power consumption Operating temperature Dimensions (w/h/d) Mass Plug & Play Accessories Panel type: a-Si TFT Active Matrix Picture size: 18.1 inch RGB operating frequency* Horizontal: 28 - 92 kHz Vertical: 48 - 85 Hz Horizontal: Max.1280 dots Vertical: Max.1024 lines Analog RGB: HD15 Digital/analog RGB: DVI...

Operating Instructions
Page 104
... the manufacturing. There are also other characteristics of the product or its power consumption to a lower level in fisheating birds and mammals, due to conserve energy. The requirements cover a wide range of issues: environment, ergonomics, usability, emission of expanded foam for the black model) x Conglatulations! The product must not contain any of the electrical or electronics...
... the manufacturing. There are also other characteristics of the product or its power consumption to a lower level in fisheating birds and mammals, due to conserve energy. The requirements cover a wide range of issues: environment, ergonomics, usability, emission of expanded foam for the black model) x Conglatulations! The product must not contain any of the electrical or electronics...
Marketing Specifications
Page 1
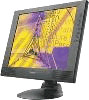
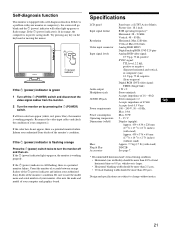
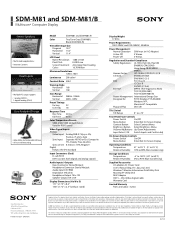
... inputs - 1 analog input (HD15) and combination analog/digital input (DVI-I) provides flexibility for computer system connections. Delivers a crisp, clear, full-screen image for resolutions up to deliver exceptional audio. M-Series LCD Zero Footprint™ design - TFT LCD technology is combined with outstanding onscreen colors all in a sleek, space-saving design. 18.1" Flat Panel - Removable tilt base adjusts to any angle or can be removed to provide arm or wall mounting. Stereo speakers - SDM-M81 and SDM-M81/B Multiscan® Computer Display Technologically advanced LCD display...
... inputs - 1 analog input (HD15) and combination analog/digital input (DVI-I) provides flexibility for computer system connections. Delivers a crisp, clear, full-screen image for resolutions up to deliver exceptional audio. M-Series LCD Zero Footprint™ design - TFT LCD technology is combined with outstanding onscreen colors all in a sleek, space-saving design. 18.1" Flat Panel - Removable tilt base adjusts to any angle or can be removed to provide arm or wall mounting. Stereo speakers - SDM-M81 and SDM-M81/B Multiscan® Computer Display Technologically advanced LCD display...
Marketing Specifications
Page 2
... come • Adjustable and removable tilt base • Arm or wall mounting Model SDM-M81 and SDM-M81/B Color Two Tone Gray (SDM-M81) Black (SDM-M81/B) Viewable Image Size Diagonal 18.1" Horizontal 14.2" Vertical 11.4" LCD Panel Native Resolution Pixel Pitch Screen Treatment Colors 1280 x 1024 0.2805 mm Anti-Glare/Hard Coating 16.78 Million Maximum Resolutions 1280 x 1024 Luminance 200 cd/m2 Contrast Ratio 300:1 Viewing Angle Horizontal 160 Vertical 160 Scan Range Horizontal Vertical 28kHz - 92kHz 48Hz - 85Hz Preset Timings Factory 22 User Adj 18...
... come • Adjustable and removable tilt base • Arm or wall mounting Model SDM-M81 and SDM-M81/B Color Two Tone Gray (SDM-M81) Black (SDM-M81/B) Viewable Image Size Diagonal 18.1" Horizontal 14.2" Vertical 11.4" LCD Panel Native Resolution Pixel Pitch Screen Treatment Colors 1280 x 1024 0.2805 mm Anti-Glare/Hard Coating 16.78 Million Maximum Resolutions 1280 x 1024 Luminance 200 cd/m2 Contrast Ratio 300:1 Viewing Angle Horizontal 160 Vertical 160 Scan Range Horizontal Vertical 28kHz - 92kHz 48Hz - 85Hz Preset Timings Factory 22 User Adj 18...


