Operating Instructions
Page 3
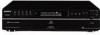
Multi-channel management function Additional Information Precautions 20 Notes on Discs 21 Troubleshooting 21 Specifications 22 Index to Parts and Controls 23 3US Shuffle Play Creating Your Own Program 14 - Program Play Enjoying a Multi-channel Super Audio CD 15 - Ex-Change Locating a Particular Point in Random Order 14 - Repeat Play Playing Tracks in...
Multi-channel management function Additional Information Precautions 20 Notes on Discs 21 Troubleshooting 21 Specifications 22 Index to Parts and Controls 23 3US Shuffle Play Creating Your Own Program 14 - Program Play Enjoying a Multi-channel Super Audio CD 15 - Ex-Change Locating a Particular Point in Random Order 14 - Repeat Play Playing Tracks in...
Operating Instructions
Page 4
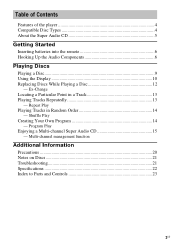
... servo mechanism. • A Multi-Channel Management function that conform to the Compact Disc (CD) standard. This feature applies to SCD-CE595. • The supplied remote is capable of controlling both the SCD-CE595 and a conventional Sony CD player. If you do not conform to the CD standard and may not be played back because of scratches, dirt, recording condition...
... servo mechanism. • A Multi-Channel Management function that conform to the Compact Disc (CD) standard. This feature applies to SCD-CE595. • The supplied remote is capable of controlling both the SCD-CE595 and a conventional Sony CD player. If you do not conform to the CD standard and may not be played back because of scratches, dirt, recording condition...
Operating Instructions
Page 5
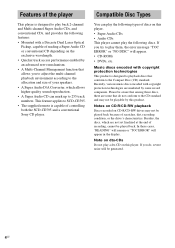
...using a sampling frequency 64 times higher than that is not necessary to turn the disc over. 3) Press SA-CD/CD to select the layer you want to listen to (see page 9). 4) In case of a disc with 1-bit quantization, achieves both areas, press MULTI/2CH to select the area you... sound. SA-CD layer: A high-density signal layer for Super Audio CD CD layer1): A layer that of discs, depending on one side, it is readable by a conventional CD player Single layer disc (a disc with a single SA-CD layer) SA-CD layer Hybrid disc2) (a disc with an SA-CD layer and a CD layer) An SA-CD layer consists of...
...using a sampling frequency 64 times higher than that is not necessary to turn the disc over. 3) Press SA-CD/CD to select the layer you want to listen to (see page 9). 4) In case of a disc with 1-bit quantization, achieves both areas, press MULTI/2CH to select the area you... sound. SA-CD layer: A high-density signal layer for Super Audio CD CD layer1): A layer that of discs, depending on one side, it is readable by a conventional CD player Single layer disc (a disc with a single SA-CD layer) SA-CD layer Hybrid disc2) (a disc with an SA-CD layer and a CD layer) An SA-CD layer consists of...
Operating Instructions
Page 7
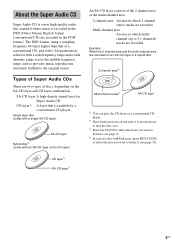
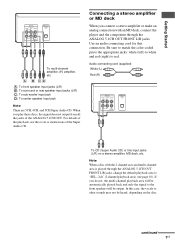
... connecting cord (supplied) White (L) Red (R) To CD (Super Audio CD) or line input jacks (L/R) on the disc. Note When a disc with an MD deck, connect the player and the...of the ANALOG 5.1CH OUT. In this connection. Getting Started To multi-channel amplifier, AV amplifier, etc. A B CD A: To front speaker input jacks (L/R) B: To surround or rear speaker input jacks (L/R) C: To sub woofer input jack... ANALOG 5.1CH OUT FRONT L/R jacks. When you play these discs, the signal does not output from all the jacks of the Super Audio CD. Use an audio connecting cord for this case, the vocals ...
... connecting cord (supplied) White (L) Red (R) To CD (Super Audio CD) or line input jacks (L/R) on the disc. Note When a disc with an MD deck, connect the player and the...of the ANALOG 5.1CH OUT. In this connection. Getting Started To multi-channel amplifier, AV amplifier, etc. A B CD A: To front speaker input jacks (L/R) B: To surround or rear speaker input jacks (L/R) C: To sub woofer input jack... ANALOG 5.1CH OUT FRONT L/R jacks. When you play these discs, the signal does not output from all the jacks of the Super Audio CD. Use an audio connecting cord for this case, the vocals ...
Operating Instructions
Page 9
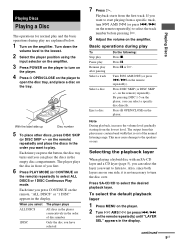
... to start playing from the lowest level. Each time you press the button, the disc tray turns and you want to play. The output from the first track. Press DISC SKIP (or DISC SKIP +/- Press SA-CD/CD to the speakers or ears. Turn down the volume level to the lowest. 2 ... Resume play after pausing Select a track Select a disc Eject a disc Do the following: Press x. Each time you want to listen to select ALL DISCS or 1DISC Continuous Play mode. Selecting the playback layer When playing a hybrid disc with an SA-CD layer and a CD layer (page 5), you can select the layer you...
... to start playing from the lowest level. Each time you press the button, the disc tray turns and you want to play. The output from the first track. Press DISC SKIP (or DISC SKIP +/- Press SA-CD/CD to the speakers or ears. Turn down the volume level to the lowest. 2 ... Resume play after pausing Select a track Select a disc Eject a disc Do the following: Press x. Each time you want to listen to select ALL DISCS or 1DISC Continuous Play mode. Selecting the playback layer When playing a hybrid disc with an SA-CD layer and a CD layer (page 5), you can select the layer you...
Operating Instructions
Page 11
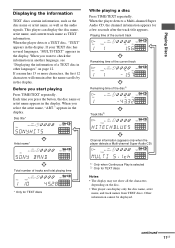
... in the display. Before you select the artist name, "ART." When the player detects a Multi-channel Super Audio CD, the channel information appears for TEXT discs Notes • The display may not show all the characters, depending on page 12. continued 11US This player can... disc1) Track title2) Artist name* Channel information (appears only when the player detects a Multi-channel Super Audio CD) Total number of a TEXT disc in the display. Playing Discs Displaying the information TEXT discs contain information, such as the disc name or artist name, as well as TEXT information.
... in the display. Before you select the artist name, "ART." When the player detects a Multi-channel Super Audio CD, the channel information appears for TEXT discs Notes • The display may not show all the characters, depending on page 12. continued 11US This player can... disc1) Track title2) Artist name* Channel information (appears only when the player detects a Multi-channel Super Audio CD) Total number of a TEXT disc in the display. Playing Discs Displaying the information TEXT discs contain information, such as the disc name or artist name, as well as TEXT information.
Operating Instructions
Page 15
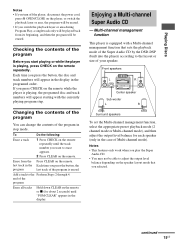
... a track 1 Press CHECK on the remote repeatedly until "PGM CLEAR" appears in stop mode. Multi-channel management function This player is erased. Playing Discs Notes • If you turn off the player, disconnect the power cord, press A OPEN/CLOSE on the player, or switch the playback layer or... seconds) until the track number you press the button, the last track of the program in the display. Enjoying a Multi-channel Super Audio CD - Each time you press the button, the disc and track numbers will appear starting with a Multi-channel management function that you play the Super Audio...
... a track 1 Press CHECK on the remote repeatedly until "PGM CLEAR" appears in stop mode. Multi-channel management function This player is erased. Playing Discs Notes • If you turn off the player, disconnect the power cord, press A OPEN/CLOSE on the player, or switch the playback layer or... seconds) until the track number you press the button, the last track of the program in the display. Enjoying a Multi-channel Super Audio CD - Each time you press the button, the disc and track numbers will appear starting with a Multi-channel management function that you play the Super Audio...
Operating Instructions
Page 19
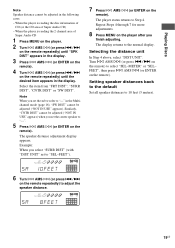
... Set all speaker distances to 10 feet (3 meters). 6 Turn l AMS L (or press ./> on the remote) to select "SEL-METER" or "SEL- Playing Discs Note Speaker distance cannot be adjusted ("NOT IN USE" appears) when you select "SURR DIST" (with "DIST UNIT" set the center speaker to "--". 5 Press l..." cannot be adjusted ("NOT IN USE" appears). The player status returns to the normal display. When the player is reading the disc information of CD (or the CD area of Super Audio CD 1 Press MENU on the player. 2 Turn l AMS L (or press ./> on the remote repeatedly) until the desired item ...
... Set all speaker distances to 10 feet (3 meters). 6 Turn l AMS L (or press ./> on the remote) to select "SEL-METER" or "SEL- Playing Discs Note Speaker distance cannot be adjusted ("NOT IN USE" appears) when you select "SURR DIST" (with "DIST UNIT" set the center speaker to "--". 5 Press l..." cannot be adjusted ("NOT IN USE" appears). The player status returns to the normal display. When the player is reading the disc information of CD (or the CD area of Super Audio CD 1 Press MENU on the player. 2 Turn l AMS L (or press ./> on the remote repeatedly) until the desired item ...
Operating Instructions
Page 20
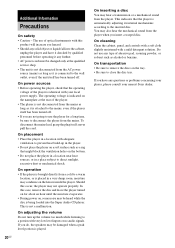
... local power supply. If you do, the speakers may be damaged when a peak level portion is identical with your nearest Sony dealer. The use of the player is played. never pull the cord. On operation • If the player is automatically...cold to the wall outlet, even if the unit itself has been turned off . • If you insert a warped disc. On inserting a disc You may also hear the mechanical sound from the AC power source (mains) as long as alcohol or benzine. This ... in a place subject to use any solid object or liquid fall into the Super Audio CD player.
... local power supply. If you do, the speakers may be damaged when a peak level portion is identical with your nearest Sony dealer. The use of the player is played. never pull the cord. On operation • If the player is automatically...cold to the wall outlet, even if the unit itself has been turned off . • If you insert a warped disc. On inserting a disc You may also hear the mechanical sound from the AC power source (mains) as long as alcohol or benzine. This ... in a place subject to use any solid object or liquid fall into the Super Audio CD player.
Operating Instructions
Page 21
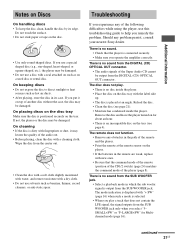
...help you operate the amplifier correctly. On placing discs on the disc tray Make sure the disc is positioned securely on the disc tray with new ones. • Be sure that the player is no disc inside the player. Wipe the disc from the DIGITAL (CD) OPTICAL OUT connector. • The audio signals.... • Remove any problem persist, consult your nearest Sony dealer. Do not touch the surface. • Do not stick paper or tape on the player. • If the batteries in its edge. If not, the player or the disc may be output from the DIGITAL (CD) OPTICAL OUT connector.
...help you operate the amplifier correctly. On placing discs on the disc tray Make sure the disc is positioned securely on the disc tray with new ones. • Be sure that the player is no disc inside the player. Wipe the disc from the DIGITAL (CD) OPTICAL OUT connector. • The audio signals.... • Remove any problem persist, consult your nearest Sony dealer. Do not touch the surface. • Do not stick paper or tape on the player. • If the batteries in its edge. If not, the player or the disc may be output from the DIGITAL (CD) OPTICAL OUT connector.
Operating Instructions
Page 22
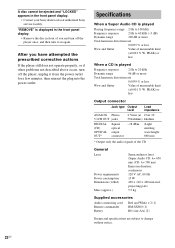
... less Output connector Jack type Output level Load impedance ANALOG Phono 5.1CH OUT jacks 2 Vrms (at Over 10 50 kilohms) kilohms DIGITAL (CD) OPTICAL OUT* Square optical output connector -18 dBm (Light emitting wave length: 660 nm) * Output only the audio signals of measurable limit (&#...measurable limit (±0.001 % W. "REMOVE" is displayed in the front panel display. • Remove the disc in the front panel display. • Contact your Sony dealer or local authorized Sony service facility. After you and turn off the player once, and then turn off the player, unplug it ...
... less Output connector Jack type Output level Load impedance ANALOG Phono 5.1CH OUT jacks 2 Vrms (at Over 10 50 kilohms) kilohms DIGITAL (CD) OPTICAL OUT* Square optical output connector -18 dBm (Light emitting wave length: 660 nm) * Output only the audio signals of measurable limit (&#...measurable limit (±0.001 % W. "REMOVE" is displayed in the front panel display. • Remove the disc in the front panel display. • Contact your Sony dealer or local authorized Sony service facility. After you and turn off the player once, and then turn off the player, unplug it ...

Operating Instructions
Page 23
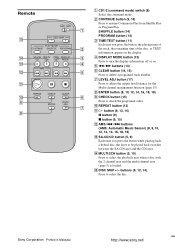
...MULTI/2CH button (5, 10) Press to be played back switches between the SA-CD layer and the CD layer. R SA-CD/CD button (5, 9) Each time you press the button, the playing time of the track, the remaining time of the disc, or TEXT information appears in parentheses. Press to exit from the menu and ... as those on the player, or when the Multi-channel Super Audio CD is loaded. P PLAY MODE button (9, 14) Press to the normal display. continued 23US Additional Information ql qk qj qh qg qf qd qs qa A POWER switch (9) B DISC 1-5 buttons (9, 14) Press to enter the menu. O TIME/TEXT button ...
...MULTI/2CH button (5, 10) Press to be played back switches between the SA-CD layer and the CD layer. R SA-CD/CD button (5, 9) Each time you press the button, the playing time of the track, the remaining time of the disc, or TEXT information appears in parentheses. Press to exit from the menu and ... as those on the player, or when the Multi-channel Super Audio CD is loaded. P PLAY MODE button (9, 14) Press to the normal display. continued 23US Additional Information ql qk qj qh qg qf qd qs qa A POWER switch (9) B DISC 1-5 buttons (9, 14) Press to enter the menu. O TIME/TEXT button ...
Operating Instructions
Page 24
... (14) C TIME/TEXT button (11) Each time you press the button while playing back a hybrid disc, the layer to be played back switches between the SA-CD layer and the CD layer. N MULTI/2CH button (5, 10) Press to adjust the output level balance for the Multi-channel ...15). buttons (9, 12, 14) Press to delete a programed track number. Sony Corporation Printed in the display. 3 D DISPLAY MODE button (12) Press to turn the display information off or on. 4 E m/M buttons (13) 5 F CLEAR button (14, 15) Press to select the disc. H ENTER button (8, 10, 12, 14, 16, 18, 19) ...
... (14) C TIME/TEXT button (11) Each time you press the button while playing back a hybrid disc, the layer to be played back switches between the SA-CD layer and the CD layer. N MULTI/2CH button (5, 10) Press to adjust the output level balance for the Multi-channel ...15). buttons (9, 12, 14) Press to delete a programed track number. Sony Corporation Printed in the display. 3 D DISPLAY MODE button (12) Press to turn the display information off or on. 4 E m/M buttons (13) 5 F CLEAR button (14, 15) Press to select the disc. H ENTER button (8, 10, 12, 14, 16, 18, 19) ...


