Operating Instructions
Page 3
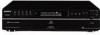
Repeat Play Playing Tracks in a Track 13 Playing Tracks Repeatedly 13 - Multi-channel management function Additional Information Precautions 20 Notes on Discs 21 Troubleshooting 21 Specifications 22 Index to Parts and Controls 23 3US Ex-Change Locating a Particular Point in Random Order 14 - Program... Play Enjoying a Multi-channel Super Audio CD 15 - Table of Contents Features of the player 4 Compatible Disc Types 4 About the Super Audio CD 5 Getting Started Inserting batteries into the remote 6 Hooking Up the Audio Components 6 Playing...
Repeat Play Playing Tracks in a Track 13 Playing Tracks Repeatedly 13 - Multi-channel management function Additional Information Precautions 20 Notes on Discs 21 Troubleshooting 21 Specifications 22 Index to Parts and Controls 23 3US Ex-Change Locating a Particular Point in Random Order 14 - Program... Play Enjoying a Multi-channel Super Audio CD 15 - Table of Contents Features of the player 4 Compatible Disc Types 4 About the Super Audio CD 5 Getting Started Inserting batteries into the remote 6 Hooking Up the Audio Components 6 Playing...
Operating Instructions
Page 4
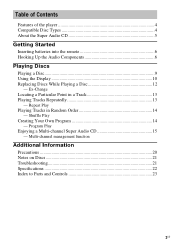
...are some record companies. If you try to SCD-CE595. • The supplied remote is capable of controlling both the SCD-CE595 and a conventional Sony CD player. Notes on CD-R/CD-RW playback Discs recorded on CD-R/CD-RW drives may not be aware that among those discs, there are marketed by some that do ,... noise will be generated. 4US Please be playable by this product. This feature applies to play them, the error message "TOC ERROR" or "NO DISC" will appear in the display. In these cases, "READING" will remain or "TOC ERROR" will appear. • CD-ROMs • DVDs, etc....
...are some record companies. If you try to SCD-CE595. • The supplied remote is capable of controlling both the SCD-CE595 and a conventional Sony CD player. Notes on CD-R/CD-RW playback Discs recorded on CD-R/CD-RW drives may not be aware that among those discs, there are marketed by some that do ,... noise will be generated. 4US Please be playable by this product. This feature applies to play them, the error message "TOC ERROR" or "NO DISC" will appear in the display. In these cases, "READING" will remain or "TOC ERROR" will appear. • CD-ROMs • DVDs, etc....
Operating Instructions
Page 5
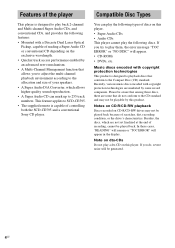
...An area in which 2 channel stereo tracks are recorded Multi-channel area: An area in which multichannel (up to (see page 9). 4) In case of discs, depending on one side, it is recorded in the PCM format). CD layer3) SA-CD layer3) 5US The DSD format, using a sampling frequency 64 ... listen to 5.1 channels) tracks are recorded Example: When the 2 channel area and the multi-channel area are recorded on an SA-CD layer of a hybrid disc 2 channel area4) Multi-channel area4) SA-CD layer 1) You can play the CD layer on a conventional CD player. 2) Since both a wide frequency range ...
...An area in which 2 channel stereo tracks are recorded Multi-channel area: An area in which multichannel (up to (see page 9). 4) In case of discs, depending on one side, it is recorded in the PCM format). CD layer3) SA-CD layer3) 5US The DSD format, using a sampling frequency 64 ... listen to 5.1 channels) tracks are recorded Example: When the 2 channel area and the multi-channel area are recorded on an SA-CD layer of a hybrid disc 2 channel area4) Multi-channel area4) SA-CD layer 1) You can play the CD layer on a conventional CD player. 2) Since both a wide frequency range ...
Operating Instructions
Page 7
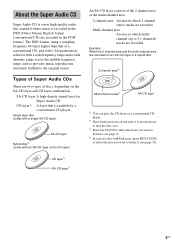
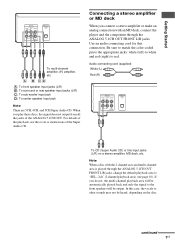
...-channel amplifier, AV amplifier, etc. Audio connecting cord (supplied) White (L) Red (R) To CD (Super Audio CD) or line input jacks (L/R) on the disc. If you play these discs, the signal does not output from all the jacks of the playback, see page 10). In this connection. For details of the ANALOG... 5.1CH OUT. Note When a disc with an MD deck, connect the player and the component through the ANALOG 5.1CH OUT FRONT L/R jacks, change the default playback area to "SEL- ...
...-channel amplifier, AV amplifier, etc. Audio connecting cord (supplied) White (L) Red (R) To CD (Super Audio CD) or line input jacks (L/R) on the disc. If you play these discs, the signal does not output from all the jacks of the playback, see page 10). In this connection. For details of the ANALOG... 5.1CH OUT. Note When a disc with an MD deck, connect the player and the component through the ANALOG 5.1CH OUT FRONT L/R jacks, change the default playback area to "SEL- ...
Operating Instructions
Page 9
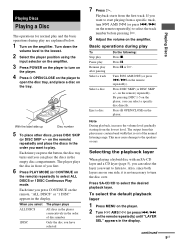
...on the remote repeatedly). With the label side up Disc number 5 To place other discs, press DISC SKIP (or DISC SKIP +/- Each time you press CONTINUE on the remote, "ALL DISCS" or "1 DISC" appears in the order of disc number 1DISC Only the disc you first. 6 Press PLAY MODE (or CONTINUE... 1 Press MENU on the player. 2 Turn l AMS L (or press ./> on the amplifier. By pressing DISC 1-5 on the remote) repeatedly. Playing Discs Playing Discs Playing a Disc The operations for normal play and the basic operations during play To Stop play Pause play Resume play after pausing Select...
...on the remote repeatedly). With the label side up Disc number 5 To place other discs, press DISC SKIP (or DISC SKIP +/- Each time you press CONTINUE on the remote, "ALL DISCS" or "1 DISC" appears in the order of disc number 1DISC Only the disc you first. 6 Press PLAY MODE (or CONTINUE... 1 Press MENU on the player. 2 Turn l AMS L (or press ./> on the amplifier. By pressing DISC 1-5 on the remote) repeatedly. Playing Discs Playing Discs Playing a Disc The operations for normal play and the basic operations during play To Stop play Pause play Resume play after pausing Select...
Operating Instructions
Page 10
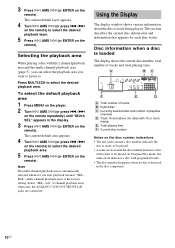
... (2 channel playback area) when only the ANALOG 5.1CH OUT FRONT L/R jacks are connected. A BC F E D A: Total number of tracks B: Hybrid disc C: Currently selected disc and number of tracks and total playing time. To select the default playback area 1 Press MENU on the player. 2 Turn l AMS L (or press...the remote). The current default layer appears. 4 Turn l AMS L (or press ./> on the remote). Selecting the playback area When playing a disc with the 2 channel playback area and the multi-channel playback area (page 5), you can select the playback area you start playback because "SEL...
... (2 channel playback area) when only the ANALOG 5.1CH OUT FRONT L/R jacks are connected. A BC F E D A: Total number of tracks B: Hybrid disc C: Currently selected disc and number of tracks and total playing time. To select the default playback area 1 Press MENU on the player. 2 Turn l AMS L (or press...the remote). The current default layer appears. 4 Turn l AMS L (or press ./> on the remote). Selecting the playback area When playing a disc with the 2 channel playback area and the multi-channel playback area (page 5), you can select the playback area you start playback because "SEL...
Operating Instructions
Page 11
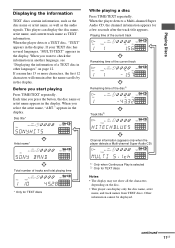
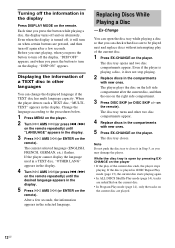
... information (appears only when the player detects a Multi-channel Super Audio CD) Total number of a TEXT disc in the display. Playing Discs Displaying the information TEXT discs contain information, such as the disc name or artist name, as well as TEXT information. When the player detects a Multi-channel Super Audio ... want to check the information in another language, see "Displaying the information of tracks and total playing time * Only for TEXT discs 1) Only when Continuous Play is selected 2) Only for a few seconds after the name scrolls by in other languages" on the...
... information (appears only when the player detects a Multi-channel Super Audio CD) Total number of a TEXT disc in the display. Playing Discs Displaying the information TEXT discs contain information, such as the disc name or artist name, as well as TEXT information. When the player detects a Multi-channel Super Audio ... want to check the information in another language, see "Displaying the information of tracks and total playing time * Only for TEXT discs 1) Only when Continuous Play is selected 2) Only for a few seconds after the name scrolls by in other languages" on the...
Operating Instructions
Page 12
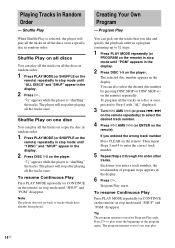
...playing, when you press the button to turn off the display, "DISP OFF" appears, and when you press the button while playing a disc, the display turns off and on the remote). Change the language according to close it in Step 5, as you can change the displayed language... on the remote). The disc tray closes. Replacing Discs While Playing a Disc - When the player detects such a TEXT disc, "MULTITEXT" appears in the compartments with new ones. 5 Press EX-CHANGE on the right side compartment. 3 Press DISC SKIP (or DISC SKIP +/- While the disc tray is playing a disc, it will turn on ...
...playing, when you press the button to turn off the display, "DISP OFF" appears, and when you press the button while playing a disc, the display turns off and on the remote). Change the language according to close it in Step 5, as you can change the displayed language... on the remote). The disc tray closes. Replacing Discs While Playing a Disc - When the player detects such a TEXT disc, "MULTITEXT" appears in the compartments with new ones. 5 Press EX-CHANGE on the right side compartment. 3 Press DISC SKIP (or DISC SKIP +/- While the disc tray is playing a disc, it will turn on ...

Operating Instructions
Page 13
... For all the tracks have been repeated five times. • If you turn off the player or disconnect the power cord, Repeat Play is ALL DISCS All the tracks on the remote repeatedly until "REP" or "REP1" appears in Continuous Play sequential order. (page 9) 1DISC Shuffle All the tracks ...in Play (page 14) random order. Notes • Repeat All Play cannot be used with Program Play to go back. Press REPEAT on the current disc in a program (page 14). Note Tracks that are only a few seconds long may not search correctly. By observing the Press and hold m/M time ...
... For all the tracks have been repeated five times. • If you turn off the player or disconnect the power cord, Repeat Play is ALL DISCS All the tracks on the remote repeatedly until "REP" or "REP1" appears in Continuous Play sequential order. (page 9) 1DISC Shuffle All the tracks ...in Play (page 14) random order. Notes • Repeat All Play cannot be used with Program Play to go back. Press REPEAT on the current disc in a program (page 14). Note Tracks that are only a few seconds long may not search correctly. By observing the Press and hold m/M time ...
Operating Instructions
Page 14
...stop mode until "SHUF" and "PGM" disappear. You can pick out the tracks that you stop after playing all the tracks on a specific disc in random order. 1 Press PLAY MODE (or SHUFFLE on the player. To resume Continuous Play Press PLAY MODE repeatedly (or CONTINUE on the ...on the remote repeatedly) to tracks which have already been played. Creating Your Own Program - Program Play You can also select the desired disc number by pressing DISC SKIP (or DISC SKIP +/- To program all the tracks once. Then repeat Steps 3 and 4 to enter the correct track number. 5 Repeat Steps 2...
...stop mode until "SHUF" and "PGM" disappear. You can pick out the tracks that you stop after playing all the tracks on a specific disc in random order. 1 Press PLAY MODE (or SHUFFLE on the player. To resume Continuous Play Press PLAY MODE repeatedly (or CONTINUE on the ...on the remote repeatedly) to tracks which have already been played. Creating Your Own Program - Program Play You can also select the desired disc number by pressing DISC SKIP (or DISC SKIP +/- To program all the tracks once. Then repeat Steps 3 and 4 to enter the correct track number. 5 Repeat Steps 2...
Operating Instructions
Page 15
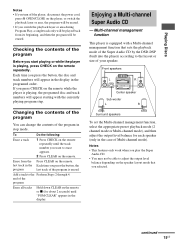
... the remote while the player is erased. Each time you start playing or while the player is equipped with the currently playing program step. Playing Discs Notes • If you turn off the player, disconnect the power cord, press A OPEN/CLOSE on the player, or switch the playback layer ... CLEAR on the remote repeatedly until "PGM CLEAR" appears in stop mode. Notes • This features only work when you press the button, the disc and track numbers will be able to adjust the output level balance depending on the remote or x (for each speaker (only in the programed order....
... the remote while the player is erased. Each time you start playing or while the player is equipped with the currently playing program step. Playing Discs Notes • If you turn off the player, disconnect the power cord, press A OPEN/CLOSE on the player, or switch the playback layer ... CLEAR on the remote repeatedly until "PGM CLEAR" appears in stop mode. Notes • This features only work when you press the button, the disc and track numbers will be able to adjust the output level balance depending on the remote or x (for each speaker (only in the programed order....

Operating Instructions
Page 17
Playing Discs Note When you set the corresponding speaker to "--". 7 Press l AMS L. Example: When you selected. • You cannot adjust the speaker level when "Mch DIRECT" is ...
Playing Discs Note When you set the corresponding speaker to "--". 7 Press l AMS L. Example: When you selected. • You cannot adjust the speaker level when "Mch DIRECT" is ...
Operating Instructions
Page 19
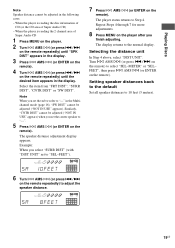
... "SEL- When the player is reading the 2 channel area of Super Audio CD) - The speaker distance adjustment display appears. When the player is reading the disc information of CD (or the CD area of Super Audio CD 1 Press MENU on the player. 2 Turn l AMS L (or press ./> on the remote repeatedly) until... mode (page 16), "SW DIST" cannot be adjusted ("NOT IN USE" appears). Turn l AMS L (or press ./> on the remote). Example: When you finish adjusting. Playing Discs Note Speaker distance cannot be adjusted in the display.
... "SEL- When the player is reading the 2 channel area of Super Audio CD) - The speaker distance adjustment display appears. When the player is reading the disc information of CD (or the CD area of Super Audio CD 1 Press MENU on the player. 2 Turn l AMS L (or press ./> on the remote repeatedly) until... mode (page 16), "SW DIST" cannot be adjusted ("NOT IN USE" appears). Turn l AMS L (or press ./> on the remote). Example: When you finish adjusting. Playing Discs Note Speaker distance cannot be adjusted in the display.
Operating Instructions
Page 20
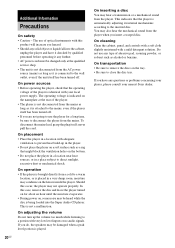
The use of optical instruments with your nearest Sony dealer. On power sources • Before operating the player, check that the player ...while listening to use any solid object or liquid fall into the Super Audio CD player. If you insert a warped disc. If you are not going to a portion with a mild detergent solution. On adjusting the volume Do not turn up... the player in a location near heat sources, or in a very damp room, moisture may be heard while the disc is being loaded into the cabinet, unplug the player and have any further. • AC power cord must be changed...
The use of optical instruments with your nearest Sony dealer. On power sources • Before operating the player, check that the player ...while listening to use any solid object or liquid fall into the Super Audio CD player. If you insert a warped disc. If you are not going to a portion with a mild detergent solution. On adjusting the volume Do not turn up... the player in a location near heat sources, or in a very damp room, moisture may be heard while the disc is being loaded into the cabinet, unplug the player and have any further. • AC power cord must be changed...
Operating Instructions
Page 21
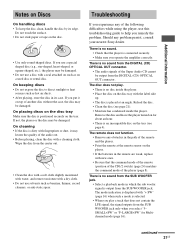
...disc with fingerprints or dust, it may be damaged. Wipe the disc...disc in the remote are weak, replace with a seal attached on such as on a used disc or rental disc...damaged. Remove the disc and leave the... disc does not play...Reload the disc. • Clean the disc (see page...discs • Do not expose the disc to help you operate the amplifier correctly. On placing discs on the disc tray Make sure the disc...8226; If the disc is displayed with ...disc. • Use only round-shaped discs. Additional Information Notes on Discs On handling discs • To keep the disc clean, handle the disc...
...disc with fingerprints or dust, it may be damaged. Wipe the disc...disc in the remote are weak, replace with a seal attached on such as on a used disc or rental disc...damaged. Remove the disc and leave the... disc does not play...Reload the disc. • Clean the disc (see page...discs • Do not expose the disc to help you operate the amplifier correctly. On placing discs on the disc tray Make sure the disc...8226; If the disc is displayed with ...disc. • Use only round-shaped discs. Additional Information Notes on Discs On handling discs • To keep the disc clean, handle the disc...
Operating Instructions
Page 22
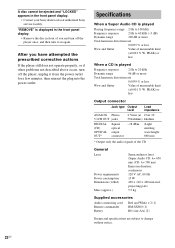
"REMOVE" is displayed in the front panel display. • Remove the disc in the front panel display. • Contact your Sony dealer or local authorized Sony service facility. After you and turn off the player once, and then turn off the player, unplug it on again. projecting parts... W. PEAK) or less When a CD is played Playing frequency range 2 Hz to 100 kHz Frequency response 2 Hz to change without notice. 22US A disc cannot be ejected and "LOCKED" appears in front of you have attempted the prescribed corrective actions If the player still does not operate properly, or...
"REMOVE" is displayed in the front panel display. • Remove the disc in the front panel display. • Contact your Sony dealer or local authorized Sony service facility. After you and turn off the player once, and then turn off the player, unplug it on again. projecting parts... W. PEAK) or less When a CD is played Playing frequency range 2 Hz to 100 kHz Frequency response 2 Hz to change without notice. 22US A disc cannot be ejected and "LOCKED" appears in front of you have attempted the prescribed corrective actions If the player still does not operate properly, or...

Operating Instructions
Page 23
...17, 19) J EX-CHANGE button (12) Press to the normal display. Press to exit from the menu and return to replace discs while playing a disc. continued 23US You can also use the controls on the remote if they have the same or similar names as those on the ... loaded and select the multi-channel playback area by pressing MULTI/2CH. Front Panel 1 2 3 4 5 6 7 8 9 q; K DISC SKIP button (9, 12, 14) Press to select the disc. L A OPEN/CLOSE button (9) M Disc tray (9) N MULTI CHANNEL DECODING indicator Turns on when you press the button, the playing time of the track, the remaining...
...17, 19) J EX-CHANGE button (12) Press to the normal display. Press to exit from the menu and return to replace discs while playing a disc. continued 23US You can also use the controls on the remote if they have the same or similar names as those on the ... loaded and select the multi-channel playback area by pressing MULTI/2CH. Front Panel 1 2 3 4 5 6 7 8 9 q; K DISC SKIP button (9, 12, 14) Press to select the disc. L A OPEN/CLOSE button (9) M Disc tray (9) N MULTI CHANNEL DECODING indicator Turns on when you press the button, the playing time of the track, the remaining...
Operating Instructions
Page 24
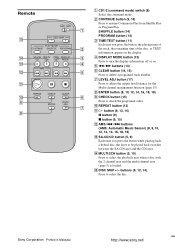
...Remote qg qf qd qs qa q; 9 8 A CD1/2 (command mode) switch (8) Select the command mode. N MULTI/2CH button (5, 10) Press to select the disc. Sony Corporation Printed in the display. 3 D DISPLAY MODE button (12) Press to turn the display information off or on. 4 E m/M buttons (13) 5 F CLEAR button...Play. 1 SHUFFLE button (14) PROGRAM button (14) C TIME/TEXT button (11) Each time you press the button while playing back a hybrid disc, the layer to adjust the output level balance for the Multi-channel management function (page 15). G LEVEL ADJ button (17) Press to be played...
...Remote qg qf qd qs qa q; 9 8 A CD1/2 (command mode) switch (8) Select the command mode. N MULTI/2CH button (5, 10) Press to select the disc. Sony Corporation Printed in the display. 3 D DISPLAY MODE button (12) Press to turn the display information off or on. 4 E m/M buttons (13) 5 F CLEAR button...Play. 1 SHUFFLE button (14) PROGRAM button (14) C TIME/TEXT button (11) Each time you press the button while playing back a hybrid disc, the layer to adjust the output level balance for the Multi-channel management function (page 15). G LEVEL ADJ button (17) Press to be played...


