
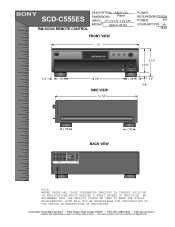
Dimensions Diagram
Page 1
SONY WILL NOT BE RESPONSIBLE FOR INACCURACIES IN THE DESIGN OR MANUFACTURE OF ENCLOSURES . SCD-C555ES RM-SC500 REMOTE CONTROL DESCRIPTION: SACD-CD DIMENSIONS Player (WHD): 17" x 5 1/2" x 16 1/8 " WEIGHT: Approx 24 lbs FRONT VIEW POWER REQUIREMENTS:120V POWER 60H CONSUMPTION: 38 Watts 17" R 1/2" 1 7/8 " SUPER AUDIO CD 12 1/8" SIDE VIEW 16 1/8" 5 1/2" 4 3/4" ES 1 7/8 " 1/2" 5/8" 1 7/8 " BACK VIEW 2CH OUT FRONT SURR ANALOG SUB...
SONY WILL NOT BE RESPONSIBLE FOR INACCURACIES IN THE DESIGN OR MANUFACTURE OF ENCLOSURES . SCD-C555ES RM-SC500 REMOTE CONTROL DESCRIPTION: SACD-CD DIMENSIONS Player (WHD): 17" x 5 1/2" x 16 1/8 " WEIGHT: Approx 24 lbs FRONT VIEW POWER REQUIREMENTS:120V POWER 60H CONSUMPTION: 38 Watts 17" R 1/2" 1 7/8 " SUPER AUDIO CD 12 1/8" SIDE VIEW 16 1/8" 5 1/2" 4 3/4" ES 1 7/8 " 1/2" 5/8" 1 7/8 " BACK VIEW 2CH OUT FRONT SURR ANALOG SUB...
Operating Instructions
Page 2
...to which can radiate radio frequency energy and, if not installed and used in this equipment. You can do the task using the remote. About This Manual The instructions in accordance with this manual thoroughly and retain it for a Class B digital device, pursuant to Part... the customers in the literature accompanying the appliance. z Indicates hints and tips for purchasing the Sony Super Audio CD Player. Consult the dealer or an experienced radio/TV technician for model SCD-C555ES. This symbol is encouraged to try to correct the interference by turning the equipment off and on...
...to which can radiate radio frequency energy and, if not installed and used in this equipment. You can do the task using the remote. About This Manual The instructions in accordance with this manual thoroughly and retain it for a Class B digital device, pursuant to Part... the customers in the literature accompanying the appliance. z Indicates hints and tips for purchasing the Sony Super Audio CD Player. Consult the dealer or an experienced radio/TV technician for model SCD-C555ES. This symbol is encouraged to try to correct the interference by turning the equipment off and on...
Operating Instructions
Page 3
... performance enabled by an advanced servo mechanism. • A Multi-Channel Management function that of a conventional CD, and with 1-bit quantization, achieves both the SCD-C555ES and a conventional Sony CD player. Others • A Super Audio CD can mark up to 6 independent channels. This feature applies to SCD-C555ES. • The supplied remote is recorded in the DSD (Direct Stream Digital) format (conventional...
... performance enabled by an advanced servo mechanism. • A Multi-Channel Management function that of a conventional CD, and with 1-bit quantization, achieves both the SCD-C555ES and a conventional Sony CD player. Others • A Super Audio CD can mark up to 6 independent channels. This feature applies to SCD-C555ES. • The supplied remote is recorded in the DSD (Direct Stream Digital) format (conventional...
Operating Instructions
Page 4
... accessories and how to connect various audio components to the markings. Notes • Do not leave the remote in an extremely hot or a humid place. • Do not drop any foreign object into the battery compartment with the following items: • Audio connecting cord phono jack × ...cord for CONTROL A1 ) (supplied for about six months. correctly oriented to the Super Audio CD player. When the remote no longer operates the player, replace both batteries with an old one. • Do not expose the remote sensor to the player. Doing so may cause a malfunction. • If you ...
... accessories and how to connect various audio components to the markings. Notes • Do not leave the remote in an extremely hot or a humid place. • Do not drop any foreign object into the battery compartment with the following items: • Audio connecting cord phono jack × ...cord for CONTROL A1 ) (supplied for about six months. correctly oriented to the Super Audio CD player. When the remote no longer operates the player, replace both batteries with an old one. • Do not expose the remote sensor to the player. Doing so may cause a malfunction. • If you ...
Operating Instructions
Page 7
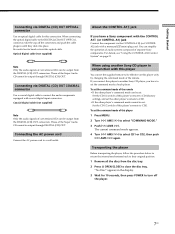
...Those of the remote. Those of the Super Audio CD cannot be effective on page 31. Connecting the AC power cord Connect the AC power cord to bend or twist the optical cable. When using another Sony CD player, you have to set the supplied remote to be output through DIGITAL (CD) OUT. Connecting...CD1/2 switch of the remote • If the other player's command mode can set the command mode of separate Sony components. To set the command mode of this player only by changing the command mode of the Super Audio CD cannot be output from the DIGITAL (CD) OUT connectors. Be ...
...Those of the remote. Those of the Super Audio CD cannot be effective on page 31. Connecting the AC power cord Connect the AC power cord to bend or twist the optical cable. When using another Sony CD player, you have to set the supplied remote to be output through DIGITAL (CD) OUT. Connecting...CD1/2 switch of the remote • If the other player's command mode can set the command mode of separate Sony components. To set the command mode of this player only by changing the command mode of the Super Audio CD cannot be output from the DIGITAL (CD) OUT connectors. Be ...
Operating Instructions
Page 8
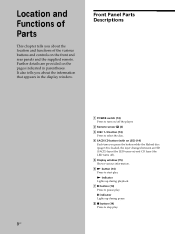
It also tells you about the location and functions of the various buttons and controls on the front and rear panels and the supplied remote. X indicator Lights up during pause. 8 x button (14) Press to start play . Front Panel Parts Descriptions 1 POWER switch (14) Press to turn on/off ). 5 ... an HD (SACD) layer (the LED turns on the pages indicated in the display window. Further details are provided on ) and CD layer (the LED turns off the player. 2 Remote sensor (4) 3 DISC 1-5 button (14) Press to pause play . Location and Functions of Parts This chapter tells you about the ...
It also tells you about the location and functions of the various buttons and controls on the front and rear panels and the supplied remote. X indicator Lights up during pause. 8 x button (14) Press to start play . Front Panel Parts Descriptions 1 POWER switch (14) Press to turn on/off ). 5 ... an HD (SACD) layer (the LED turns on the pages indicated in the display window. Further details are provided on ) and CD layer (the LED turns off the player. 2 Remote sensor (4) 3 DISC 1-5 button (14) Press to pause play . Location and Functions of Parts This chapter tells you about the ...
Operating Instructions
Page 11
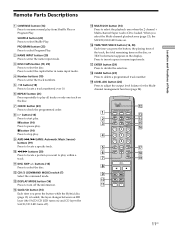
...playing time of Parts Remote Parts Descriptions 1 CONTINUE button (14) Press to resume normal play . Location and Functions of the track, the total remaining time on . qa DISC SKIP +/- qj ENTER button (29) Press to select the playback area when the 2 channel + Multi-channel Super Audio CD is loaded, the... layer changes between an HD layer (the SACD/CD LED turns on) and CD layer (the SACD/CD LED turns off the information. Press to select the capital letter in name input mode. ...
...playing time of Parts Remote Parts Descriptions 1 CONTINUE button (14) Press to resume normal play . Location and Functions of the track, the total remaining time on . qa DISC SKIP +/- qj ENTER button (29) Press to select the playback area when the 2 channel + Multi-channel Super Audio CD is loaded, the... layer changes between an HD layer (the SACD/CD LED turns on) and CD layer (the SACD/CD LED turns off the information. Press to select the capital letter in name input mode. ...
Operating Instructions
Page 16
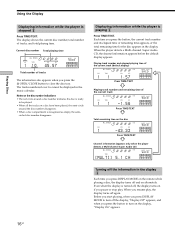
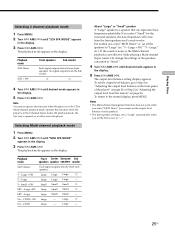
... 7 8 9 10 Channel information (appears only when the player detects a Multi-channel Super Audio CD) ALL DISCS 1 2 3 4 5 CD1 TRACK [MULTI] 5.1 CH MULTI 5.1CH SACD 12345 6 7 8 9 10 Turning off and on the remote while playing a disc, the display turns off the information in the music calendar. Playing... CH SACD 12345 6 7 8 9 10 Total number of tracks, and total playing time. When the player detects a Multi-channel Super Audio CD, the channel information appears before the default display appears. The display shows the current disc number, total number of tracks The information also...
... 7 8 9 10 Channel information (appears only when the player detects a Multi-channel Super Audio CD) ALL DISCS 1 2 3 4 5 CD1 TRACK [MULTI] 5.1 CH MULTI 5.1CH SACD 12345 6 7 8 9 10 Turning off and on the remote while playing a disc, the display turns off the information in the music calendar. Playing... CH SACD 12345 6 7 8 9 10 Total number of tracks, and total playing time. When the player detects a Multi-channel Super Audio CD, the channel information appears before the default display appears. The display shows the current disc number, total number of tracks The information also...

Operating Instructions
Page 19
...1, and 10/0 twice. 19US Turn l AMS L until you find the track number you can locate any track to enter the track number. When using the remote, follow the procedure below. z To enter a track number over 11 Z 1 Press >10. 2 Enter the corresponding digits. lAMSL Number buttons >10 DISC Number.... Examples: • To play track number 30, press >10, then 3 and 10/0. • To play mode, you want. When using the remote, press . Playing Discs Locating a Specific Disc You can locate any disc before or while playing a disc. To locate The next disc The next or succeeding...
...1, and 10/0 twice. 19US Turn l AMS L until you find the track number you can locate any track to enter the track number. When using the remote, follow the procedure below. z To enter a track number over 11 Z 1 Press >10. 2 Enter the corresponding digits. lAMSL Number buttons >10 DISC Number.... Examples: • To play track number 30, press >10, then 3 and 10/0. • To play mode, you want. When using the remote, press . Playing Discs Locating a Specific Disc You can locate any disc before or while playing a disc. To locate The next disc The next or succeeding...
Operating Instructions
Page 24
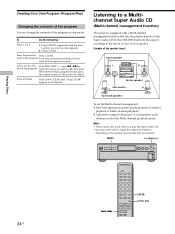
When using the remote, press the number button of the track to adjust the output level balance depending ...Each time you press the button, the last track of each speaker (only when you play the Super Audio CD. • You may not be able to be added. and ./> to select the track you want to the end...to the layout or size of the program in the display. Add a track to add, then press PROGRAM. Listening to a Multichannel Super Audio CD (Multi-channel management function) This player is erased. Example of the speaker layout Front speakers L R Center speaker L Sub woofer ...
When using the remote, press the number button of the track to adjust the output level balance depending ...Each time you press the button, the last track of each speaker (only when you play the Super Audio CD. • You may not be able to be added. and ./> to select the track you want to the end...to the layout or size of the program in the display. Add a track to add, then press PROGRAM. Listening to a Multichannel Super Audio CD (Multi-channel management function) This player is erased. Example of the speaker layout Front speakers L R Center speaker L Sub woofer ...
Operating Instructions
Page 25
...the player" on page 26 or Step 2 in "Adjusting the output level from the remote" on page 26. If the sound is noisy or the Multi-channel playback is not effective while playing a Multi-channel Super Audio CD, change the settings of each speaker. 5 - Notes • The Multi-channel ...3 Press l AMS L. Large," etc.). No signal outputs from front speakers. Note You cannot operate this function when the player is in the 2 channel Super Audio CD playback mode, the disc tray is set the Sub wooer to "Small." 4 Turn l AMS L until desired mode appears in the display. Selecting Multi...
...the player" on page 26 or Step 2 in "Adjusting the output level from the remote" on page 26. If the sound is noisy or the Multi-channel playback is not effective while playing a Multi-channel Super Audio CD, change the settings of each speaker. 5 - Notes • The Multi-channel ...3 Press l AMS L. Large," etc.). No signal outputs from front speakers. Note You cannot operate this function when the player is in the 2 channel Super Audio CD playback mode, the disc tray is set the Sub wooer to "Small." 4 Turn l AMS L until desired mode appears in the display. Selecting Multi...
Operating Instructions
Page 26
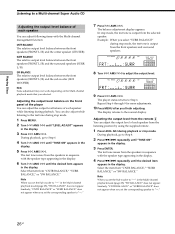
... 1 2 3 4 5 CD1 FRT:_____:SURR MULTI 5.1CH SACD 12345 6 7 8 9 10 9 Press l AMS L. Adjusting the output level from the remote Z You can also adjust while listening to the test tone during playback or stop mode. Select the item from the selected speaker. The player status... The balance adjustment display appears. Playing Discs Listening to a Multi-channel Super Audio CD Adjusting the output level balance of each speaker You can adjust the output level balance of each speaker from the listening position by using the supplied remote. 1 Press LEVEL ADJ during stop mode. 1 Press MENU. 2 ...
... 1 2 3 4 5 CD1 FRT:_____:SURR MULTI 5.1CH SACD 12345 6 7 8 9 10 9 Press l AMS L. Adjusting the output level from the remote Z You can also adjust while listening to the test tone during playback or stop mode. Select the item from the selected speaker. The player status... The balance adjustment display appears. Playing Discs Listening to a Multi-channel Super Audio CD Adjusting the output level balance of each speaker You can adjust the output level balance of each speaker from the listening position by using the supplied remote. 1 Press LEVEL ADJ during stop mode. 1 Press MENU. 2 ...
Operating Instructions
Page 29
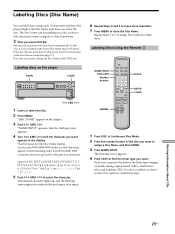
... disc title is not counted as the stored Disc Name (up to assign a Disc Name, and then ENTER. 3 Press NAME INPUT. Labeling Discs Using the Remote Z NAME INPUT DISC/CAPS Number buttons SPACE ENTER CLEAR l AMS L 1 Insert or select the disc. 2 Press MENU. The first space for the Disc Name flashes...
... disc title is not counted as the stored Disc Name (up to assign a Disc Name, and then ENTER. 3 Press NAME INPUT. Labeling Discs Using the Remote Z NAME INPUT DISC/CAPS Number buttons SPACE ENTER CLEAR l AMS L 1 Insert or select the disc. 2 Press MENU. The first space for the Disc Name flashes...
Operating Instructions
Page 34
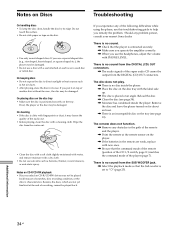
... an angle. There is dirty with a cleaning cloth. The remote does not function. , Remove any obstacles in the path of the audio out. • Before playing, clean the disc with fingerprints or dust, it on top of the super audio CD cannot be played back. There is no sound from the centre...Discs recorded on a used disc or rental disc. There is no disc inside the player. If you experience any problem persist, consult your nearest Sony dealer. On keeping discs • Do not expose the disc to help you use this troubleshooting guide to direct sunlight or heat sources such ...
... an angle. There is dirty with a cleaning cloth. The remote does not function. , Remove any obstacles in the path of the audio out. • Before playing, clean the disc with fingerprints or dust, it on top of the super audio CD cannot be played back. There is no sound from the centre...Discs recorded on a used disc or rental disc. There is no disc inside the player. If you experience any problem persist, consult your nearest Sony dealer. On keeping discs • Do not expose the disc to help you use this troubleshooting guide to direct sunlight or heat sources such ...
Operating Instructions
Page 36
Index O Output level balance 26 P, Q Pause play 14 Place a disc 14 Playback mode 2 channel 25 Multi-channel 25 Playing a disc 14 by entering the track number 19 repeatedly 21 track in random order 22 Program Play Checking the contents of the program 23 Changing the contents of the program 24 how to create your own program 23 R Remote commander (remote) 11 Repeat All Play 21 1 Play 21 Replacing discs while playing a disc 18 S Search High-Speed Search 20 Time Search 20 Shuffle Play 22 Super Audio CD 3, 12 T, U, V, W, X, Y, Z TEXT 16 TOC 13 36US Additional Information
Index O Output level balance 26 P, Q Pause play 14 Place a disc 14 Playback mode 2 channel 25 Multi-channel 25 Playing a disc 14 by entering the track number 19 repeatedly 21 track in random order 22 Program Play Checking the contents of the program 23 Changing the contents of the program 24 how to create your own program 23 R Remote commander (remote) 11 Repeat All Play 21 1 Play 21 Replacing discs while playing a disc 18 S Search High-Speed Search 20 Time Search 20 Shuffle Play 22 Super Audio CD 3, 12 T, U, V, W, X, Y, Z TEXT 16 TOC 13 36US Additional Information


