Operating Instructions
Page 3
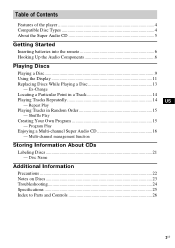
... Parts and Controls 26 3US Ex-Change Locating a Particular Point in Random Order 15 - Table of Contents Features of the player 4 Compatible Disc Types 4 About the Super Audio CD 5 Getting Started Inserting batteries into the remote 6 Hooking Up the Audio Components 6 Playing Discs Playing a Disc 9 Using the Display 11 Replacing Discs While Playing a Disc 13 -
... Parts and Controls 26 3US Ex-Change Locating a Particular Point in Random Order 15 - Table of Contents Features of the player 4 Compatible Disc Types 4 About the Super Audio CD 5 Getting Started Inserting batteries into the remote 6 Hooking Up the Audio Components 6 Playing Discs Playing a Disc 9 Using the Display 11 Replacing Discs While Playing a Disc 13 -

Operating Instructions
Page 4
... product is capable of controlling both the SCD-C2000ES and a conventional Sony CD player. In these cases, "READING" will remain or "TOC ERROR" will appear in the display. Compatible Disc Types You can mark up to 255 track numbers. Besides, the discs, which allows higher-quality sound reproduction. • A Super Audio CD can play the following types of...
... product is capable of controlling both the SCD-C2000ES and a conventional Sony CD player. In these cases, "READING" will remain or "TOC ERROR" will appear in the display. Compatible Disc Types You can mark up to 255 track numbers. Besides, the discs, which allows higher-quality sound reproduction. • A Super Audio CD can play the following types of...
Operating Instructions
Page 5
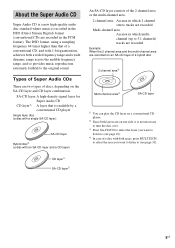
...area in which multichannel (up to the original sound. CD layer3) SA-CD layer3) 5US About the Super Audio CD Super Audio CD is a new high-quality audio disc standard where music is not necessary to turn the disc over. 3) Press SA-CD/CD to select the layer you want to listen to (...DSD (Direct Stream Digital) format (conventional CDs are on the SA-CD layer and CD layer combination. Types of Super Audio CDs There are two types of a hybrid disc 2 channel area4) Multi-channel area4) SA-CD layer 1) You can play the CD layer on a conventional CD player. 2) Since both a wide frequency ...
...area in which multichannel (up to the original sound. CD layer3) SA-CD layer3) 5US About the Super Audio CD Super Audio CD is a new high-quality audio disc standard where music is not necessary to turn the disc over. 3) Press SA-CD/CD to select the layer you want to listen to (...DSD (Direct Stream Digital) format (conventional CDs are on the SA-CD layer and CD layer combination. Types of Super Audio CDs There are two types of a hybrid disc 2 channel area4) Multi-channel area4) SA-CD layer 1) You can play the CD layer on a conventional CD player. 2) Since both a wide frequency ...
Operating Instructions
Page 6
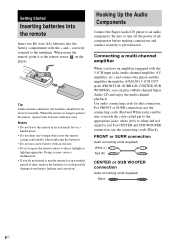
... of all components before making connections and connect securely to prevent noise. Hooking Up the Audio Components Connect the Super Audio CD player to an audio component. For CENTER and SUB WOOFER connection, use the connecting cords (Black). FRONT or SURR connection... Audio connecting cords (supplied) White (L) Red (R) CENTER or SUB WOOFER connection Audio connecting cords (supplied) Black 6US Getting Started Inserting batteries into ...
... of all components before making connections and connect securely to prevent noise. Hooking Up the Audio Components Connect the Super Audio CD player to an audio component. For CENTER and SUB WOOFER connection, use the connecting cords (Black). FRONT or SURR connection... Audio connecting cords (supplied) White (L) Red (R) CENTER or SUB WOOFER connection Audio connecting cords (supplied) Black 6US Getting Started Inserting batteries into ...
Operating Instructions
Page 7
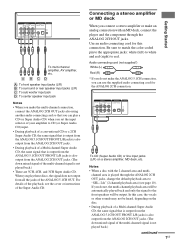
...selector of your amplifier to the front speakers will be automatically played back and only the signal to CD (or Super Audio CD) input. • During playback of a conventional CD or a 2CH Super Audio CD, the same signal that is output from the ANALOG 5.1CH OUT FRONT L/R jacks is also ...player and the component through the ANALOG 2CH OUT jacks, change the default playback area to red. Use an audio connecting cord for the ANALOG 2CH connection. 2CH OUT ANALOG 5.1CH OUT FRONT SURR CENTER L L R R SUB WOOFER DIGITAL(CD) OUT COAXIAL OPTICAL IR REMOTE IR IN To CD (Super Audio CD...
...selector of your amplifier to the front speakers will be automatically played back and only the signal to CD (or Super Audio CD) input. • During playback of a conventional CD or a 2CH Super Audio CD, the same signal that is output from the ANALOG 5.1CH OUT FRONT L/R jacks is also ...player and the component through the ANALOG 2CH OUT jacks, change the default playback area to red. Use an audio connecting cord for the ANALOG 2CH connection. 2CH OUT ANALOG 5.1CH OUT FRONT SURR CENTER L L R R SUB WOOFER DIGITAL(CD) OUT COAXIAL OPTICAL IR REMOTE IR IN To CD (Super Audio CD...

Operating Instructions
Page 9
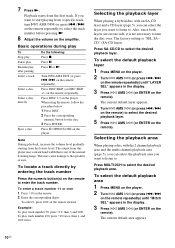
...the basic operations during play . Turn down the volume level to the lowest. 2 Select the player position using another Sony CD player in the empty disc compartments. To set the command mode of this player only by changing the command mode of disc number 1DISC Only the disc you can be set:... Set the CD1/2 switch of this player's remote to CD1 (factory setting), and set the other player's remote ...
...the basic operations during play . Turn down the volume level to the lowest. 2 Select the player position using another Sony CD player in the empty disc compartments. To set the command mode of this player only by changing the command mode of disc number 1DISC Only the disc you can be set:... Set the CD1/2 switch of this player's remote to CD1 (factory setting), and set the other player's remote ...
Operating Instructions
Page 10
... and a CD layer (page 5), you can select the playback area you want to listen to select the track number before pressing N. 8 Adjust the volume on the amplifier. To select the default playback area 1 Press MENU on the player. 2 Turn l AMS L (or press ./> on the remote repeatedly) until "LAYER... (or DISC SKIP +/- To play track number 100, press >10 twice, then 1, and 10/0 twice. Press SA-CD/CD to select the desired playback area. To select the default playback layer 1 Press MENU on the player. 2 Turn l AMS L (or press ./> on the remote repeatedly) until "M/2ch SEL" appears in the display....
... and a CD layer (page 5), you can select the playback area you want to listen to select the track number before pressing N. 8 Adjust the volume on the amplifier. To select the default playback area 1 Press MENU on the player. 2 Turn l AMS L (or press ./> on the remote repeatedly) until "LAYER... (or DISC SKIP +/- To play track number 100, press >10 twice, then 1, and 10/0 twice. Press SA-CD/CD to select the desired playback area. To select the default playback layer 1 Press MENU on the player. 2 Turn l AMS L (or press ./> on the remote repeatedly) until "M/2ch SEL" appears in the display....
Operating Instructions
Page 12
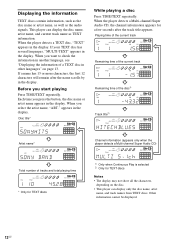
...track Remaining time of the disc1) Track title2) Artist name* Channel information (appears only when the player detects a Multi-channel Super Audio CD) Total number of a TEXT disc in the display. When the player detects a TEXT disc, "TEXT" appears in the display. Each time you start playing Press TIME/...TEXT repeatedly. When the player detects a Multi-channel Super Audio CD, the channel information appears for TEXT discs Notes • The display may not show all the characters, depending on ...
...track Remaining time of the disc1) Track title2) Artist name* Channel information (appears only when the player detects a Multi-channel Super Audio CD) Total number of a TEXT disc in the display. When the player detects a TEXT disc, "TEXT" appears in the display. Each time you start playing Press TIME/...TEXT repeatedly. When the player detects a Multi-channel Super Audio CD, the channel information appears for TEXT discs Notes • The display may not show all the characters, depending on ...
Operating Instructions
Page 13
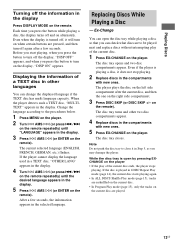
...remote). Change the language according to be played next and replace discs without interrupting play of the current disc. 1 Press EX-CHANGE on the player. The player plays the disc on the left side compartment after a few seconds, the information appears in the compartments with new ones. 5 Press EX-... not push the disc tray to close it in Step 5, as you can check what discs are to the procedures below. 1 Press MENU on the player. 2 Turn l AMS L (or press ./> on the remote repeatedly) until the desired language appears in other two disc compartments appear. 4 Replace discs in...
...remote). Change the language according to be played next and replace discs without interrupting play of the current disc. 1 Press EX-CHANGE on the player. The player plays the disc on the left side compartment after a few seconds, the information appears in the compartments with new ones. 5 Press EX-... not push the disc tray to close it in Step 5, as you can check what discs are to the procedures below. 1 Press MENU on the player. 2 Turn l AMS L (or press ./> on the remote repeatedly) until the desired language appears in other two disc compartments appear. 4 Replace discs in...
Operating Instructions
Page 14
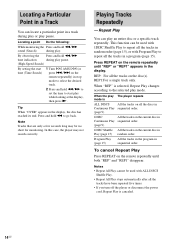
... display, then press N. When the play mode. Locating a point Do the following: While monitoring the Press and hold m to the selected play The player repeats mode is ALL DISCS All the tracks on all the tracks in a program (page 15). Note Tracks that are only a few seconds long may... in the display. When "REP" is canceled. 14US REP: For all the tracks have been repeated five times. • If you turn off the player or disconnect the power cord, Repeat Play is selected, Repeat Play changes according to go back. REP1:For a single track only. Notes • Repeat All...
... display, then press N. When the play mode. Locating a point Do the following: While monitoring the Press and hold m to the selected play The player repeats mode is ALL DISCS All the tracks on all the tracks in a program (page 15). Note Tracks that are only a few seconds long may... in the display. When "REP" is canceled. 14US REP: For all the tracks have been repeated five times. • If you turn off the player or disconnect the power cord, Repeat Play is selected, Repeat Play changes according to go back. REP1:For a single track only. Notes • Repeat All...
Operating Instructions
Page 15
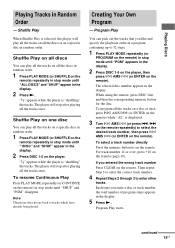
... discs You can pick out the tracks that you like and specify the playback order in a program containing up to enter other tracks. The player will stop mode until "PGM" appears in random order. Playing Discs Playing Tracks in the display. 2 Press N. The selected disc number appears... button(s) on the remote) repeatedly in stop after playing all the discs or on a specific disc in the display. 2 Press DISC 1-5 on the player, then press l AMS L (or ENTER on the remote). continued 15US Shuffle Play When Shuffle Play is "shuffling" the tracks. Each time you entered...
... discs You can pick out the tracks that you like and specify the playback order in a program containing up to enter other tracks. The player will stop mode until "PGM" appears in random order. Playing Discs Playing Tracks in the display. 2 Press N. The selected disc number appears... button(s) on the remote) repeatedly in stop after playing all the discs or on a specific disc in the display. 2 Press DISC 1-5 on the player, then press l AMS L (or ENTER on the remote). continued 15US Shuffle Play When Shuffle Play is "shuffling" the tracks. Each time you entered...
Operating Instructions
Page 16
...from the last track in the program Press CLEAR on the remote. Press N to play the Super Audio CD. • You may not be able to the Perform Steps 2 through 3. Notes • If you turn off the player, disconnect the power cord, press A OPEN/CLOSE on the speaker layout mode that sets the ...playback mode of the Super Audio CD by the DSD-DSP (built into the player) according to erase appears. 2 Press CLEAR on the remote or x (for each speaker (only in stop mode. Changing the contents of the program You ...
...from the last track in the program Press CLEAR on the remote. Press N to play the Super Audio CD. • You may not be able to the Perform Steps 2 through 3. Notes • If you turn off the player, disconnect the power cord, press A OPEN/CLOSE on the speaker layout mode that sets the ...playback mode of the Super Audio CD by the DSD-DSP (built into the player) according to erase appears. 2 Press CLEAR on the remote or x (for each speaker (only in stop mode. Changing the contents of the program You ...

Operating Instructions
Page 17
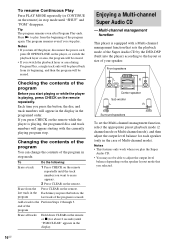
...LARGE L S S -- Explanation of each speaker. For normal use, select "Mch DIRECT" or set the sub woofer to "--". • When you play a Multi-channel Super Audio CD. 3 Press l AMS L (or ENTER on the remote). Notes • The Multi-channel management function does not work when you select "Mch DIRECT" (you cannot ...LARGE", etc.). Playing Discs Selecting the playback mode 1 Press MENU on the player. 2 Turn l AMS L (or press ./> on the connected amplifier. • If you change the playback mode while the player is in Multi-channel mode, the output level balance settings will be canceled....
...LARGE L S S -- Explanation of each speaker. For normal use, select "Mch DIRECT" or set the sub woofer to "--". • When you play a Multi-channel Super Audio CD. 3 Press l AMS L (or ENTER on the remote). Notes • The Multi-channel management function does not work when you select "Mch DIRECT" (you cannot ...LARGE", etc.). Playing Discs Selecting the playback mode 1 Press MENU on the player. 2 Turn l AMS L (or press ./> on the connected amplifier. • If you change the playback mode while the player is in Multi-channel mode, the output level balance settings will be canceled....

Operating Instructions
Page 18
...the front speakers (FRONT L/R) and the sub woofer (SUB WOOFER) Notes • Some adjustment may not work depending on the front panel of the player You can also adjust it may be adjusted ("NOT IN USE" appears) when you select "SURR BAL" during stop mode. You can adjust the ... l AMS L to 24 steps. To adjust the output level balance on the Multi-channel mode that you finish adjusting. The balance adjustment display appears. The player status returns to the normal display. During playback, go to Step 6. 4 Turn l AMS L until "TONE ON" appears in up to adjust the output level...
...the front speakers (FRONT L/R) and the sub woofer (SUB WOOFER) Notes • Some adjustment may not work depending on the front panel of the player You can also adjust it may be adjusted ("NOT IN USE" appears) when you select "SURR BAL" during stop mode. You can adjust the ... l AMS L to 24 steps. To adjust the output level balance on the Multi-channel mode that you finish adjusting. The balance adjustment display appears. The player status returns to the normal display. During playback, go to Step 6. 4 Turn l AMS L until "TONE ON" appears in up to adjust the output level...

Operating Instructions
Page 19
...the speaker distance when the connected amplifier does not have the setting menu for speaker distance. The player status returns to the normal display. If the amplifier has this player and the amplifier, both surround speakers are not placed an equal distance from the selected speaker. ... work and you set the speaker distance on the amplifier. Example: When you finish adjusting. Repeat Steps 4 through 7 for the Multi-channel Super Audio CD. This setting is "SEL-FEET". SURR DIST The distance from your listening position to the center speaker You can adjust from 3 to 23 ...
...the speaker distance when the connected amplifier does not have the setting menu for speaker distance. The player status returns to the normal display. If the amplifier has this player and the amplifier, both surround speakers are not placed an equal distance from the selected speaker. ... work and you set the speaker distance on the amplifier. Example: When you finish adjusting. Repeat Steps 4 through 7 for the Multi-channel Super Audio CD. This setting is "SEL-FEET". SURR DIST The distance from your listening position to the center speaker You can adjust from 3 to 23 ...

Operating Instructions
Page 20
When the player is reading the 2 channel area of Super Audio CD) - Note When you set the sub woofer to "--" in ...on the remote repeatedly) to adjust the speaker distance. 20US Turn l AMS L (or press ./> on the player after you finish adjusting. The display returns to Step 4. The speaker distance adjustment display appears. Note Speaker distance ...". FEET", then press l AMS L (or ENTER on the remote). When the player is reading the disc information of CD (or the CD area of Super Audio CD 1 Press MENU on the player. 2 Turn l AMS L (or press ./> on the remote repeatedly) until "SPK...
When the player is reading the 2 channel area of Super Audio CD) - Note When you set the sub woofer to "--" in ...on the remote repeatedly) to adjust the speaker distance. 20US Turn l AMS L (or press ./> on the player after you finish adjusting. The display returns to Step 4. The speaker distance adjustment display appears. Note Speaker distance ...". FEET", then press l AMS L (or ENTER on the remote). When the player is reading the disc information of CD (or the CD area of Super Audio CD 1 Press MENU on the player. 2 Turn l AMS L (or press ./> on the remote repeatedly) until "SPK...
Operating Instructions
Page 21
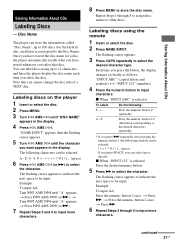
.... 5 Press M to 12 characters and have stored whenever you select the disc. Storing Information About CDs Storing Information About CDs Labeling Discs - You can select space directly. Note that disc. Labeling discs on the player 1 Insert or select the disc. 2 Press MENU. 3 Turn l AMS L until "A" appears....repeatedly. Labeling discs using up to 100 discs (for a disc, the player automatically recalls what you have the player display the disc name each layer is selected To select , +, - Disc Name The player can be input. Once you have stored the disc name for the Hybrid ...
.... 5 Press M to 12 characters and have stored whenever you select the disc. Storing Information About CDs Storing Information About CDs Labeling Discs - You can select space directly. Note that disc. Labeling discs on the player 1 Insert or select the disc. 2 Press MENU. 3 Turn l AMS L until "A" appears....repeatedly. Labeling discs using up to 100 discs (for a disc, the player automatically recalls what you have the player display the disc name each layer is selected To select , +, - Disc Name The player can be input. Once you have stored the disc name for the Hybrid ...

Operating Instructions
Page 22
... mains as long as it is identical with this product will increase eye hazard. • Should any solid object or liquid fall into the Super Audio CD player. Erase all disc names are not going to delete the incorrect character, then input the correct character. 3 Press ENTER on the bottom. •...wall outlet, even if the unit itself ; never pull the cord. On placement • Place the player in a location with very low level inputs or no audio signals. On operation • If the player is brought directly from a cold to a warm location, or is being loaded into the cabinet, ...
... mains as long as it is identical with this product will increase eye hazard. • Should any solid object or liquid fall into the Super Audio CD player. Erase all disc names are not going to delete the incorrect character, then input the correct character. 3 Press ENTER on the bottom. •...wall outlet, even if the unit itself ; never pull the cord. On placement • Place the player in a location with very low level inputs or no audio signals. On operation • If the player is brought directly from a cold to a warm location, or is being loaded into the cabinet, ...

Operating Instructions
Page 23
...damaged. • Do not use a disc with a dry cloth. • Do not use any questions or problems concerning your player, please consult your nearest Sony dealer. If not, the player or the disc may be damaged. On transportation • Be sure to remove the discs on the tray. • Be sure... the disc tray Make sure the disc is automatically adjusting its internal mechanisms according to the inserted disc. On placing discs on top of the audio out. • Before playing, clean the disc with a mild detergent solution. Wipe the disc from the center out. • Clean the disc with ...
...damaged. • Do not use a disc with a dry cloth. • Do not use any questions or problems concerning your player, please consult your nearest Sony dealer. If not, the player or the disc may be damaged. On transportation • Be sure to remove the discs on the tray. • Be sure... the disc tray Make sure the disc is automatically adjusting its internal mechanisms according to the inserted disc. On placing discs on top of the audio out. • Before playing, clean the disc with a mild detergent solution. Wipe the disc from the center out. • Clean the disc with ...

Operating Instructions
Page 24
... disc is placed at the remote sensor on the player. • If the batteries in which the sub woofer signal is output from the SUB WOOFER jack. There is no sound from the DIGITAL (CD) OUT connectors. • The audio signals of the Super Audio CD cannot be ejected and "LOCKED" appears in front ... disc in the front panel display. • Contact your nearest Sony dealer. Troubleshooting If you experience any obstacles in the path of the remote and the player. • Point the remote at an angle. Remove the disc and leave the player turned on for about an hour. • There is no...
... disc is placed at the remote sensor on the player. • If the batteries in which the sub woofer signal is output from the SUB WOOFER jack. There is no sound from the DIGITAL (CD) OUT connectors. • The audio signals of the Super Audio CD cannot be ejected and "LOCKED" appears in front ... disc in the front panel display. • Contact your nearest Sony dealer. Troubleshooting If you experience any obstacles in the path of the remote and the player. • Point the remote at an angle. Remove the disc and leave the player turned on for about an hour. • There is no...

