
Operating Instructions
Page 2
... of sufficient magnitude to comply with this product. Connect the equipment into an outlet on the apparatus. CAUTION You are cautioned that may cause harmful interference to persons. Record the serial number in a residential installation. CAUTION The use of important operating and maintenance (servicing) instructions in accordance with this equipment does cause harmful interference to radio or television reception, which the receiver...
... of sufficient magnitude to comply with this product. Connect the equipment into an outlet on the apparatus. CAUTION You are cautioned that may cause harmful interference to persons. Record the serial number in a residential installation. CAUTION The use of important operating and maintenance (servicing) instructions in accordance with this equipment does cause harmful interference to radio or television reception, which the receiver...
Operating Instructions
Page 3
... Precautions 22 Notes on Discs 23 Troubleshooting 24 Specifications 25 Index to Parts and Controls 26 3US Shuffle Play Creating Your Own Program 15 - Multi-channel management function Storing Information About CDs Labeling Discs 21 - Program Play Enjoying a Multi-channel Super Audio CD 16 - Table of Contents Features of the player 4 Compatible Disc Types 4 About the Super Audio CD 5 Getting Started Inserting batteries into the remote 6 Hooking Up the Audio Components 6 Playing Discs Playing a Disc 9 Using the Display 11 Replacing Discs While Playing a Disc 13 -
... Precautions 22 Notes on Discs 23 Troubleshooting 24 Specifications 25 Index to Parts and Controls 26 3US Shuffle Play Creating Your Own Program 15 - Multi-channel management function Storing Information About CDs Labeling Discs 21 - Program Play Enjoying a Multi-channel Super Audio CD 16 - Table of Contents Features of the player 4 Compatible Disc Types 4 About the Super Audio CD 5 Getting Started Inserting batteries into the remote 6 Hooking Up the Audio Components 6 Playing Discs Playing a Disc 9 Using the Display 11 Replacing Discs While Playing a Disc 13 -

Operating Instructions
Page 4
... to 255 track numbers. Please be playable by this product. Notes on CD-R/CD-RW playback Discs recorded on this player. • Super Audio CDs • Audio CDs This player cannot play the following discs. If you do not conform to SCDC2000ES. • The supplied remote is capable of controlling both the SCD-C2000ES and a conventional Sony CD player. Besides, the discs, which allows higher-quality sound reproduction. • A Super Audio CD can play the following types of discs on CD-R/CD-RW drives may...
... to 255 track numbers. Please be playable by this product. Notes on CD-R/CD-RW playback Discs recorded on this player. • Super Audio CDs • Audio CDs This player cannot play the following discs. If you do not conform to SCDC2000ES. • The supplied remote is capable of controlling both the SCD-C2000ES and a conventional Sony CD player. Besides, the discs, which allows higher-quality sound reproduction. • A Super Audio CD can play the following types of discs on CD-R/CD-RW drives may...
Operating Instructions
Page 5
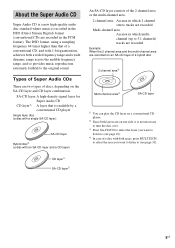
... the Super Audio CD Super Audio CD is a new high-quality audio disc standard where music is recorded in the DSD (Direct Stream Digital) format (conventional CDs are recorded in which multichannel (up to 5.1 channels) tracks are recorded Example: When the 2 channel area and the multi-channel area are recorded on an SA-CD layer of a hybrid disc 2 channel area4) Multi-channel area4) SA-CD layer 1) You can play the CD layer on a conventional CD player. 2) Since both a wide frequency range...
... the Super Audio CD Super Audio CD is a new high-quality audio disc standard where music is recorded in the DSD (Direct Stream Digital) format (conventional CDs are recorded in which multichannel (up to 5.1 channels) tracks are recorded Example: When the 2 channel area and the multi-channel area are recorded on an SA-CD layer of a hybrid disc 2 channel area4) Multi-channel area4) SA-CD layer 1) You can play the CD layer on a conventional CD player. 2) Since both a wide frequency range...
Operating Instructions
Page 6
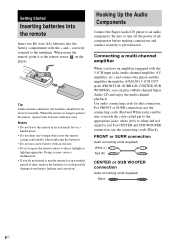
...-AA) batteries into the remote casing, particularly when replacing the batteries. • Do not use a new battery with the 5.1CH input jacks (multi-channel amplifier, AV amplifier, etc.) and connect the player and the amplifier through the ANALOG 5.1CH OUT jacks (FRONT L/R, SURR L/R, CENTER, SUB WOOFER), you can play a Multi-channel Super Audio CD and enjoy the multi-channel playback. For FRONT or SURR connection, use the connecting cords (Black). FRONT or SURR connection Audio connecting cords (supplied) White...
...-AA) batteries into the remote casing, particularly when replacing the batteries. • Do not use a new battery with the 5.1CH input jacks (multi-channel amplifier, AV amplifier, etc.) and connect the player and the amplifier through the ANALOG 5.1CH OUT jacks (FRONT L/R, SURR L/R, CENTER, SUB WOOFER), you can play a Multi-channel Super Audio CD and enjoy the multi-channel playback. For FRONT or SURR connection, use the connecting cords (Black). FRONT or SURR connection Audio connecting cords (supplied) White...
Operating Instructions
Page 7
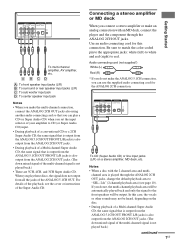
..., etc. When you play a CD (or Super Audio CD) when you connect a stereo amplifier or make an analog connection with the 2 channel area and multi- A B CD A: To front speaker input jacks (L/R) B: To surround or rear speaker input jacks (L/R) C: To sub woofer input jack D: To center speaker input jack Notes • When you make the ANALOG 5.1CH connection, you do not, the multi-channel playback area will be automatically played back and only the signal to red. Audio connecting cord (not supplied*) White (L) Red...
..., etc. When you play a CD (or Super Audio CD) when you connect a stereo amplifier or make an analog connection with the 2 channel area and multi- A B CD A: To front speaker input jacks (L/R) B: To surround or rear speaker input jacks (L/R) C: To sub woofer input jack D: To center speaker input jack Notes • When you make the ANALOG 5.1CH connection, you do not, the multi-channel playback area will be automatically played back and only the signal to red. Audio connecting cord (not supplied*) White (L) Red...
Operating Instructions
Page 8
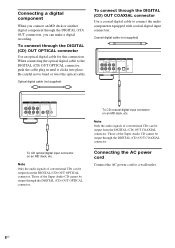
... make a digital recording. Connecting the AC power cord Connect the AC power cord to bend or twist the optical cable. Optical digital cable (not supplied) To connect through the DIGITAL (CD) OUT COAXIAL connector Use a coaxial digital cable to the DIGITAL (CD) OUT OPTICAL connector, push the cable plug in until it clicks into place. Note Only the audio signals of the Super Audio CD cannot be output from the DIGITAL (CD) OUT OPTICAL connector. When connecting the optical digital cable to connect the audio components equipped with coaxial digital input connectors. Connecting...
... make a digital recording. Connecting the AC power cord Connect the AC power cord to bend or twist the optical cable. Optical digital cable (not supplied) To connect through the DIGITAL (CD) OUT COAXIAL connector Use a coaxial digital cable to the DIGITAL (CD) OUT OPTICAL connector, push the cable plug in until it clicks into place. Note Only the audio signals of the Super Audio CD cannot be output from the DIGITAL (CD) OUT OPTICAL connector. When connecting the optical digital cable to connect the audio components equipped with coaxial digital input connectors. Connecting...

Operating Instructions
Page 9
... using another Sony CD player in the order you have selected continued 9US Each time you press the button, the disc tray turns and you can place the discs in the order of this player You can be set : Set the CD1/2 switch of disc number 1DISC Only the disc you want to play are explained below. 1 Turn on the amplifier. When you first. 6 Press PLAY MODE (or CONTINUE on the remote) repeatedly...
... using another Sony CD player in the order you have selected continued 9US Each time you press the button, the disc tray turns and you can place the discs in the order of this player You can be set : Set the CD1/2 switch of disc number 1DISC Only the disc you want to play are explained below. 1 Turn on the amplifier. When you first. 6 Press PLAY MODE (or CONTINUE on the remote) repeatedly...
Operating Instructions
Page 10
... in the display. 3 Press l AMS L (or ENTER on the player. Press DISC 1-5 on the remote). CD" (SA-CD layer). Press MULTI/2CH to select the track number before pressing N. 8 Adjust the volume on the remote repeatedly) to select the desired playback area. Basic operations during play To Stop play Pause play Resume play track number 30, press >10, then 3 and 10/0. Example: To play after pausing Select a track Select a disc Select a disc directly Eject a disc Do the...
... in the display. 3 Press l AMS L (or ENTER on the player. Press DISC 1-5 on the remote). CD" (SA-CD layer). Press MULTI/2CH to select the track number before pressing N. 8 Adjust the volume on the remote repeatedly) to select the desired playback area. Basic operations during play To Stop play Pause play Resume play track number 30, press >10, then 3 and 10/0. Example: To play after pausing Select a track Select a disc Select a disc directly Eject a disc Do the...
Operating Instructions
Page 12
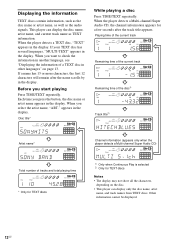
... you start playing Press TIME/TEXT repeatedly. Playing time of the current track Remaining time of the current track Remaining time of the disc1) Track title2) Artist name* Channel information (appears only when the player detects a Multi-channel Super Audio CD) Total number of a TEXT disc in the display. Other information cannot be displayed. 12US When the player detects a TEXT disc, "TEXT" appears in the display. When the player detects a Multi-channel Super Audio CD, the channel information appears...
... you start playing Press TIME/TEXT repeatedly. Playing time of the current track Remaining time of the current track Remaining time of the disc1) Track title2) Artist name* Channel information (appears only when the player detects a Multi-channel Super Audio CD) Total number of a TEXT disc in the display. Other information cannot be displayed. 12US When the player detects a TEXT disc, "TEXT" appears in the display. When the player detects a Multi-channel Super Audio CD, the channel information appears...
Operating Instructions
Page 15
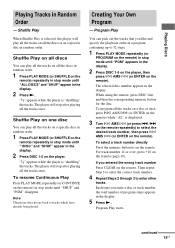
... wrong track number Press CLEAR on a specific disc in the display. 2 Press N. Program Play You can play all the tracks on all the tracks on a specific disc in random order. 1 Press PLAY MODE (or SHUFFLE on the remote) repeatedly in stop mode until "1DISC" and "SHUF" appear in the display. 2 Press DISC 1-5 on the remote) repeatedly in stop mode until "ALL DISCS" and "SHUF" appear in random order. Shuffle Play When Shuffle Play is displayed. 3 Turn l AMS L (or press ./> on the remote repeatedly) to...
... wrong track number Press CLEAR on a specific disc in the display. 2 Press N. Program Play You can play all the tracks on all the tracks on a specific disc in random order. 1 Press PLAY MODE (or SHUFFLE on the remote) repeatedly in stop mode until "1DISC" and "SHUF" appear in the display. 2 Press DISC 1-5 on the remote) repeatedly in stop mode until "ALL DISCS" and "SHUF" appear in random order. Shuffle Play When Shuffle Play is displayed. 3 Turn l AMS L (or press ./> on the remote repeatedly) to...
Operating Instructions
Page 16
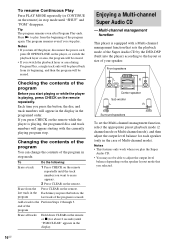
... PLAY MODE repeatedly (or CONTINUE on the remote repeatedly. Each time you turn off the player, disconnect the power cord, press A OPEN/CLOSE on the remote while the player is erased. Notes • If you press the button, the disc and track numbers will be played back from its beginning, and then the program will appear in the display in the display. 16US Enjoying a Multi-channel Super Audio CD - Add a track to play . Multi-channel management function This player is playing...
... PLAY MODE repeatedly (or CONTINUE on the remote repeatedly. Each time you turn off the player, disconnect the power cord, press A OPEN/CLOSE on the remote while the player is erased. Notes • If you press the button, the disc and track numbers will be played back from its beginning, and then the program will appear in the display in the display. 16US Enjoying a Multi-channel Super Audio CD - Add a track to play . Multi-channel management function This player is playing...

Operating Instructions
Page 17
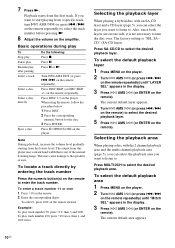
Playing Discs Selecting the playback mode 1 Press MENU on the player. 2 Turn l AMS L (or press ./> on the remote repeatedly) until the desired channel mode appears in the display. 2chSP MODE: To play a 2 channel Super Audio CD. The playback mode appears in the display. 4 Turn l AMS L (or press ./> on the remote repeatedly) until the desired playback mode appears in the display. For normal use, select "Mch DIRECT" or set the speaker setting to "S"), the bass frequencies will come from each speaker). • The front speaker setting is not effective...
Playing Discs Selecting the playback mode 1 Press MENU on the player. 2 Turn l AMS L (or press ./> on the remote repeatedly) until the desired channel mode appears in the display. 2chSP MODE: To play a 2 channel Super Audio CD. The playback mode appears in the display. 4 Turn l AMS L (or press ./> on the remote repeatedly) until the desired playback mode appears in the display. For normal use, select "Mch DIRECT" or set the speaker setting to "S"), the bass frequencies will come from each speaker). • The front speaker setting is not effective...

Operating Instructions
Page 18
... test tone issues from the front speakers and surround speakers. 8 Turn l AMS L to "--". 7 Press l AMS L. Adjusting the output level balance of each speaker while listening during playback. You can adjust the following items in the case of each speaker from the listening position by using the supplied remote. 1 Press LEVEL ADJ during stop mode, the test tone is selected. The display returns to 24 steps. During...
... test tone issues from the front speakers and surround speakers. 8 Turn l AMS L to "--". 7 Press l AMS L. Adjusting the output level balance of each speaker while listening during playback. You can adjust the following items in the case of each speaker from the listening position by using the supplied remote. 1 Press LEVEL ADJ during stop mode, the test tone is selected. The display returns to 24 steps. During...

Operating Instructions
Page 19
...) The initial setting is output from 3 to 23 feet (1.0 meter to Step 4. Playing Discs 3 Press ENTER. Select the item from the speakers in sequence with the speaker type appearing in the display. 4 Press ./> repeatedly until the desired item appears in the Multichannel mode (page 17), "SW BAL" cannot be adjusted ("NOT IN USE" appears) when you set the speaker distance on this function, we...
...) The initial setting is output from 3 to 23 feet (1.0 meter to Step 4. Playing Discs 3 Press ENTER. Select the item from the speakers in sequence with the speaker type appearing in the display. 4 Press ./> repeatedly until the desired item appears in the Multichannel mode (page 17), "SW BAL" cannot be adjusted ("NOT IN USE" appears) when you set the speaker distance on this function, we...

Operating Instructions
Page 20
... USE" appears) when you set the center speaker to select "SEL-METER" or "SEL- When the player is reading the 2 channel area of Super Audio CD) - Similarly, "CNTR DIST" cannot be adjusted ("NOT IN USE" appears). Turn l AMS L (or press ./> on the remote) to "--". 5 Press l AMS L (or ENTER on the remote repeatedly) until "SPK DIST" appears in the display. 3 Press l AMS L (or ENTER on the remote). 4 Turn...
... USE" appears) when you set the center speaker to select "SEL-METER" or "SEL- When the player is reading the 2 channel area of Super Audio CD) - Similarly, "CNTR DIST" cannot be adjusted ("NOT IN USE" appears). Turn l AMS L (or press ./> on the remote) to "--". 5 Press l AMS L (or ENTER on the remote repeatedly) until "SPK DIST" appears in the display. 3 Press l AMS L (or ENTER on the remote). 4 Turn...

Operating Instructions
Page 22
...INPUT on the remote. 2 Press CLEAR on the remote repeatedly to direct sunlight, excessive dust or mechanical shock. The use of optical instruments with adequate ventilation to prevent heat build-up the volume too much while listening to a portion with your local power supply. never pull the cord. On adjusting the volume Do not turn up in the player...warm location, or is being loaded into the Super Audio CD player. Erase all disc names are not going to use the Disc Name when you do, the speakers may not operate properly. The operating voltage is indicated on , some noise may ...
...INPUT on the remote. 2 Press CLEAR on the remote repeatedly to direct sunlight, excessive dust or mechanical shock. The use of optical instruments with adequate ventilation to prevent heat build-up the volume too much while listening to a portion with your local power supply. never pull the cord. On adjusting the volume Do not turn up in the player...warm location, or is being loaded into the Super Audio CD player. Erase all disc names are not going to use the Disc Name when you do, the speakers may not operate properly. The operating voltage is indicated on , some noise may ...

Operating Instructions
Page 24
... no sound from the DIGITAL (CD) OUT connectors. • The audio signals of the Super Audio CD cannot be ejected and "LOCKED" appears in the path of the following difficulties while using the player, use the headphones, adjust the volume with new ones. • Be sure that does not contain the LFE signal, the signal outputs from the SUB WOOFER jack. Reload the disc. • Clean the disc...
... no sound from the DIGITAL (CD) OUT connectors. • The audio signals of the Super Audio CD cannot be ejected and "LOCKED" appears in the path of the following difficulties while using the player, use the headphones, adjust the volume with new ones. • Be sure that does not contain the LFE signal, the signal outputs from the SUB WOOFER jack. Reload the disc. • Clean the disc...
Operating Instructions
Page 25
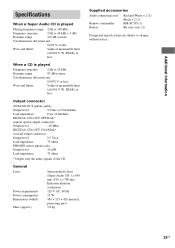
... 50 kilohms) Load impedance Over 10 kilohms DIGITAL (CD) OUT OPTICAL* (square optical output connector): Output level -18 dBm DIGITAL (CD) OUT COAXIAL* (coaxial output connector): Output level 0.5 Vp-p Load impedance 75 ohms PHONES (stereo phone jack): Output level 10 mW Load impedance 32 ohms * Output only the audio signals of the CD General Laser Power requirements Power consumption Dimensions (w/h/d) Mass (approx.) Semiconductor laser (Super Audio CD: λ= 650 nm) (CD: λ= 780 nm) Emission duration: continuous...
... 50 kilohms) Load impedance Over 10 kilohms DIGITAL (CD) OUT OPTICAL* (square optical output connector): Output level -18 dBm DIGITAL (CD) OUT COAXIAL* (coaxial output connector): Output level 0.5 Vp-p Load impedance 75 ohms PHONES (stereo phone jack): Output level 10 mW Load impedance 32 ohms * Output only the audio signals of the CD General Laser Power requirements Power consumption Dimensions (w/h/d) Mass (approx.) Semiconductor laser (Super Audio CD: λ= 650 nm) (CD: λ= 780 nm) Emission duration: continuous...

Operating Instructions
Page 26
Instructions in the display. L A OPEN/CLOSE button (9) M LEVEL control Adjust the headphones volume. In name input mode, press to replace discs while playing a disc. N PHONES jack Connect the headphones. C Remote sensor (6) D Display window (11) E N button (10, 14, 15) F X button (10) G x button (10, 16, 22) H m/M buttons (14, 21) I l AMS L dial (AMS: Automatic Music Sensor) (9, 10, 13, 14, 15, 17, 18, 20, 21) J EX-CHANGE button (13) Press to select the character type. K DISC SKIP button (9, 13) Press to Parts and...
Instructions in the display. L A OPEN/CLOSE button (9) M LEVEL control Adjust the headphones volume. In name input mode, press to replace discs while playing a disc. N PHONES jack Connect the headphones. C Remote sensor (6) D Display window (11) E N button (10, 14, 15) F X button (10) G x button (10, 16, 22) H m/M buttons (14, 21) I l AMS L dial (AMS: Automatic Music Sensor) (9, 10, 13, 14, 15, 17, 18, 20, 21) J EX-CHANGE button (13) Press to select the character type. K DISC SKIP button (9, 13) Press to Parts and...


