Operating Instructions
Page 3
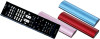
... free.) (page 33) You can remote control your non-Sony components by setting the type and code number of each component (page 10). You can use the remote control supplied with this one remote commander This Commander is preset for most major brands components as well as a control center for programming various other remote control signals This Commander has a Learning function, to "learn " remote control signals (infrared signals only) of non-Audio Visual components such as air-conditioners, lights, etc. (Some specific...
... free.) (page 33) You can remote control your non-Sony components by setting the type and code number of each component (page 10). You can use the remote control supplied with this one remote commander This Commander is preset for most major brands components as well as a control center for programming various other remote control signals This Commander has a Learning function, to "learn " remote control signals (infrared signals only) of non-Audio Visual components such as air-conditioners, lights, etc. (Some specific...

Operating Instructions
Page 5
... ) button of your VCR's remote control until the VCR button of the RM-VL610 lights up. 3 Press the desired Component Select button. 6 Repeat Steps 4 and 5 to "teach." For more details, see page 16. 5 Press SET. Press and hold the H (play ) signal of your video cassette recorder to the VCR H button of your component's remote control. Learning function If your component does not work as supposed even if the code number is set, make the RM-VL610 "learn" the functions...
... ) button of your VCR's remote control until the VCR button of the RM-VL610 lights up. 3 Press the desired Component Select button. 6 Repeat Steps 4 and 5 to "teach." For more details, see page 16. 5 Press SET. Press and hold the H (play ) signal of your video cassette recorder to the VCR H button of your component's remote control. Learning function If your component does not work as supposed even if the code number is set, make the RM-VL610 "learn" the functions...
Operating Instructions
Page 6
...control signals to the Component Select buttons and System Control buttons 20 Changing or erasing the function of a "learned" button 22 Notes on the Component Select Buttons ...32 To clear programmed commands 33 Assigning Other Components to its factory settings ..... 35 6 Hold Function 34 Erasing all settings - Setting component codes 10 Setting a component code 10 Checking if the code number works 12 Setting a Component Code by pressing that Component Select button (for non-Sony Preset Audio and Visual Components - Table of Contents Getting Started Installing the Batteries...
...control signals to the Component Select buttons and System Control buttons 20 Changing or erasing the function of a "learned" button 22 Notes on the Component Select Buttons ...32 To clear programmed commands 33 Assigning Other Components to its factory settings ..... 35 6 Hold Function 34 Erasing all settings - Setting component codes 10 Setting a component code 10 Checking if the code number works 12 Setting a Component Code by pressing that Component Select button (for non-Sony Preset Audio and Visual Components - Table of Contents Getting Started Installing the Batteries...
Operating Instructions
Page 8
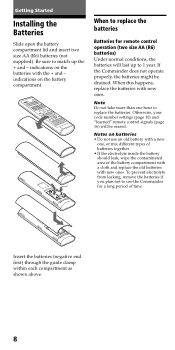
... contaminated area of time. indications on the batteries with the + and - Be sure to replace the batteries. Getting Started Installing the Batteries Slide open the battery compartment lid and insert two size AA (R6) batteries (not supplied). indications on the battery compartment. If the Commander does not operate properly, the batteries might be erased. Otherwise, your code number settings (page 10) and "learned" remote control signals (page 16...
... contaminated area of time. indications on the batteries with the + and - Be sure to replace the batteries. Getting Started Installing the Batteries Slide open the battery compartment lid and insert two size AA (R6) batteries (not supplied). indications on the battery compartment. If the Commander does not operate properly, the batteries might be erased. Otherwise, your code number settings (page 10) and "learned" remote control signals (page 16...
Operating Instructions
Page 9
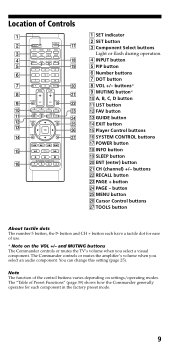
...Commander generally operates for ease of use. * Note on settings/operating modes. You can change this setting (page 25). The Commander controls or mutes the amplifier's volume when you select a visual component. Note The function of Controls 1 SET indicator 2 SET button 3 Component Select buttons Light or flash during operation. 4 INPUT button 5 PIP button 6 Number buttons 7 DOT button 8 VOL +/- Location of the control buttons varies depending on the VOL +/- buttons* 9 MUTING button* q; A, B, C, D button qa LIST button qs FAV button qd GUIDE button qf EXIT button qg Player...
...Commander generally operates for ease of use. * Note on settings/operating modes. You can change this setting (page 25). The Commander controls or mutes the amplifier's volume when you select a visual component. Note The function of Controls 1 SET indicator 2 SET button 3 Component Select buttons Light or flash during operation. 4 INPUT button 5 PIP button 6 Number buttons 7 DOT button 8 VOL +/- Location of the control buttons varies depending on the VOL +/- buttons* 9 MUTING button* q; A, B, C, D button qa LIST button qs FAV button qd GUIDE button qf EXIT button qg Player...
Operating Instructions
Page 10
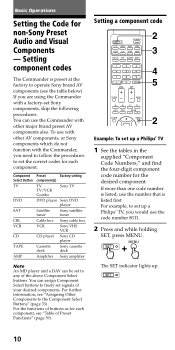
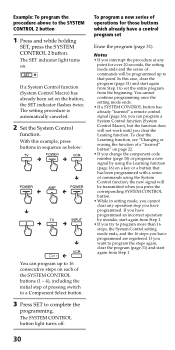
...-digit component code number for non-Sony Preset Audio and Visual Components - To use the code number 8011. 2 Press and while holding SET, press MENU. For further information, see "Assigning Other Components to operate Sony brand AV components (see "Table of the above Component Select buttons. If you would use with other major brand preset AV components also. Setting a component code Example: To set up a Philips' TV, you are using the Commander with other AV components, or Sony components which do not function with the Commander, you need...
...-digit component code number for non-Sony Preset Audio and Visual Components - To use the code number 8011. 2 Press and while holding SET, press MENU. For further information, see "Assigning Other Components to operate Sony brand AV components (see "Table of the above Component Select buttons. If you would use with other major brand preset AV components also. Setting a component code Example: To set up a Philips' TV, you are using the Commander with other AV components, or Sony components which do not function with the Commander, you need...
Operating Instructions
Page 12
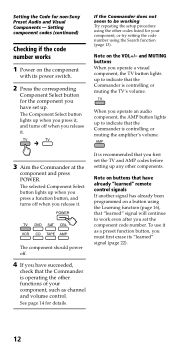
... be working Try repeating the setup procedure using the other components. The selected Component Select button lights up when you press a function button, and turns off when you operate an audio component, the AMP button lights up to indicate that the Commander is controlling or muting the amplifier's volume. 3 Aim the Commander at the component and press POWER. Note on buttons that the Commander is operating the other functions of your component, or try setting the code number using the Learning function...
... be working Try repeating the setup procedure using the other components. The selected Component Select button lights up when you press a function button, and turns off when you operate an audio component, the AMP button lights up to indicate that the Commander is controlling or muting the amplifier's volume. 3 Aim the Commander at the component and press POWER. Note on buttons that the Commander is operating the other functions of your component, or try setting the code number using the Learning function...

Operating Instructions
Page 15
Note, however, that components and functions that do not support the remote control of the TV or amplifier when you select that component. • If you used the Learning function (page 16) to program the VOL +/- or MUTING button to send a signal to any Player Control button. You can change this Commander. or MUTING button for the TV or AMP buttons to send a signal to any other component, that signal will be...
Note, however, that components and functions that do not support the remote control of the TV or amplifier when you select that component. • If you used the Learning function (page 16) to program the VOL +/- or MUTING button to send a signal to any Player Control button. You can change this Commander. or MUTING button for the TV or AMP buttons to send a signal to any other component, that signal will be...
Operating Instructions
Page 16
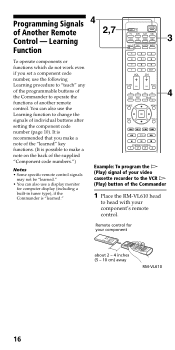
... "Component code numbers.") Notes • Some specific remote control signals may not be "learned." • You can also use the following Learning procedure to "teach" any of the programmable buttons of another remote control. It is "learned." Programming Signals of individual buttons after setting the component code number (page 10). Example: To program the H (Play) signal of your video cassette recorder to the VCR H (Play) button of the Commander 1 Place the RM-VL610 head to operate the functions...
... "Component code numbers.") Notes • Some specific remote control signals may not be "learned." • You can also use the following Learning procedure to "teach" any of the programmable buttons of another remote control. It is "learned." Programming Signals of individual buttons after setting the component code number (page 10). Example: To program the H (Play) signal of your video cassette recorder to the VCR H (Play) button of the Commander 1 Place the RM-VL610 head to operate the functions...
Operating Instructions
Page 18
... Component Select button turns off. To "teach" another component's remote control signal After positioning the two remote commanders as in Step 3. remote control of Another Remote Control - If the Commander does not seem to be working If the "learned" button does not operate properly, "teach" once again. (For example, if the volume becomes very loud after pressing VOL + only once, noise may have interfered during the Learning procedure.) If you set a component code...
... Component Select button turns off. To "teach" another component's remote control signal After positioning the two remote commanders as in Step 3. remote control of Another Remote Control - If the Commander does not seem to be working If the "learned" button does not operate properly, "teach" once again. (For example, if the volume becomes very loud after pressing VOL + only once, noise may have interfered during the Learning procedure.) If you set a component code...

Operating Instructions
Page 19
... "learning" button until your Commander reacts as air conditioners, heaters, electric appliances, and electric shutters or curtains receiving an infrared signal can be transmitted only by pressing VOL +/- or MUTING when you select that signal will not reach the main unit (e.g. For accurate Learning • Do not move to components other rooms, etc.). When you used the Learning function to program the...
... "learning" button until your Commander reacts as air conditioners, heaters, electric appliances, and electric shutters or curtains receiving an infrared signal can be transmitted only by pressing VOL +/- or MUTING when you select that signal will not reach the main unit (e.g. For accurate Learning • Do not move to components other rooms, etc.). When you used the Learning function to program the...

Operating Instructions
Page 20
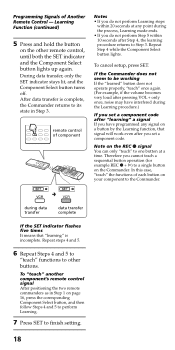
... SYSTEM CONTROL button does not light up (Learning function standby). 1 Follow Steps 1 to be "learned" for over 3 seconds. To teach signals to the SYSTEM CONTROL buttons, press and hold the Component Select button for the component whose signals are to 2 (page 16). When the SET indicator lights up, you "teach" signals to the DVD button. When you "teach" signals to the SYSTEM CONTROL buttons, you use a DVD player, "teach" an input select...
... SYSTEM CONTROL button does not light up (Learning function standby). 1 Follow Steps 1 to be "learned" for over 3 seconds. To teach signals to the SYSTEM CONTROL buttons, press and hold the Component Select button for the component whose signals are to 2 (page 16). When the SET indicator lights up, you "teach" signals to the DVD button. When you "teach" signals to the SYSTEM CONTROL buttons, you use a DVD player, "teach" an input select...

Operating Instructions
Page 25
... sound of your audio components from your TV speakers. The following table shows the factory setting of TV TV TV TV TV amplifier amplifier amplifier The SET indicator lights up. Component Select button TV VCR CBL DVD SAT AMP CD TAPE Controls the volume of which volume would be controlled for each component. 1 Press and while holding SET, press MENU. For example, to control the volume while using a VCR, you don't need to change the Factory Preset of the Volume Control The Commander is factory preset...
... sound of your audio components from your TV speakers. The following table shows the factory setting of TV TV TV TV TV amplifier amplifier amplifier The SET indicator lights up. Component Select button TV VCR CBL DVD SAT AMP CD TAPE Controls the volume of which volume would be controlled for each component. 1 Press and while holding SET, press MENU. For example, to control the volume while using a VCR, you don't need to change the Factory Preset of the Volume Control The Commander is factory preset...
Operating Instructions
Page 30
... from Step 1. 30 The SET indicator light turns on a key or a button that point. To program a new series of operations for over 20 seconds, the setting mode ends and the series of a "learned" button" on page 22. • If you have programmed an incorrect operation by using the System Control function, the new signal will not work until you interrupt the procedure at any operation step you change the component code number (page 10) or program a new signal...
... from Step 1. 30 The SET indicator light turns on a key or a button that point. To program a new series of operations for over 20 seconds, the setting mode ends and the series of a "learned" button" on page 22. • If you have programmed an incorrect operation by using the System Control function, the new signal will not work until you interrupt the procedure at any operation step you change the component code number (page 10) or program a new signal...

Operating Instructions
Page 31
... below: TV Power-ontVCR Power-ont VCR playbacktTV input select To clear programmed commands 1 Press and while holding SET, press and hold for programming the System Control functions The following information helps you want to program a consecutive operation steps. Executing a Series of the components may not accept consecutive remote control signals. For example, some TVs generally may not work properly. System Control Functions (continued) Tips for more than 3 seconds the SYSTEM CONTROL button you to...
... below: TV Power-ontVCR Power-ont VCR playbacktTV input select To clear programmed commands 1 Press and while holding SET, press and hold for programming the System Control functions The following information helps you want to program a consecutive operation steps. Executing a Series of the components may not accept consecutive remote control signals. For example, some TVs generally may not work properly. System Control Functions (continued) Tips for more than 3 seconds the SYSTEM CONTROL button you to...

Operating Instructions
Page 33
... use frequently. • You can program a Control Program function (Component Macro) for more than 3 seconds the Component Select button you clear the "Learned" Function. Notes • You can only assign a TV to a different type of a "learned" button" on which the Power-On function (page 27) has been programmed. Once if you set the component code number again (page 10). • If you enter a new brand's component code number without clearing the previous "learned" functions on signal and the INPUT...
... use frequently. • You can program a Control Program function (Component Macro) for more than 3 seconds the Component Select button you clear the "Learned" Function. Notes • You can only assign a TV to a different type of a "learned" button" on which the Power-On function (page 27) has been programmed. Once if you set the component code number again (page 10). • If you enter a new brand's component code number without clearing the previous "learned" functions on signal and the INPUT...

Operating Instructions
Page 37
... controlled by a remote commander. • You have set the component codes, then use the Learning function to the component. In this case, the volume cannot be operated with the learning of Visual Components Connected to an audio system, make sure the desired component is listed first for your component didn't come with a remote commander, it probably isn't capable of CBL or DVD, make sure you programmed the remote control signals with new ones. • Set the component code correctly. The Component Select buttons...
... controlled by a remote commander. • You have set the component codes, then use the Learning function to the component. In this case, the volume cannot be operated with the learning of Visual Components Connected to an audio system, make sure the desired component is listed first for your component didn't come with a remote commander, it probably isn't capable of CBL or DVD, make sure you programmed the remote control signals with new ones. • Set the component code correctly. The Component Select buttons...
Operating Instructions
Page 38
... before using the System Control function. • If you change the AV brands' component code number (page 10) set has any remote control signals programmed by changing the order of a "learned" button" on by the Control Program function, the new signal will not does not function work until you may need to follow the correct steps (pages 29, 32). • Change the direction the Remote Commander is on the Component Power-On command of the components do this case, check the operating component's power...
... before using the System Control function. • If you change the AV brands' component code number (page 10) set has any remote control signals programmed by changing the order of a "learned" button" on by the Control Program function, the new signal will not does not function work until you may need to follow the correct steps (pages 29, 32). • Change the direction the Remote Commander is on the Component Power-On command of the components do this case, check the operating component's power...
Operating Instructions
Page 43
... into REC/ REVIEW mode during play . To change to the previous location. For example, to change the channel. To turn on the display. First release H, then release REC z. To operate "Flash +." To move the cursor downward. KEY DISPLAY ws OK qj CHANNEL +/- 7A (REPLAY*1) 8 LIST*1 7 B*1 (Live TV) qlPAGE +*1 (THUMBS+) qlPAGE -*1 (THUMBS-) qgSLEEP FUNCTION To enter the selection of the SAT receiver to the TV. (When connecting a TV cable or antenna to...
... into REC/ REVIEW mode during play . To change to the previous location. For example, to change the channel. To turn on the display. First release H, then release REC z. To operate "Flash +." To move the cursor downward. KEY DISPLAY ws OK qj CHANNEL +/- 7A (REPLAY*1) 8 LIST*1 7 B*1 (Live TV) qlPAGE +*1 (THUMBS+) qlPAGE -*1 (THUMBS-) qgSLEEP FUNCTION To enter the selection of the SAT receiver to the TV. (When connecting a TV cable or antenna to...
Operating Instructions
Page 45
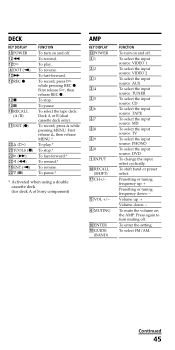
... (X) FUNCTION To turn on and off. To record, press f while pressing MENU. To pause.* * Activated when using a double cassette deck (for deck A of Sony component) AMP KEY DISPLAY qd POWER 31 32 33 34 35 36 37 38 39 30 1 INPUT qk RECALL (SHIFT) qj CH+/- 5VOL +/- 6 MUTING qh ENTER q; To shift band or preset select. Volume up : + Presetting or tuning frequency down : - To stop...
... (X) FUNCTION To turn on and off. To record, press f while pressing MENU. To pause.* * Activated when using a double cassette deck (for deck A of Sony component) AMP KEY DISPLAY qd POWER 31 32 33 34 35 36 37 38 39 30 1 INPUT qk RECALL (SHIFT) qj CH+/- 5VOL +/- 6 MUTING qh ENTER q; To shift band or preset select. Volume up : + Presetting or tuning frequency down : - To stop...


