
Operating Instructions
Page 3
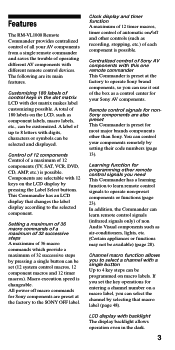
...code numbers (page 13). Clock display and timer function A maximum of 12 timer macros, timer control of automatic on/off macro commands for Sony components are selectable with this one remote commander This Commander is changeable. In addition, the Commander can be customized. Learning function for your AV components from a single remote commander..., stopping, etc.) of each component is preset for nonSony components are its main features. Features The RM-VL1000 Remote Commander provides centralized control of all your Sony AV components. LCD display with backlight The ...
...code numbers (page 13). Clock display and timer function A maximum of 12 timer macros, timer control of automatic on/off macro commands for Sony components are selectable with this one remote commander This Commander is changeable. In addition, the Commander can be customized. Learning function for your AV components from a single remote commander..., stopping, etc.) of each component is preset for nonSony components are its main features. Features The RM-VL1000 Remote Commander provides centralized control of all your Sony AV components. LCD display with backlight The ...
Operating Instructions
Page 4
... 11 Basic Operations Setting the Code for Preset Audio and Visual Components 13 Setting a component code 13 Checking if the code number works 16 Finding a component code with the Search function 17 To clear the contents programmed for a specific component label .......... 19 Operating Your Components with a Single Label - System Control Functions 34 Programming a series of commands for the System Macro labels...
... 11 Basic Operations Setting the Code for Preset Audio and Visual Components 13 Setting a component code 13 Checking if the code number works 16 Finding a component code with the Search function 17 To clear the contents programmed for a specific component label .......... 19 Operating Your Components with a Single Label - System Control Functions 34 Programming a series of commands for the System Macro labels...
Operating Instructions
Page 13
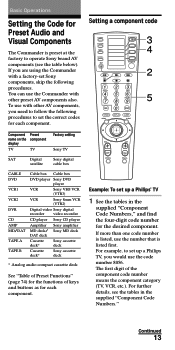
... follow the following procedures. For example, to operate Sony brand AV components (see the tables in the supplied "Component Code Numbers," and find the four-digit code number for the desired component. If more than one code number is listed, use the Commander with other AV components, you would use with other preset AV components also. For further details, see the table below...
... follow the following procedures. For example, to operate Sony brand AV components (see the tables in the supplied "Component Code Numbers," and find the four-digit code number for the desired component. If more than one code number is listed, use the Commander with other AV components, you would use with other preset AV components also. For further details, see the table below...
Operating Instructions
Page 15
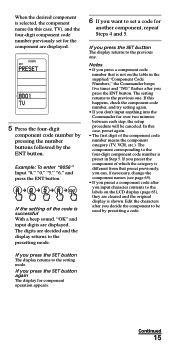
... (page 65), they are cleared and the original display is shown. In this case, preset again. • The first digit of the code is preset in the supplied "Component Code Numbers," the Commander beeps five times and "NG" flashes after you press the SET button again The display for over two minutes between each step...
... (page 65), they are cleared and the original display is shown. In this case, preset again. • The first digit of the code is preset in the supplied "Component Code Numbers," the Commander beeps five times and "NG" flashes after you press the SET button again The display for over two minutes between each step...
Operating Instructions
Page 16
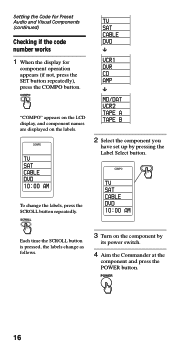
MD/DAT VCR2 TAPE A TAPE B 2 Select the component you have set up by its power switch. 4 Aim the Commander at the component and press the POWER button. 16 Setting the Code for Preset Audio and Visual Components (continued) Checking if the code number works 1 When the display for component operation appears (if not, press the SET button repeatedly), press...
MD/DAT VCR2 TAPE A TAPE B 2 Select the component you have set up by its power switch. 4 Aim the Commander at the component and press the POWER button. 16 Setting the Code for Preset Audio and Visual Components (continued) Checking if the code number works 1 When the display for component operation appears (if not, press the SET button repeatedly), press...
Operating Instructions
Page 17
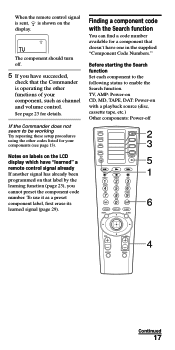
... function You can find a code number available for a component that doesn't have one in the supplied "Component Code Numbers." TV, AMP: Power-on CD, MD, TAPE, DAT: Power-on the LCD display which have succeeded, check that the Commander is shown on that label by the learning function (page 23), you have "learned" a remote control signal already If...
... function You can find a code number available for a component that doesn't have one in the supplied "Component Code Numbers." TV, AMP: Power-on CD, MD, TAPE, DAT: Power-on the LCD display which have succeeded, check that the Commander is shown on that label by the learning function (page 23), you have "learned" a remote control signal already If...
Operating Instructions
Page 18
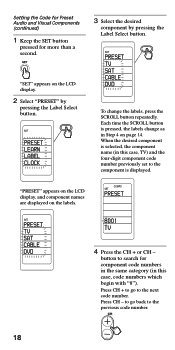
...Step 4 on page 14. When the desired component is selected, the component name (in this case, TV) and the four-digit component code number previously set to the previous code number. 18 "PRESET" appears on the LCD display, and component names are displayed on the LCD display. ... 3 Select the desired component by pressing the Label Select button. button to the next code number. Press CH - Setting the Code for Preset Audio and Visual Components (continued) 1 Keep the SET button pressed for component code numbers in the same category (in this case, code numbers which begin with "8"). ...
...Step 4 on page 14. When the desired component is selected, the component name (in this case, TV) and the four-digit component code number previously set to the previous code number. 18 "PRESET" appears on the LCD display, and component names are displayed on the LCD display. ... 3 Select the desired component by pressing the Label Select button. button to the next code number. Press CH - Setting the Code for Preset Audio and Visual Components (continued) 1 Keep the SET button pressed for component code numbers in the same category (in this case, code numbers which begin with "8"). ...
Operating Instructions
Page 19
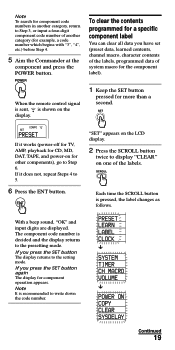
..., MD, DAT, TAPE, and power-on for example, a code number which begins with "3", "4", etc.) before Step 4. 5 Aim the Commander at the component and press the POWER button. Note To search for component code numbers in another category, return to Step 3, or input a four-digit component code number of another category (for other components), go to Step 6. To clear the contents programmed...
..., MD, DAT, TAPE, and power-on for example, a code number which begins with "3", "4", etc.) before Step 4. 5 Aim the Commander at the component and press the POWER button. Note To search for component code numbers in another category, return to Step 3, or input a four-digit component code number of another category (for other components), go to Step 6. To clear the contents programmed...
Operating Instructions
Page 23
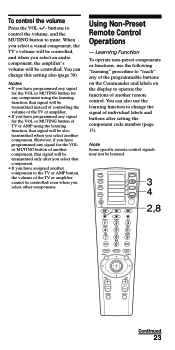
...individual labels and buttons after setting the component code number (page 13). To control the volume Press the VOL +/- Learning Function To operate non-preset components or functions, use the learning function to operate the functions of another component, that signal will be also transmitted ...remote control signals may not be controlled even when you have programmed any signal for the VOL or MUTING button for the VOL or MUTING button of the TV or amplifier cannot be learned. However, if you have programmed any signal for any of the programmable buttons on the Commander...
...individual labels and buttons after setting the component code number (page 13). To control the volume Press the VOL +/- Learning Function To operate non-preset components or functions, use the learning function to operate the functions of another component, that signal will be also transmitted ...remote control signals may not be controlled even when you have programmed any signal for the VOL or MUTING button for the VOL or MUTING button of the TV or amplifier cannot be learned. However, if you have programmed any signal for any of the programmable buttons on the Commander...
Operating Instructions
Page 26
... a signal You cannot preset the component code number to other learnable labels flash. If "NG" flashes on page 28. Then press the two buttons on your component's remote control in Step 6. or MUTING buttons •If you have interfered during the learning procedure.) If you have programmed any signal on the Commander. Try Steps 5 and 6 again...
... a signal You cannot preset the component code number to other learnable labels flash. If "NG" flashes on page 28. Then press the two buttons on your component's remote control in Step 6. or MUTING buttons •If you have interfered during the learning procedure.) If you have programmed any signal on the Commander. Try Steps 5 and 6 again...

Operating Instructions
Page 31
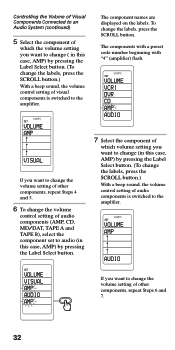
... SCROLL button is pressed, the labels change as in this case, TV) by pressing the Label Select button. SET SYSTEM TIMER CH MACRO VOLUME The component names are displayed on one of the labels. 4 To change the labels, press the SCROLL button. COMPO SET VOLUME TV SAT CABLE DVD VISUAL Continued... SCROLL button once to visual (in Step 4 on page 14. SET VOLUME VISUAL TV AUDIO AMP 3 Select "VOLUME" by pressing the Label Select button. The components with a preset code number beginning with "8" (TV) or "4" (amplifier) flash. 1 Keep the SET button pressed for more than a second.
... SCROLL button is pressed, the labels change as in this case, TV) by pressing the Label Select button. SET SYSTEM TIMER CH MACRO VOLUME The component names are displayed on one of the labels. 4 To change the labels, press the SCROLL button. COMPO SET VOLUME TV SAT CABLE DVD VISUAL Continued... SCROLL button once to visual (in Step 4 on page 14. SET VOLUME VISUAL TV AUDIO AMP 3 Select "VOLUME" by pressing the Label Select button. The components with a preset code number beginning with "8" (TV) or "4" (amplifier) flash. 1 Keep the SET button pressed for more than a second.
Operating Instructions
Page 32
... which volume setting you want to change the volume setting of other components, repeat Steps 6 and 7. 32 The components with a preset code number beginning with "4" (amplifier) flash. COMPO SET VOLUME AMP R R R AUDIO SET VOLUME VISUAL AMP AUDIO AMP If you want to change (in this case, AMP) by ...
... which volume setting you want to change the volume setting of other components, repeat Steps 6 and 7. 32 The components with a preset code number beginning with "4" (amplifier) flash. COMPO SET VOLUME AMP R R R AUDIO SET VOLUME VISUAL AMP AUDIO AMP If you want to change (in this case, AMP) by ...
Operating Instructions
Page 37
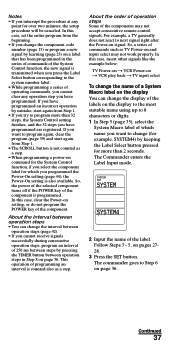
...components may not work properly. The Commander enters the Label Input mode. SYSTEM SET SYSTEM SYSTEM4 2 Input the name of the component is programmed. Follow Steps 3 - 5, on page 36. The commander...system number label. • While programming a series of the component. ...-on command for the System Control function, if you select the component label... 35), select the System Macro label of commands such as a step. • When programming...operation steps in the series of commands of the System Control function,...name using up to change the component code number (page 13) or program a...
...components may not work properly. The Commander enters the Label Input mode. SYSTEM SET SYSTEM SYSTEM4 2 Input the name of the component is programmed. Follow Steps 3 - 5, on page 36. The commander...system number label. • While programming a series of the component. ...-on command for the System Control function, if you select the component label... 35), select the System Macro label of commands such as a step. • When programming...operation steps in the series of commands of the System Control function,...name using up to change the component code number (page 13) or program a...

Operating Instructions
Page 48
... the SCROLL button once to send data. SET SYSTEM TIMER CH MACRO VOLUME "CH MACRO" appears on the LCD display, and component names are displayed on one of the fourdigit preset component code number is 3 (SAT, DVR and a digital cable box), 8 (TV) or 9 (CABLE). Example: To program TV channel 123... for the PIP CH+ key 1 Keep the SET button pressed for a component again to display "CH MACRO" on the labels. 48 SET 2 COMPO ...
... the SCROLL button once to send data. SET SYSTEM TIMER CH MACRO VOLUME "CH MACRO" appears on the LCD display, and component names are displayed on one of the fourdigit preset component code number is 3 (SAT, DVR and a digital cable box), 8 (TV) or 9 (CABLE). Example: To program TV channel 123... for the PIP CH+ key 1 Keep the SET button pressed for a component again to display "CH MACRO" on the labels. 48 SET 2 COMPO ...
Operating Instructions
Page 71
... or using the Remote Commander, first check the batteries (page 7), then check the items below. For example, if your component didn't come with the learning of the Commander. If some of Sony's receivers and amplifiers) to the TV or AMP label (page 46). In such a case, move to the component. See the supplied "Component Code Numbers" and try learning...
... or using the Remote Commander, first check the batteries (page 7), then check the items below. For example, if your component didn't come with the learning of the Commander. If some of Sony's receivers and amplifiers) to the TV or AMP label (page 46). In such a case, move to the component. See the supplied "Component Code Numbers" and try learning...
Operating Instructions
Page 72
... set the components properly to receive commands (page 38). • The component codes are some function labels for the component for the label to which you can program the Channel Macro function of the components of which the first digit of the four-digit preset component code number is heard ... may try the copying procedure again. • You may select the component name for Sony components. Clear infrequently used . "NG" appears during learning. • The memory is only for which the component code of the Commander. Clear the contents (page 19, 29) and try to program the...
... set the components properly to receive commands (page 38). • The component codes are some function labels for the component for the label to which you can program the Channel Macro function of the components of which the first digit of the four-digit preset component code number is heard ... may try the copying procedure again. • You may select the component name for Sony components. Clear infrequently used . "NG" appears during learning. • The memory is only for which the component code of the Commander. Clear the contents (page 19, 29) and try to program the...
Operating Instructions
Page 84
...Sony Corporation Printed in China button 6 Channel Macro function 48 Clearing/Changing contents programmed for a component label 19 Channel Macro function 50 learned signal 29 Power-On command 45 System Control function 37, 39 component macro 41 timer setting 60 Clock setting 8 DS time 9, 12 STD time 9, 12 Code number 13 Component... Select label assigning other components 46 copying settings 46 programming a series of commands 40 setting Power-On function 44 Copying settings of a component label 46 E Erasing all the settings 68 F, G...
...Sony Corporation Printed in China button 6 Channel Macro function 48 Clearing/Changing contents programmed for a component label 19 Channel Macro function 50 learned signal 29 Power-On command 45 System Control function 37, 39 component macro 41 timer setting 60 Clock setting 8 DS time 9, 12 STD time 9, 12 Code number 13 Component... Select label assigning other components 46 copying settings 46 programming a series of commands 40 setting Power-On function 44 Copying settings of a component label 46 E Erasing all the settings 68 F, G...

