
Operating Instructions
Page 6
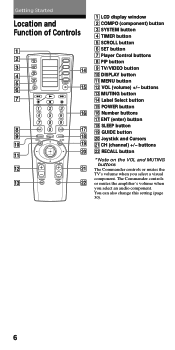
Getting Started Location and Function of Controls COMPO SYSTEM TIMER SCROLL SET POWER REC VIDEO1 VIDEO2 AUX TUNER CD TAPE MD TV PHONO DVD MENU GUIDE VOL CH MUTING RECALL 1 LCD display window 2 COMPO (component) button 3 SYSTEM button 4 TIMER button 5 SCROLL button 6 SET button 7 Player...you select an audio component. The Commander controls or mutes the amplifier's volume when you select a visual component. buttons qd MUTING button qf Label Select button qg POWER button qh Number buttons qj ENT (enter) button qk SLEEP button ql GUIDE button w; Joystick and Cursors wa CH...
Getting Started Location and Function of Controls COMPO SYSTEM TIMER SCROLL SET POWER REC VIDEO1 VIDEO2 AUX TUNER CD TAPE MD TV PHONO DVD MENU GUIDE VOL CH MUTING RECALL 1 LCD display window 2 COMPO (component) button 3 SYSTEM button 4 TIMER button 5 SCROLL button 6 SET button 7 Player...you select an audio component. The Commander controls or mutes the amplifier's volume when you select a visual component. buttons qd MUTING button qf Label Select button qg POWER button qh Number buttons qj ENT (enter) button qk SLEEP button ql GUIDE button w; Joystick and Cursors wa CH...
Operating Instructions
Page 8
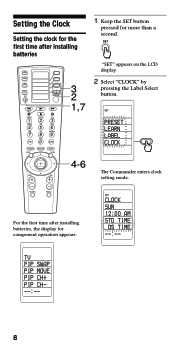
... VIDEO1 VIDEO2 AUX TUNER CD TAPE MD TV PHONO DVD 3 2 1,7 1 Keep the SET button pressed for component operation appears. SET PRESET LEARN LABEL CLOCK MENU GUIDE VOL CH 4-6 The Commander enters clock setting mode.
... VIDEO1 VIDEO2 AUX TUNER CD TAPE MD TV PHONO DVD 3 2 1,7 1 Keep the SET button pressed for component operation appears. SET PRESET LEARN LABEL CLOCK MENU GUIDE VOL CH 4-6 The Commander enters clock setting mode.
Operating Instructions
Page 11
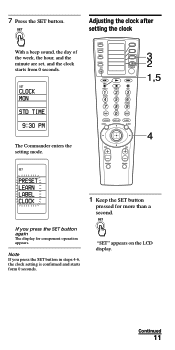
...SET PRESET LEARN LABEL CLOCK COMPO SYSTEM TIMER SCROLL SET POWER REC VIDEO1 VIDEO2 AUX TUNER CD TAPE MD TV PHONO DVD 3 2 1,5 MENU VOL GUIDE CH 4 MUTING RECALL 1 Keep the SET button pressed for component operation appears. Note If you press the SET button again The display for more than... 4-6, the clock setting is confirmed and starts form 0 seconds. "SET" appears on the LCD display. SET CLOCK MON STD TIME 9:30 PM The Commander enters the setting mode. Continued 11 Adjusting the clock after setting the clock With a beep sound, the day of the week, the hour, and the...
...SET PRESET LEARN LABEL CLOCK COMPO SYSTEM TIMER SCROLL SET POWER REC VIDEO1 VIDEO2 AUX TUNER CD TAPE MD TV PHONO DVD 3 2 1,5 MENU VOL GUIDE CH 4 MUTING RECALL 1 Keep the SET button pressed for component operation appears. Note If you press the SET button again The display for more than... 4-6, the clock setting is confirmed and starts form 0 seconds. "SET" appears on the LCD display. SET CLOCK MON STD TIME 9:30 PM The Commander enters the setting mode. Continued 11 Adjusting the clock after setting the clock With a beep sound, the day of the week, the hour, and the...
Operating Instructions
Page 13
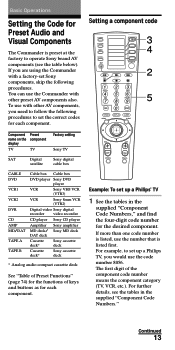
...SCROLL SET POWER REC VIDEO1 VIDEO2 AUX TUNER CD TAPE MD TV PHONO DVD 3 4 2 5 MENU GUIDE Component name on the display TV Preset component TV Factory setting Sony TV SAT Digital Sony digital satellite cable box CABLE DVD VCR1 VCR2 DVR CD AMP MD/DAT TAPE A TAPE B Cable ...the tables in the supplied "Component Code Numbers." Basic Operations Setting the Code for Preset Audio and Visual Components The Commander is listed first. For example, to operate Sony brand AV components (see the tables in the supplied "Component Code Numbers," and find the four-digit code number ...
...SCROLL SET POWER REC VIDEO1 VIDEO2 AUX TUNER CD TAPE MD TV PHONO DVD 3 4 2 5 MENU GUIDE Component name on the display TV Preset component TV Factory setting Sony TV SAT Digital Sony digital satellite cable box CABLE DVD VCR1 VCR2 DVR CD AMP MD/DAT TAPE A TAPE B Cable ...the tables in the supplied "Component Code Numbers." Basic Operations Setting the Code for Preset Audio and Visual Components The Commander is listed first. For example, to operate Sony brand AV components (see the tables in the supplied "Component Code Numbers," and find the four-digit code number ...
Operating Instructions
Page 17
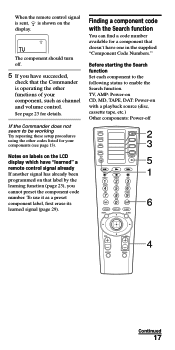
TV The component should turn off COMPO SYSTEM TIMER SCROLL SET POWER REC VIDEO1 VIDEO2 AUX TUNER CD TAPE MD TV PHONO DVD MENU GUIDE 2 3 5 1 6 VOL CH MUTING RECALL 4 Continued 17 To use it as channel and volume control. Before starting the Search function Set each ... the supplied "Component Code Numbers." Notes on labels on the LCD display which have "learned" a remote control signal already If another signal has already been programmed on the display. If the Commander does not seem to enable the Search function. See page 23 for your component, such as a ...
TV The component should turn off COMPO SYSTEM TIMER SCROLL SET POWER REC VIDEO1 VIDEO2 AUX TUNER CD TAPE MD TV PHONO DVD MENU GUIDE 2 3 5 1 6 VOL CH MUTING RECALL 4 Continued 17 To use it as channel and volume control. Before starting the Search function Set each ... the supplied "Component Code Numbers." Notes on labels on the LCD display which have "learned" a remote control signal already If another signal has already been programmed on the display. If the Commander does not seem to enable the Search function. See page 23 for your component, such as a ...
Operating Instructions
Page 21
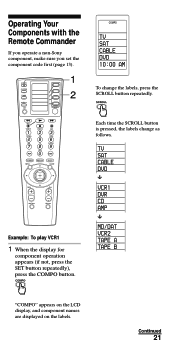
... CD TAPE MD TV PHONO DVD MENU GUIDE VOL CH MUTING RECALL Example: To play VCR1 1 When the display for component operation appears (if not, press the SET button repeatedly), press the COMPO button. Continued 21 Operating Your Components with the Remote Commander If you operate a non-Sony component, make sure you set the...
... CD TAPE MD TV PHONO DVD MENU GUIDE VOL CH MUTING RECALL Example: To play VCR1 1 When the display for component operation appears (if not, press the SET button repeatedly), press the COMPO button. Continued 21 Operating Your Components with the Remote Commander If you operate a non-Sony component, make sure you set the...
Operating Instructions
Page 23
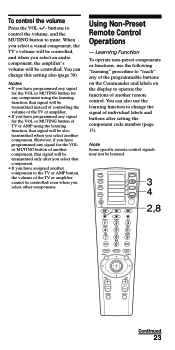
...signal for the VOL or MUTING button of another component, that signal will be learned. Note Some specific remote control signals may not be controlled, and when you select another remote control. Notes • If you have programmed any signal for the VOL or MUTING button for any ...However, if you have programmed any of the programmable buttons on the Commander and labels on the display to mute. COMPO SYSTEM TIMER SCROLL SET POWER REC VIDEO1 VIDEO2 AUX TUNER CD TAPE MD TV PHONO DVD 3 4 2,8 MENU GUIDE VOL CH MUTING RECALL Continued 23 When you select a visual component...
...signal for the VOL or MUTING button of another component, that signal will be learned. Note Some specific remote control signals may not be controlled, and when you select another remote control. Notes • If you have programmed any signal for the VOL or MUTING button for any ...However, if you have programmed any of the programmable buttons on the Commander and labels on the display to mute. COMPO SYSTEM TIMER SCROLL SET POWER REC VIDEO1 VIDEO2 AUX TUNER CD TAPE MD TV PHONO DVD 3 4 2,8 MENU GUIDE VOL CH MUTING RECALL Continued 23 When you select a visual component...

Operating Instructions
Page 30
... Preset of the Volume Control COMPO SYSTEM TIMER SCROLL SET POWER REC VIDEO1 VIDEO2 AUX TUNER CD TAPE MD TV PHONO DVD 2 5,7 4 3,6 1,8 MENU GUIDE VOL CH Component Controls the volume name on the assumption that you hear the sound of your visual components from your TV speakers, and that...the visual components to the amplifier at the same time. Advanced Features Controlling the Volume of Visual Components Connected to an Audio System The Commander is factory preset based on the of display TV TV VCR1 TV VCR2 TV CABLE TV SAT TV DVR TV DVD TV CD amplifier AMP...
... Preset of the Volume Control COMPO SYSTEM TIMER SCROLL SET POWER REC VIDEO1 VIDEO2 AUX TUNER CD TAPE MD TV PHONO DVD 2 5,7 4 3,6 1,8 MENU GUIDE VOL CH Component Controls the volume name on the assumption that you hear the sound of your visual components from your TV speakers, and that...the visual components to the amplifier at the same time. Advanced Features Controlling the Volume of Visual Components Connected to an Audio System The Commander is factory preset based on the of display TV TV VCR1 TV VCR2 TV CABLE TV SAT TV DVR TV DVD TV CD amplifier AMP...
Operating Instructions
Page 34
...video (VCR1). 3 Turn on the amplifier. 4 Set the input selector of the amplifier to each remote control signal is transmitted, the corresponding label is displayed. You can program up to 32 consecutive operation... PHONO DVD 1,9 MENU GUIDE VOL CH MUTING RECALL 34 If you have set the System Control function for a component label (page 40), the execution of the programmed commands begins when you can ...overwrite a system macro over this label. At the factory, the SONY OFF label is variable by pressing the Label...
...video (VCR1). 3 Turn on the amplifier. 4 Set the input selector of the amplifier to each remote control signal is transmitted, the corresponding label is displayed. You can program up to 32 consecutive operation... PHONO DVD 1,9 MENU GUIDE VOL CH MUTING RECALL 34 If you have set the System Control function for a component label (page 40), the execution of the programmed commands begins when you can ...overwrite a system macro over this label. At the factory, the SONY OFF label is variable by pressing the Label...
Operating Instructions
Page 44
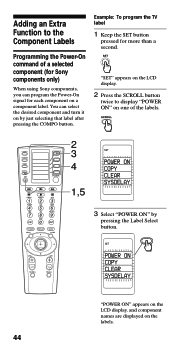
...component on a component label. "SET" appears on the LCD display. 2 Press the SCROLL button twice to the Component Labels Programming the Power-On command of the labels. You can program the Power-On signal for more than a second. Adding an Extra Function to display "POWER ON" on ... only) When using Sony components, you can select the desired component and turn it on by pressing the Label Select button. COMPO SYSTEM TIMER SCROLL SET POWER REC VIDEO1 VIDEO2 AUX TUNER CD TAPE MD TV PHONO DVD MENU GUIDE VOL CH MUTING RECALL 2 3 4 1,5 SET POWER ON COPY CLEAR ...
...component on a component label. "SET" appears on the LCD display. 2 Press the SCROLL button twice to the Component Labels Programming the Power-On command of the labels. You can program the Power-On signal for more than a second. Adding an Extra Function to display "POWER ON" on ... only) When using Sony components, you can select the desired component and turn it on by pressing the Label Select button. COMPO SYSTEM TIMER SCROLL SET POWER REC VIDEO1 VIDEO2 AUX TUNER CD TAPE MD TV PHONO DVD MENU GUIDE VOL CH MUTING RECALL 2 3 4 1,5 SET POWER ON COPY CLEAR ...
Operating Instructions
Page 46
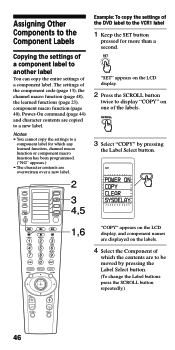
...the contents are overwritten over a new label. SET POWER ON COPY CLEAR SYSDELAY REC VIDEO1 VIDEO2 AUX TUNER CD TAPE MD TV PHONO DVD MENU GUIDE VOL CH 1,6 "COPY" appears on the LCD display, and component names are copied to a new label. COMPO SYSTEM TIMER SCROLL SET 2 ...component code (page 13), the channel macro function (page 48), the learned functions (page 23), component macro function (page 40), Power-On command (page 44) and character contents are displayed on one of a component label. Assigning Other Components to the Component Labels Copying the settings of...
...the contents are overwritten over a new label. SET POWER ON COPY CLEAR SYSDELAY REC VIDEO1 VIDEO2 AUX TUNER CD TAPE MD TV PHONO DVD MENU GUIDE VOL CH 1,6 "COPY" appears on the LCD display, and component names are copied to a new label. COMPO SYSTEM TIMER SCROLL SET 2 ...component code (page 13), the channel macro function (page 48), the learned functions (page 23), component macro function (page 40), Power-On command (page 44) and character contents are displayed on one of a component label. Assigning Other Components to the Component Labels Copying the settings of...

Operating Instructions
Page 48
... 9 (CABLE). SET 2 COMPO SYSTEM SYSTEM 4,5 TIMER TIMER SCROLL SET 3 POWER CH MACRO VOLUME REC VIDEO1 VIDEO2 AUX TUNER CD TAPE MD TV PHONO DVD MENU GUIDE VOL CH MUTING RECALL 1,7 6 3 Select "CH MACRO" by selecting that single label. "SET" appears on the labels. 48 SET SYSTEM TIMER CH MACRO VOLUME "CH...
... 9 (CABLE). SET 2 COMPO SYSTEM SYSTEM 4,5 TIMER TIMER SCROLL SET 3 POWER CH MACRO VOLUME REC VIDEO1 VIDEO2 AUX TUNER CD TAPE MD TV PHONO DVD MENU GUIDE VOL CH MUTING RECALL 1,7 6 3 Select "CH MACRO" by selecting that single label. "SET" appears on the labels. 48 SET SYSTEM TIMER CH MACRO VOLUME "CH...
Operating Instructions
Page 51
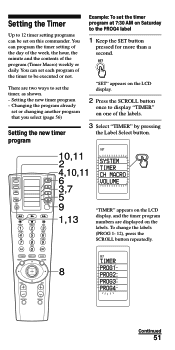
... the timer, as shown. - Setting the Timer Up to 12 timer setting programs can set each program of the timer to be set on this commander. You can be executed or not. "SET" appears on the LCD display. 2 Press the SCROLL button once to the PROG4 label 1 Keep the SET button... timer setting of the day of the week, the hour, the minute and the contents of the program (Timer Macro) weekly or daily. MENU VOL GUIDE CH 8 SET TIMER PROG1 PROG2 PROG3 PROG4 MUTING RECALL Continued 51
... the timer, as shown. - Setting the Timer Up to 12 timer setting programs can set each program of the timer to be set on this commander. You can be executed or not. "SET" appears on the LCD display. 2 Press the SCROLL button once to the PROG4 label 1 Keep the SET button... timer setting of the day of the week, the hour, the minute and the contents of the program (Timer Macro) weekly or daily. MENU VOL GUIDE CH 8 SET TIMER PROG1 PROG2 PROG3 PROG4 MUTING RECALL Continued 51
Operating Instructions
Page 63
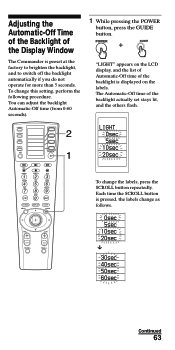
.... COMPO SYSTEM TIMER SCROLL SET 2 POWER 1 LIGHT 0sec 5sec 10sec 20sec REC VIDEO1 VIDEO2 AUX TUNER CD TAPE MD TV PHONO DVD MENU GUIDE VOL CH MUTING RECALL To change this setting, perform the following procedure. The Automatic-Off time of the backlight is displayed on the labels. To ... time of the backlight actually set stays lit, and the others flash. Adjusting the Automatic-Off Time of the Backlight of the Display Window The Commander is pressed, the labels change as follows. 0sec 5sec 10sec 20sec 30sec 40sec 50sec 60sec Continued 63
.... COMPO SYSTEM TIMER SCROLL SET 2 POWER 1 LIGHT 0sec 5sec 10sec 20sec REC VIDEO1 VIDEO2 AUX TUNER CD TAPE MD TV PHONO DVD MENU GUIDE VOL CH MUTING RECALL To change this setting, perform the following procedure. The Automatic-Off time of the backlight is displayed on the labels. To ... time of the backlight actually set stays lit, and the others flash. Adjusting the Automatic-Off Time of the Backlight of the Display Window The Commander is pressed, the labels change as follows. 0sec 5sec 10sec 20sec 30sec 40sec 50sec 60sec Continued 63
Operating Instructions
Page 65
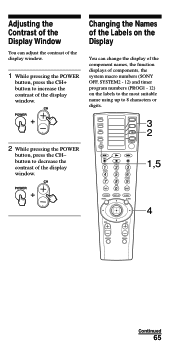
COMPO SYSTEM TIMER SCROLL SET 3 2 POWER REC VIDEO1 VIDEO2 AUX TUNER CD TAPE MD TV PHONO DVD 1,5 MENU VOL GUIDE CH 4 MUTING RECALL Continued 65 Changing the Names of the Labels on the labels to the most suitable name using up to decrease the contrast ...- Adjusting the Contrast of the Display Window You can change the display of the component names, the function displays of components, the system macro numbers (SONY OFF, SYSTEM2 - 12) and timer program numbers (PROG1 - 12) on the Display You can adjust the contrast of the display window. 1 While pressing the POWER...
COMPO SYSTEM TIMER SCROLL SET 3 2 POWER REC VIDEO1 VIDEO2 AUX TUNER CD TAPE MD TV PHONO DVD 1,5 MENU VOL GUIDE CH 4 MUTING RECALL Continued 65 Changing the Names of the Labels on the labels to the most suitable name using up to decrease the contrast ...- Adjusting the Contrast of the Display Window You can change the display of the component names, the function displays of components, the system macro numbers (SONY OFF, SYSTEM2 - 12) and timer program numbers (PROG1 - 12) on the Display You can adjust the contrast of the display window. 1 While pressing the POWER...
Operating Instructions
Page 68
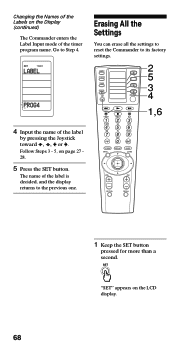
... pressing the Joystick toward , , or . COMPO SYSTEM TIMER SCROLL SET 2 5 3 POWER 4 REC VIDEO1 VIDEO2 AUX TUNER CD TAPE MD TV PHONO DVD 1,6 MENU GUIDE VOL CH MUTING RECALL 1 Keep the SET button pressed for more than a second. Follow Steps 3 - 5, on the LCD display. 68 SET TIMER LABEL PROG4 4 ... returns to the previous one. Go to its factory settings. Erasing All the Settings You can erase all the settings to reset the Commander to Step 4. "SET" appears on page 27 28. 5 Press the SET button. Changing the Names of the Labels on the Display (continued) ...
... pressing the Joystick toward , , or . COMPO SYSTEM TIMER SCROLL SET 2 5 3 POWER 4 REC VIDEO1 VIDEO2 AUX TUNER CD TAPE MD TV PHONO DVD 1,6 MENU GUIDE VOL CH MUTING RECALL 1 Keep the SET button pressed for more than a second. Follow Steps 3 - 5, on the LCD display. 68 SET TIMER LABEL PROG4 4 ... returns to the previous one. Go to its factory settings. Erasing All the Settings You can erase all the settings to reset the Commander to Step 4. "SET" appears on page 27 28. 5 Press the SET button. Changing the Names of the Labels on the Display (continued) ...
Operating Instructions
Page 74
... change the input mode To display the current channel on TV To operate the SLEEP function on the TV (works only for a TV with this Commander. To swap the "window" picture To move the cursor to the left To enter the selection of the MENU display To exit the setting menu... To switch the sound of the TV's manufacturer Volume up: + Volume down : - PIPINPUT TV KEY DISPLAY POWER 1 - 9, 0, ENT TV/VIDEO DISPLAY SLEEP MENU OK (Joystick) GUIDE PIP CH +/- To mute the volume on the TV. KEY DISPLAY PIP CH + PIP CH -
... change the input mode To display the current channel on TV To operate the SLEEP function on the TV (works only for a TV with this Commander. To swap the "window" picture To move the cursor to the left To enter the selection of the MENU display To exit the setting menu... To switch the sound of the TV's manufacturer Volume up: + Volume down : - PIPINPUT TV KEY DISPLAY POWER 1 - 9, 0, ENT TV/VIDEO DISPLAY SLEEP MENU OK (Joystick) GUIDE PIP CH +/- To mute the volume on the TV. KEY DISPLAY PIP CH + PIP CH -
Operating Instructions
Page 75
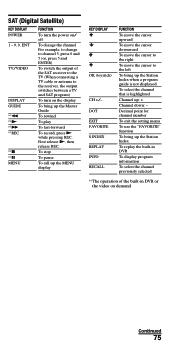
To stop To pause To call up : + Channel down: - SAT (Digital Satellite) KEY DISPLAY POWER 1 - 9, 0, ENT TV/VIDEO DISPLAY GUIDE *1 m *1 N *1 M *1 REC *1 x *1 X MENU FUNCTION To turn on demand Continued 75 First release N, then release REC. Decimal point for channel number To exit the setting menu To... bring up the Station Index To replay the built-in DVR or the video on the display To bring up the Station Index when a program guide is not displayed To select the channel that is highlighted Channel up the MENU display KEY DISPLAY OK (Joystick) CH +/- DOT EXIT FAVORITE S.INDEX ...
To stop To pause To call up : + Channel down: - SAT (Digital Satellite) KEY DISPLAY POWER 1 - 9, 0, ENT TV/VIDEO DISPLAY GUIDE *1 m *1 N *1 M *1 REC *1 x *1 X MENU FUNCTION To turn on demand Continued 75 First release N, then release REC. Decimal point for channel number To exit the setting menu To... bring up the Station Index To replay the built-in DVR or the video on the display To bring up the Station Index when a program guide is not displayed To select the channel that is highlighted Channel up the MENU display KEY DISPLAY OK (Joystick) CH +/- DOT EXIT FAVORITE S.INDEX ...
Operating Instructions
Page 76
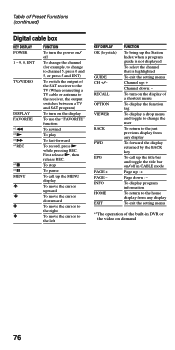
... BACK FWD EPG PAGE + PAGE - To display program information To return to the left KEY DISPLAY OK (Joystick) GUIDE CH +/- INFO HOME EXIT FUNCTION To bring up the Station Index when a program guide is not displayed To select the channel that is highlighted To exit the setting menu Channel up the MENU...
... BACK FWD EPG PAGE + PAGE - To display program information To return to the left KEY DISPLAY OK (Joystick) GUIDE CH +/- INFO HOME EXIT FUNCTION To bring up the Station Index when a program guide is not displayed To select the channel that is highlighted To exit the setting menu Channel up the MENU...
Operating Instructions
Page 78
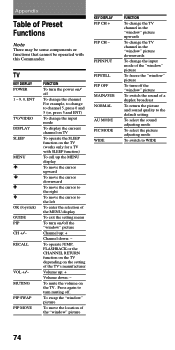
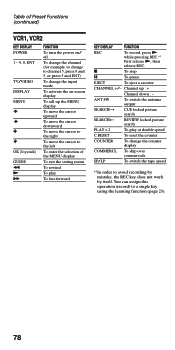
Table of Preset Functions (continued) VCR1, VCR2 KEY DISPLAY POWER 1 - 9, 0, ENT TV/VIDEO DISPLAY MENU OK (Joystick) GUIDE m N M FUNCTION To turn the power on -screen display To call up : + Channel down : - x To stop X To pause EJECT To eject a cassette CHANNEL +/- You can assign ...
Table of Preset Functions (continued) VCR1, VCR2 KEY DISPLAY POWER 1 - 9, 0, ENT TV/VIDEO DISPLAY MENU OK (Joystick) GUIDE m N M FUNCTION To turn the power on -screen display To call up : + Channel down : - x To stop X To pause EJECT To eject a cassette CHANNEL +/- You can assign ...


