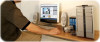

Quick Start Guide
Page 2
.... All other trademarks are available to U.S. Sony Electronics Inc. Updates and additions to this manual or the information contained herein at any machine-readable form without notice. Important information for Canadian customers: Your new VAIO computer includes certain software versions or upgrades, and Internet services or offers that are trademarks or registered trademarks of their respective owners. 2 Intel and Pentium are trademarks...
.... All other trademarks are available to U.S. Sony Electronics Inc. Updates and additions to this manual or the information contained herein at any machine-readable form without notice. Important information for Canadian customers: Your new VAIO computer includes certain software versions or upgrades, and Internet services or offers that are trademarks or registered trademarks of their respective owners. 2 Intel and Pentium are trademarks...

Quick Start Guide
Page 11
Contents Getting Started 13 Unpacking your Computer 14 Locating Controls And Ports 17 About the Front Panel 18 About the Back Panel 21 About the Sub-Woofer 23 About the Keyboard 24 Setting Up Your Computer 27 Connecting a Display (Monitor 28 Connecting the Speakers and Sub-woofer Unit ........30 Connecting the Keyboard and Mouse 33 Connecting the Telephone and Modem cables .........34 Connecting the Power Cords 35 Turning On your Computer 36 Registering your Computer 36 Turning Off your Computer 37 11
Contents Getting Started 13 Unpacking your Computer 14 Locating Controls And Ports 17 About the Front Panel 18 About the Back Panel 21 About the Sub-Woofer 23 About the Keyboard 24 Setting Up Your Computer 27 Connecting a Display (Monitor 28 Connecting the Speakers and Sub-woofer Unit ........30 Connecting the Keyboard and Mouse 33 Connecting the Telephone and Modem cables .........34 Connecting the Power Cords 35 Turning On your Computer 36 Registering your Computer 36 Turning Off your Computer 37 11

Quick Start Guide
Page 18
System configuration may vary, depending on the model purchased. VAIO Digital Studio Computer Quick Start About the Front Panel The front panel of your VAIO® Computer enables access to a 3.5-inch floppy disk. 18 Front panel 1 Optical drive 1 See the online specifications sheet for optical drive information. 2 Optical drive 2 See the online specifications sheet for details. See the online specifications sheet for optical drive information. 3 Floppy disk drive Reads and writes data from and to drives, media slots, ports and jacks.
System configuration may vary, depending on the model purchased. VAIO Digital Studio Computer Quick Start About the Front Panel The front panel of your VAIO® Computer enables access to a 3.5-inch floppy disk. 18 Front panel 1 Optical drive 1 See the online specifications sheet for optical drive information. 2 Optical drive 2 See the online specifications sheet for details. See the online specifications sheet for optical drive information. 3 Floppy disk drive Reads and writes data from and to drives, media slots, ports and jacks.

Quick Start Guide
Page 22
... specifications sheet for a 10BASE-T/100BASE-TX/1000BASE-TX Ethernet. (The port marked with a sub-woofer unit. Line Out jack* Connection for a microphone (optional). Digital/Analog Out jack* Connection for external digital devices or digital speaker systems. 14 Modem line jack Connection for the modem (supplied) cable to the computer. 9 Speaker DC Out jack Connection for the supplied speaker power cable. 10 Ethernet port Connection for information on your computer's hardware configuration † Certain VAIO computer models are supplied with (Network...
... specifications sheet for a 10BASE-T/100BASE-TX/1000BASE-TX Ethernet. (The port marked with a sub-woofer unit. Line Out jack* Connection for a microphone (optional). Digital/Analog Out jack* Connection for external digital devices or digital speaker systems. 14 Modem line jack Connection for the modem (supplied) cable to the computer. 9 Speaker DC Out jack Connection for the supplied speaker power cable. 10 Ethernet port Connection for information on your computer's hardware configuration † Certain VAIO computer models are supplied with (Network...

Quick Start Guide
Page 28
To connect a display MONITOR 28 VAIO Digital Studio Computer Quick Start Connecting a Display (Monitor) 1 Plug the display's cable into the monitor port. 2 If necessary, plug the display's cable into the rear of the display.
To connect a display MONITOR 28 VAIO Digital Studio Computer Quick Start Connecting a Display (Monitor) 1 Plug the display's cable into the monitor port. 2 If necessary, plug the display's cable into the rear of the display.

VAIO User Guide
Page 7
... configuration may vary, depending on . Page 7 See the online specifications sheet for optical drive information. 3 Floppy disk drive Reads and writes data from and to a 3.5-inch floppy disk. 4 Floppy disk drive access indicator Light is green while reading and writing data from and to connect compatible peripheral devices. About the Front Panel The front panel of your VAIO® Computer enables access to drives, media slots, ports and jacks that enable you to a floppy disk. 5 Power...
... configuration may vary, depending on . Page 7 See the online specifications sheet for optical drive information. 3 Floppy disk drive Reads and writes data from and to a 3.5-inch floppy disk. 4 Floppy disk drive access indicator Light is green while reading and writing data from and to connect compatible peripheral devices. About the Front Panel The front panel of your VAIO® Computer enables access to drives, media slots, ports and jacks that enable you to a floppy disk. 5 Power...

VAIO User Guide
Page 10
... panel locate and identify the ports on your computer contains the ports for a compatible digital device, such as a Sony Digital Handycam® camcorder. Back panel 1 AC Input port Connection for the supplied power cord. 2 Mouse port Connection for a PS/2® mouse. 3 Keyboard port Connection for a PS/2 keyboard. 4 Printer port Connection for a parallel device, such as a printer or scanner. 5 i.LINK 6-pin S400 port (IEEE 1394) Connection and power for supplied and optional accessories. About the Back Panel The back panel of your computer...
... panel locate and identify the ports on your computer contains the ports for a compatible digital device, such as a Sony Digital Handycam® camcorder. Back panel 1 AC Input port Connection for the supplied power cord. 2 Mouse port Connection for a PS/2® mouse. 3 Keyboard port Connection for a PS/2 keyboard. 4 Printer port Connection for a parallel device, such as a printer or scanner. 5 i.LINK 6-pin S400 port (IEEE 1394) Connection and power for supplied and optional accessories. About the Back Panel The back panel of your computer...

VAIO User Guide
Page 16
Setting Up Your Computer Your computer may not be equipped with all of the controls, ports, and jacks may vary from the illustrations shown. The location of the hardware features described in the section. See the online Specifications sheet for your system's specific hardware configuration. Connecting a Display (Monitor) Connecting the Speakers and Sub-woofer Unit Connecting the Keyboard and Mouse Connecting the Telephone and Modem cables Connecting the Power Cords Turning On your Computer Registering your Computer Page 16
Setting Up Your Computer Your computer may not be equipped with all of the controls, ports, and jacks may vary from the illustrations shown. The location of the hardware features described in the section. See the online Specifications sheet for your system's specific hardware configuration. Connecting a Display (Monitor) Connecting the Speakers and Sub-woofer Unit Connecting the Keyboard and Mouse Connecting the Telephone and Modem cables Connecting the Power Cords Turning On your Computer Registering your Computer Page 16

VAIO User Guide
Page 17
If necessary, plug the display's cable into the monitor port. 2. Connecting a Display (Monitor) 1. To connect a display To connect a DVI display Install your equipment so that you can easily reach the power outlet in the event of the display. Plug the display's cable into the rear of an emergency. Page 17
If necessary, plug the display's cable into the monitor port. 2. Connecting a Display (Monitor) 1. To connect a display To connect a DVI display Install your equipment so that you can easily reach the power outlet in the event of the display. Plug the display's cable into the rear of an emergency. Page 17

VAIO User Guide
Page 33
... 4-pin i.LINK port does not supply power to a connected i.LINK device. Connecting an i.LINK (IEEE 1394) device 1. Plug the i.LINK cable connector into the corresponding 4- A 4-pin i.LINK port cannot supply power to a connected i.LINK device. Please refer to locate the i.LINK port on your digital devices. To view the hardware configuration for more information on your computer, see the online Specifications sheet. Use the symbol to the documentation that came with each other end of Sony used...
... 4-pin i.LINK port does not supply power to a connected i.LINK device. Connecting an i.LINK (IEEE 1394) device 1. Plug the i.LINK cable connector into the corresponding 4- A 4-pin i.LINK port cannot supply power to a connected i.LINK device. Please refer to locate the i.LINK port on your digital devices. To view the hardware configuration for more information on your computer, see the online Specifications sheet. Use the symbol to the documentation that came with each other end of Sony used...
VAIO User Guide
Page 41
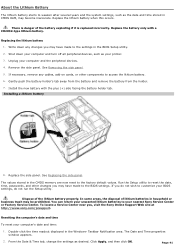
... CMOS RAM, may be prohibited. Install the new battery with a CR2032-type lithium battery. You can return your unwanted lithium batteries to access the lithium battery. 6. Resetting the computer's date and time To reset your printer. 3. From the Date & Time tab, change the settings as your computer's date and time: 1. See Replacing the side panel. Run the Setup utility to reset the date, time, passwords, and other components to your computer and the peripheral devices. 4. Replace...
... CMOS RAM, may be prohibited. Install the new battery with a CR2032-type lithium battery. You can return your unwanted lithium batteries to access the lithium battery. 6. Resetting the computer's date and time To reset your printer. 3. From the Date & Time tab, change the settings as your computer's date and time: 1. See Replacing the side panel. Run the Setup utility to reset the date, time, passwords, and other components to your computer and the peripheral devices. 4. Replace...

VAIO User Guide
Page 42
...VAIO Recovery Wizard utility program cannot restore the drive partitions, operating system, or original software programs. Before replacing the hard disk drive, create a VAIO Recovery Media Kit or purchase a kit from Sony. See Removing the side panel. 4. Sony recommends using an ATA-100 hard disk drive to access the Sony Online Support Web site. Hard disk drive recovery When you upgrade your Sony computer. The identified drives, including those for more information about installing additional hard disk drives, see the System Reference Manual. Replacing the original hard disk...
...VAIO Recovery Wizard utility program cannot restore the drive partitions, operating system, or original software programs. Before replacing the hard disk drive, create a VAIO Recovery Media Kit or purchase a kit from Sony. See Removing the side panel. 4. Sony recommends using an ATA-100 hard disk drive to access the Sony Online Support Web site. Hard disk drive recovery When you upgrade your Sony computer. The identified drives, including those for more information about installing additional hard disk drives, see the System Reference Manual. Replacing the original hard disk...

VAIO User Guide
Page 43
... 8. Orient the connector to the new drive following the instructions supplied with the necessary screws. Connect the second power connector to align pin 1 on the inside of the drive holder. Slide the drive holder in your computer. 6. Connect the second drive connector to the drive holder. 10. Slide the new drive into position. 12. Unlock the drive holder from the original hard disk drive that is supplied with the drive. Align the drive holder with the...
... 8. Orient the connector to the new drive following the instructions supplied with the necessary screws. Connect the second power connector to align pin 1 on the inside of the drive holder. Slide the drive holder in your computer. 6. Connect the second drive connector to the drive holder. 10. Slide the new drive into position. 12. Unlock the drive holder from the original hard disk drive that is supplied with the drive. Align the drive holder with the...

VAIO User Guide
Page 56
... are using a USB mouse, verify that the mouse is plugged securely into the appropriate USB port. Save and close all open applications. To access VAIO Recovery Options, follow these steps: Click Start in the Windows® taskbar and click Help and Support. From the VAIO Help And Support Center menu, click VAIO Recovery Options. If you are using a mouse pad. Avoid surfaces that may be working properly. A good mouse surface requires...
... are using a USB mouse, verify that the mouse is plugged securely into the appropriate USB port. Save and close all open applications. To access VAIO Recovery Options, follow these steps: Click Start in the Windows® taskbar and click Help and Support. From the VAIO Help And Support Center menu, click VAIO Recovery Options. If you are using a mouse pad. Avoid surfaces that may be working properly. A good mouse surface requires...
VAIO User Guide
Page 64
... And Support Center menu, click VAIO Recovery Options. If you are using these steps: 1. To access VAIO Recovery Options, follow these steps: 1. Page 64 To recover your own headphones instead of the supplied speakers, adjust the volume control dial, located on the left panel, to adjust speaker volume. The speakers continue to your computer. If the software application you want to use an external power source, verify that the power cord is plugged...
... And Support Center menu, click VAIO Recovery Options. If you are using these steps: 1. To access VAIO Recovery Options, follow these steps: 1. Page 64 To recover your own headphones instead of the supplied speakers, adjust the volume control dial, located on the left panel, to adjust speaker volume. The speakers continue to your computer. If the software application you want to use an external power source, verify that the power cord is plugged...

VAIO User Guide
Page 65
... the Windows volume control. The sound driver(s) may not be working properly. To recover your speakers have been connected. For PCV-W series models only Adjust the volume control dial, located on the wireless keyboard. For PCV-V series models only Adjust the volume by moving the slider bar to mute the sound from your speakers if headphones are connected to your computer. If the software application you want to use an external power...
... the Windows volume control. The sound driver(s) may not be working properly. To recover your speakers have been connected. For PCV-W series models only Adjust the volume control dial, located on the wireless keyboard. For PCV-V series models only Adjust the volume by moving the slider bar to mute the sound from your speakers if headphones are connected to your computer. If the software application you want to use an external power...
VAIO User Guide
Page 70
... click Control Panel. 2. Page 70 About Using Peripheral Equipment How do not function properly without the updated drivers for "Automatically detect and install my Plug and Play printer", if you are included with the printer, choose an alternate printer driver that your printer may emulate. Click Start in the list and the printer manufacturer included a disk with a Windows XP Printer driver, choose Have Disk, enter...
... click Control Panel. 2. Page 70 About Using Peripheral Equipment How do not function properly without the updated drivers for "Automatically detect and install my Plug and Play printer", if you are included with the printer, choose an alternate printer driver that your printer may emulate. Click Start in the list and the printer manufacturer included a disk with a Windows XP Printer driver, choose Have Disk, enter...

VAIO User Guide
Page 71
... printer, choose an alternate printer driver that came with installation. Page 71 Click Start in the list and the printer manufacturer included a disk with Plug and Play capability. 5. Select the appropriate printer manufacturer and model. 7. If the printer is not included in the Windows taskbar, then click Control Panel. 2. Refer to print a test page and complete printer installation. Place a check mark in...
... printer, choose an alternate printer driver that came with installation. Page 71 Click Start in the list and the printer manufacturer included a disk with Plug and Play capability. 5. Select the appropriate printer manufacturer and model. 7. If the printer is not included in the Windows taskbar, then click Control Panel. 2. Refer to print a test page and complete printer installation. Place a check mark in...

Technical Specifications
Page 1
...disc drive option: DVD±RW V.90 data/fax modem*** Hard disk drive bay** PCI slot i.LINK (4-pin) S400 port USB 2.0 ports (3) Memory Stick® media slot USB 2.0 ports (4) PS/2® keyboard port PS/2 mouse port VGA and DVI monitor ports Parallel (printer) port i.LINK (6-pin) S400 port Modem line jack Telephone jack DC Out jack VAIO® keyboard PS/2® optical mouse Modem cable Power cord Video adapter 295 watts maximum SmartMedia™ card slot CompactFlash® / Microdrive media slot 10BASE-T/100BASE-TX/1000BASE-TX - VAIO® Desktop Computer Specifications PCV-RZ40C / PCV...
...disc drive option: DVD±RW V.90 data/fax modem*** Hard disk drive bay** PCI slot i.LINK (4-pin) S400 port USB 2.0 ports (3) Memory Stick® media slot USB 2.0 ports (4) PS/2® keyboard port PS/2 mouse port VGA and DVI monitor ports Parallel (printer) port i.LINK (6-pin) S400 port Modem line jack Telephone jack DC Out jack VAIO® keyboard PS/2® optical mouse Modem cable Power cord Video adapter 295 watts maximum SmartMedia™ card slot CompactFlash® / Microdrive media slot 10BASE-T/100BASE-TX/1000BASE-TX - VAIO® Desktop Computer Specifications PCV-RZ40C / PCV...

Technical Specifications
Page 2
...-Threading Technology requires a computer system with the PCVA-SP4 speakers option. Performance may vary. ** Installation of a second hard disk drive (maximum size up to hard drive capacity. For more information, including details on the hardware configuration purchased. ***Maximum speed for recovery partition. ‡‡ The amount of downloading at this technology or operate at 53 Kbps using 56K/V.90. VAIO® Desktop Computer Specifications Model Power Source Dimensions Weight Operating Temperature PCV-RZ40C / PCV-RZ40CP 100 - 240...
...-Threading Technology requires a computer system with the PCVA-SP4 speakers option. Performance may vary. ** Installation of a second hard disk drive (maximum size up to hard drive capacity. For more information, including details on the hardware configuration purchased. ***Maximum speed for recovery partition. ‡‡ The amount of downloading at this technology or operate at 53 Kbps using 56K/V.90. VAIO® Desktop Computer Specifications Model Power Source Dimensions Weight Operating Temperature PCV-RZ40C / PCV-RZ40CP 100 - 240...


