

PCVASP4 (with Sub) Supplemental Document
Page 2
... Sony Direct Accessories and Parts Center Web site at http://servicesales.sel.sony.com. 3 In the section, Search by Model for Accessories, type in your computer model (for approximately 30 seconds, and then turn on the power. 2 Open the optical drive, and place the Startup Recovery Disc in the Windows® taskbar. 2 Click Help and Support. Replacing the primary hard disk drive Use the Recovery Media Kit to recover your system or the new hard disk drive. To access the VAIO Recovery Options...
... Sony Direct Accessories and Parts Center Web site at http://servicesales.sel.sony.com. 3 In the section, Search by Model for Accessories, type in your computer model (for approximately 30 seconds, and then turn on the power. 2 Open the optical drive, and place the Startup Recovery Disc in the Windows® taskbar. 2 Click Help and Support. Replacing the primary hard disk drive Use the Recovery Media Kit to recover your system or the new hard disk drive. To access the VAIO Recovery Options...

PCVASP4 (with Sub) Supplemental Document
Page 8
... can find instructions on how to set up connection to quickly view specific information using the context-sensitive search features. Use these support options: ❑ VAIO® Computer Quick Start - The Quick Start can locate helpful information immediately by accessing the online Computer User Guide and the individual software Help files. Your system's hardware and software applications are described in the text, "View the VAIO® Computer Specifications..." * A hard copy of installed memory, identify optical drive specifications, and more...
... can find instructions on how to set up connection to quickly view specific information using the context-sensitive search features. Use these support options: ❑ VAIO® Computer Quick Start - The Quick Start can locate helpful information immediately by accessing the online Computer User Guide and the individual software Help files. Your system's hardware and software applications are described in the text, "View the VAIO® Computer Specifications..." * A hard copy of installed memory, identify optical drive specifications, and more...

Quick Start Guide
Page 2
..., OR YOUR DOWNLOADING OF ANY MATERIALS, DATA, TEXT, IMAGES, VIDEO, OR AUDIO FROM ANY DESCRIBED WEB SITE. reserves the right to this product. Certain product(s) included with participating financial institutions. 2 This manual and the software described herein, in whole or in part without prior written approval. USE OF THE SOFTWARE PRODUCT(S) REQUIRES AGREEMENT TO APPLICABLE END USER AGREEMENTS AND FULL...
..., OR YOUR DOWNLOADING OF ANY MATERIALS, DATA, TEXT, IMAGES, VIDEO, OR AUDIO FROM ANY DESCRIBED WEB SITE. reserves the right to this product. Certain product(s) included with participating financial institutions. 2 This manual and the software described herein, in whole or in part without prior written approval. USE OF THE SOFTWARE PRODUCT(S) REQUIRES AGREEMENT TO APPLICABLE END USER AGREEMENTS AND FULL...

Quick Start Guide
Page 11
Contents Getting Started 13 Unpacking your Computer 14 Locating Controls And Ports 17 About the Front Panel 18 About the Back Panel 21 About the Remote Control 24 About the Keyboard 29 Setting Up Your Computer 31 Connecting a Display (Monitor 32 Connecting the Speakers 34 Connecting the Keyboard and Mouse 35 Connecting the Telephone and Modem cables .........36 Connecting the Power Cords 37 Turning On Your Computer 38 Registering your Computer 38 Turning Off your Computer 39 11
Contents Getting Started 13 Unpacking your Computer 14 Locating Controls And Ports 17 About the Front Panel 18 About the Back Panel 21 About the Remote Control 24 About the Keyboard 29 Setting Up Your Computer 31 Connecting a Display (Monitor 32 Connecting the Speakers 34 Connecting the Keyboard and Mouse 35 Connecting the Telephone and Modem cables .........36 Connecting the Power Cords 37 Turning On Your Computer 38 Registering your Computer 38 Turning Off your Computer 39 11

Quick Start Guide
Page 22
...S-video cable (optional). 22 Headphones jack Connection for a microphone (optional). VAIO Digital Studio Computer Quick Start 4 Printer port Connection for a parallel device, such as a printer or scanner. 5 Monitor port* Connection for a standard display. 6 i.LINK 6-pin S400 port (IEEE 1394) Connection and power for a compatible digital device, such as a Sony Digital Handycam® camcorder. 7 Universal Serial Bus (USB 2.0) ports (4) Connections for compatible high/full/low-speed USB devices. 8 Microphone jack Connection for the supplied speakers or optional headphones...
...S-video cable (optional). 22 Headphones jack Connection for a microphone (optional). VAIO Digital Studio Computer Quick Start 4 Printer port Connection for a parallel device, such as a printer or scanner. 5 Monitor port* Connection for a standard display. 6 i.LINK 6-pin S400 port (IEEE 1394) Connection and power for a compatible digital device, such as a Sony Digital Handycam® camcorder. 7 Universal Serial Bus (USB 2.0) ports (4) Connections for compatible high/full/low-speed USB devices. 8 Microphone jack Connection for the supplied speakers or optional headphones...

Quick Start Guide
Page 25
.... 4 AUDIO button Press to view available sound mode options on the monitor/display. 5 DVD angle button Press to show the settings window. See the DVD player software for details. DISPLAY button During DVD playback in full-screen size. Press again to restore the sound. 2 Channel number buttons (1-9) Press to select specific channels. (Press the ENT button to activate channel selection.) JUMP button Press to go to view the current software in full screen mode, press to change the...
.... 4 AUDIO button Press to view available sound mode options on the monitor/display. 5 DVD angle button Press to show the settings window. See the DVD player software for details. DISPLAY button During DVD playback in full-screen size. Press again to restore the sound. 2 Channel number buttons (1-9) Press to select specific channels. (Press the ENT button to activate channel selection.) JUMP button Press to go to view the current software in full screen mode, press to change the...

Quick Start Guide
Page 32
To connect a display 32 VAIO Digital Studio Computer Quick Start Connecting a Display (Monitor) 1 Plug the display's cable into the monitor port. 2 If necessary, plug the display's cable into the rear of the display.
To connect a display 32 VAIO Digital Studio Computer Quick Start Connecting a Display (Monitor) 1 Plug the display's cable into the monitor port. 2 If necessary, plug the display's cable into the rear of the display.

Quick Start Guide
Page 33
To connect a DVI display Connecting a Display (Monitor) ✍ Install your equipment so that you can easily reach the power outlet in the event of an emergency. 33
To connect a DVI display Connecting a Display (Monitor) ✍ Install your equipment so that you can easily reach the power outlet in the event of an emergency. 33

VAIO User Guide
Page 14
... show the settings window. DVD Subtitle button Press to turn on -screen image from the TV/Recording deck to external video equipment, such as your VCR. (Note: You cannot change the input source while recording.) 6 REW and FF buttons Press to change the camera angle during DVD playback. The window returns to its original size. 4 AUDIO button Press to view available sound mode options on the monitor/display. 5 DVD angle button Press to...
... show the settings window. DVD Subtitle button Press to turn on -screen image from the TV/Recording deck to external video equipment, such as your VCR. (Note: You cannot change the input source while recording.) 6 REW and FF buttons Press to change the camera angle during DVD playback. The window returns to its original size. 4 AUDIO button Press to view available sound mode options on the monitor/display. 5 DVD angle button Press to...

VAIO User Guide
Page 20
See the online specifications sheet for your system's specific hardware configuration. Connecting a Display (Monitor) Connecting the Speakers Connecting the Keyboard and Mouse Connecting the Telephone and Modem cables Connecting the Power Cords Turning On Your Computer Registering your Computer Page 20 The location of the controls, ports, and jacks may not be equipped with all of the hardware features described in the section. Setting Up Your Computer Your computer may vary from the illustrations shown.
See the online specifications sheet for your system's specific hardware configuration. Connecting a Display (Monitor) Connecting the Speakers Connecting the Keyboard and Mouse Connecting the Telephone and Modem cables Connecting the Power Cords Turning On Your Computer Registering your Computer Page 20 The location of the controls, ports, and jacks may not be equipped with all of the hardware features described in the section. Setting Up Your Computer Your computer may vary from the illustrations shown.

VAIO User Guide
Page 21
Plug the display's cable into the rear of an emergency. If necessary, plug the display's cable into the monitor port. 2. Page 21 Connecting a Display (Monitor) 1. To connect a display To connect a DVI display Install your equipment so that you can easily reach the power outlet in the event of the display.
Plug the display's cable into the rear of an emergency. If necessary, plug the display's cable into the monitor port. 2. Page 21 Connecting a Display (Monitor) 1. To connect a display To connect a DVI display Install your equipment so that you can easily reach the power outlet in the event of the display.

VAIO User Guide
Page 47
... are controlled by the TV listing provider and may change without notice. The Timer Recording Wizard begins and the New Timer Recording - Click Start in the Windows taskbar, point to All Programs, point to 100 timer recordings using Giga Pocket Personal Video Recorder. Select Giga Pocket, Help, and click Giga Pocket Help. Set Channel and Start Date and Time window appears. Accessing...
... are controlled by the TV listing provider and may change without notice. The Timer Recording Wizard begins and the New Timer Recording - Click Start in the Windows taskbar, point to All Programs, point to 100 timer recordings using Giga Pocket Personal Video Recorder. Select Giga Pocket, Help, and click Giga Pocket Help. Set Channel and Start Date and Time window appears. Accessing...

VAIO User Guide
Page 68
... window appears, listing all Giga Pocket applications before setting up your Internet Electronic Program Guide service You must be connected to the Internet, before downloading your Internet Electronic Program Guide service. The Confirm Lineup window appears, listing available channels by time and channel. Your TV listings appear in your TV provider adds new channels or changes existing channels, an Update icon appears next to continue. If your area. 5. Click Start...
... window appears, listing all Giga Pocket applications before setting up your Internet Electronic Program Guide service You must be connected to the Internet, before downloading your Internet Electronic Program Guide service. The Confirm Lineup window appears, listing available channels by time and channel. Your TV listings appear in your TV provider adds new channels or changes existing channels, an Update icon appears next to continue. If your area. 5. Click Start...
VAIO User Guide
Page 94
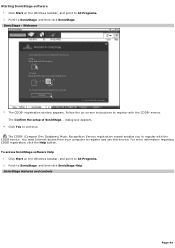
... SonicStage, and then click SonicStage. SonicStage features and controls Page 94 Point to SonicStage, and then click SonicStage Help. Click Start on the Windows taskbar, and point to register with the CDDB service. Click Yes to register and use this service. You need Internet access from your computer to continue. Follow the on-screen instructions to All Programs. 2. To access SonicStage software Help 1. SonicStage -
... SonicStage, and then click SonicStage. SonicStage features and controls Page 94 Point to SonicStage, and then click SonicStage Help. Click Start on the Windows taskbar, and point to register with the CDDB service. Click Yes to register and use this service. You need Internet access from your computer to continue. Follow the on-screen instructions to All Programs. 2. To access SonicStage software Help 1. SonicStage -
VAIO User Guide
Page 137
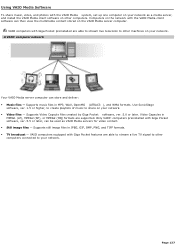
... software, ver. 5.0 or later. Supports still image files in MP3, WAV, OpenMG (ATRAC3 ), and WMA formats. Only VAIO® computers preinstalled with Giga Pocket software, ver. 5.5 or later, can be used as a media server, and install the VAIO Media client software on other machines on your network. Video files - A VAIO® com puter network Your VAIO Media server computer can then view the multimedia content stored on the VAIO Media server computer. Using VAIO Media Software To share music, video...
... software, ver. 5.0 or later. Supports still image files in MP3, WAV, OpenMG (ATRAC3 ), and WMA formats. Only VAIO® computers preinstalled with Giga Pocket software, ver. 5.5 or later, can be used as a media server, and install the VAIO Media client software on other machines on your network. Video files - A VAIO® com puter network Your VAIO Media server computer can then view the multimedia content stored on the VAIO Media server computer. Using VAIO Media Software To share music, video...

VAIO User Guide
Page 170
Locate the notch on cards, or other components to access the memory module slots. 5. Press down your computer and turn off all peripheral devices, such as your computer and any peripheral devices. 3. To avoid damaging a memory module slot, move the end latches slightly outward to align it by the the edges. 6. See Replacing the side panel. Shut down evenly against the module's upper corners. Remove the...
Locate the notch on cards, or other components to access the memory module slots. 5. Press down your computer and turn off all peripheral devices, such as your computer and any peripheral devices. 3. To avoid damaging a memory module slot, move the end latches slightly outward to align it by the the edges. 6. See Replacing the side panel. Shut down evenly against the module's upper corners. Remove the...

VAIO User Guide
Page 177
Connect the second power connector to the new drive. Connect the second drive connector to the new drive following the instructions supplied with pin 1 on the new drive. 13. Orient the connector to your computer. Reconnect the power cord to align pin 1 on the drive holder tab to lock the drive into position. 12. See Replacing the side panel. 15. Push down on the red side of the ribbon cable with the drive. Replace the side panel. 11. Replacing the driv e holder 14. Page 177
Connect the second power connector to the new drive. Connect the second drive connector to the new drive following the instructions supplied with pin 1 on the new drive. 13. Orient the connector to your computer. Reconnect the power cord to align pin 1 on the drive holder tab to lock the drive into position. 12. See Replacing the side panel. 15. Push down on the red side of the ribbon cable with the drive. Replace the side panel. 11. Replacing the driv e holder 14. Page 177

VAIO User Guide
Page 210
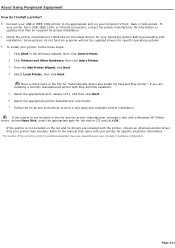
... a USB, IEEE 1394, or infrared connection, contact the printer manufacturer for the disk or CD and click OK. Select the appropriate printer manufacturer and model. 7. Place a check mark in the Windows taskbar, then click Control Panel. 2. Click Start in the box for "Automatically detect and install my Plug and Play printer", if you are included with a Windows XP Printer driver, choose Have Disk, enter...
... a USB, IEEE 1394, or infrared connection, contact the printer manufacturer for the disk or CD and click OK. Select the appropriate printer manufacturer and model. 7. Place a check mark in the Windows taskbar, then click Control Panel. 2. Click Start in the box for "Automatically detect and install my Plug and Play printer", if you are included with a Windows XP Printer driver, choose Have Disk, enter...
VAIO User Guide
Page 211
... infrared connection, contact the printer manufacturer for information or updates that your c omputer's hardware c onfiguration. Click Start in the list and the printer manufacturer included a disk with a Windows XP Printer driver, choose Have Disk, enter the appropriate path for specific operating systems. To install your computer's front, back or side panels1. Select the appropriate printer manufacturer and model. 7. Click Printers and Other Hardware, then click Add...
... infrared connection, contact the printer manufacturer for information or updates that your c omputer's hardware c onfiguration. Click Start in the list and the printer manufacturer included a disk with a Windows XP Printer driver, choose Have Disk, enter the appropriate path for specific operating systems. To install your computer's front, back or side panels1. Select the appropriate printer manufacturer and model. 7. Click Printers and Other Hardware, then click Add...
Marketing Specifications
Page 1
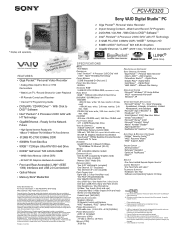
... (occupied by Graphics Card) Three PCI (two occupied) Memory Stick® Media Slot EXPANSION BAYS Two 5.25" Half-Height (occupied) One External 3.5" (occupied) Two Internal 3.5" (one billion bytes when referring to DVDTM Software*** ! DVD Creation PictureGear StudioTM - Network File Sharing OPERATING SYSTEM Microsoft® Windows® XP Home Edition VAIO® recommends Microsoft® Windows® XP OTHER SOFTWARE APPLICATIONS Microsoft® Works® 7.0 - Video Audio Integrated Operation DPVeDRrs±...
... (occupied by Graphics Card) Three PCI (two occupied) Memory Stick® Media Slot EXPANSION BAYS Two 5.25" Half-Height (occupied) One External 3.5" (occupied) Two Internal 3.5" (one billion bytes when referring to DVDTM Software*** ! DVD Creation PictureGear StudioTM - Network File Sharing OPERATING SYSTEM Microsoft® Windows® XP Home Edition VAIO® recommends Microsoft® Windows® XP OTHER SOFTWARE APPLICATIONS Microsoft® Works® 7.0 - Video Audio Integrated Operation DPVeDRrs±...


