

PCVASP4 (with Sub) Supplemental Document
Page 8
...computer with Sony, and establish a dial-up your VAIO computer. Your computer is a printed document, supplied with the computer. You can locate helpful information immediately by accessing the online Computer User Guide and the individual software Help files. VAIO® COMPUTERS SUPPLEMENTAL INFORMATION Your new VAIO® computer... and Support. 2 From the VAIO Help and Support Center, click VAIO User Guide. 3 Locate the link in the Windows® taskbar. 2 Click Help and Support. This support resource offers a variety of installed memory, identify optical drive specifications, and...
...computer with Sony, and establish a dial-up your VAIO computer. Your computer is a printed document, supplied with the computer. You can locate helpful information immediately by accessing the online Computer User Guide and the individual software Help files. VAIO® COMPUTERS SUPPLEMENTAL INFORMATION Your new VAIO® computer... and Support. 2 From the VAIO Help and Support Center, click VAIO User Guide. 3 Locate the link in the Windows® taskbar. 2 Click Help and Support. This support resource offers a variety of installed memory, identify optical drive specifications, and...

Quick Start Guide
Page 3
...in the space provided here, and keep in which business proprietors can participate voluntarily. Sony, VAIO, the VAIO logo, VAIO Digital Studio, Giga Pocket, MovieShaker, DVgate, Handycam, MagicGate, Memory Stick, the Memory Stick logo, OpenMG, MICROMV, SonicStage, ImageStation, ATRAC3, and i.LINK are trademarks .... registered trademark of products with functions that are available to the model and serial numbers when you call your Sony VAIO® computer. PS/2 is a U.S. The program backs the development and dissemination of the Environmental Protection Agency. Intel and Pentium...
...in the space provided here, and keep in which business proprietors can participate voluntarily. Sony, VAIO, the VAIO logo, VAIO Digital Studio, Giga Pocket, MovieShaker, DVgate, Handycam, MagicGate, Memory Stick, the Memory Stick logo, OpenMG, MICROMV, SonicStage, ImageStation, ATRAC3, and i.LINK are trademarks .... registered trademark of products with functions that are available to the model and serial numbers when you call your Sony VAIO® computer. PS/2 is a U.S. The program backs the development and dissemination of the Environmental Protection Agency. Intel and Pentium...
Quick Start Guide
Page 18
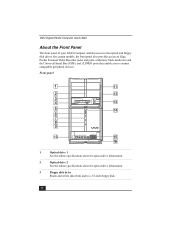
On certain models, the front panel also provides access to Giga Pocket Personal Video Recorder jacks and ports, a Memory Stick media slot and the Universal Serial Bus (USB), and i.LINK® ports that enable you to a 3.5-inch floppy disk. 18 Front panel 1 ... drive 2 See the online specifications sheet for optical drive information. 3 Floppy disk drive Reads and writes data from and to connect compatible peripheral devices. VAIO Digital Studio Computer Quick Start About the Front Panel The front panel of your VAIO Computer enables access to the optical and floppy disk drives.
On certain models, the front panel also provides access to Giga Pocket Personal Video Recorder jacks and ports, a Memory Stick media slot and the Universal Serial Bus (USB), and i.LINK® ports that enable you to a 3.5-inch floppy disk. 18 Front panel 1 ... drive 2 See the online specifications sheet for optical drive information. 3 Floppy disk drive Reads and writes data from and to connect compatible peripheral devices. VAIO Digital Studio Computer Quick Start About the Front Panel The front panel of your VAIO Computer enables access to the optical and floppy disk drives.

Quick Start Guide
Page 19
... floppy disk. 5 Power indicator Light is blue while the power is on. 6 Power switch Turns the computer on and off. 7 Stand by indicator Light is red when the computer is placed in Stand by mode. 8 Optical drive access indicator Light is amber while reading and writing data... a disc from Optical drive 1. 12 Optical drive 2 eject button Ejects a disc from Optical drive 2. 13 Memory Stick media slot and access indicator Reads and writes data from and to a Memory Stick® media. Composite audio L In jack Connection for a video cable (optional). Composite video In jack ...
... floppy disk. 5 Power indicator Light is blue while the power is on. 6 Power switch Turns the computer on and off. 7 Stand by indicator Light is red when the computer is placed in Stand by mode. 8 Optical drive access indicator Light is amber while reading and writing data... a disc from Optical drive 1. 12 Optical drive 2 eject button Ejects a disc from Optical drive 2. 13 Memory Stick media slot and access indicator Reads and writes data from and to a Memory Stick® media. Composite audio L In jack Connection for a video cable (optional). Composite video In jack ...

VAIO User Guide
Page 7
About the Front Panel The front panel of your VAIO Computer enables access to a floppy disk. 5 Power indicator Light is blue while the power is green while reading and writing data from and to the optical ... indicator Light is on. 6 Power switch Page 7 On certain models, the front panel also provides access to Giga Pocket Personal Video Recorder jacks and ports, a Memory Stick media slot and the Universal Serial Bus (USB), and i.LINK® ports that enable you to connect compatible peripheral devices.
About the Front Panel The front panel of your VAIO Computer enables access to a floppy disk. 5 Power indicator Light is blue while the power is green while reading and writing data from and to the optical ... indicator Light is on. 6 Power switch Page 7 On certain models, the front panel also provides access to Giga Pocket Personal Video Recorder jacks and ports, a Memory Stick media slot and the Universal Serial Bus (USB), and i.LINK® ports that enable you to connect compatible peripheral devices.

VAIO User Guide
Page 8
...11 Optical drive 1 eject button Ejects a disc from Optical drive 1. 12 Optical drive 2 eject button Ejects a disc from Optical drive 2. 13 Memory Stick media slot and access indicator Reads and writes data from the floppy disk drive. 15 Universal Serial Bus (USB 2.0) ports (4) Page 8 Turns ...the computer on and off. 7 Stand by indicator Light is red when the computer is placed in Stand by mode. 8 Optical drive access indicator Light is amber while reading and writing data...
...11 Optical drive 1 eject button Ejects a disc from Optical drive 1. 12 Optical drive 2 eject button Ejects a disc from Optical drive 2. 13 Memory Stick media slot and access indicator Reads and writes data from the floppy disk drive. 15 Universal Serial Bus (USB 2.0) ports (4) Page 8 Turns ...the computer on and off. 7 Stand by indicator Light is red when the computer is placed in Stand by mode. 8 Optical drive access indicator Light is amber while reading and writing data...

VAIO User Guide
Page 30
...onto the hard disk drive as modified Playlists. Accessing the Giga Pocket Help For more information about the software and Video Capsules on your Sony CLIÉ Handheld. This folder and its contents are not designed for your Giga Pocket software and Video Capsules to stop working properly....click Giga Pocket Help. Giga Pocket Personal Video Recorder includes: Giga Pocket-This application enables you to watch TV programs on your computer's display and record them onto a Memory Stick® media for viewing with your computer's drive D, in a folder named D:\Giga Pocket V5.
...onto the hard disk drive as modified Playlists. Accessing the Giga Pocket Help For more information about the software and Video Capsules on your Sony CLIÉ Handheld. This folder and its contents are not designed for your Giga Pocket software and Video Capsules to stop working properly....click Giga Pocket Help. Giga Pocket Personal Video Recorder includes: Giga Pocket-This application enables you to watch TV programs on your computer's display and record them onto a Memory Stick® media for viewing with your computer's drive D, in a folder named D:\Giga Pocket V5.

VAIO User Guide
Page 61
...of Video Capsules into gMovie format. For more information on this exciting device, go to the Sony Style Web site at http://sonystyle.com/vaio/clie. You are able to convert your Sony CLIÉ Handheld. Powered by the Palm operating system, the CLIÉ handheld is a ... amazing clarity. The Sony CLIÉ Handheld personal entertainment organizers provide a rich and compelling handheld computing experience. Page 61 CLIÉ Converter The CLIÉ Converter is ready to deliver music and video with your Giga Pocket contents and HotSync® onto a Memory Stick® media ...
...of Video Capsules into gMovie format. For more information on this exciting device, go to the Sony Style Web site at http://sonystyle.com/vaio/clie. You are able to convert your Sony CLIÉ Handheld. Powered by the Palm operating system, the CLIÉ handheld is a ... amazing clarity. The Sony CLIÉ Handheld personal entertainment organizers provide a rich and compelling handheld computing experience. Page 61 CLIÉ Converter The CLIÉ Converter is ready to deliver music and video with your Giga Pocket contents and HotSync® onto a Memory Stick® media ...

VAIO User Guide
Page 64
... transfer destination. Click Start in application, follow these steps: 1. Insert a Memory Stick® media into the Memory Stick media slot on your CLIÉ Handheld. The Send To dialog box... 4. When transfer is complete, the GP2CLIE window appears. Designate a user name, if applicable to the Memory Stick media. 3. From the Giga Pocket -> CLIÉ Converter main window, click to select the ...point to a Memory Stick media 1. Page 64 Select Using Memory Stick as the transfer destination. Follow the on CLIÉ Handhelds that support the use of a Memory Stick media. Transferring...
... transfer destination. Click Start in application, follow these steps: 1. Insert a Memory Stick® media into the Memory Stick media slot on your CLIÉ Handheld. The Send To dialog box... 4. When transfer is complete, the GP2CLIE window appears. Designate a user name, if applicable to the Memory Stick media. 3. From the Giga Pocket -> CLIÉ Converter main window, click to select the ...point to a Memory Stick media 1. Page 64 Select Using Memory Stick as the transfer destination. Follow the on CLIÉ Handhelds that support the use of a Memory Stick media. Transferring...

VAIO User Guide
Page 92
... as a Network Walkman® or CLIÉ Handheld, to your VAIO computer and check in Memory Stick media slot, transfer songs to your computer's hard drive. MagicGate Memory Stick media - For computers with O penM G tec hnology. Download songs from the Internet to your VAIO computer from a MagicGate Memory Stick media. Electronic Music Distribution2 (EMD) services on the...
... as a Network Walkman® or CLIÉ Handheld, to your VAIO computer and check in Memory Stick media slot, transfer songs to your computer's hard drive. MagicGate Memory Stick media - For computers with O penM G tec hnology. Download songs from the Internet to your VAIO computer from a MagicGate Memory Stick media. Electronic Music Distribution2 (EMD) services on the...

VAIO User Guide
Page 107
... a USB cable. Page 107 Some digital cameras store pictures on Memory Stick or other data storage media - You can connect directly to your computer and transfer images. Memory Stick® or other media. Transferring still images to your VAIO computer There are a variety of ways to bring still images into your film developer for...
... a USB cable. Page 107 Some digital cameras store pictures on Memory Stick or other data storage media - You can connect directly to your computer and transfer images. Memory Stick® or other media. Transferring still images to your VAIO computer There are a variety of ways to bring still images into your film developer for...

VAIO User Guide
Page 111
.... An identification window may attempt to recognize the device or media. Connect your digital camera or camcorder to your computer, or insert your computer. Select Import Photo using PictureGear Studio software, you initially connect your favorite pictures and place them in the Select Device...to proceed directly to the PhotoCollection Import window. 3. Click Import Photo. When you can select your digital camera, camcorder or insert a Memory Stick® media, Windows® XP operating system may appear. The window closes. To import photos with the Import Photo feature 1. ...
.... An identification window may attempt to recognize the device or media. Connect your digital camera or camcorder to your computer, or insert your computer. Select Import Photo using PictureGear Studio software, you initially connect your favorite pictures and place them in the Select Device...to proceed directly to the PhotoCollection Import window. 3. Click Import Photo. When you can select your digital camera, camcorder or insert a Memory Stick® media, Windows® XP operating system may appear. The window closes. To import photos with the Import Photo feature 1. ...

VAIO User Guide
Page 118
To export a photo album 1. Select Folder window 3. Click Browse and navigate to recordable media, such as a CD-R/CD-RW or Memory Stick® media. Click Export. This creates a .swf file that you can use three export formats: Export the album as a Flash File... Exporting window Page 118 This creates an uncompressed file to be saved to the destination folder. This creates a compressed file that you can view on a computer. Export as a Full Package. With a a photo album open, click Export. Sharing your digital albums To share your albums with friends and ...
To export a photo album 1. Select Folder window 3. Click Browse and navigate to recordable media, such as a CD-R/CD-RW or Memory Stick® media. Click Export. This creates a .swf file that you can use three export formats: Export the album as a Flash File... Exporting window Page 118 This creates an uncompressed file to be saved to the destination folder. This creates a compressed file that you can view on a computer. Export as a Full Package. With a a photo album open, click Export. Sharing your digital albums To share your albums with friends and ...

VAIO User Guide
Page 125
... store pictures on your VAIO® computer, you to your computer. Digital Video device and i.LINK® cable - Page 125 You can transfer your video from your DV device. Memory Stick® or other media. Many digital video devices can connect directly to your computer's hard disk drive.... you need to transfer it from your DV device to import video from the storage media directly to your computer using an i.LINK cable. Transferring video content to your VAIO computer Before you can start creating your video on Memory Stick or other data storage media -
... store pictures on your VAIO® computer, you to your computer. Digital Video device and i.LINK® cable - Page 125 You can transfer your video from your DV device. Memory Stick® or other media. Many digital video devices can connect directly to your computer's hard disk drive.... you need to transfer it from your DV device to import video from the storage media directly to your computer using an i.LINK cable. Transferring video content to your VAIO computer Before you can start creating your video on Memory Stick or other data storage media -

VAIO User Guide
Page 139
... Control Settings tab, select the check box, Access this computer from other VAIO PCs, and then click Get Installer. 3. Click Register. 4. Type this computer [recommended]. 3. To distribute the installer program 1. Click Start on each client computers. The installation is generated and the registration process must start... 3. Stand by the other clients on the desktop. Restart the client computer. You can only register one client computer is 19 MB in size. Add the file to a blank storage media, such as a CD-R, CD-RW or Memory Stick® media, for that cannot be ...
... Control Settings tab, select the check box, Access this computer from other VAIO PCs, and then click Get Installer. 3. Click Register. 4. Type this computer [recommended]. 3. To distribute the installer program 1. Click Start on each client computers. The installation is generated and the registration process must start... 3. Stand by the other clients on the desktop. Restart the client computer. You can only register one client computer is 19 MB in size. Add the file to a blank storage media, such as a CD-R, CD-RW or Memory Stick® media, for that cannot be ...

VAIO User Guide
Page 152
To view the specific hardware configuration for your computer's hard disk drive performance, using i.LINK devices, Memory Stick media, PC Cards, and changing default settings. Configuring Your VAIO Computer This section provides basic information about managing your computer, see the online specifications sheet. About i.LINK Compatibility About the Memory Stick Media Slot Page 152 Your computer may not be equipped with all of the hardware features described in this section, depending on the system configuration purchased.
To view the specific hardware configuration for your computer's hard disk drive performance, using i.LINK devices, Memory Stick media, PC Cards, and changing default settings. Configuring Your VAIO Computer This section provides basic information about managing your computer, see the online specifications sheet. About i.LINK Compatibility About the Memory Stick Media Slot Page 152 Your computer may not be equipped with all of the hardware features described in this section, depending on the system configuration purchased.

VAIO User Guide
Page 155
... on a single Memory Stick media. Memory Stick® media - About the Memory Stick Media Slot Your VAIO® computer is only transferred between compliant devices and media. VAIO® computers support Memory Stick PRO media for the latest information on a single Memory Stick media. You can store different data formats on Memory Stick® media. Visit the Sony Computing Support Web...
... on a single Memory Stick media. Memory Stick® media - About the Memory Stick Media Slot Your VAIO® computer is only transferred between compliant devices and media. VAIO® computers support Memory Stick PRO media for the latest information on a single Memory Stick media. You can store different data formats on Memory Stick® media. Visit the Sony Computing Support Web...

VAIO User Guide
Page 156
Inserting the Mem ory Stick Media 3. Page 156 Opening the front panel 2. Insert the Memory Stick® media into the slot. If the media does not insert easily, remove it from the slot and verify that it into the Memory Stick media slot. Inserting a Memory Stick media 1. Use your fingertip to pull open the upper front panel cover, as shown. Carefully reinsert the Memory Stick media, but do not force it is not upside-down or backwards.
Inserting the Mem ory Stick Media 3. Page 156 Opening the front panel 2. Insert the Memory Stick® media into the slot. If the media does not insert easily, remove it from the slot and verify that it into the Memory Stick media slot. Inserting a Memory Stick media 1. Use your fingertip to pull open the upper front panel cover, as shown. Carefully reinsert the Memory Stick media, but do not force it is not upside-down or backwards.

VAIO User Guide
Page 157
The media extends further, enabling you to release it from the slot carefully. Page 157 The media or its data may become damaged. Removing a Memory Stick media A small portion of the Memory Stick media to grasp it is on. Remove the Memory Stick media from the Memory Stick slot. Rem ov ing the Mem ory Stick Media Do not remove the Memory Stick media while the media access indicator light is inserted into the Memory Stick media slot. 1. Press the extended portion of the Memory Stick media remains extended when it . 2.
The media extends further, enabling you to release it from the slot carefully. Page 157 The media or its data may become damaged. Removing a Memory Stick media A small portion of the Memory Stick media to grasp it is on. Remove the Memory Stick media from the Memory Stick slot. Rem ov ing the Mem ory Stick Media Do not remove the Memory Stick media while the media access indicator light is inserted into the Memory Stick media slot. 1. Press the extended portion of the Memory Stick media remains extended when it . 2.

VAIO User Guide
Page 158
The write-protect tab prevents accidental changes to or modify your Memory Stick media's contents. When you slide the tab to the un-LOCK position, you slide the write-protect tab to the LOCK position, your Memory Stick media. When you can write to information recorded on your Memory Stick media is write-protected. Locking the Mem ory Stick Media Page 158 Protecting data on the media while the write-protect tab in the LOCK position. You cannot delete, copy, or save information on Memory Stick media Memory Stick media contain a write-protect tab.
The write-protect tab prevents accidental changes to or modify your Memory Stick media's contents. When you slide the tab to the un-LOCK position, you slide the write-protect tab to the LOCK position, your Memory Stick media. When you can write to information recorded on your Memory Stick media is write-protected. Locking the Mem ory Stick Media Page 158 Protecting data on the media while the write-protect tab in the LOCK position. You cannot delete, copy, or save information on Memory Stick media Memory Stick media contain a write-protect tab.


