
Creative Inspire MultiMedia Speaker Quick Start Guide
Page 1
... equipment has been tested and found to comply with the powerful Sound Blaster Live!® family or the innovative Sound Blaster Audigy™ series audio cards to heighten your intended location of usage. If this breach of warranty is encouraged to try one or more information on , the user is limited to servicing or replacement only and shall not cover any shipping...
... equipment has been tested and found to comply with the powerful Sound Blaster Live!® family or the innovative Sound Blaster Audigy™ series audio cards to heighten your intended location of usage. If this breach of warranty is encouraged to try one or more information on , the user is limited to servicing or replacement only and shall not cover any shipping...
Quick Start Guide
Page 2
... whole or in part, may include features such as copy protection and content management technology. WEB SITE INFORMATION IS OBTAINED FROM VARIOUS SOURCES AND MAY BE INACCURATE. Sony Electronics Inc. Updates and additions to online service providers may require an additional charge. SONY ALSO ASSUMES NO ... YOUR COMPUTER EQUIPMENT, OR OTHER PROPERTY ON ACCOUNT OF YOUR ACCESS TO, USE OF, OR BROWSING IN ANY DESCRIBED WEB SITE, OR YOUR DOWNLOADING OF ANY MATERIALS, DATA, TEXT, IMAGES, VIDEO, OR AUDIO FROM ANY DESCRIBED WEB SITE. PROVIDES NO WARRANTY WITH REGARD TO THIS MANUAL, THE SOFTWARE, OR...
... whole or in part, may include features such as copy protection and content management technology. WEB SITE INFORMATION IS OBTAINED FROM VARIOUS SOURCES AND MAY BE INACCURATE. Sony Electronics Inc. Updates and additions to online service providers may require an additional charge. SONY ALSO ASSUMES NO ... YOUR COMPUTER EQUIPMENT, OR OTHER PROPERTY ON ACCOUNT OF YOUR ACCESS TO, USE OF, OR BROWSING IN ANY DESCRIBED WEB SITE, OR YOUR DOWNLOADING OF ANY MATERIALS, DATA, TEXT, IMAGES, VIDEO, OR AUDIO FROM ANY DESCRIBED WEB SITE. PROVIDES NO WARRANTY WITH REGARD TO THIS MANUAL, THE SOFTWARE, OR...

Quick Start Guide
Page 11
Contents Getting Started 13 Unpacking your Computer 14 Locating Controls And Ports 17 About the Front Panel 18 About the Back Panel 21 About the Remote Control 24 About the Keyboard 29 Setting Up Your Computer 31 Connecting a Display (Monitor 32 Connecting the Speakers 34 Connecting the Keyboard and Mouse 35 Connecting the Telephone and Modem cables .........36 Connecting the Power Cords 37 Turning On Your Computer 38 Registering your Computer 38 Turning Off your Computer 39 11
Contents Getting Started 13 Unpacking your Computer 14 Locating Controls And Ports 17 About the Front Panel 18 About the Back Panel 21 About the Remote Control 24 About the Keyboard 29 Setting Up Your Computer 31 Connecting a Display (Monitor 32 Connecting the Speakers 34 Connecting the Keyboard and Mouse 35 Connecting the Telephone and Modem cables .........36 Connecting the Power Cords 37 Turning On Your Computer 38 Registering your Computer 38 Turning Off your Computer 39 11

Quick Start Guide
Page 22
... Ethernet. (The port marked with (Network) is for LAN connections only.) 15 TV Out (S-Video/video) jack‡ Connection for an audio or stereo dubbing cable (optional). Composite video In jack Connection for a microphone (optional). VAIO Digital Studio Computer Quick Start 4 Printer port Connection for a parallel device, such as a printer or scanner. 5 Monitor port* Connection for a standard display. 6 i.LINK 6-pin S400 port (IEEE 1394) Connection and power for a compatible digital device, such as a Sony Digital Handycam® camcorder. 7 Universal Serial Bus (USB...
... Ethernet. (The port marked with (Network) is for LAN connections only.) 15 TV Out (S-Video/video) jack‡ Connection for an audio or stereo dubbing cable (optional). Composite video In jack Connection for a microphone (optional). VAIO Digital Studio Computer Quick Start 4 Printer port Connection for a parallel device, such as a printer or scanner. 5 Monitor port* Connection for a standard display. 6 i.LINK 6-pin S400 port (IEEE 1394) Connection and power for a compatible digital device, such as a Sony Digital Handycam® camcorder. 7 Universal Serial Bus (USB...

Quick Start Guide
Page 25
... external video equipment, such as your VCR. (Note: You cannot change the input source while recording.) 6 REW and FF buttons Press to view the current software in full screen mode, press to change the camera angle during DVD playback. About the Remote Control 1 MUTE button Press to the previous channel. Press again to restore the sound. 2 Channel number buttons (1-9) Press to select specific channels. (Press the ENT button...
... external video equipment, such as your VCR. (Note: You cannot change the input source while recording.) 6 REW and FF buttons Press to view the current software in full screen mode, press to change the camera angle during DVD playback. About the Remote Control 1 MUTE button Press to the previous channel. Press again to restore the sound. 2 Channel number buttons (1-9) Press to select specific channels. (Press the ENT button...

Quick Start Guide
Page 32
VAIO Digital Studio Computer Quick Start Connecting a Display (Monitor) 1 Plug the display's cable into the monitor port. 2 If necessary, plug the display's cable into the rear of the display. To connect a display 32
VAIO Digital Studio Computer Quick Start Connecting a Display (Monitor) 1 Plug the display's cable into the monitor port. 2 If necessary, plug the display's cable into the rear of the display. To connect a display 32

Quick Start Guide
Page 33
To connect a DVI display Connecting a Display (Monitor) ✍ Install your equipment so that you can easily reach the power outlet in the event of an emergency. 33
To connect a DVI display Connecting a Display (Monitor) ✍ Install your equipment so that you can easily reach the power outlet in the event of an emergency. 33

VAIO User Guide
Page 14
... screen. 7 TITLE button The function of this button may vary between DVDs. 3 SIZE button Press to view the current software in full screen mode, press to show the settings window. See the DVD player software for details. When using Giga Pocket software, press to close an error message dialog box. The window returns to its original size. 4 AUDIO button Press to view available sound mode options on the monitor/display. 5 DVD angle button Press to change...
... screen. 7 TITLE button The function of this button may vary between DVDs. 3 SIZE button Press to view the current software in full screen mode, press to show the settings window. See the DVD player software for details. When using Giga Pocket software, press to close an error message dialog box. The window returns to its original size. 4 AUDIO button Press to view available sound mode options on the monitor/display. 5 DVD angle button Press to change...

VAIO User Guide
Page 20
See the online specifications sheet for your system's specific hardware configuration. Connecting a Display (Monitor) Connecting the Speakers Connecting the Keyboard and Mouse Connecting the Telephone and Modem cables Connecting the Power Cords Turning On Your Computer Registering your Computer Page 20 The location of the controls, ports, and jacks may not be equipped with all of the hardware features described in the section. Setting Up Your Computer Your computer may vary from the illustrations shown.
See the online specifications sheet for your system's specific hardware configuration. Connecting a Display (Monitor) Connecting the Speakers Connecting the Keyboard and Mouse Connecting the Telephone and Modem cables Connecting the Power Cords Turning On Your Computer Registering your Computer Page 20 The location of the controls, ports, and jacks may not be equipped with all of the hardware features described in the section. Setting Up Your Computer Your computer may vary from the illustrations shown.

VAIO User Guide
Page 21
If necessary, plug the display's cable into the monitor port. 2. To connect a display To connect a DVI display Install your equipment so that you can easily reach the power outlet in the event of the display. Page 21 Plug the display's cable into the rear of an emergency. Connecting a Display (Monitor) 1.
If necessary, plug the display's cable into the monitor port. 2. To connect a display To connect a DVI display Install your equipment so that you can easily reach the power outlet in the event of the display. Page 21 Plug the display's cable into the rear of an emergency. Connecting a Display (Monitor) 1.

VAIO User Guide
Page 47
... requires an Internet connection. You can schedule up for the recorded content that are controlled by the TV listing provider and may change without notice. Click Start in the Windows taskbar, point to All Programs, point to record. Accessing the Giga Pocket Help For more information about Giga Pocket Personal Video Recorder, follow these steps: 1. Internet Electronic Program Guide Web site...
... requires an Internet connection. You can schedule up for the recorded content that are controlled by the TV listing provider and may change without notice. Click Start in the Windows taskbar, point to All Programs, point to record. Accessing the Giga Pocket Help For more information about Giga Pocket Personal Video Recorder, follow these steps: 1. Internet Electronic Program Guide Web site...
VAIO User Guide
Page 68
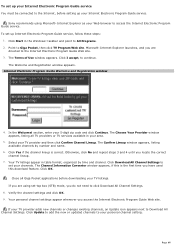
Sony recommends using set-top box (STB) mode, you have used this is correct. Internet Electronic Program Guide Welcom e and Registration window 4. Select your 5-digit zip code and click Continue. Click OK. Click Update to add the new or updated channels to access the Internet Electronic Program Guide service. Page 68 Click I accept, to set your channels. section, enter your TV provider and then click Confirm Channel Lineup. Click Download All...
Sony recommends using set-top box (STB) mode, you have used this is correct. Internet Electronic Program Guide Welcom e and Registration window 4. Select your 5-digit zip code and click Continue. Click OK. Click Update to add the new or updated channels to access the Internet Electronic Program Guide service. Page 68 Click I accept, to set your channels. section, enter your TV provider and then click Confirm Channel Lineup. Click Download All...
VAIO User Guide
Page 94
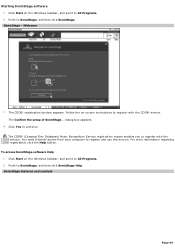
... to SonicStage, and then click SonicStage Help. SonicStage - dialog box appears. 4. Follow the on-screen instructions to All Programs. 2. For more information regarding CDDB registration, click the Help button. Click Start on the Windows taskbar, and point to register with the CDDB service. Welcom e 3. You need Internet access from your computer to continue. Starting SonicStage software 1. Click Yes to register and use this service.
... to SonicStage, and then click SonicStage Help. SonicStage - dialog box appears. 4. Follow the on-screen instructions to All Programs. 2. For more information regarding CDDB registration, click the Help button. Click Start on the Windows taskbar, and point to register with the CDDB service. Welcom e 3. You need Internet access from your computer to continue. Starting SonicStage software 1. Click Yes to register and use this service.
VAIO User Guide
Page 137
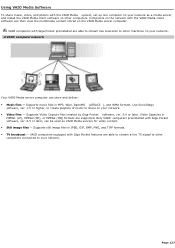
... to other computers connected to your network. VAIO computers equipped with Giga Pocket features are supported. Video Capsules in MPEG1 (LP), MPEG2 (SP), or MPEG2 (HQ) formats are able to stream a live television to share on your network. Video files - Using VAIO Media Software To share music, video, and photos with the VAIO Media system, set up one computer on your network as VAIO Media servers for video content. Still image files -
... to other computers connected to your network. VAIO computers equipped with Giga Pocket features are supported. Video Capsules in MPEG1 (LP), MPEG2 (SP), or MPEG2 (HQ) formats are able to stream a live television to share on your network. Video files - Using VAIO Media Software To share music, video, and photos with the VAIO Media system, set up one computer on your network as VAIO Media servers for video content. Still image files -

VAIO User Guide
Page 170
... removed. 10. Replace the side panel. Installing a memory module 1. Unplug your printer. 2. See Replacing the side panel. If necessary, remove any components or add-on cards, or other components to access the memory module slots. 5. Locate the notch on its anti-static package, handling it over the open memory slot. 7. Shut down evenly against the module's upper corners. Page 170 Press down your computer and turn off all peripheral devices...
... removed. 10. Replace the side panel. Installing a memory module 1. Unplug your printer. 2. See Replacing the side panel. If necessary, remove any components or add-on cards, or other components to access the memory module slots. 5. Locate the notch on its anti-static package, handling it over the open memory slot. 7. Shut down evenly against the module's upper corners. Page 170 Press down your computer and turn off all peripheral devices...

VAIO User Guide
Page 177
See Replacing the side panel. 15. Connect the second power connector to the new drive following the instructions supplied with pin 1 on the drive holder tab to align pin 1 on the red side of the ribbon cable with the drive. Push down on the new drive. 13. Reconnect the power cord to the new drive. Orient the connector to lock the drive into position. 12. Page 177 Connect the second drive connector to your computer. Replacing the driv e holder 14. 11. Replace the side panel.
See Replacing the side panel. 15. Connect the second power connector to the new drive following the instructions supplied with pin 1 on the drive holder tab to align pin 1 on the red side of the ribbon cable with the drive. Push down on the new drive. 13. Reconnect the power cord to the new drive. Orient the connector to lock the drive into position. 12. Page 177 Connect the second drive connector to your computer. Replacing the driv e holder 14. 11. Replace the side panel.
VAIO User Guide
Page 210
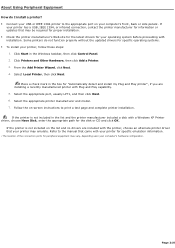
... with the printer, choose an alternate printer driver that may emulate. Place a check mark in the list and the printer manufacturer included a disk with Plug and Play capability. 5. Click Start in the Windows taskbar, then click Control Panel. 2. Follow the on-screen instructions to print a test page and complete printer installation. Page 210 Select the appropriate port, usually LPT1, and then click Next...
... with the printer, choose an alternate printer driver that may emulate. Place a check mark in the list and the printer manufacturer included a disk with Plug and Play capability. 5. Click Start in the Windows taskbar, then click Control Panel. 2. Follow the on-screen instructions to print a test page and complete printer installation. Page 210 Select the appropriate port, usually LPT1, and then click Next...

VAIO User Guide
Page 211
... the c onnec tion ports for information or updates that came with installation. Follow the on the list and no drivers are installing a recently manufactured printer with a Windows XP Printer driver, choose Have Disk, enter the appropriate path for specific operating systems. To install your computer's front, back or side panels1. If the printer is not included on -screen instructions to the manual that may be required...
... the c onnec tion ports for information or updates that came with installation. Follow the on the list and no drivers are installing a recently manufactured printer with a Windows XP Printer driver, choose Have Disk, enter the appropriate path for specific operating systems. To install your computer's front, back or side panels1. If the printer is not included on -screen instructions to the manual that may be required...

VAIO User Guide
Page 221
... work space, connect power cords, cables and peripheral devices, register your computer with these Help files, you can find instructions on how to set up connection to the Internet. From the VAIO Help And Support Center menu, click VAIO User Guide. Specifications - Click Start in the Windows® taskbar, then click Help and Support. 2. From the menu bar, click Help. Page 221 You can find tutorials that describes the software's features. Click Start...
... work space, connect power cords, cables and peripheral devices, register your computer with these Help files, you can find instructions on how to set up connection to the Internet. From the VAIO Help And Support Center menu, click VAIO User Guide. Specifications - Click Start in the Windows® taskbar, then click Help and Support. 2. From the menu bar, click Help. Page 221 You can find tutorials that describes the software's features. Click Start...

PCVASP4 (with Sub) Supplemental Document
Page 8
... hardware configuration and preinstalled software applications of installed memory, identify optical drive specifications, and more. Use these support options: ❑ VAIO® Computer Quick Start - Your computer is a printed document, supplied with the computer. The VAIO Help and Support Center menu appears. 3 Click VAIO User Guide. You can locate helpful information immediately by consulting your computer. To access the online specification sheet: 1 Click Start in the Windows taskbar, and then click Help and Support. 2 From the VAIO Help and Support Center, click VAIO User Guide...
... hardware configuration and preinstalled software applications of installed memory, identify optical drive specifications, and more. Use these support options: ❑ VAIO® Computer Quick Start - Your computer is a printed document, supplied with the computer. The VAIO Help and Support Center menu appears. 3 Click VAIO User Guide. You can locate helpful information immediately by consulting your computer. To access the online specification sheet: 1 Click Start in the Windows taskbar, and then click Help and Support. 2 From the VAIO Help and Support Center, click VAIO User Guide...


