Online Help Center (VAIO User Guide)
Page 3
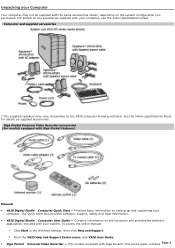
... on setting up and registering your computer, see the online Specifications sheet. See the online specifications sheet for details on the VAIO computer model purchased. From the VAIO Help and Support Center menu, click VAIO User Guide. Giga Pocket Personal Video Recorder - (For models equipped with Giga Pocket features) Manuals VAIO Digital Studio Com puter Quick Start - To access the online manual: 1. Contains information on the hardware and preinstalled software applications...
... on setting up and registering your computer, see the online Specifications sheet. See the online specifications sheet for details on the VAIO computer model purchased. From the VAIO Help and Support Center menu, click VAIO User Guide. Giga Pocket Personal Video Recorder - (For models equipped with Giga Pocket features) Manuals VAIO Digital Studio Com puter Quick Start - To access the online manual: 1. Contains information on the hardware and preinstalled software applications...
Online Help Center (VAIO User Guide)
Page 4
... and Sony end-user license agreement. To access this online information: 1. From the VAIO Help and Support Center menu, click VAIO User Guide. 3. Page 4 Click the Welcome link. Click Giga Pocket Personal Video Recorder. Creating DVDs - (For models equipped with a DVD-RW drive) This online guide provides information designed to use the basic features of your VAIO computer. This online specification sheet describes the hardware and software configuration of the latest Windows operating system...
... and Sony end-user license agreement. To access this online information: 1. From the VAIO Help and Support Center menu, click VAIO User Guide. 3. Page 4 Click the Welcome link. Click Giga Pocket Personal Video Recorder. Creating DVDs - (For models equipped with a DVD-RW drive) This online guide provides information designed to use the basic features of your VAIO computer. This online specification sheet describes the hardware and software configuration of the latest Windows operating system...
Online Help Center (VAIO User Guide)
Page 7
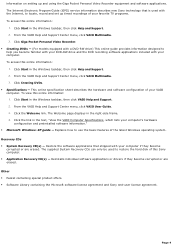
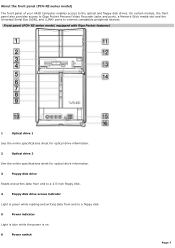
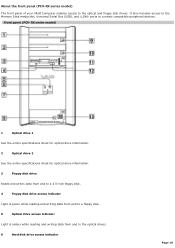
... data from and to connect compatible peripheral devices. Front panel (PCV- On certain models, the front panel also provides access to Giga Pocket Personal Video Recorder jacks and ports, a Memory Stick media slot and the Universal Serial Bus (USB), and i.LINK® ports to a floppy disk. 5 Power indicator Light is blue while the power is on. 6 Power switch Page 7 About the front panel (PCV-RZ series model) The front panel of your VAIO Computer enables access to the optical and floppy disk drives.
... data from and to connect compatible peripheral devices. Front panel (PCV- On certain models, the front panel also provides access to Giga Pocket Personal Video Recorder jacks and ports, a Memory Stick media slot and the Universal Serial Bus (USB), and i.LINK® ports to a floppy disk. 5 Power indicator Light is blue while the power is on. 6 Power switch Page 7 About the front panel (PCV-RZ series model) The front panel of your VAIO Computer enables access to the optical and floppy disk drives.
Online Help Center (VAIO User Guide)
Page 10
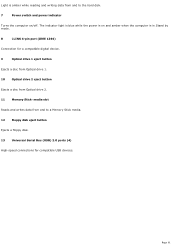
... disk drive access indicator Light is green while reading and writing data from and to a floppy disk. 5 Optical drive access indicator Light is amber while reading and writing data from and to connect compatible peripheral devices. It also includes access to the Memory Stick media slot, Universal Serial Bus (USB), and i.LINK® ports to the optical drives. 6 Hard disk drive access indicator Page 10 Front panel (PCV- About the front panel (PCV-RX series model) The front panel of your VAIO Computer enables access...
... disk drive access indicator Light is green while reading and writing data from and to a floppy disk. 5 Optical drive access indicator Light is amber while reading and writing data from and to connect compatible peripheral devices. It also includes access to the Memory Stick media slot, Universal Serial Bus (USB), and i.LINK® ports to the optical drives. 6 Hard disk drive access indicator Page 10 Front panel (PCV- About the front panel (PCV-RX series model) The front panel of your VAIO Computer enables access...
Online Help Center (VAIO User Guide)
Page 11
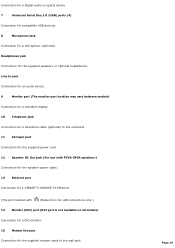
... writing data from and to a Memory Stick media. 12 Floppy disk eject button Ejects a floppy disk. 13 Universal Serial Bus (USB) 2.0 ports (4) High-speed connections for a compatible digital device. 9 Optical drive 1 eject button Ejects a disc from Optical drive 1. 10 Optical drive 2 eject button Ejects a disc from Optical drive 2. 11 Memory Stick® media slot Reads and writes data from and to the hard disk. 7 Power switch and power indicator Turns the computer on/off. Light is in Stand by mode. 8 i.LINK 4-pin port (IEEE 1394) Connection for compatible USB devices.
... writing data from and to a Memory Stick media. 12 Floppy disk eject button Ejects a floppy disk. 13 Universal Serial Bus (USB) 2.0 ports (4) High-speed connections for a compatible digital device. 9 Optical drive 1 eject button Ejects a disc from Optical drive 1. 10 Optical drive 2 eject button Ejects a disc from Optical drive 2. 11 Memory Stick® media slot Reads and writes data from and to the hard disk. 7 Power switch and power indicator Turns the computer on/off. Light is in Stand by mode. 8 i.LINK 4-pin port (IEEE 1394) Connection for compatible USB devices.
Online Help Center (VAIO User Guide)
Page 12
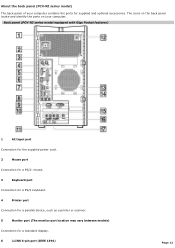
... computer. The icons on the back panel locate and identify the ports on your computer contains the ports for a standard display. 6 i.LINK 6-pin port (IEEE 1394) Page 12 RZ series m odel equipped with Giga Pocket features) 1 AC Input port Connection for the supplied power cord. 2 Mouse port Connection for a PS/2® mouse. 3 Keyboard port Connection for a PS/2 keyboard. 4 Printer port Connection for a parallel device, such as a printer or scanner. 5 Monitor port (The monitor port location may vary between models) Connection for supplied and optional...
... computer. The icons on the back panel locate and identify the ports on your computer contains the ports for a standard display. 6 i.LINK 6-pin port (IEEE 1394) Page 12 RZ series m odel equipped with Giga Pocket features) 1 AC Input port Connection for the supplied power cord. 2 Mouse port Connection for a PS/2® mouse. 3 Keyboard port Connection for a PS/2 keyboard. 4 Printer port Connection for a parallel device, such as a printer or scanner. 5 Monitor port (The monitor port location may vary between models) Connection for supplied and optional...
Online Help Center (VAIO User Guide)
Page 15
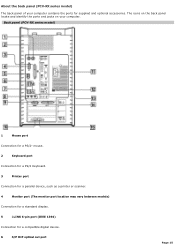
... your computer contains the ports for a compatible digital device. 6 S/P DIF optical out port Page 15 About the back panel (PCV-RX series model) The back panel of your computer. RX series m odel) 1 Mouse port Connection for a PS/2® mouse. 2 Keyboard port Connection for a PS/2 Keyboard. 3 Printer port Connection for a parallel device, such as a printer or scanner. 4 Monitor port (The monitor port location may vary between models) Connection for a standard display. 5 i.LINK 6-pin port (IEEE 1394) Connection for supplied and optional accessories. Back panel (PCV-
... your computer contains the ports for a compatible digital device. 6 S/P DIF optical out port Page 15 About the back panel (PCV-RX series model) The back panel of your computer. RX series m odel) 1 Mouse port Connection for a PS/2® mouse. 2 Keyboard port Connection for a PS/2 Keyboard. 3 Printer port Connection for a parallel device, such as a printer or scanner. 4 Monitor port (The monitor port location may vary between models) Connection for a standard display. 5 i.LINK 6-pin port (IEEE 1394) Connection for supplied and optional accessories. Back panel (PCV-
Online Help Center (VAIO User Guide)
Page 16
... an audio device. 9 Monitor port (The monitor port location may vary between models) Connection for a standard display. 10 Telephone jack Connection for a telephone cable (optional) to the computer. 11 AC Input port Connection for the supplied power cord. 12 Speaker DC Out jack (For use with PCVA-SP3A speakers1) Connection for the speaker power cable. 13 Ethernet port Connection for a 10BASE-T/100BASE-TX Ethernet. (The port marked with (Network) is for LAN connections only.) 14 Monitor (DVI) port (DVI port is not available on all models) Connection...
... an audio device. 9 Monitor port (The monitor port location may vary between models) Connection for a standard display. 10 Telephone jack Connection for a telephone cable (optional) to the computer. 11 AC Input port Connection for the supplied power cord. 12 Speaker DC Out jack (For use with PCVA-SP3A speakers1) Connection for the speaker power cable. 13 Ethernet port Connection for a 10BASE-T/100BASE-TX Ethernet. (The port marked with (Network) is for LAN connections only.) 14 Monitor (DVI) port (DVI port is not available on all models) Connection...
Online Help Center (VAIO User Guide)
Page 22
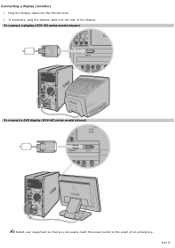
RZ series m odel shown) To connect a DVI display (PCV- RZ series m odel shown) Install your equipment so that you can easily reach the power outlet in the event of the display. If necessary, plug the display cable into the Monitor port. 2. To connect a display (PCV- Page 22 Plug the display cable into the rear of an emergency. Connecting a display (monitor) 1.
RZ series m odel shown) To connect a DVI display (PCV- RZ series m odel shown) Install your equipment so that you can easily reach the power outlet in the event of the display. If necessary, plug the display cable into the Monitor port. 2. To connect a display (PCV- Page 22 Plug the display cable into the rear of an emergency. Connecting a display (monitor) 1.

Online Help Center (VAIO User Guide)
Page 34
... the specific hardware configuration for your computer's hard disk drive performance, using i.LINK devices, Memory Stick media, PC Cards, and changing default settings. Your computer may not be equipped with all of the hardware features described in this section, depending on the system configuration purchased. Configuring Your VAIO Computer This section provides basic information about managing your computer, see the online specifications sheet. About Your Hard Disk Drive Partition i.LINK Compatibility VAIO Action Setup Changing The Sony Software Window...
... the specific hardware configuration for your computer's hard disk drive performance, using i.LINK devices, Memory Stick media, PC Cards, and changing default settings. Your computer may not be equipped with all of the hardware features described in this section, depending on the system configuration purchased. Configuring Your VAIO Computer This section provides basic information about managing your computer, see the online specifications sheet. About Your Hard Disk Drive Partition i.LINK Compatibility VAIO Action Setup Changing The Sony Software Window...

Online Help Center (VAIO User Guide)
Page 38
Use the symbol to locate the i.LINK port on your compatible i.LINK device and on installation and use. Plug the i.LINK cable connector into the corresponding 4- See the instructions that came with your i.LINK device for more information on your computer. Plug the other end of the cable into this port. 2. Page 38 or 6-pin i.LINK port on your computer. Connecting an i.LINK (IEEE 1394) device 1.
Use the symbol to locate the i.LINK port on your compatible i.LINK device and on installation and use. Plug the i.LINK cable connector into the corresponding 4- See the instructions that came with your i.LINK device for more information on your computer. Plug the other end of the cable into this port. 2. Page 38 or 6-pin i.LINK port on your computer. Connecting an i.LINK (IEEE 1394) device 1.

Online Help Center (VAIO User Guide)
Page 54
... of memory installed in a static-free bag. Gently place the unit on boards, or other components to gently eject it out. Rem ov ing/Installing m em ory (PCV- Installing Memory The amount of preinstalled memory may ship with all peripheral devices. 3. Your computer may vary, depending on the system configuration you add or remove the memory in your computer. See Removing the Side Panel. 4. If necessary, remove any cables, add-on...
... of memory installed in a static-free bag. Gently place the unit on boards, or other components to gently eject it out. Rem ov ing/Installing m em ory (PCV- Installing Memory The amount of preinstalled memory may ship with all peripheral devices. 3. Your computer may vary, depending on the system configuration you add or remove the memory in your computer. See Removing the Side Panel. 4. If necessary, remove any cables, add-on...
Online Help Center (VAIO User Guide)
Page 56
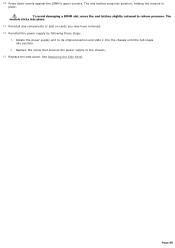
.... 2. Rotate the power supply unit to relieve pressure. Replace the screw that secures the power supply to the chassis. 13. Press down evenly against the DIMM's upper corners. Page 56 The end latches snap into place. 11. Reinstall the power supply by following these steps: 1. Reinstall any components or add-on cards you may have removed. 12. Replace the side panel. 10...
.... 2. Rotate the power supply unit to relieve pressure. Replace the screw that secures the power supply to the chassis. 13. Press down evenly against the DIMM's upper corners. Page 56 The end latches snap into place. 11. Reinstall the power supply by following these steps: 1. Reinstall any components or add-on cards you may have removed. 12. Replace the side panel. 10...

Online Help Center (VAIO User Guide)
Page 57
... nearest Sony Service Center or Factory Service Center. If you , visit the Sony Computing Support Web site at http://www.sony.com/pcsupport. Page 57 Replace the lithium battery when this occurs. To access the VAIO Help and Support Center: 1. Click Start in the CMOS memory are now reset to the factory default values. Shut down any cables, add-on cards, or other changes you may have made to the settings in the BIOS Setup utility. 2. Installing a lithium battery (PCV- The VAIO Help and Support Center window...
... nearest Sony Service Center or Factory Service Center. If you , visit the Sony Computing Support Web site at http://www.sony.com/pcsupport. Page 57 Replace the lithium battery when this occurs. To access the VAIO Help and Support Center: 1. Click Start in the CMOS memory are now reset to the factory default values. Shut down any cables, add-on cards, or other changes you may have made to the settings in the BIOS Setup utility. 2. Installing a lithium battery (PCV- The VAIO Help and Support Center window...
Online Help Center (VAIO User Guide)
Page 58
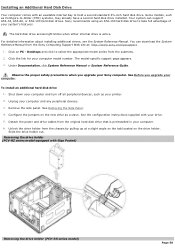
... upgrade your Sony computer. To install an additional hard disk drive 1. Shut down your computer and turn off all peripheral devices, such as a slave. Configure the jumpers on PC - The model-specific support page appears. 3. The hard disk drive access light blinks when either internal drive is preinstalled in your computer. 6. See the configuration instructions supplied with Giga Pocket) Rem ov ing the driv e holder (PCV- For detailed information about installing additional drives, see the System Reference Manual. Click on the new drive...
... upgrade your Sony computer. To install an additional hard disk drive 1. Shut down your computer and turn off all peripheral devices, such as a slave. Configure the jumpers on PC - The model-specific support page appears. 3. The hard disk drive access light blinks when either internal drive is preinstalled in your computer. 6. See the configuration instructions supplied with Giga Pocket) Rem ov ing the driv e holder (PCV- For detailed information about installing additional drives, see the System Reference Manual. Click on the new drive...
Online Help Center (VAIO User Guide)
Page 65
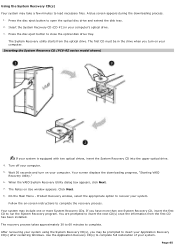
... (PCV- Your screen displays the downloading progress, "Starting VAIO Recovery Utility." 6. Your system may include one or more than one System Recovery CD, insert the first CD to run the System Recovery program. When the VAIO System Recovery Utility dialog box appears, click Next. 7. Follow the on your computer. Using the System Recovery CD(s) Your system may be in your computer's optical drive. 3. Product Recovery window, select the appropriate option to open the optical disc drive and...
... (PCV- Your screen displays the downloading progress, "Starting VAIO Recovery Utility." 6. Your system may include one or more than one System Recovery CD, insert the first CD to run the System Recovery program. When the VAIO System Recovery Utility dialog box appears, click Next. 7. Follow the on your computer. Using the System Recovery CD(s) Your system may be in your computer's optical drive. 3. Product Recovery window, select the appropriate option to open the optical disc drive and...

Online Help Center (VAIO User Guide)
Page 68
... the driver installation and click Update Driver from the shortcut menu. Page 68 Follow the on-screen instructions to select the unknown device1 or the device that has a driver problem is capable of reinstalling the original factory-installed device drivers, without using the Application Recovery CD(s). 1 A n unknown devic e(s ) is identified by a yellow exc lamation mark. Click Properties. The Hardware Update Wizard appears. 5. From the Hardware tab, click the Device Manager button. 4. If Windows XP...
... the driver installation and click Update Driver from the shortcut menu. Page 68 Follow the on-screen instructions to select the unknown device1 or the device that has a driver problem is capable of reinstalling the original factory-installed device drivers, without using the Application Recovery CD(s). 1 A n unknown devic e(s ) is identified by a yellow exc lamation mark. Click Properties. The Hardware Update Wizard appears. 5. From the Hardware tab, click the Device Manager button. 4. If Windows XP...

Online Help Center (VAIO User Guide)
Page 69
Click Properties. From the Hardware tab, click the Device Manager button. 6. Click Start in the Windows taskbar and then right-click My Computer. Insert Application Recovery CD #1, to cancel the option, Search removable media (floppy, CD-ROM...). 9. Click Next. 8. Select the device folder, and click Next. Wait 30 seconds, and turn on the software application or driver you want to select the option, Install from the optical drive. 15. Your system...
Click Properties. From the Hardware tab, click the Device Manager button. 6. Click Start in the Windows taskbar and then right-click My Computer. Insert Application Recovery CD #1, to cancel the option, Search removable media (floppy, CD-ROM...). 9. Click Next. 8. Select the device folder, and click Next. Wait 30 seconds, and turn on the software application or driver you want to select the option, Install from the optical drive. 15. Your system...
Online Help Center (VAIO User Guide)
Page 106
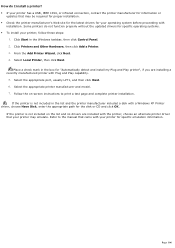
... not included in the Windows taskbar, then click Control Panel. 2. Refer to print a test page and complete printer installation. Select the appropriate port, usually LPT1, and then click Next. 6. Page 106 If the printer is not included on -screen instructions to the manual that came with a Windows XP Printer driver, choose Have Disk, enter the appropriate path for information or updates that may emulate...
... not included in the Windows taskbar, then click Control Panel. 2. Refer to print a test page and complete printer installation. Select the appropriate port, usually LPT1, and then click Next. 6. Page 106 If the printer is not included on -screen instructions to the manual that came with a Windows XP Printer driver, choose Have Disk, enter the appropriate path for information or updates that may emulate...
Online Help Center (VAIO User Guide)
Page 116
... topics, enabling you to use the software and locate troubleshooting support, should problems occur. The VAIO Help and Support Center menu appears. 3. You can view your VAIO computer. From the VAIO Help and Support Center, click VAIO User Guide. 3. Click the desired software application.3 The software's main window appears. 3. The Help file appears. 1 A hardc opy vers ion of installed memory, identify optical drive specifications, and more. Your computer is provided with s elec ted models . 2 A hardc opy s oftware manual may available...
... topics, enabling you to use the software and locate troubleshooting support, should problems occur. The VAIO Help and Support Center menu appears. 3. You can view your VAIO computer. From the VAIO Help and Support Center, click VAIO User Guide. 3. Click the desired software application.3 The software's main window appears. 3. The Help file appears. 1 A hardc opy vers ion of installed memory, identify optical drive specifications, and more. Your computer is provided with s elec ted models . 2 A hardc opy s oftware manual may available...


