
VAIO User Guide
Page 50
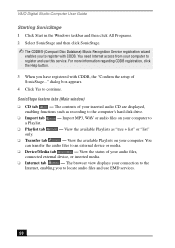
... computer's hard disk drive. ❑ Import tab a Playlist. - View the available Playlists as recording to the Internet, enabling you have registered with CDDB. You need Internet access from your computer to locate audio files and use this service. For more information regarding CDDB registration, click the Help button. 3 When you to ❑ Playlist tab only. - SonicStage feature tabs (Main window) ❑ CD tab - The browser view displays...
... computer's hard disk drive. ❑ Import tab a Playlist. - View the available Playlists as recording to the Internet, enabling you have registered with CDDB. You need Internet access from your computer to locate audio files and use this service. For more information regarding CDDB registration, click the Help button. 3 When you to ❑ Playlist tab only. - SonicStage feature tabs (Main window) ❑ CD tab - The browser view displays...
VAIO User Guide
Page 60
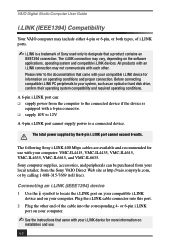
..., and VMC-IL6635. A 4-pin i.LINK port cannot supply power to your compatible i.LINK device and on the software applications, operating system and compatible i.LINK devices. Connecting an i.LINK (IEEE1394) device 1 Use the symbol to locate the i.LINK port on your system, such as an optical or hard disk drive, confirm their operating system compatibility and required operating conditions. All products with each other end of the cable into the corresponding 4-
..., and VMC-IL6635. A 4-pin i.LINK port cannot supply power to your compatible i.LINK device and on the software applications, operating system and compatible i.LINK devices. Connecting an i.LINK (IEEE1394) device 1 Use the symbol to locate the i.LINK port on your system, such as an optical or hard disk drive, confirm their operating system compatibility and required operating conditions. All products with each other end of the cable into the corresponding 4-
VAIO User Guide
Page 65
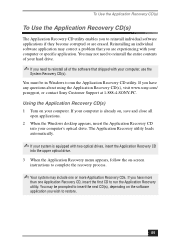
... Use the Application Recovery CD(s) To Use the Application Recovery CD(s) The Application Recovery CD utility enables you to restore. 65 You may not need to run the Application Recovery CD utility. Reinstalling an individual software application may include one Application Recovery CD, insert the first CD to reinstall all open applications. 2 When the Windows desktop appears, insert the Application Recovery CD into the upper optical drive. 3 When the Application Recovery menu...
... Use the Application Recovery CD(s) To Use the Application Recovery CD(s) The Application Recovery CD utility enables you to restore. 65 You may not need to run the Application Recovery CD utility. Reinstalling an individual software application may include one Application Recovery CD, insert the first CD to reinstall all open applications. 2 When the Windows desktop appears, insert the Application Recovery CD into the upper optical drive. 3 When the Application Recovery menu...

VAIO User Guide
Page 66
... computer. VAIO Digital Studio Computer User Guide To Use the Driver Recovery CD The Driver Recovery CD utility enables you need to reinstall all applications. 2 When the Windows desktop appears, insert the Driver Recovery CD into the upper optical drive. 3 Click Start in the Windows taskbar and click Control Panel. The Control Panel window appears. 4 Click Performance and Maintenance and click System. Click OK. This removes the device driver from the Driver Recovery CD. 66 You must be in the Windows taskbar, select Turn...
... computer. VAIO Digital Studio Computer User Guide To Use the Driver Recovery CD The Driver Recovery CD utility enables you need to reinstall all applications. 2 When the Windows desktop appears, insert the Driver Recovery CD into the upper optical drive. 3 Click Start in the Windows taskbar and click Control Panel. The Control Panel window appears. 4 Click Performance and Maintenance and click System. Click OK. This removes the device driver from the Driver Recovery CD. 66 You must be in the Windows taskbar, select Turn...

VAIO User Guide
Page 69
... VAIO Help and Support dialog box appears. 2 Select Fixing a Problem and then select Startup and Shut Down problems. A list of specific problem topics appears on your keyboard. 3 Select the Advanced tab from the Setup Utility screen. 4 Select "I change the parallel port type using the directional arrow keys. 6 Select the desired setting displays, and press Enter. 7 Press the F10 key to restore this Network setting, repeat these steps (1 - 3) and select Enable. Open your specific situation. Topic: How do I /O Device Configuration...
... VAIO Help and Support dialog box appears. 2 Select Fixing a Problem and then select Startup and Shut Down problems. A list of specific problem topics appears on your keyboard. 3 Select the Advanced tab from the Setup Utility screen. 4 Select "I change the parallel port type using the directional arrow keys. 6 Select the desired setting displays, and press Enter. 7 Press the F10 key to restore this Network setting, repeat these steps (1 - 3) and select Enable. Open your specific situation. Topic: How do I /O Device Configuration...

VAIO User Guide
Page 71
... screen area is turned off. ❑ Check the master volume setting in the Windows taskbar, then select Control Panel. 2 Click Performance and Maintenance and then click Systems. The System Properties dialog box appears. 3 Select the Hardware tab and then select the Device Manager button to view installed drivers. To check your video resolution, see "To Use the Application Recovery CD(s)" for details about your computer's video RAM. If necessary, remove...
... screen area is turned off. ❑ Check the master volume setting in the Windows taskbar, then select Control Panel. 2 Click Performance and Maintenance and then click Systems. The System Properties dialog box appears. 3 Select the Hardware tab and then select the Device Manager button to view installed drivers. To check your video resolution, see "To Use the Application Recovery CD(s)" for details about your computer's video RAM. If necessary, remove...
VAIO User Guide
Page 77
... list and no drivers are installing a recently manufactured printer with Plug and Play capability. 5 Select the appropriate port, usually LPT1, and then click Next. 6 Select the appropriate printer manufacturer and model 7 Follow the onscreen instructions to the manual that came with your printer, follow these steps: 1 Click Start in the Windows taskbar, then click Control Panel. 2 Click Printers and Other Hardware, then click Add...
... list and no drivers are installing a recently manufactured printer with Plug and Play capability. 5 Select the appropriate port, usually LPT1, and then click Next. 6 Select the appropriate printer manufacturer and model 7 Follow the onscreen instructions to the manual that came with your printer, follow these steps: 1 Click Start in the Windows taskbar, then click Control Panel. 2 Click Printers and Other Hardware, then click Add...
VAIO User Guide
Page 87
... to set up your hard disk drive as online help files. To contact the Sony fax-on-demand service, call 1-888-4-SONYPC (1-888-476-6972). (Requires a fax machine or fax software.) You can use this automated service to VAIO Help and Support Center. 2. Most manuals for your computer's hardware. You can access the Sony Knowledge Database from the Help menu within the specific application. Two additional guides, Upgrading and Maintaining your Sony computer. This...
... to set up your hard disk drive as online help files. To contact the Sony fax-on-demand service, call 1-888-4-SONYPC (1-888-476-6972). (Requires a fax machine or fax software.) You can use this automated service to VAIO Help and Support Center. 2. Most manuals for your computer's hardware. You can access the Sony Knowledge Database from the Help menu within the specific application. Two additional guides, Upgrading and Maintaining your Sony computer. This...

VAIO User Guide
Page 89
...-RW recording problems 72 changing window design 15 Check-In/Check-out 53 computer adjusting voltage settings 79 changing parallel port type 69 condensation 81 disposing of lithium battery 80 hard disk drive 83 proper handling 80 removing side cover 79 shutting down 79 startup problems 67 system response problem 68 upgrading 81 connecting cables 81 peripheral equipment 81 power cord 79 printers 77 CRT display port 11 D defragmenting hard disk drive 59 DigitalPrint software 19 LabelMaker...
...-RW recording problems 72 changing window design 15 Check-In/Check-out 53 computer adjusting voltage settings 79 changing parallel port type 69 condensation 81 disposing of lithium battery 80 hard disk drive 83 proper handling 80 removing side cover 79 shutting down 79 startup problems 67 system response problem 68 upgrading 81 connecting cables 81 peripheral equipment 81 power cord 79 printers 77 CRT display port 11 D defragmenting hard disk drive 59 DigitalPrint software 19 LabelMaker...

VAIO User Guide
Page 90
... port 11 F Floppy disk drive 9 Front Panel 7 Full mode 55 H handling your computer 80 hard disk drive defragmenting 59 partitioning 59 using 83 hardware cooling the heat sink 79 Headphones jack 11 I i.LINK (4-pin) port 9 (6-pin) port 11 compatibility 60 connecting 60 ImageStation 35 90 interference 81 J Jog Dial 56 K keyboard port 10 troubleshooting 76 L Line In jack 11 lithium battery, disposing 80 losing power 79 M magnetic shielding 80 Memory Stick 56 Memory Stick media slot...
... port 11 F Floppy disk drive 9 Front Panel 7 Full mode 55 H handling your computer 80 hard disk drive defragmenting 59 partitioning 59 using 83 hardware cooling the heat sink 79 Headphones jack 11 I i.LINK (4-pin) port 9 (6-pin) port 11 compatibility 60 connecting 60 ImageStation 35 90 interference 81 J Jog Dial 56 K keyboard port 10 troubleshooting 76 L Line In jack 11 lithium battery, disposing 80 losing power 79 M magnetic shielding 80 Memory Stick 56 Memory Stick media slot...
Quick Start Guide
Page 53
... manufacturer's Web site for the latest drivers for specific emulation information. Refer to the manual that came with your printer for your operating system before proceeding with a Windows XP Printer driver, choose Have Disk, enter the appropriate path for approximately 10 seconds, and then turning it back on -screen instructions to print a test page and complete printer installation. ✍ If the printer is...
... manufacturer's Web site for the latest drivers for specific emulation information. Refer to the manual that came with your printer for your operating system before proceeding with a Windows XP Printer driver, choose Have Disk, enter the appropriate path for approximately 10 seconds, and then turning it back on -screen instructions to print a test page and complete printer installation. ✍ If the printer is...
Quick Start Guide
Page 67
...É Converter 29 computer adjusting voltage settings 57 changing parallel port type 43 disposing of lithium battery 58 hard disk drive 60 Locating the Windows taskbar 41 moisture condensation 60 proper handling 59 registration 20 setting up 13 shutting down 57 startup problems 40 system response problem 40 turning off 26 turning on 19 upgrading 61 connecting cables 59 keyboard 16 modem cable 17 monitor/Display 14 mouse 16 peripheral equipment 59 power cord 17, 57...
...É Converter 29 computer adjusting voltage settings 57 changing parallel port type 43 disposing of lithium battery 58 hard disk drive 60 Locating the Windows taskbar 41 moisture condensation 60 proper handling 59 registration 20 setting up 13 shutting down 57 startup problems 40 system response problem 40 turning off 26 turning on 19 upgrading 61 connecting cables 59 keyboard 16 modem cable 17 monitor/Display 14 mouse 16 peripheral equipment 59 power cord 17, 57...
Quick Start Guide
Page 68
... Mouse 52 Optical Disk Drive(s) 45 Preinstalled software 48 Speakers 48 Using peripheral devices 53 Using System Recovery CDs 44 G Giga Pocket Personal Video Recorder 30 H handling your computer 59 hard disk drive using 60 hardware cooling the heat sink 57 Help and support 64 I i.LINK interface 7 interference 59 Internet connecting to 21 K keyboard 7 connecting 16 troubleshooting 52 Knowledge Database 65 L left-hand settings for the mouse 52 Lighting workspace planning 12 Limited warranty 20 lithium battery...
... Mouse 52 Optical Disk Drive(s) 45 Preinstalled software 48 Speakers 48 Using peripheral devices 53 Using System Recovery CDs 44 G Giga Pocket Personal Video Recorder 30 H handling your computer 59 hard disk drive using 60 hardware cooling the heat sink 57 Help and support 64 I i.LINK interface 7 interference 59 Internet connecting to 21 K keyboard 7 connecting 16 troubleshooting 52 Knowledge Database 65 L left-hand settings for the mouse 52 Lighting workspace planning 12 Limited warranty 20 lithium battery...

Quick Start Guide
Page 69
... 32 precautions about power source 57 preinstalled software 27, 28 printer installing 53 resuming after power save mode 53 Q Quicken 2002 New User Edition 32 QuickTime 32 R radio interference 59 RealPlayer 32 RecordNow DX 32 recovering drivers 44 Recovery CDs 11 region codes 46 registering your computer 20 rotary dialing 49 S safeguarding data 57 setting up computer 13 dial-up connection 21 electronic equipment...
... 32 precautions about power source 57 preinstalled software 27, 28 printer installing 53 resuming after power save mode 53 Q Quicken 2002 New User Edition 32 QuickTime 32 R radio interference 59 RealPlayer 32 RecordNow DX 32 recovering drivers 44 Recovery CDs 11 region codes 46 registering your computer 20 rotary dialing 49 S safeguarding data 57 setting up computer 13 dial-up connection 21 electronic equipment...
Quick Start Guide
Page 70
... recording 47 Changing default settings 43 changing the display's video resolution 43 computer stopped responding 40 DVD playback problems 46 DVD-RW recording 47 Keyboard 52 Microphone 51 Modem 49 Mouse 52 operating system locks up 41 Optical Disk Drive(s) 45 optical drive tray eject 45 parallel port 43 Playback problems 45 Preinstalled Software 48 printer installation 53 recover applications 44 resuming printer function 53 software audio problems 48 Sony customer support 20 Speakers 48 startup problems 40 support resource listing 64...
... recording 47 Changing default settings 43 changing the display's video resolution 43 computer stopped responding 40 DVD playback problems 46 DVD-RW recording 47 Keyboard 52 Microphone 51 Modem 49 Mouse 52 operating system locks up 41 Optical Disk Drive(s) 45 optical drive tray eject 45 parallel port 43 Playback problems 45 Preinstalled Software 48 printer installation 53 recover applications 44 resuming printer function 53 software audio problems 48 Sony customer support 20 Speakers 48 startup problems 40 support resource listing 64...
System Reference Manual
Page 12
... Technical Information ......... 63 User and Supervisor Passwords 64 Beep Code Error Messages 65 PCI Configuration Status and Error Messages 66 DMA Channel Assignments 68 System I /O Slot 38 Installing an Internal Hard Disk Drive 39 To identify additional hard disk space 43 Removing the Power Supply 44 Replacing the Power Supply 45 Chapter 4 - CMOS Setup Options 53 Main Screen 55 Advanced Screen 57 Power Screen 59 Boot Screen 60 Exit Screen 61 Chapter 6 - Upgrading and Maintaining Components . 23 Removing the Side Panel 24 Replacing the Side Panel 25 Removing a PCI Add-in Card...
... Technical Information ......... 63 User and Supervisor Passwords 64 Beep Code Error Messages 65 PCI Configuration Status and Error Messages 66 DMA Channel Assignments 68 System I /O Slot 38 Installing an Internal Hard Disk Drive 39 To identify additional hard disk space 43 Removing the Power Supply 44 Replacing the Power Supply 45 Chapter 4 - CMOS Setup Options 53 Main Screen 55 Advanced Screen 57 Power Screen 59 Boot Screen 60 Exit Screen 61 Chapter 6 - Upgrading and Maintaining Components . 23 Removing the Side Panel 24 Replacing the Side Panel 25 Removing a PCI Add-in Card...
System Reference Manual
Page 19
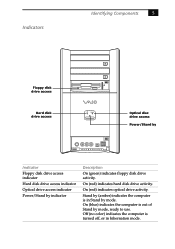
... computer is in Stand by (amber) indicates the computer is turned off, or in hibernation mode. On (red) indicates optical drive activity. On (blue) indicates the computer is out of Stand by indicator Description On (green) indicates floppy disk drive activity. Indicators Identifying Components 5 Floppy disk drive access Hard disk drive access Optical disc drive access Power/Stand by Indicator Floppy disk drive access indicator Hard disk drive access indicator Optical drive access indicator Power/Stand by mode, ready to use. On (red) indicates hard disk drive...
... computer is in Stand by (amber) indicates the computer is turned off, or in hibernation mode. On (red) indicates optical drive activity. On (blue) indicates the computer is out of Stand by indicator Description On (green) indicates floppy disk drive activity. Indicators Identifying Components 5 Floppy disk drive access Hard disk drive access Optical disc drive access Power/Stand by Indicator Floppy disk drive access indicator Hard disk drive access indicator Optical drive access indicator Power/Stand by mode, ready to use. On (red) indicates hard disk drive...
System Reference Manual
Page 93
...2 buttons and switches 4 connectors 5, 6 indicators 5 G Giga Pocket specifications 75 graphics controller - See processor D display, power management 17 disposal of lithium battery viii DMA channel assignments 68 drive installing additional drive 39 E Energy Star iii error messages beep codes 65 PCI configuration 66 expansion slots 14 specifications for 76 expansion slots - See graphics graphics specifications 74 H hard drive specifications 76 79 See Also slots F fax/modem - See lithium battery beep codes 65 BIOS Setup Utility See CMOS Setup Utility BIOS setup utility advanced screen...
...2 buttons and switches 4 connectors 5, 6 indicators 5 G Giga Pocket specifications 75 graphics controller - See processor D display, power management 17 disposal of lithium battery viii DMA channel assignments 68 drive installing additional drive 39 E Energy Star iii error messages beep codes 65 PCI configuration 66 expansion slots 14 specifications for 76 expansion slots - See graphics graphics specifications 74 H hard drive specifications 76 79 See Also slots F fax/modem - See lithium battery beep codes 65 BIOS Setup Utility See CMOS Setup Utility BIOS setup utility advanced screen...
System Reference Manual
Page 94
...installing hard disk drive 39 PCI add-in , headphones 12 monitor 11 printer port 11 serial port 1 11 telephone and line 12 USB ports 10 I/O slot covering 38 I/O slot specifications 76 icons, description of discs 3, 76 optical drive specifications 76 P passwords, user and supervisor 64 PCI add-in card 26 side panel 24 slot cover 37 replacing 25 side panel 25 replacing lithium battery 30 resolution - See graphics RIMM - See I /O slot slot cover, removing 37 See processor modem - See Also communications monitor - 80 VAIO Digital Studio System Reference Manual I i.LINK connector...
...installing hard disk drive 39 PCI add-in , headphones 12 monitor 11 printer port 11 serial port 1 11 telephone and line 12 USB ports 10 I/O slot covering 38 I/O slot specifications 76 icons, description of discs 3, 76 optical drive specifications 76 P passwords, user and supervisor 64 PCI add-in card 26 side panel 24 slot cover 37 replacing 25 side panel 25 replacing lithium battery 30 resolution - See graphics RIMM - See I /O slot slot cover, removing 37 See processor modem - See Also communications monitor - 80 VAIO Digital Studio System Reference Manual I i.LINK connector...
Marketing Specifications
Page 1
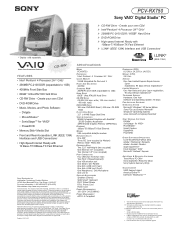
... Sony Desktop Computer are trademarks of Microsoft Corporation. PCV-RX750 Sony VAIO® Digital Studio™ PC * Display sold separately. Microsoft, Windows and Outlook are trademarks of additional fees or subscription for VAIO® • PowerDVD • Memory Stick® Media Slot • Front and Rear Accessible i.LINK (IEEE 1394) Interfaces and USB Connections1 • High-Speed Internet Ready with Real256TM 2D/3D Graphics Accelerator 32MB Shared Graphics Memory (64MB Max.) ETHERNET...
... Sony Desktop Computer are trademarks of Microsoft Corporation. PCV-RX750 Sony VAIO® Digital Studio™ PC * Display sold separately. Microsoft, Windows and Outlook are trademarks of additional fees or subscription for VAIO® • PowerDVD • Memory Stick® Media Slot • Front and Rear Accessible i.LINK (IEEE 1394) Interfaces and USB Connections1 • High-Speed Internet Ready with Real256TM 2D/3D Graphics Accelerator 32MB Shared Graphics Memory (64MB Max.) ETHERNET...


