

VAIO User Guide
Page 4
...To access this online software information: 1. You can create a VAIO Recovery Media Kit using CD-R, single layer DVD+R, or single layer DVD-R media on -screen instructions to locate your computer's operating system and preinstalled software. The online specifications sheet describes the hardware and software configuration of your computer. Provides specific information on the preinstalled software on your VAIO computer. For online information about hard disk recovery: 1. From the VAIO Help And Support Center menu, click VAIO Recovery Options. DVD+RW, DVD-RW, double layer DVD+R, and...
...To access this online software information: 1. You can create a VAIO Recovery Media Kit using CD-R, single layer DVD+R, or single layer DVD-R media on -screen instructions to locate your computer's operating system and preinstalled software. The online specifications sheet describes the hardware and software configuration of your computer. Provides specific information on the preinstalled software on your VAIO computer. For online information about hard disk recovery: 1. From the VAIO Help And Support Center menu, click VAIO Recovery Options. DVD+RW, DVD-RW, double layer DVD+R, and...
VAIO User Guide
Page 9
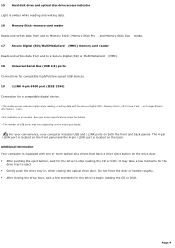
... models . 15 Hard disk drive and optical disc drive access indicator Light is amber while reading and writing data. 16 Memory Stick® memory card reader Reads and writes data from and to Memory Stick®, Memory Stick Pro , and Memory Stick Duo media. 17 Secure Digital (SD)/MultiMediaCard (MMC) memory card reader Reads and writes data from and to a Secure Digital (SD) or MultiMediaCard (MMC). 18 Universal Serial Bus (USB 2.0) ports3 Connections...
... models . 15 Hard disk drive and optical disc drive access indicator Light is amber while reading and writing data. 16 Memory Stick® memory card reader Reads and writes data from and to Memory Stick®, Memory Stick Pro , and Memory Stick Duo media. 17 Secure Digital (SD)/MultiMediaCard (MMC) memory card reader Reads and writes data from and to a Secure Digital (SD) or MultiMediaCard (MMC). 18 Universal Serial Bus (USB 2.0) ports3 Connections...
VAIO User Guide
Page 10
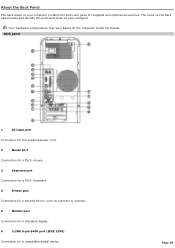
...computer model purchased. Your hardware configuration may vary based on your computer contains the ports and jacks for a compatible digital device. Page 10 Back panel 1 AC Input port Connection for the supplied power cord. 2 Mouse port Connection for a PS/2® mouse. 3 Keyboard port Connection for a PS/2® keyboard. 4 Printer port Connection for a parallel device, such as a printer or scanner. 5 Monitor port Connection for a standard display. 6 i.LINK 6-pin S400 port (IEEE 1394) Connection for supplied and optional accessories. About the Back Panel The back panel...
...computer model purchased. Your hardware configuration may vary based on your computer contains the ports and jacks for a compatible digital device. Page 10 Back panel 1 AC Input port Connection for the supplied power cord. 2 Mouse port Connection for a PS/2® mouse. 3 Keyboard port Connection for a PS/2® keyboard. 4 Printer port Connection for a parallel device, such as a printer or scanner. 5 Monitor port Connection for a standard display. 6 i.LINK 6-pin S400 port (IEEE 1394) Connection for supplied and optional accessories. About the Back Panel The back panel...

VAIO User Guide
Page 12
... models . See your c omputer's s pec ific ations s heet for details about your c omputer's s pec ific ation s heet for details on the software applications, operating system, and compatible i.LINK devices. See your c omputer's hardware c onfiguration, s ee the online s pec ific ations s heet. 12 Speaker DC Out jack Connection for the speaker power cable (supplied 2-channel speakers). 13 S/PDIF Optical Out port Connection for a digital audio or optical device. 14 Ethernet port Connection...
... models . See your c omputer's s pec ific ations s heet for details about your c omputer's s pec ific ation s heet for details on the software applications, operating system, and compatible i.LINK devices. See your c omputer's hardware c onfiguration, s ee the online s pec ific ations s heet. 12 Speaker DC Out jack Connection for the speaker power cable (supplied 2-channel speakers). 13 S/PDIF Optical Out port Connection for a digital audio or optical device. 14 Ethernet port Connection...

VAIO User Guide
Page 17
... to external video equipment, such as your VCR. (Note: You cannot change the on the monitor/display. 9 VOLUME button Press to raise or lower the volume. 10 STANDBY button Press to place the system into Stand by mode. (Note: You cannot place the computer into Stand by mode when certain Giga Pocket functions are running.) 11 AUDIO button Press to view available sound mode options on -screen image...
... to external video equipment, such as your VCR. (Note: You cannot change the on the monitor/display. 9 VOLUME button Press to raise or lower the volume. 10 STANDBY button Press to place the system into Stand by mode. (Note: You cannot place the computer into Stand by mode when certain Giga Pocket functions are running.) 11 AUDIO button Press to view available sound mode options on -screen image...
VAIO User Guide
Page 18
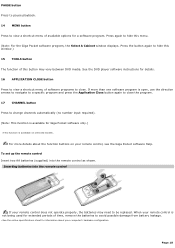
... tion is available on your c omputer's hardware c onfiguration. To set up the remote control Insert two AA batteries (supplied) into the rem ote control If your remote control does not operate properly, the batteries may vary between DVD media. If more details about your remote control, see the Giga Pocket software Help. Page 18 For more than one software program is open, use the direction arrows to navigate to...
... tion is available on your c omputer's hardware c onfiguration. To set up the remote control Insert two AA batteries (supplied) into the rem ote control If your remote control does not operate properly, the batteries may vary between DVD media. If more details about your remote control, see the Giga Pocket software Help. Page 18 For more than one software program is open, use the direction arrows to navigate to...

VAIO User Guide
Page 20
See the specifications sheet for your computer on the Sony online support Web site at http://www.sony.com/pcsupport for details on your computer's hardware configuration. Connecting a Display (Monitor) Connecting the Speakers Connecting the Keyboard and Mouse Connecting the Telephone and Modem Connecting the Power Cords Turning On your Computer Registering Your Computer Turning Off Your Computer Page 20 Setting Up Your Computer Your computer may not be equipped...
See the specifications sheet for your computer on the Sony online support Web site at http://www.sony.com/pcsupport for details on your computer's hardware configuration. Connecting a Display (Monitor) Connecting the Speakers Connecting the Keyboard and Mouse Connecting the Telephone and Modem Connecting the Power Cords Turning On your Computer Registering Your Computer Turning Off Your Computer Page 20 Setting Up Your Computer Your computer may not be equipped...

VAIO User Guide
Page 22
... For information about supplied accessories, go to the Sony online support Web site at http://www.sony.com/pcsupport to -order (CTO), are configured-to view your 5.1 (6-channel) speaker system. From the right speaker, plug the AC power cord into the Headphones jack located on the speaker components used. Speaker configuration can vary, depending on the back panel of your computer. Review the connection instructions provided with your...
... For information about supplied accessories, go to the Sony online support Web site at http://www.sony.com/pcsupport to -order (CTO), are configured-to view your 5.1 (6-channel) speaker system. From the right speaker, plug the AC power cord into the Headphones jack located on the speaker components used. Speaker configuration can vary, depending on the back panel of your computer. Review the connection instructions provided with your...
VAIO User Guide
Page 23
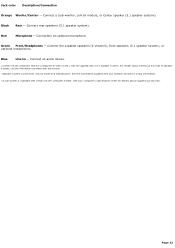
... - Connect rear speakers (5.1 speaker system). Page 23 Connect a Sub-woofer3, control module, or Center speaker (5.1 speaker system1). See your s peaker s ys tem for details about s etting up this type of s peaker s ys tem, s ee the information provided with the s ys tem. 2 Speaker s ys tem c onnec tions vary by model and manufac turer. Connection an optional microphone. Connect the supplied speakers (2-channel), front speakers (5.1 speaker system), or optional headphones. Connect an audio device. 1 C ertain...
... - Connect rear speakers (5.1 speaker system). Page 23 Connect a Sub-woofer3, control module, or Center speaker (5.1 speaker system1). See your s peaker s ys tem for details about s etting up this type of s peaker s ys tem, s ee the information provided with the s ys tem. 2 Speaker s ys tem c onnec tions vary by model and manufac turer. Connection an optional microphone. Connect the supplied speakers (2-channel), front speakers (5.1 speaker system), or optional headphones. Connect an audio device. 1 C ertain...
VAIO User Guide
Page 78
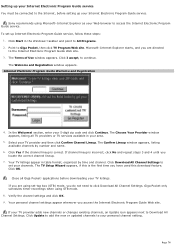
.... Sony recommends using STB mode. 8. section, enter your TV provider and then click Confirm Channel Lineup. Select your 5-digit zip code and click Continue. Click Update to add the new or updated channels to the Internet Electronic Program Guide Web site. 3. In the Welcome! The TV Setup Wizard appears, if this download feature. Setting up your Internet Electronic Program Guide service You must be connected to the Internet, before downloading...
.... Sony recommends using STB mode. 8. section, enter your TV provider and then click Confirm Channel Lineup. Select your 5-digit zip code and click Continue. Click Update to add the new or updated channels to the Internet Electronic Program Guide Web site. 3. In the Welcome! The TV Setup Wizard appears, if this download feature. Setting up your Internet Electronic Program Guide service You must be connected to the Internet, before downloading...

VAIO User Guide
Page 95
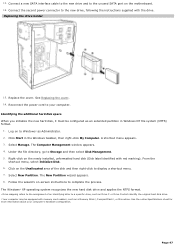
... drive. Replacing the original hard disk drive If you replace the original, factory-installed hard disk drive, you start Click to correct your drive mapping, create a VAIO Recovery Media Kit, or visit the Sony online support Web site for removable media2, may already have a second hard disk drive installed. Drive letter assignment When a new hard disk drive is installed, an identifying drive letter is not supplied with Click to DVD software. If the Microsoft® Windows® operating system identifies the new hard disk drive as your Sony computer. Some models...
... drive. Replacing the original hard disk drive If you replace the original, factory-installed hard disk drive, you start Click to correct your drive mapping, create a VAIO Recovery Media Kit, or visit the Sony online support Web site for removable media2, may already have a second hard disk drive installed. Drive letter assignment When a new hard disk drive is installed, an identifying drive letter is not supplied with Click to DVD software. If the Microsoft® Windows® operating system identifies the new hard disk drive as your Sony computer. Some models...
VAIO User Guide
Page 97
...'s hardware c onfiguration. Select New Partition. See Replacing the cover. 16. Under the file directory, go to the unused SATA port on to the new drive, following the instructions supplied with red marking). 13. Connect a new SATA interface cable to the new drive and to Storage and then select Disk Management. 5. Replacing the driv e holder 15. Log on the motherboard. 14. The Computer Management window appears. 4. From the shortcut menu, select Initialize Disk. 6. Connect the second power connector to Windows®...
...'s hardware c onfiguration. Select New Partition. See Replacing the cover. 16. Under the file directory, go to the unused SATA port on to the new drive, following the instructions supplied with red marking). 13. Connect a new SATA interface cable to the new drive and to Storage and then select Disk Management. 5. Replacing the driv e holder 15. Log on the motherboard. 14. The Computer Management window appears. 4. From the shortcut menu, select Initialize Disk. 6. Connect the second power connector to Windows®...
VAIO User Guide
Page 128
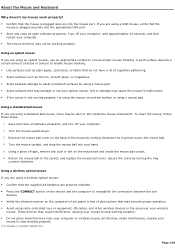
... the mouse by turning the ring counter-clockwise. Using a wireless optical mouse If you are properly installed. Press the CONNECT button on the mouse and the computer to stop working properly. Do not place metal furniture near your computer. The mouse driver(s) may create interference, causing your optical mouse. If you are using a wireless optical mouse: Confirm that the supplied AA batteries are using a USB mouse, verify that the mouse is free of tape, remove...
... the mouse by turning the ring counter-clockwise. Using a wireless optical mouse If you are properly installed. Press the CONNECT button on the mouse and the computer to stop working properly. Do not place metal furniture near your computer. The mouse driver(s) may create interference, causing your optical mouse. If you are using a wireless optical mouse: Confirm that the supplied AA batteries are using a USB mouse, verify that the mouse is free of tape, remove...

VAIO User Guide
Page 129
... the cursor is plugged securely into the appropriate USB port. Save and close all open software programs. Turn off your wireless mouse. Secure the cover by turning clockwise the ring that covers the mouse ball. 4. Using a wireless optical mouse If you are properly installed. Press the CONNECT button on the mouse and the computer to stop working properly. Do not place metal furniture near your computer. 2. Remove the mouse ball cover on the...
... the cursor is plugged securely into the appropriate USB port. Save and close all open software programs. Turn off your wireless mouse. Secure the cover by turning clockwise the ring that covers the mouse ball. 4. Using a wireless optical mouse If you are properly installed. Press the CONNECT button on the mouse and the computer to stop working properly. Do not place metal furniture near your computer. 2. Remove the mouse ball cover on the...

VAIO User Guide
Page 144
... provides a disk with the appropriate Windows XP Printer driver: 1. Select the appropriate port, usually LPT1 if using the parallel port, and then click Next. 6. Follow the on your computer's front, back or side panels1. Page 144 Choose Have Disk. 2. Some printers do I install a printer? Connect your USB or IEEE 1394 printer to the appropriate port on -screen instructions to the user manual or guide supplied with your...
... provides a disk with the appropriate Windows XP Printer driver: 1. Select the appropriate port, usually LPT1 if using the parallel port, and then click Next. 6. Follow the on your computer's front, back or side panels1. Page 144 Choose Have Disk. 2. Some printers do I install a printer? Connect your USB or IEEE 1394 printer to the appropriate port on -screen instructions to the user manual or guide supplied with your...

VAIO User Guide
Page 145
... Plug and Play printer, if you are provided with your computer's front, back or side panels1. Some printers do I install a printer? Connect your USB or IEEE 1394 printer to the appropriate port on -screen instructions to the user manual or guide supplied with the printer: 1. Place a check mark in the list, but the printer manufacturer provides a disk with the appropriate Windows XP Printer driver: 1. About Using...
... Plug and Play printer, if you are provided with your computer's front, back or side panels1. Some printers do I install a printer? Connect your USB or IEEE 1394 printer to the appropriate port on -screen instructions to the user manual or guide supplied with the printer: 1. Place a check mark in the list, but the printer manufacturer provides a disk with the appropriate Windows XP Printer driver: 1. About Using...

VAIO User Guide
Page 156
... factory installed settings. VAIO® Computer User Guide - Click the desired software program.1 The software's main window appears. 3. Immediate Help and Support You can find tutorials that describes the software's features. Provides information about configuring, maintaining, and upgrading your model's specifications sheet. Preinstalled software Help files - From the VAIO Help And Support Center menu, click VAIO User Guide. Specifications - Connect to the Sony online support Web site at http://www.sony.com/pcsupport. 3. Go to the Internet...
... factory installed settings. VAIO® Computer User Guide - Click the desired software program.1 The software's main window appears. 3. Immediate Help and Support You can find tutorials that describes the software's features. Provides information about configuring, maintaining, and upgrading your model's specifications sheet. Preinstalled software Help files - From the VAIO Help And Support Center menu, click VAIO User Guide. Specifications - Connect to the Sony online support Web site at http://www.sony.com/pcsupport. 3. Go to the Internet...

VAIO User Guide
Page 161
.... Serial number1. For VAIO® computers purchased in the U.S. Sony Customer Information Services Center If other support options do not resolve your issue, you can access the Web site at 1-888-476-6972. 1 T he s erial number is loc ated on using your computer's hardware and software features. Links that enable you to: quickly find the nearest Sony service center locations. arrange for repairs or check repair status. review...
.... Serial number1. For VAIO® computers purchased in the U.S. Sony Customer Information Services Center If other support options do not resolve your issue, you can access the Web site at 1-888-476-6972. 1 T he s erial number is loc ated on using your computer's hardware and software features. Links that enable you to: quickly find the nearest Sony service center locations. arrange for repairs or check repair status. review...

Welcome Mat
Page 1
... port* MONITOR i.LINK 6-pin S400 port (IEEE 1394) Power indicator (VAIO) Universal Serial Bus USB (USB 2.0 ports) Hard disk and optical disc drive access indicator Audio jacks Monitor port* WOOFER /CENTER FRONT REAR MONITOR Giga Pocket® features*† AUDIO AUDIO COMPOSITE S VIDEO - VIDEO1 INPUT - Part No. 2-345-580-02 © 2004 Sony Electronics Inc. All rights reserved. Press the power button on the power. A System unit B Keyboard C Speakers D Power cord E Video adapter* F TV coaxial cable* G Mouse H Remote control* I G D F J Your VAIO® computer...
... port* MONITOR i.LINK 6-pin S400 port (IEEE 1394) Power indicator (VAIO) Universal Serial Bus USB (USB 2.0 ports) Hard disk and optical disc drive access indicator Audio jacks Monitor port* WOOFER /CENTER FRONT REAR MONITOR Giga Pocket® features*† AUDIO AUDIO COMPOSITE S VIDEO - VIDEO1 INPUT - Part No. 2-345-580-02 © 2004 Sony Electronics Inc. All rights reserved. Press the power button on the power. A System unit B Keyboard C Speakers D Power cord E Video adapter* F TV coaxial cable* G Mouse H Remote control* I G D F J Your VAIO® computer...

Welcome Mat
Page 2
...entire hard disk drive to the following sources for answers. VIDEO1 INPUT - For online information about restoring individual software programs, software drivers, drive partition(s), or your computer or the preinstalled programs, refer to the original factory installed settings. 1 Click Start > Help and Support. 2 From the VAIO Help And Support Center menu, click VAIO Recovery Options. Cable service access (wall outlet) TV coaxial cable (supplied) VHF/UHF port MONITOR AUDIO AUDIO COMPOSITE S VIDEO - Starting Giga Pocket 1 Click Start > All Programs > Giga Pocket. DVD+RW, DVD-RW...
...entire hard disk drive to the following sources for answers. VIDEO1 INPUT - For online information about restoring individual software programs, software drivers, drive partition(s), or your computer or the preinstalled programs, refer to the original factory installed settings. 1 Click Start > Help and Support. 2 From the VAIO Help And Support Center menu, click VAIO Recovery Options. Cable service access (wall outlet) TV coaxial cable (supplied) VHF/UHF port MONITOR AUDIO AUDIO COMPOSITE S VIDEO - Starting Giga Pocket 1 Click Start > All Programs > Giga Pocket. DVD+RW, DVD-RW...


