
User Guide
Page 2
...may not be authorized by Macrovision Corporation, and is subject to the model and serial numbers when you call your Sony VAIO Digital Studio™ computer. SONY ELECTRONICS INC. BE LIABLE FOR ANY INCIDENTAL, CONSEQUENTIAL, OR SPECIAL DAMAGES, WHETHER BASED ON TORT, CONTRACT, OR OTHERWISE...agreement. Owner's Record The model number and serial number are subject to change without prior written approval. Model Number: PCV-R553DS/PCV-R556DS/PCVR558DS Serial Number 2 Software specifications are located on the back of Microsoft Corporation. Financial services may require an ...
...may not be authorized by Macrovision Corporation, and is subject to the model and serial numbers when you call your Sony VAIO Digital Studio™ computer. SONY ELECTRONICS INC. BE LIABLE FOR ANY INCIDENTAL, CONSEQUENTIAL, OR SPECIAL DAMAGES, WHETHER BASED ON TORT, CONTRACT, OR OTHERWISE...agreement. Owner's Record The model number and serial number are subject to change without prior written approval. Model Number: PCV-R553DS/PCV-R556DS/PCVR558DS Serial Number 2 Software specifications are located on the back of Microsoft Corporation. Financial services may require an ...

User Guide
Page 6
...network, the telephone company may request that could affect the operations of the equipment. This equipment cannot be made only by a Sony Service Center or Sony authorized agent. In order to program this happens, the telephone company will notify the customer as soon as determined by the telephone ... may make the necessary modifications in advance that may be advised of your right to file a complaint with Canadian ICES-003. VAIO Digital Studio™ Computer User Guide The REN is used on the first page of the transmission, the date and time it unlawful for the calling area.
...network, the telephone company may request that could affect the operations of the equipment. This equipment cannot be made only by a Sony Service Center or Sony authorized agent. In order to program this happens, the telephone company will notify the customer as soon as determined by the telephone ... may make the necessary modifications in advance that may be advised of your right to file a complaint with Canadian ICES-003. VAIO Digital Studio™ Computer User Guide The REN is used on the first page of the transmission, the date and time it unlawful for the calling area.

User Guide
Page 9
Contents Welcome 11 Choosing an Ergonomic Location 11 Front Panel Overview 12 Back Panel Overview 14 VAIO Action Setup 17 Pre-setting i.LINK devices 18 Changing the Window Design of Sony Software ....19 Sony Digital Media Park Applications .........20 Movie Shaker 21 Importing Images and Sound Clips 21 Create a Movie using Shaker 21 Editing Clips...
Contents Welcome 11 Choosing an Ergonomic Location 11 Front Panel Overview 12 Back Panel Overview 14 VAIO Action Setup 17 Pre-setting i.LINK devices 18 Changing the Window Design of Sony Software ....19 Sony Digital Media Park Applications .........20 Movie Shaker 21 Importing Images and Sound Clips 21 Create a Movie using Shaker 21 Editing Clips...
User Guide
Page 10
VAIO Digital Studio™ Computer User Guide Defragmenting your Hard Disk Drive 27 i.LINK (IEEE1394) Compatibility 28 Enabling Smart Connect 29 Enabling Ethernet 30 System and Application Recovery CD(s) ....31 Using the System Recovery CD(s 31 Using the Application Recovery CD(s 33 Troubleshooting 34 To Reach Sony 45 Notes on Use 45 On the Power ...Diskettes 50 On Handling CD or DVD Media 50 On Cleaning CD or DVD Media 50 Resources 51 For Answers to Your Software Questions 52 Sony Service Center 52 Specifications PCV-R553DS 55 Specifications PCV-R556DS/R558DS 57 Index 59 10
VAIO Digital Studio™ Computer User Guide Defragmenting your Hard Disk Drive 27 i.LINK (IEEE1394) Compatibility 28 Enabling Smart Connect 29 Enabling Ethernet 30 System and Application Recovery CD(s) ....31 Using the System Recovery CD(s 31 Using the Application Recovery CD(s 33 Troubleshooting 34 To Reach Sony 45 Notes on Use 45 On the Power ...Diskettes 50 On Handling CD or DVD Media 50 On Cleaning CD or DVD Media 50 Resources 51 For Answers to Your Software Questions 52 Sony Service Center 52 Specifications PCV-R553DS 55 Specifications PCV-R556DS/R558DS 57 Index 59 10

User Guide
Page 11
...so that your workspace: ❑ Stable work surface large enough to the floor. Keep your wrists in a relaxed position when you for your computer. Position the mouse at or a little below eye level. Position the display 18 to find the best location for resting. Choosing an Ergonomic... Location Welcome Thank you are using the keyboard-not angled up or down. Excessive use your Sony VAIO computer! Use the display's tilting feature to 26 inches directly in front of the screen at the same level as the keyboard. Leave at...
...so that your workspace: ❑ Stable work surface large enough to the floor. Keep your wrists in a relaxed position when you for your computer. Position the mouse at or a little below eye level. Position the display 18 to find the best location for resting. Choosing an Ergonomic... Location Welcome Thank you are using the keyboard-not angled up or down. Excessive use your Sony VAIO computer! Use the display's tilting feature to 26 inches directly in front of the screen at the same level as the keyboard. Leave at...

User Guide
Page 12
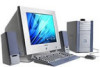
.... Proper lighting adds to the diskette, DVD, and CD-RW drives. It also includes USB and i.LINK ports to avoid bright spots on the display. VAIO Digital Studio™ Computer User Guide ❑ Lighting - Choose a location where windows and lights do not create glare and reflection on the display. Use indirect lighting to connect... Button Power/Standby Switch Power/Standby Indicator Light Hard Disk Drive Access Indicator Light i.LINK USB 12 Front Panel Overview The front panel of your VAIO Digital Studio Computer allows for your comfort and work effectiveness.
.... Proper lighting adds to the diskette, DVD, and CD-RW drives. It also includes USB and i.LINK ports to avoid bright spots on the display. VAIO Digital Studio™ Computer User Guide ❑ Lighting - Choose a location where windows and lights do not create glare and reflection on the display. Use indirect lighting to connect... Button Power/Standby Switch Power/Standby Indicator Light Hard Disk Drive Access Indicator Light i.LINK USB 12 Front Panel Overview The front panel of your VAIO Digital Studio Computer allows for your comfort and work effectiveness.
User Guide
Page 14
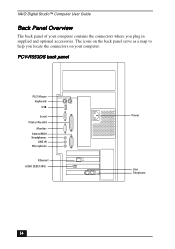
The icons on the back panel serve as a map to help you locate the connectors on your computer contains the connectors where you plug in supplied and optional accessories. PCV-R553DS back panel PS/2 Mouse Keyboard USB Serial Printer/Parallel Monitor Games/MIDI Headphones LINE IN Microphone Ethernet i.LINK (IEEE1394) Power Line Telephone 14 VAIO Digital Studio™ Computer User Guide Back Panel Overview The back panel of your computer.
The icons on the back panel serve as a map to help you locate the connectors on your computer contains the connectors where you plug in supplied and optional accessories. PCV-R553DS back panel PS/2 Mouse Keyboard USB Serial Printer/Parallel Monitor Games/MIDI Headphones LINE IN Microphone Ethernet i.LINK (IEEE1394) Power Line Telephone 14 VAIO Digital Studio™ Computer User Guide Back Panel Overview The back panel of your computer.

User Guide
Page 16
VAIO Digital Studio™ Computer User Guide 6 LINE IN connector Connects an audio device. 7 PHONES (Headphones) connector* Connects headphones (not supplied). 8 Games/MIDI connector Connects a game or MIDI device. 9 MONITOR connector Connects a standard CRT display. 10 PRINTER connector Connects a parallel device, such as a printer or scanner. 11 SERIAL connector Connects a serial device, such as a digital still...
VAIO Digital Studio™ Computer User Guide 6 LINE IN connector Connects an audio device. 7 PHONES (Headphones) connector* Connects headphones (not supplied). 8 Games/MIDI connector Connects a game or MIDI device. 9 MONITOR connector Connects a standard CRT display. 10 PRINTER connector Connects a parallel device, such as a printer or scanner. 11 SERIAL connector Connects a serial device, such as a digital still...

User Guide
Page 17
...drop feature to place any application into the list box. 4 The Confirmation Application Name window appears showing you the application you want to open VAIO Action Setup. 2 Click the S Key you have selected. Outlook Express ❑ S2 - The programmable S Keys come with the following ...Bar ❑ S4 - DVGate Motion ❑ S6 - To change . 3 From the Select Application dialog box, click the radio button for your computer's Shortcut keys (S Keys) and i.LINK interface. The corresponding applications appear in the list box on the Windows taskbar to change the settings of function. ...
...drop feature to place any application into the list box. 4 The Confirmation Application Name window appears showing you the application you want to open VAIO Action Setup. 2 Click the S Key you have selected. Outlook Express ❑ S2 - The programmable S Keys come with the following ...Bar ❑ S4 - DVGate Motion ❑ S6 - To change . 3 From the Select Application dialog box, click the radio button for your computer's Shortcut keys (S Keys) and i.LINK interface. The corresponding applications appear in the list box on the Windows taskbar to change the settings of function. ...

User Guide
Page 18
...may change the name and description of the application you want to launch. 13 Click Finish to confirm the application name. VAIO Digital Studio™ Computer User Guide Pre-setting i.LINK devices You can pre-set your i.LINK device to launch a desired function: 1 From the...LINK launcher function checkbox and click Apply. 5 Connect the device to your computer with your i.LINK-equipped devices to launch desired functions, such as automatically starting DVgate applications or connecting two VAIO computers. The Input Application Name dialog box appears. The Select Application dialog box ...
...may change the name and description of the application you want to launch. 13 Click Finish to confirm the application name. VAIO Digital Studio™ Computer User Guide Pre-setting i.LINK devices You can pre-set your i.LINK device to launch a desired function: 1 From the...LINK launcher function checkbox and click Apply. 5 Connect the device to your computer with your i.LINK-equipped devices to launch desired functions, such as automatically starting DVgate applications or connecting two VAIO computers. The Input Application Name dialog box appears. The Select Application dialog box ...

User Guide
Page 20
... a variety of new media formats with a collection of your computer. Smart Capture allows you to capture individual frames from digital video clips, and then save or share via e-mail. VAIO Digital Studio™ Computer User Guide Sony Digital Media Park Applications Your VAIO® computer comes with an easy-to digital video quality control and effects features. The possibilities are low...
... a variety of new media formats with a collection of your computer. Smart Capture allows you to capture individual frames from digital video clips, and then save or share via e-mail. VAIO Digital Studio™ Computer User Guide Sony Digital Media Park Applications Your VAIO® computer comes with an easy-to digital video quality control and effects features. The possibilities are low...

User Guide
Page 22
VAIO Digital Studio™ Computer User Guide 1 Click the Shake tab. 2 Select a mood by adding effects and text, adjusting the color and contrast, and modifying the length of clips. Working ...
VAIO Digital Studio™ Computer User Guide 1 Click the Shake tab. 2 Select a mood by adding effects and text, adjusting the color and contrast, and modifying the length of clips. Working ...

User Guide
Page 24
... 20%. 24 Thumbnail views provide quick reminders of still images into a 360 degree panoramic picture. Using Panorama Maker Panorama Maker stitches a group of your pictures. VAIO Digital Studio™ Computer User Guide PictureGear™ PictureGear is a digital image management application that allows you to have in any directory on your...
... 20%. 24 Thumbnail views provide quick reminders of still images into a 360 degree panoramic picture. Using Panorama Maker Panorama Maker stitches a group of your pictures. VAIO Digital Studio™ Computer User Guide PictureGear™ PictureGear is a digital image management application that allows you to have in any directory on your...

User Guide
Page 26
...; You cannot use . ❑ DVgate does not support hard disk compression. You should not use DVgate when the connected digital video peripheral is in Timer Recording mode, as this could be accurate. ❑ Make sure the video head of capture ...LP mode, the information displayed by DVgate. ❑ To avoid interruption of your digital video device is properly cleaned. VAIO Digital Studio™ Computer User Guide Using Digital Video Connecting a Digital Video Recorder Before connecting a digital video camera recorder to your selected [OUT] point. You should disable the screen...
...; You cannot use . ❑ DVgate does not support hard disk compression. You should not use DVgate when the connected digital video peripheral is in Timer Recording mode, as this could be accurate. ❑ Make sure the video head of capture ...LP mode, the information displayed by DVgate. ❑ To avoid interruption of your digital video device is properly cleaned. VAIO Digital Studio™ Computer User Guide Using Digital Video Connecting a Digital Video Recorder Before connecting a digital video camera recorder to your selected [OUT] point. You should disable the screen...
User Guide
Page 28
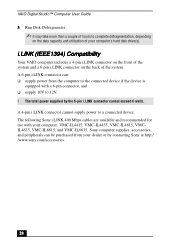
The total power supplied by contacting Sony at http:/ /www.sony.com/accessories. 28 Sony computer supplies, accessories, and peripherals can : ❑ supply power from your computer's hard disk drive(s). VAIO Digital Studio™ Computer User Guide 3 Run Disk Defragmenter. ✍ It may take more than a couple of hours to complete defragmentation, depending on the back of your dealer or...
The total power supplied by contacting Sony at http:/ /www.sony.com/accessories. 28 Sony computer supplies, accessories, and peripherals can : ❑ supply power from your computer's hard disk drive(s). VAIO Digital Studio™ Computer User Guide 3 Run Disk Defragmenter. ✍ It may take more than a couple of hours to complete defragmentation, depending on the back of your dealer or...
User Guide
Page 30
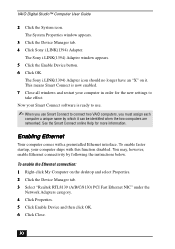
VAIO Digital Studio™ Computer User Guide 2 Click the System icon. The Sony i.LINK(1394) Adapter window appears. 5 Click the Enable Device button. 6 Click OK. To enable the Ethernet connection: 1 Right-click My Computer on it can be identified when the two computers are networked. This means Smart ... for the new settings to connect two VAIO computers, you use Smart Connect to take effect. You may, however, enable Ethernet connectivity by which it . The Sony i.LINK(1394) Adapter icon should no longer have an "X" on the desktop and select Properties. 2 Click the Device...
VAIO Digital Studio™ Computer User Guide 2 Click the System icon. The Sony i.LINK(1394) Adapter window appears. 5 Click the Enable Device button. 6 Click OK. To enable the Ethernet connection: 1 Right-click My Computer on it can be identified when the two computers are networked. This means Smart ... for the new settings to connect two VAIO computers, you use Smart Connect to take effect. You may, however, enable Ethernet connectivity by which it . The Sony i.LINK(1394) Adapter icon should no longer have an "X" on the desktop and select Properties. 2 Click the Device...
User Guide
Page 32
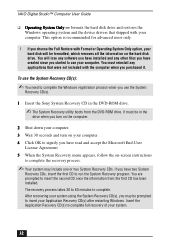
VAIO Digital Studio™ Computer User Guide ❑ Operating System Only - If you use the System Recovery CD(s). 1 Insert the Sony System Recovery CD in the drive when you started to signify you have created since you turn on the computer. 2 Shut down your computer. 3 Wait 30 seconds and turn on the...your system. 32 This option is recommended for advanced users only. ! You must be formatted, which removes all the information on your computer. 4 Click OK to use the System Recovery CD(s): ✍ You need to complete the Windows registration process when you choose the Full...
VAIO Digital Studio™ Computer User Guide ❑ Operating System Only - If you use the System Recovery CD(s). 1 Insert the Sony System Recovery CD in the drive when you started to signify you have created since you turn on the computer. 2 Shut down your computer. 3 Wait 30 seconds and turn on the...your system. 32 This option is recommended for advanced users only. ! You must be formatted, which removes all the information on your computer. 4 Click OK to use the System Recovery CD(s): ✍ You need to complete the Windows registration process when you choose the Full...
User Guide
Page 34
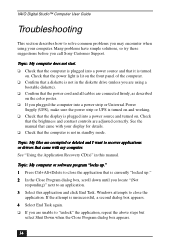
...are unable to "unlock" the application, repeat the above steps but select Shut Down when the Close Program dialog box appears. 34 VAIO Digital Studio™ Computer User Guide Troubleshooting This section describes how to solve common problems you may encounter when using a bootable diskette). ❑ Confirm that... (UPS), make sure the power strip or UPS is turned on and working. ❑ Check that came with my computer. Check that it is unsuccessful, a second dialog box appears. 4 Select End Task again. ❑ If you call Sony Customer Support. If the attempt is turned on.
...are unable to "unlock" the application, repeat the above steps but select Shut Down when the Close Program dialog box appears. 34 VAIO Digital Studio™ Computer User Guide Troubleshooting This section describes how to solve common problems you may encounter when using a bootable diskette). ❑ Confirm that... (UPS), make sure the power strip or UPS is turned on and working. ❑ Check that came with my computer. Check that it is unsuccessful, a second dialog box appears. 4 Select End Task again. ❑ If you call Sony Customer Support. If the attempt is turned on.
User Guide
Page 36
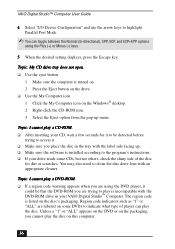
... drive tray does not open. ❑ Use the eject button 1 Make sure the computer is turned on. 2 Press the Eject button on the drive. ❑ Use the My Computer icon 1 Click the My Computer icon on the Windows® desktop. 2 Right-click the CD-ROM icon. 3 Select the Eject option from the pop... the DVD-ROM you are trying to play a DVD-ROM. ❑ If a region code warning appears when you place the disc in your VAIO Digital Studio™ Computer. The region code is incompatible with the DVD-ROM drive in the tray with an appropriate cleaner. You may also need to clean the disc...
... drive tray does not open. ❑ Use the eject button 1 Make sure the computer is turned on. 2 Press the Eject button on the drive. ❑ Use the My Computer icon 1 Click the My Computer icon on the Windows® desktop. 2 Right-click the CD-ROM icon. 3 Select the Eject option from the pop... the DVD-ROM you are trying to play a DVD-ROM. ❑ If a region code warning appears when you place the disc in your VAIO Digital Studio™ Computer. The region code is incompatible with the DVD-ROM drive in the tray with an appropriate cleaner. You may also need to clean the disc...
User Guide
Page 38
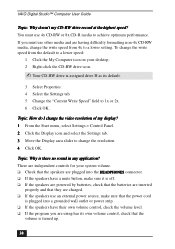
VAIO Digital Studio™ Computer User Guide Topic: Why doesn't my CD-RW drive record at the highest speed? ...formatting non-4x CD-RW media, change the write speed from the default to a lower speed: 1 Click the My Computer icon on your system volume. ❑ Check that the speakers are plugged into the HEADPHONES connector. ❑ If the... the Settings tab. 5 Change the "Current Write Speed" field to achieve optimum performance. If you are independent controls for your desktop. 2 Right-click the CD-RW drive icon. ✍ Your CD-RW drive is assigned drive H as its own volume ...
VAIO Digital Studio™ Computer User Guide Topic: Why doesn't my CD-RW drive record at the highest speed? ...formatting non-4x CD-RW media, change the write speed from the default to a lower speed: 1 Click the My Computer icon on your system volume. ❑ Check that the speakers are plugged into the HEADPHONES connector. ❑ If the... the Settings tab. 5 Change the "Current Write Speed" field to achieve optimum performance. If you are independent controls for your desktop. 2 Right-click the CD-RW drive icon. ✍ Your CD-RW drive is assigned drive H as its own volume ...


