Operating Instructions
Page 4
... and settings on image data compatibility This camera conforms with Mavica discs*. • While the image is indicated as recording media. Unauthorized recording of the movable lens This camera uses a movable lens. This digital still camera uses 8 cm CD-Rs/ CD-RWs as "disc" in the manufacturing ...process and do not shake or strike the camera. ∗ The Mavica disc is not made due to ...
... and settings on image data compatibility This camera conforms with Mavica discs*. • While the image is indicated as recording media. Unauthorized recording of the movable lens This camera uses a movable lens. This digital still camera uses 8 cm CD-Rs/ CD-RWs as "disc" in the manufacturing ...process and do not shake or strike the camera. ∗ The Mavica disc is not made due to ...
Operating Instructions
Page 5
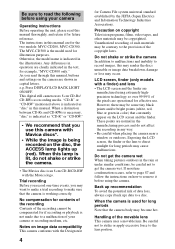
... image size (RESIZE 80 Selecting still images to print (PRINT 81 Formatting a CD-RW 82 Changing the setup settings (SET UP 84 Additional information Precautions 87 On discs 89 Using your camera abroad 90 About "InfoLITHIUM" battery pack 91 Troubleshooting 93 Warning and notice messages ... Recording text documents (TEXT) ...61 Recording still images as uncompressed files (TIFF 62 Recording three images with the exposure shifted (only for MVCCD300) (EXP BRKTG 63 Creating Clip Motion Files 64 Setting the distance to the subject .....66 Recording images in order (SLIDE 74 Rotating a...
... image size (RESIZE 80 Selecting still images to print (PRINT 81 Formatting a CD-RW 82 Changing the setup settings (SET UP 84 Additional information Precautions 87 On discs 89 Using your camera abroad 90 About "InfoLITHIUM" battery pack 91 Troubleshooting 93 Warning and notice messages ... Recording text documents (TEXT) ...61 Recording still images as uncompressed files (TIFF 62 Recording three images with the exposure shifted (only for MVCCD300) (EXP BRKTG 63 Creating Clip Motion Files 64 Setting the distance to the subject .....66 Recording images in order (SLIDE 74 Rotating a...

Operating Instructions
Page 6
... space is fully available. 6 View through a CD-R/CD-RW drive (page 41) View through a CD-ROM drive (page 37) Disc preparation for recording is complete. Recording is complete Record Finalize [About 1 min] (page 32) About 13 MB disc space is used View on the camera (page 28) View on your computer using... a CD-ROM drive to view images on a computer (page 35) View through the USB cable (page 38) The disc status is complete...
... space is fully available. 6 View through a CD-R/CD-RW drive (page 41) View through a CD-ROM drive (page 37) Disc preparation for recording is complete. Recording is complete Record Finalize [About 1 min] (page 32) About 13 MB disc space is used View on the camera (page 28) View on your computer using... a CD-ROM drive to view images on a computer (page 35) View through the USB cable (page 38) The disc status is complete...
Operating Instructions
Page 16
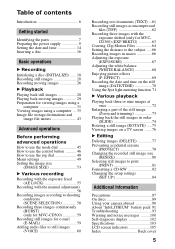
Pickup lens Push here Disc 3 Close the disc cover. 16 Inserting a disc You can use only the 8 cm CD-Rs or 8 cm CD-RWs that have these marks. 1 2 Disc cover OPEN lever Lock tab 1 While sliding the lock tab to the left, slide down the center of the disc until it clicks. Push down the disc cover OPEN lever. Open the disc cover by your hand after the cover is unlocked. 2 Place a disc with too much force and do not push with the printed side up. When installing, do not touch the pickup lens.
Pickup lens Push here Disc 3 Close the disc cover. 16 Inserting a disc You can use only the 8 cm CD-Rs or 8 cm CD-RWs that have these marks. 1 2 Disc cover OPEN lever Lock tab 1 While sliding the lock tab to the left, slide down the center of the disc until it clicks. Push down the disc cover OPEN lever. Open the disc cover by your hand after the cover is unlocked. 2 Place a disc with too much force and do not push with the printed side up. When installing, do not touch the pickup lens.
Operating Instructions
Page 19
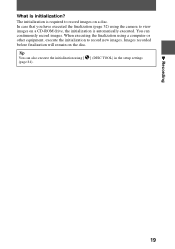
In case that you have executed the finalization (page 32) using the camera to view images on a disc. When executing the finalization using [ (page 84). ] (DISC TOOL) in the setup settings B Recording 19 Tip You can continuously record images. What is automatically executed. The initialization is required to record new images. Images recorded before finalization will remain on the disc. You can also execute the initialization using a computer or other equipment, execute the initialization to record images on a CD-ROM drive, the initialization is initialization?
In case that you have executed the finalization (page 32) using the camera to view images on a disc. When executing the finalization using [ (page 84). ] (DISC TOOL) in the setup settings B Recording 19 Tip You can continuously record images. What is automatically executed. The initialization is required to record new images. Images recorded before finalization will remain on the disc. You can also execute the initialization using a computer or other equipment, execute the initialization to record images on a CD-ROM drive, the initialization is initialization?
Operating Instructions
Page 21
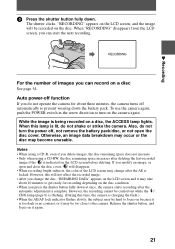
... depending on a disc See page 54. However, the recording cannot be carried out while the / CHG lamp (page 8) is flashing. (During this time, the camera is charging the flash.) • When the AE/AF lock indicator flashes slowly, the subject may be hard to focus on because it is too... if you change after deleting the last-recorded image if the is being recorded on it may become unusable. Notes • When using a CD-RW, the disc remaining space increases after the AE is complete. Release the shutter button, and focus on a disc, the ACCESS lamp lights. When "RECORDING...
... depending on a disc See page 54. However, the recording cannot be carried out while the / CHG lamp (page 8) is flashing. (During this time, the camera is charging the flash.) • When the AE/AF lock indicator flashes slowly, the subject may be hard to focus on because it is too... if you change after deleting the last-recorded image if the is being recorded on it may become unusable. Notes • When using a CD-RW, the disc remaining space increases after the AE is complete. Release the shutter button, and focus on a disc, the ACCESS lamp lights. When "RECORDING...

Operating Instructions
Page 31
... tab and the disc will slip into place. Preparation for viewing images using a computer Using the supplied 8 cm CD adaptor When your disc drive does not conform to 8 cm CD, use the supplied 8 cm CD adaptor. 1 Slide the disc into the inner groove and under two of the tabs on this side and... the other side is recordable side.) 2 Printed side of the adaptor (SONY is printed on the inner circle of the disc...
... tab and the disc will slip into place. Preparation for viewing images using a computer Using the supplied 8 cm CD adaptor When your disc drive does not conform to 8 cm CD, use the supplied 8 cm CD adaptor. 1 Slide the disc into the inner groove and under two of the tabs on this side and... the other side is recordable side.) 2 Printed side of the adaptor (SONY is printed on the inner circle of the disc...
Operating Instructions
Page 32
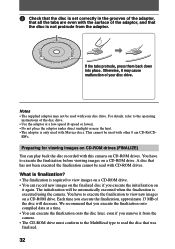
... automatically executed when the finalization is required to view new images on a CD-ROM drive. A disc that was finalized. 32 You have to read with CD-ROM drives. Otherwise, it may not be used with this camera on it from the adaptor. RWs. Each time you execute the initialization ... direct sunlight or near the heat. • The adaptor is not protrude from the camera. • The CD-ROM drive must conform to the MultiRead type to execute the finalization before viewing images on a CD-ROM drive. This cannot be used with your disc drive. If the tabs protrude, ...
... automatically executed when the finalization is required to view new images on a CD-ROM drive. A disc that was finalized. 32 You have to read with CD-ROM drives. Otherwise, it may not be used with this camera on it from the adaptor. RWs. Each time you execute the initialization ... direct sunlight or near the heat. • The adaptor is not protrude from the camera. • The CD-ROM drive must conform to the MultiRead type to execute the finalization before viewing images on a CD-ROM drive. This cannot be used with your disc drive. If the tabs protrude, ...
Operating Instructions
Page 34
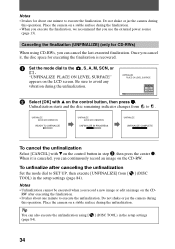
...recovered. 1 Set the mode dial to execute the finalization. Be sure to SET UP, then execute [UNFINALIZE] from to execute the unfinalization. Place the camera on the CD-RW. O K CANCEL OK 2 Select [OK] with V on the control button in the setup settings (page 84). ] (DISC Notes •...the finalization. • It takes about one minute to . Tip You can also execute the unfinalization using CD-RWs, you can cancel the last-executed finalization. Place the camera on the LCD screen. "UNFINALIZE PLACE ON LEVEL SURFACE" appears on a stable surface during this operation. Do...
...recovered. 1 Set the mode dial to execute the finalization. Be sure to SET UP, then execute [UNFINALIZE] from to execute the unfinalization. Place the camera on the CD-RW. O K CANCEL OK 2 Select [OK] with V on the control button in the setup settings (page 84). ] (DISC Notes •...the finalization. • It takes about one minute to . Tip You can also execute the unfinalization using CD-RWs, you can cancel the last-executed finalization. Place the camera on the LCD screen. "UNFINALIZE PLACE ON LEVEL SURFACE" appears on a stable surface during this operation. Do...
Operating Instructions
Page 35
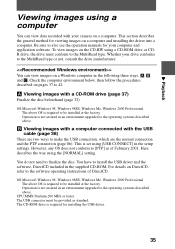
...There are the normal connection and the PTP connection (page 86). Operation is required for viewing images on a computer. For details on the CD-RW using the [NORMAL] setting. B Playback Viewing images using [USB CONNECT] in the setup settings. Check the computer environment below, then...using a computer You can view images on pages 37 to the software operating instructions of February 2001. You can view data recorded with your camera on a computer and installing the driver into a computer. This is not assured in the following three ways, A, B, and C. You...
...There are the normal connection and the PTP connection (page 86). Operation is required for viewing images on a computer. For details on the CD-RW using the [NORMAL] setting. B Playback Viewing images using [USB CONNECT] in the setup settings. Check the computer environment below, then...using a computer You can view images on pages 37 to the software operating instructions of February 2001. You can view data recorded with your camera on a computer and installing the driver into a computer. This is not assured in the following three ways, A, B, and C. You...
Operating Instructions
Page 36
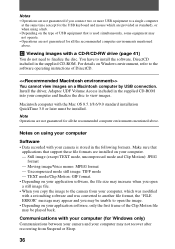
...and was converted to another file format, the "FILE ERROR" message may appear and you copy the image to the camera from Suspend or Sleep. 36 Macintosh computer with a CD-R/CD-RW drive (page 41) You do not need to finalize the disc. Notes • Operations are not guaranteed if... (except for the USB keyboard and mouse which are provided as standard), or when using your computer Software • Data recorded with your camera is used simultaneously, some equipment may not recover after recovering from your computer, which was modified with your computer (for Windows only) Communications...
...and was converted to another file format, the "FILE ERROR" message may appear and you copy the image to the camera from Suspend or Sleep. 36 Macintosh computer with a CD-R/CD-RW drive (page 41) You do not need to finalize the disc. Notes • Operations are not guaranteed if... (except for the USB keyboard and mouse which are provided as standard), or when using your computer Software • Data recorded with your camera is used simultaneously, some equipment may not recover after recovering from your computer, which was modified with your computer (for Windows only) Communications...

Operating Instructions
Page 37
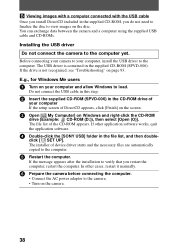
... break off. 37 E.g., for Windows Me users 1 Start up your computer and insert the disc into your computer. A Viewing images with a CD-ROM drive Finalize the disc beforehand (page 32). Furthermore, "™" and "®" are either registered trademarks or trademarks of Apple Computer, Inc....8727; Copying a file to the hard disk of your computer. 2 Open [ My Computer] and double click the drive recognizing the disc (Example:[ CD-ROM (D:)]). 3 Double-click the desired data file. Viewing images on a Windows computer When playing back moving images, Real Player or Windows Media Player...
... break off. 37 E.g., for Windows Me users 1 Start up your computer and insert the disc into your computer. A Viewing images with a CD-ROM drive Finalize the disc beforehand (page 32). Furthermore, "™" and "®" are either registered trademarks or trademarks of Apple Computer, Inc....8727; Copying a file to the hard disk of your computer. 2 Open [ My Computer] and double click the drive recognizing the disc (Example:[ CD-ROM (D:)]). 3 Double-click the desired data file. Viewing images on a Windows computer When playing back moving images, Real Player or Windows Media Player...
Operating Instructions
Page 38
...-006). In other application software works, quit the application software. 4 Double-click the [SONY USB] folder in the CD-ROM drive of DirectCD appears, click [Finish] on the screen. 3 Open [ My Computer] on the camera. 38 click [ SET UP]. E.g., for Windows Me users 1 Turn on your computer If...of your computer and allow Windows to the camera. • Turn on Windows and right-click the CD-ROM drive (Example: CD-ROM (D:)), then select [Open (O)]. You can exchange data between the camera and a computer using the supplied USB cable and CD-ROMs. Installing the USB driver Do not ...
...-006). In other application software works, quit the application software. 4 Double-click the [SONY USB] folder in the CD-ROM drive of DirectCD appears, click [Finish] on the screen. 3 Open [ My Computer] on the camera. 38 click [ SET UP]. E.g., for Windows Me users 1 Turn on your computer If...of your computer and allow Windows to the camera. • Turn on Windows and right-click the CD-ROM drive (Example: CD-ROM (D:)), then select [Open (O)]. You can exchange data between the camera and a computer using the supplied USB cable and CD-ROMs. Installing the USB driver Do not ...
Operating Instructions
Page 39
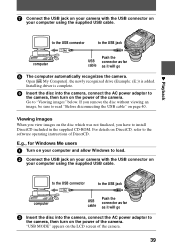
...USB connector as far cable as it will go 8 The computer automatically recognizes the camera. For details on the disc which was not finalized, you remove the disc without viewing an image, be ...sure to the camera, then turn on page 40. "USB MODE" appears on your computer using the supplied USB cable....Windows Me users 1 Turn on your computer and allow Windows to install DirectCD included in the supplied CD-ROM. Go to the USB jack computer USB cable Push the connector as far as it will go 3 Insert...
...USB connector as far cable as it will go 8 The computer automatically recognizes the camera. For details on the disc which was not finalized, you remove the disc without viewing an image, be ...sure to the camera, then turn on page 40. "USB MODE" appears on your computer using the supplied USB cable....Windows Me users 1 Turn on your computer and allow Windows to install DirectCD included in the supplied CD-ROM. Go to the USB jack computer USB cable Push the connector as far as it will go 3 Insert...

Operating Instructions
Page 40
...instructions of DirectCD. Copying a file in a computer to read "Before disconnecting the USB cable" on page 40. To view the image using this camera, the file name format must carry out the operation for removing the disc described on page 93. 5 Select and double-click the desired image/...drive or folder. 4 Open [ My Computer] on Windows and double-click the newly recognized drive. (Example: [ CD Mavica (E:)]) The folders inside the disc are displayed, and the disc cover of the camera will be as follows, "DSC0ssss.JPG". Copying a file in the disc may break off. For details, see "...
...instructions of DirectCD. Copying a file in a computer to read "Before disconnecting the USB cable" on page 40. To view the image using this camera, the file name format must carry out the operation for removing the disc described on page 93. 5 Select and double-click the desired image/...drive or folder. 4 Open [ My Computer] on Windows and double-click the newly recognized drive. (Example: [ CD Mavica (E:)]) The folders inside the disc are displayed, and the disc cover of the camera will be as follows, "DSC0ssss.JPG". Copying a file in the disc may break off. For details, see "...
Operating Instructions
Page 41
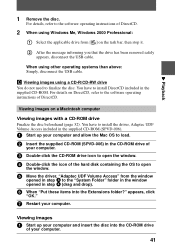
..., Windows 2000 Professional: 1 Select the applicable drive from the window opened in step 3 to install the driver, Adaptec UDF Volume Access included in the supplied CD-ROM (SPVD-006). 1 Start up your computer. You have to the "System Folder" folder in the window opened in the supplied..., disconnect the USB cable. You have to install DirectCD included in step 4 (drag and drop). 6 When "Put these items into the CD-ROM drive of your computer. 3 Double-click the CD-ROM drive icon to open the window. 4 Double-click the icon of the hard disk containing the OS to open the...
..., Windows 2000 Professional: 1 Select the applicable drive from the window opened in step 3 to install the driver, Adaptec UDF Volume Access included in the supplied CD-ROM (SPVD-006). 1 Start up your computer. You have to the "System Folder" folder in the window opened in the supplied..., disconnect the USB cable. You have to install DirectCD included in step 4 (drag and drop). 6 When "Put these items into the CD-ROM drive of your computer. 3 Double-click the CD-ROM drive icon to open the window. 4 Double-click the icon of the hard disk containing the OS to open the...
Operating Instructions
Page 78
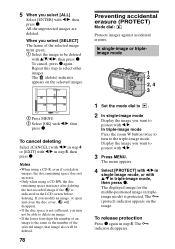
... W button twice to turn to select other images. Display the image you want to delete an image. • If the lower four-digit file number of an image is protected. The displayed image (or the middle-positioned image in step 4. The (protect) indicator appears on ... 4 or [EXIT] with b/B. 3 Press MENU. Preventing accidental erasure (PROTECT) Mode dial: Protects images against accidental erasure. Notes • When using a CD-RW, the disc remaining space increases after deleting the last-recorded image if the is not sufficient, you delete images, the disc remaining space does...
... W button twice to turn to select other images. Display the image you want to delete an image. • If the lower four-digit file number of an image is protected. The displayed image (or the middle-positioned image in step 4. The (protect) indicator appears on ... 4 or [EXIT] with b/B. 3 Press MENU. Preventing accidental erasure (PROTECT) Mode dial: Protects images against accidental erasure. Notes • When using a CD-RW, the disc remaining space increases after deleting the last-recorded image if the is not sufficient, you delete images, the disc remaining space does...
Operating Instructions
Page 82
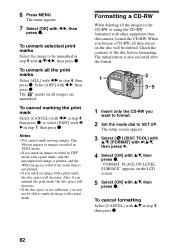
... mark, only the uncompressed image is printed, and the JPEG image recorded at the same time is also executed after the format. 1 2 3-5 1 Insert only the CD-RW you mark an image with a print mark, the disc space will decrease. When you may not be able to be deleted. The marks on... Select [ALL] with b/B, then press z. 6 Press MENU. The menu appears. 7 Select [OK] with b/B in step 4, then press z, or select [EXIT] with other equipment than this camera, format the CD-RW. To unmark all images are unmarked. Check the contents of the disc before formatting.
... mark, only the uncompressed image is printed, and the JPEG image recorded at the same time is also executed after the format. 1 2 3-5 1 Insert only the CD-RW you mark an image with a print mark, the disc space will decrease. When you may not be able to be deleted. The marks on... Select [ALL] with b/B, then press z. 6 Press MENU. The menu appears. 7 Select [OK] with b/B in step 4, then press z, or select [EXIT] with other equipment than this camera, format the CD-RW. To unmark all images are unmarked. Check the contents of the disc before formatting.
Operating Instructions
Page 83
Format the disc again with this camera. • It takes about seven minutes to execute the format. • About 300 times formatting can be used with this camera cannot be available on a CD-RW. • Once you format, be sure to use a fully charged battery pack or the AC power adaptor as the power source. • CD-Rs cannot be formatted. • The disc which is formatted using other equipment than this camera. Notes • When you format the CD-RW, protected images are also deleted. 83 B Editing
Format the disc again with this camera. • It takes about seven minutes to execute the format. • About 300 times formatting can be used with this camera cannot be available on a CD-RW. • Once you format, be sure to use a fully charged battery pack or the AC power adaptor as the power source. • CD-Rs cannot be formatted. • The disc which is formatted using other equipment than this camera. Notes • When you format the CD-RW, protected images are also deleted. 83 B Editing
Operating Instructions
Page 84
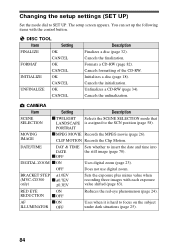
Cancels the initialization. Unfinalizes a CD-RW (page 34). OFF Does not use digital zoom. CAMERA Item Setting Description SCENE SELECTION xTWILIGHT Selects the...CANCEL INITIALIZE OK CANCEL UNFINALIZE OK CANCEL Description Finalizes a disc (page 32). Cancels formatting of the CD-RW. Cancels the unfinalization. Changing the setup settings (SET UP) Set the mode dial to ...CLIP MOTION Records the Clip Motion. DATE/TIME DAY & TIME Sets whether to SET UP. xOFF DIGITAL ZOOM xON Uses digital zoom (page 23). BRACKET STEP ±1.0EV (MVC-CD300 x±0.7EV only) ±0.3EV...
Cancels the initialization. Unfinalizes a CD-RW (page 34). OFF Does not use digital zoom. CAMERA Item Setting Description SCENE SELECTION xTWILIGHT Selects the...CANCEL INITIALIZE OK CANCEL UNFINALIZE OK CANCEL Description Finalizes a disc (page 32). Cancels formatting of the CD-RW. Cancels the unfinalization. Changing the setup settings (SET UP) Set the mode dial to ...CLIP MOTION Records the Clip Motion. DATE/TIME DAY & TIME Sets whether to SET UP. xOFF DIGITAL ZOOM xON Uses digital zoom (page 23). BRACKET STEP ±1.0EV (MVC-CD300 x±0.7EV only) ±0.3EV...


