Operating Instructions (primary manual)
Page 2
... patent number 1,037,877. Additionally licensed under license from that any changes or modification not expressly approved in this manual could void your authority to radio communications. To avoid electrical shock, do not expose the unit to comply with the limits for energy efficiency. (MHC-M500AV/M300AV only) This stereo system is a U.S. Refer servicing to Part 15 of Dolby Laboratories...
... patent number 1,037,877. Additionally licensed under license from that any changes or modification not expressly approved in this manual could void your authority to radio communications. To avoid electrical shock, do not expose the unit to comply with the limits for energy efficiency. (MHC-M500AV/M300AV only) This stereo system is a U.S. Refer servicing to Part 15 of Dolby Laboratories...
Operating Instructions (primary manual)
Page 3
... Timer-recording radio programs 43 Optional Components Connecting audio components 44 Connecting a DVD player 45 Connecting a VCR 47 Connecting external antennas 47 Additional Information Precautions 48 Troubleshooting 49 Specifications 52 Index 55 * MHC-M500AV/M300AV only ** MHC-M500AV only 3 Preset Tuning 17 Recording from the radio 19 Playing a tape 20 The CD Player Using the CD display 22 Playing the CD tracks repeatedly - Sleep Timer .. 41 Waking up the speakers 7 Step 3: Setting the time 9 Step 4: Presetting radio stations 10 Saving the power in...
... Timer-recording radio programs 43 Optional Components Connecting audio components 44 Connecting a DVD player 45 Connecting a VCR 47 Connecting external antennas 47 Additional Information Precautions 48 Troubleshooting 49 Specifications 52 Index 55 * MHC-M500AV/M300AV only ** MHC-M500AV only 3 Preset Tuning 17 Recording from the radio 19 Playing a tape 20 The CD Player Using the CD display 22 Playing the CD tracks repeatedly - Sleep Timer .. 41 Waking up the speakers 7 Step 3: Setting the time 9 Step 4: Presetting radio stations 10 Saving the power in...

Operating Instructions (primary manual)
Page 6
... reinforce the bass sound by connecting an optional super woofer to avoid possible damage from the plug (for models equipped with new ones. 6 To deactivate the demonstration When you press ?/1 (power), the system turns on and the demonstration automatically ends. Inserting two size AA (R6) batteries into the remote For MHC-M500AV/M300AV For MHC-M100 e E E e e EE e Tip With normal use the remote for...
... reinforce the bass sound by connecting an optional super woofer to avoid possible damage from the plug (for models equipped with new ones. 6 To deactivate the demonstration When you press ?/1 (power), the system turns on and the demonstration automatically ends. Inserting two size AA (R6) batteries into the remote For MHC-M500AV/M300AV For MHC-M100 e E E e e EE e Tip With normal use the remote for...
Operating Instructions (primary manual)
Page 7
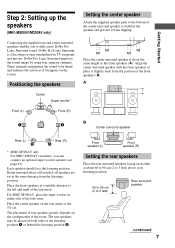
... all speakers are set . The rear speakers may be heard and enhance the action as the front speakers (A). Dolby Pro Logic Surround is a decoding system standardized in TV programs and movies. Dolby Pro Logic Surround improves the sound image by using four separate channels. Getting Started Step 2: Setting up the speakers (MHC-M500AV/M300AV only) Connecting the supplied rear and center surround speakers enables you can connect an optional super woofer speaker (see page 45). Place the center surround speaker...
... all speakers are set . The rear speakers may be heard and enhance the action as the front speakers (A). Dolby Pro Logic Surround is a decoding system standardized in TV programs and movies. Dolby Pro Logic Surround improves the sound image by using four separate channels. Getting Started Step 2: Setting up the speakers (MHC-M500AV/M300AV only) Connecting the supplied rear and center surround speakers enables you can connect an optional super woofer speaker (see page 45). Place the center surround speaker...

Operating Instructions (primary manual)
Page 8
... the remote to adjust the volume. Step 2: Setting up the speakers (continued) Adjusting the speaker volume To enjoy Dolby Pro Logic Surround sound, turn the Dolby Pro Logic mode on, then adjust the volume of the test tone. H hH hH 2,4 PRO LOGIC ON/OFF 3 Tip If you are done adjusting. "PRO LOGIC ON" appears. 8 Front (left) t Center t Front (right) R Rear T 3 From your listening position, press CENTER LEVEL (+/-) and REAR LEVEL (+/-) on the remote). The test tone turns off. on the remote. Adjust the volume of each speaker...
... the remote to adjust the volume. Step 2: Setting up the speakers (continued) Adjusting the speaker volume To enjoy Dolby Pro Logic Surround sound, turn the Dolby Pro Logic mode on, then adjust the volume of the test tone. H hH hH 2,4 PRO LOGIC ON/OFF 3 Tip If you are done adjusting. "PRO LOGIC ON" appears. 8 Front (left) t Center t Front (right) R Rear T 3 From your listening position, press CENTER LEVEL (+/-) and REAR LEVEL (+/-) on the remote). The test tone turns off. on the remote. Adjust the volume of each speaker...
Operating Instructions (primary manual)
Page 9
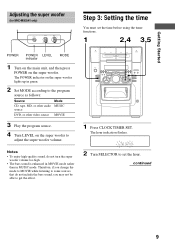
... audio MUSIC source DVD, or other video source MOVIE 3 Play the program source. 4 Turn LEVEL on the super woofer. Therefore, if you may not be able to adjust the super woofer volume. Getting Started Adjusting the super woofer (for MHC-M500AV only) POWER LEVEL MODE MOVIE MUSIC MIN MAX Step 3: Setting the time You must set the hour. The hour indication flashes. continued 9 ALL 1 DISC S TUNED DBFB PROGRAM MANUAL SHUFFLE AUTO SUR NEXT REPEAT 1 PRESET DELETE CD TEXT PLUS ONE FILE HI-LIGHT...
... audio MUSIC source DVD, or other video source MOVIE 3 Play the program source. 4 Turn LEVEL on the super woofer. Therefore, if you may not be able to adjust the super woofer volume. Getting Started Adjusting the super woofer (for MHC-M500AV only) POWER LEVEL MODE MOVIE MUSIC MIN MAX Step 3: Setting the time You must set the hour. The hour indication flashes. continued 9 ALL 1 DISC S TUNED DBFB PROGRAM MANUAL SHUFFLE AUTO SUR NEXT REPEAT 1 PRESET DELETE CD TEXT PLUS ONE FILE HI-LIGHT...
Operating Instructions (primary manual)
Page 10
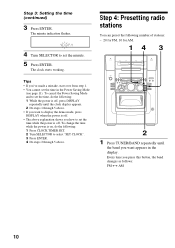
... starts working. ALL 1 DISC S TUNED DBFB PROGRAM MANUAL SHUFFLE AUTO SUR NEXT REPEAT 1 PRESET DELETE CD TEXT PLUS ONE FILE HI-LIGHT TEXT DISC GROUP SYNC TRACK ART MONO STEP STEREO kHz 1 2 REC SLEEP MHz VOLUME DOLBY NR RELAY GROUP FILE 1 2 3 4 5 4 Turn SELECTOR to set the time while the power is off. • The above . Step 4: Presetting radio stations You can preset the following : 1 Press CLOCK TIMER SET. 2 Turn SELECTOR to display the demo mode, press DISPLAY...
... starts working. ALL 1 DISC S TUNED DBFB PROGRAM MANUAL SHUFFLE AUTO SUR NEXT REPEAT 1 PRESET DELETE CD TEXT PLUS ONE FILE HI-LIGHT TEXT DISC GROUP SYNC TRACK ART MONO STEP STEREO kHz 1 2 REC SLEEP MHz VOLUME DOLBY NR RELAY GROUP FILE 1 2 3 4 5 4 Turn SELECTOR to set the time while the power is off. • The above . Step 4: Presetting radio stations You can preset the following : 1 Press CLOCK TIMER SET. 2 Turn SELECTOR to display the demo mode, press DISPLAY...

Operating Instructions (primary manual)
Page 11
... 1 DISC S TUNED DBFB PROGRAM MANUAL SHUFFLE AUTO SUR NEXT REPEAT 1 PRESET DELETE CD TEXT PLUS ONE FILE HI-LIGHT TEXT DISC GROUP SYNC TRACK ART MONO STEP STEREO kHz 1 2 REC SLEEP MHz VOLUME DOLBY NR RELAY GROUP FILE 1 2 3 4 5 2 Turn SELECTOR to select the preset number you disconnect the power cord or if a power failure occurs. 11 When you erase a preset number, the preset number decreases by one are retained for a stereo program) appear. Tip The preset stations...
... 1 DISC S TUNED DBFB PROGRAM MANUAL SHUFFLE AUTO SUR NEXT REPEAT 1 PRESET DELETE CD TEXT PLUS ONE FILE HI-LIGHT TEXT DISC GROUP SYNC TRACK ART MONO STEP STEREO kHz 1 2 REC SLEEP MHz VOLUME DOLBY NR RELAY GROUP FILE 1 2 3 4 5 2 Turn SELECTOR to select the preset number you disconnect the power cord or if a power failure occurs. 11 When you erase a preset number, the preset number decreases by one are retained for a stereo program) appear. Tip The preset stations...

Operating Instructions (primary manual)
Page 17
..., press TAPE B h to start from the front side. Recording starts. ALL 1 DISC S TUNED DBFB PROGRAM MANUAL SHUFFLE AUTO SUR NEXT REPEAT 1 PRESET DELETE CD TEXT PLUS ONE FILE HI-LIGHT TEXT DISC GROUP SYNC TRACK ART MONO STEP STEREO kHz 1 2 REC SLEEP MHz VOLUME DOLBY NR RELAY GROUP FILE 1 2 3 4 5 Disc number or Disc Memo 3 Press CD SYNCHRO. Basic Operations 2 Turn SELECTOR until the disc number or Disc Memo (see "Step 4: Presetting radio stations" on...
..., press TAPE B h to start from the front side. Recording starts. ALL 1 DISC S TUNED DBFB PROGRAM MANUAL SHUFFLE AUTO SUR NEXT REPEAT 1 PRESET DELETE CD TEXT PLUS ONE FILE HI-LIGHT TEXT DISC GROUP SYNC TRACK ART MONO STEP STEREO kHz 1 2 REC SLEEP MHz VOLUME DOLBY NR RELAY GROUP FILE 1 2 3 4 5 Disc number or Disc Memo 3 Press CD SYNCHRO. Basic Operations 2 Turn SELECTOR until the disc number or Disc Memo (see "Step 4: Presetting radio stations" on...
Operating Instructions (primary manual)
Page 18
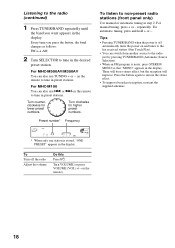
... TUNER/BAND when the power is off the radio Adjust the volume Do this Press ?/1. For MHC-M500AV/M300AV You can switch from another source to the last received station (One Touch Play). • You can also use . on and tunes to the radio just by pressing TUNER/BAND (Automatic Source Selection). • When an FM program is stored, "ONE PRESET" appears in preset stations. Turn counterclockwise for higher preset numbers. or > on the remote). Every time...
... TUNER/BAND when the power is off the radio Adjust the volume Do this Press ?/1. For MHC-M500AV/M300AV You can switch from another source to the last received station (One Touch Play). • You can also use . on and tunes to the radio just by pressing TUNER/BAND (Automatic Source Selection). • When an FM program is stored, "ONE PRESET" appears in preset stations. Turn counterclockwise for higher preset numbers. or > on the remote). Every time...

Operating Instructions (primary manual)
Page 19
... on a tape by for recording. 5 Press DIRECTION repeatedly to select "g" to record on both sides, be sure to start from the radio, move the respective antenna to reduce the noise. 19 Preset number Frequency ALL 1 DISC S TUNED DBFB PROGRAM MANUAL SHUFFLE AUTO SUR NEXT REPEAT 1 PRESET DELETE CD TEXT PLUS ONE FILE HI-LIGHT TEXT DISC GROUP SYNC TRACK ART MONO STEP STEREO kHz 1 2 REC SLEEP MHz VOLUME DOLBY NR...
... on a tape by for recording. 5 Press DIRECTION repeatedly to select "g" to record on both sides, be sure to start from the radio, move the respective antenna to reduce the noise. 19 Preset number Frequency ALL 1 DISC S TUNED DBFB PROGRAM MANUAL SHUFFLE AUTO SUR NEXT REPEAT 1 PRESET DELETE CD TEXT PLUS ONE FILE HI-LIGHT TEXT DISC GROUP SYNC TRACK ART MONO STEP STEREO kHz 1 2 REC SLEEP MHz VOLUME DOLBY NR...

Operating Instructions (primary manual)
Page 21
... the next TUNED MANUAL song AUTO PRESET DELETE CD TEXT PLUS ONE FILE HI-LIGHT 1 2 REC SLEEP TEXT DISC GROUP SYNC TRACK ART MONO STEP kHz MHz DOLBY NR RELAY GROUP FILE 1 2 3 4 5 21 Press the opposite direction to go to the tape just by pressing TAPE A (or TAPE B) h H (Automatic Source Selection). Press again to resume play Pause Fast-forward Rewind Remove the tape Adjust the volume Do this...
... the next TUNED MANUAL song AUTO PRESET DELETE CD TEXT PLUS ONE FILE HI-LIGHT 1 2 REC SLEEP TEXT DISC GROUP SYNC TRACK ART MONO STEP kHz MHz DOLBY NR RELAY GROUP FILE 1 2 3 4 5 21 Press the opposite direction to go to the tape just by pressing TAPE A (or TAPE B) h H (Automatic Source Selection). Press again to resume play Pause Fast-forward Rewind Remove the tape Adjust the volume Do this...
Operating Instructions (primary manual)
Page 40
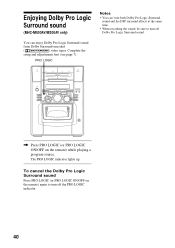
... Surround sound Press PRO LOGIC (or PRO LOGIC ON/OFF on the remote) while playing a program source. Enjoying Dolby Pro Logic Surround sound (MHC-M500AV/M300AV only) You can 't use both Dolby Pro Logic Surround sound and the DSP surround effects at the same time. • When recording the sound, be sure to turn off Dolby Pro Logic Surround sound. , Press PRO LOGIC (or PRO LOGIC ON/OFF on the remote) again to turn off the PRO LOGIC indicator. 40 Complete the setup and adjustments...
... Surround sound Press PRO LOGIC (or PRO LOGIC ON/OFF on the remote) while playing a program source. Enjoying Dolby Pro Logic Surround sound (MHC-M500AV/M300AV only) You can 't use both Dolby Pro Logic Surround sound and the DSP surround effects at the same time. • When recording the sound, be sure to turn off Dolby Pro Logic Surround sound. , Press PRO LOGIC (or PRO LOGIC ON/OFF on the remote) again to turn off the PRO LOGIC indicator. 40 Complete the setup and adjustments...
Operating Instructions (primary manual)
Page 41
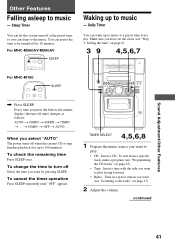
... a program (see "Programming the CD tracks" on page 25). • Tape: Insert a tape with the side you want to play facing forward. • Radio: Tune in a preset station you want (see "Listening to turn off by pressing SLEEP. continued 41 For MHC-M500AV/M300AV SLEEP H For MHC-M100 SLEEP Waking up to music - Every time you press the button, the minute display (the turn-off Select the time you select "AUTO" The power turns...
... a program (see "Programming the CD tracks" on page 25). • Tape: Insert a tape with the side you want to play facing forward. • Radio: Tune in a preset station you want (see "Listening to turn off by pressing SLEEP. continued 41 For MHC-M500AV/M300AV SLEEP H For MHC-M100 SLEEP Waking up to music - Every time you press the button, the minute display (the turn-off Select the time you select "AUTO" The power turns...

Operating Instructions (primary manual)
Page 42
... the same time. 42 To change as follows: t TUNER y CD PLAY T t TAPE PLAY T 8 Press ENTER. ALL 1 DISC S TUNED DBFB PROGRAM MANUAL SHUFFLE AUTO SUR NEXT REPEAT 1 PRESET DELETE CD TEXT PLUS ONE FILE HI-LIGHT TEXT DISC GROUP SYNC TRACK ART MONO STEP STEREO kHz 1 2 REC SLEEP MHz VOLUME DOLBY NR RELAY GROUP FILE 1 2 3 4 5 Turn SELECTOR to select the respective mode (DAILY 1 or DAILY 2), then press ENTER. The indications change the setting, start...
... the same time. 42 To change as follows: t TUNER y CD PLAY T t TAPE PLAY T 8 Press ENTER. ALL 1 DISC S TUNED DBFB PROGRAM MANUAL SHUFFLE AUTO SUR NEXT REPEAT 1 PRESET DELETE CD TEXT PLUS ONE FILE HI-LIGHT TEXT DISC GROUP SYNC TRACK ART MONO STEP STEREO kHz 1 2 REC SLEEP MHz VOLUME DOLBY NR RELAY GROUP FILE 1 2 3 4 5 Turn SELECTOR to select the respective mode (DAILY 1 or DAILY 2), then press ENTER. The indications change the setting, start...

Operating Instructions (primary manual)
Page 43
... SELECT 3,4,5 1 Tune in the display. "ON" appears and the hour indication flashes in a preset radio station (see "Step 3: Setting the time" on page 17). 2 Press CLOCK TIMER SET. The minute indication starts flashing. ALL 1 DISC S TUNED DBFB PROGRAM MANUAL SHUFFLE AUTO SUR NEXT REPEAT 1 PRESET DELETE CD TEXT PLUS ONE FILE HI-LIGHT TEXT DISC GROUP SYNC TRACK ART MONO STEP STEREO kHz 1 2 REC SLEEP MHz VOLUME DOLBY NR RELAY GROUP FILE 1 2 3 4 5 Turn SELECTOR...
... SELECT 3,4,5 1 Tune in the display. "ON" appears and the hour indication flashes in a preset radio station (see "Step 3: Setting the time" on page 17). 2 Press CLOCK TIMER SET. The minute indication starts flashing. ALL 1 DISC S TUNED DBFB PROGRAM MANUAL SHUFFLE AUTO SUR NEXT REPEAT 1 PRESET DELETE CD TEXT PLUS ONE FILE HI-LIGHT TEXT DISC GROUP SYNC TRACK ART MONO STEP STEREO kHz 1 2 REC SLEEP MHz VOLUME DOLBY NR RELAY GROUP FILE 1 2 3 4 5 Turn SELECTOR...

Operating Instructions (primary manual)
Page 49
... instructions of the speaker cord will obstruct the speaker connections. The tape may get entangled in sound level - For details, refer to the instructions of the tape deck and become dirty; - Do not change the tape operations such as you connect the power cord even though you connect the power cord. Preset stations (see "Step 3: Setting the time" on page 9) - Before placing a cassette in the tape deck Take up to music" on page 41 and "Timer-recording radio programs...
... instructions of the speaker cord will obstruct the speaker connections. The tape may get entangled in sound level - For details, refer to the instructions of the tape deck and become dirty; - Do not change the tape operations such as you connect the power cord even though you connect the power cord. Preset stations (see "Step 3: Setting the time" on page 9) - Before placing a cassette in the tape deck Take up to music" on page 41 and "Timer-recording radio programs...
Operating Instructions (primary manual)
Page 50
... (MHC-M500AV/M300AV only). • The source being played back has limited sound effects. jacks are unbalanced. • Check the speaker connection and speaker placement. CD Player The CD will not play. • Close the front cover. • Check if the CD is not pointing in the display. • A power interruption occurred. The color irregularity on a TV screen persists. • Turn off the Dolby Pro Logic mode. The remote...
... (MHC-M500AV/M300AV only). • The source being played back has limited sound effects. jacks are unbalanced. • Check the speaker connection and speaker placement. CD Player The CD will not play. • Close the front cover. • Check if the CD is not pointing in the display. • A power interruption occurred. The color irregularity on a TV screen persists. • Turn off the Dolby Pro Logic mode. The remote...

Operating Instructions (primary manual)
Page 51
... record nor play or there is a decrease in the display). • Adjust the antenna. • The signal strength is too weak. Tuner There is severe hum or noise ("TUNED" or "STEREO" flashes in sound level. • The heads are dirty. All the settings you made, such as follows: 1 Unplug the power cord. 2 Plug the power cord back in the display, and the system enters standby mode automatically. • The tape was...
... record nor play or there is a decrease in the display). • Adjust the antenna. • The signal strength is too weak. Tuner There is severe hum or noise ("TUNED" or "STEREO" flashes in sound level. • The heads are dirty. All the settings you made, such as follows: 1 Unplug the power cord. 2 Plug the power cord back in the display, and the system enters standby mode automatically. • The tape was...

Operating Instructions (primary manual)
Page 55
... Power Saving Mode 11 Presetting radio stations 10 Preset tuning 17 Program Play 25 Protecting recordings 48 R Radio stations presetting 10 tuning in 17 Recording a CD 16 a radio program 19 timer recording 43 Repeat Play 23 Resetting the system 51 S Saving recordings 48 Selecting the audio emphasis 38 Setting the time 9 Shuffle Play 24 Sleep Timer 41 Sound adjustment 37 Speakers 4, 7, 45 Surround 39, 40 T, U, V, W, X, Y, Z Test tone 8 Timer falling asleep to music 41 timer recording 43 waking up to music 41 Troubleshooting...
... Power Saving Mode 11 Presetting radio stations 10 Preset tuning 17 Program Play 25 Protecting recordings 48 R Radio stations presetting 10 tuning in 17 Recording a CD 16 a radio program 19 timer recording 43 Repeat Play 23 Resetting the system 51 S Saving recordings 48 Selecting the audio emphasis 38 Setting the time 9 Shuffle Play 24 Sleep Timer 41 Sound adjustment 37 Speakers 4, 7, 45 Surround 39, 40 T, U, V, W, X, Y, Z Test tone 8 Timer falling asleep to music 41 timer recording 43 waking up to music 41 Troubleshooting...


