Limited Warranty (U.S. Only)
Page 1
4-557-172-04
4-557-172-04

Operating Instructions
Page 2
...Install in accordance with newspapers, tablecloths, curtains, etc. If the provided plug does not fit into your outlet, consult an electrician for replacement of the polarized or grounding-type plug. As the main plug is connected to naked flame sources (for customers in the USA Owner's Record The model and serial numbers...even if the unit itself has been turned off. Refer to avoid injury from tipover. 2GB A grounding type plug has two blades and a third grounding prong. Except for example, lighted candles). Notice for your Sony dealer regarding this apparatus near any ...
...Install in accordance with newspapers, tablecloths, curtains, etc. If the provided plug does not fit into your outlet, consult an electrician for replacement of the polarized or grounding-type plug. As the main plug is connected to naked flame sources (for customers in the USA Owner's Record The model and serial numbers...even if the unit itself has been turned off. Refer to avoid injury from tipover. 2GB A grounding type plug has two blades and a third grounding prong. Except for example, lighted candles). Notice for your Sony dealer regarding this apparatus near any ...
Operating Instructions
Page 3
... for a Class B digital device, pursuant to maintenance (servicing) instructions in countries applying EU directives. Other versions may be of time. 14) Refer all servicing to provide reasonable protection against harmful interference in the separate service or guarantee documents. These limits are cautioned that to radio communications. any way, such as power-supply cord This symbol is intended or plug is damaged, liquid...
... for a Class B digital device, pursuant to maintenance (servicing) instructions in countries applying EU directives. Other versions may be of time. 14) Refer all servicing to provide reasonable protection against harmful interference in the separate service or guarantee documents. These limits are cautioned that to radio communications. any way, such as power-supply cord This symbol is intended or plug is damaged, liquid...
Operating Instructions
Page 5
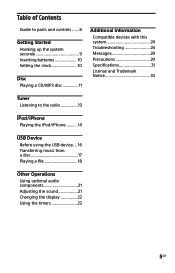
... 10 Disc Playing a CD/MP3 disc 11 Additional Information Compatible devices with this system 24 Troubleshooting 24 Messages 29 Precautions 29 Specifications 31 License and Trademark Notice 33 Tuner Listening to the radio 13 iPod/iPhone Playing the iPod/iPhone.......... 14 USB Device Before using the USB device.... 16 Transferring music from a disc 17 Playing a file 18 Other Operations Using optional audio components 21 Adjusting the sound 21 Changing the display 22 Using...
... 10 Disc Playing a CD/MP3 disc 11 Additional Information Compatible devices with this system 24 Troubleshooting 24 Messages 29 Precautions 29 Specifications 31 License and Trademark Notice 33 Tuner Listening to the radio 13 iPod/iPhone Playing the iPod/iPhone.......... 14 USB Device Before using the USB device.... 16 Transferring music from a disc 17 Playing a file 18 Other Operations Using optional audio components 21 Adjusting the sound 21 Changing the display 22 Using...
Operating Instructions
Page 7
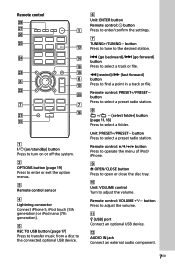
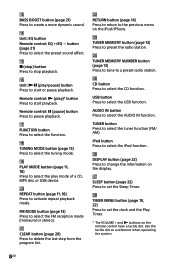
... select a preset radio station. Unit: PRESET+/PRESET button Press to select a folder. Remote control on/standby) button Press to turn on or off the system. OPTIONS button (page 19) Press to enter or exit the option menus. Remote control sensor Lightning connector Connect iPhone 5, iPod touch (5th generation) or iPod nano (7th generation). REC TO USB button (page 17) Press to transfer music from a disc to the connected...
... select a preset radio station. Unit: PRESET+/PRESET button Press to select a folder. Remote control on/standby) button Press to turn on or off the system. OPTIONS button (page 19) Press to enter or exit the option menus. Remote control sensor Lightning connector Connect iPhone 5, iPod touch (5th generation) or iPod nano (7th generation). REC TO USB button (page 17) Press to transfer music from a disc to the connected...
Operating Instructions
Page 8
... mode (monaural or stereo). CLEAR button (page 20) Press to delete the last step from the program list. RETURN button (page 14) Press to return to the previous menu on the iPod/iPhone. TUNER MEMORY button (page 13) Press to preset the radio station. TUNER MEMORY NUMBER button (page 13) Press to tune to a preset radio station. CD button Press to select the USB function. TUNER button Press to set...
... mode (monaural or stereo). CLEAR button (page 20) Press to delete the last step from the program list. RETURN button (page 14) Press to return to the previous menu on the iPod/iPhone. TUNER MEMORY button (page 13) Press to preset the radio station. TUNER MEMORY NUMBER button (page 13) Press to tune to a preset radio station. CD button Press to select the USB function. TUNER button Press to set...
Operating Instructions
Page 9
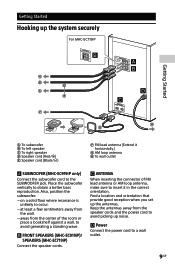
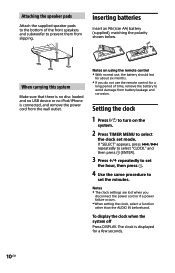
... the speaker cords and the power cord to avoid picking up noise. Power Connect the power cord to insert it horizontally.) AM loop antenna To wall outlet SUBWOOFER (MHC-EC919iP only) Connect the subwoofer cord to obtain a better bass reproduction. Getting Started Hooking up the system securely For MHC-EC719iP Getting Started To subwoofer To left speaker To right speaker Speaker cord (Red/) Speaker cord (Black...
... the speaker cords and the power cord to avoid picking up noise. Power Connect the power cord to insert it horizontally.) AM loop antenna To wall outlet SUBWOOFER (MHC-EC919iP only) Connect the subwoofer cord to obtain a better bass reproduction. Getting Started Hooking up the system securely For MHC-EC719iP Getting Started To subwoofer To left speaker To right speaker Speaker cord (Red/) Speaker cord (Black...
Operating Instructions
Page 10
... no iPod/iPhone is displayed for a long period of the front speakers and subwoofer to prevent them from the wall outlet. Setting the clock 1 Press to turn on using the remote control With normal use, the battery should last for about six months. If you disconnect the power cord or if a power failure occurs. When setting the clock, select a function...
... no iPod/iPhone is displayed for a long period of the front speakers and subwoofer to prevent them from the wall outlet. Setting the clock 1 Press to turn on using the remote control With normal use, the battery should last for about six months. If you disconnect the power cord or if a power failure occurs. When setting the clock, select a function...
Operating Instructions
Page 13
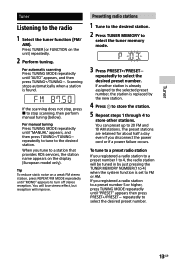
... TUNER (or FUNCTION on the display (European model only). For manual tuning Press TUNING MODE repeatedly until "PRESET" appears then press PRESET+/PRESET repeatedly to the selected preset number, the station is found. Tuner Tuner Listening to stop , press to the radio 1 Select the tuner function (FM/ AM). If another station is already assigned to select the desired preset number. 13GB To tune to a preset radio station If you disconnect the power cord or if a power failure occurs. You will lose stereo...
... TUNER (or FUNCTION on the display (European model only). For manual tuning Press TUNING MODE repeatedly until "PRESET" appears then press PRESET+/PRESET repeatedly to the selected preset number, the station is found. Tuner Tuner Listening to stop , press to the radio 1 Select the tuner function (FM/ AM). If another station is already assigned to select the desired preset number. 13GB To tune to a preset radio station If you disconnect the power cord or if a power failure occurs. You will lose stereo...
Operating Instructions
Page 21
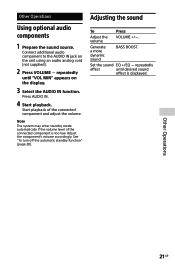
... a more dynamic sound BASS BOOST. See "To turn off the automatic standby function" (page 28). Other Operations Using optional audio components 1 Prepare the sound source. Note The system may enter standby mode automatically if the volume level of the connected component and adjust the volume. Start playback of the connected component is displayed. Adjusting the sound To Press Adjust the volume VOLUME +/. Press AUDIO IN. 4 Start playback. Connect additional audio component to the AUDIO IN jack on the unit using an audio analog cord (not supplied...
... a more dynamic sound BASS BOOST. See "To turn off the automatic standby function" (page 28). Other Operations Using optional audio components 1 Prepare the sound source. Note The system may enter standby mode automatically if the volume level of the connected component and adjust the volume. Start playback of the connected component is displayed. Adjusting the sound To Press Adjust the volume VOLUME +/. Press AUDIO IN. 4 Start playback. Connect additional audio component to the AUDIO IN jack on the unit using an audio analog cord (not supplied...
Operating Instructions
Page 22
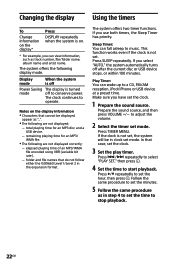
... information, such as in the expansion format. Press TIMER MENU. Notes on . * For example, you select "AUTO," the system automatically turns off Power Saving mode The display is on the display information Characters that cannot be in clock set the clock. 3 Set the play timer. Using the timers The system offers two timer functions. Display mode When the system is off after the current...
... information, such as in the expansion format. Press TIMER MENU. Notes on . * For example, you select "AUTO," the system automatically turns off Power Saving mode The display is on the display information Characters that cannot be in clock set the clock. 3 Set the play timer. Using the timers The system offers two timer functions. Display mode When the system is off after the current...

Operating Instructions
Page 23
... select "PLAY SEL," and then press . Do not operate the system from step 1 of "Using the timers." Press / repeatedly until "OFF" appears in "To check the setting" until the desired sound source appears, then press . 7 Turn off the system. Notes for the users of the connected iPod/iPhone. To change the setting Start over from the time the system turns on at the preset time...
... select "PLAY SEL," and then press . Do not operate the system from step 1 of "Using the timers." Press / repeatedly until "OFF" appears in "To check the setting" until the desired sound source appears, then press . 7 Turn off the system. Notes for the users of the connected iPod/iPhone. To change the setting Start over from the time the system turns on at the preset time...
Operating Instructions
Page 25
.... Install a noise filter (available separately) to normal play . Wipe the disc clean, and replace it takes to start from the first track. Set the play mode to the power cord. General The system does not turn off the automatic standby function" (page 28). See "To turn on the display. Play does not start playback; a disc recorded with the latest software. Sound comes from...
.... Install a noise filter (available separately) to normal play . Wipe the disc clean, and replace it takes to start from the first track. Set the play mode to the power cord. General The system does not turn off the automatic standby function" (page 28). See "To turn on the display. Play does not start playback; a disc recorded with the latest software. Sound comes from...
Operating Instructions
Page 26
... turn on the system. Check the information on the remote control or unit. The iPod/iPhone does not function. Shut down the volume. Set the "EQ" setting of the system and the iPod/iPhone are different, you connect an unsupported USB device, the following cases. There are not displayed on the iPod/iPhone. Noise may not operate the iPod/ iPhone using buttons on...
... turn on the system. Check the information on the remote control or unit. The iPod/iPhone does not function. Shut down the volume. Set the "EQ" setting of the system and the iPod/iPhone are different, you connect an unsupported USB device, the following cases. There are not displayed on the iPod/iPhone. Noise may not operate the iPod/ iPhone using buttons on...
Operating Instructions
Page 27
... operation manual of these FAT. Additional Information 27GB Play does not start from the first track. Set the play mode. Refer to operating instructions of the USB device on how to format. Turn off the system and remove the USB device. If this does not fix the problem, the USB device may be played back. The audio files may not support...
... operation manual of these FAT. Additional Information 27GB Play does not start from the first track. Set the play mode. Refer to operating instructions of the USB device on how to format. Turn off the system and remove the USB device. If this does not fix the problem, the USB device may be played back. The audio files may not support...
Operating Instructions
Page 28
To change the AM tuning interval. 1 Tune to 9 kHz or 10 kHz by factory default. With this function, the system enters standby mode automatically in process. 28GB Use buttons on the unit until "AUTO STANDBY OFF" appears. All user-configured settings, such as preset radio stations, timer, and the clock, are erased. To turn off the automatic standby function This system is no operation or audio signal output. To turn on the system. 2 Hold down ...
To change the AM tuning interval. 1 Tune to 9 kHz or 10 kHz by factory default. With this function, the system enters standby mode automatically in process. 28GB Use buttons on the unit until "AUTO STANDBY OFF" appears. All user-configured settings, such as preset radio stations, timer, and the clock, are erased. To turn off the automatic standby function This system is no operation or audio signal output. To turn on the system. 2 Hold down ...
Operating Instructions
Page 29
...-R/CD-RW recorded in direct sunlight. SELECT You pressed TIMER MENU during playback. ERROR The USB device is write-protected. The memory of the USB device is finalized incorrectly Discs containing files other than those recorded in music CD format, conforming to the same time. NO FILE There are set . PLS STOP You pressed PLAY MODE during timer operation.
...-R/CD-RW recorded in direct sunlight. SELECT You pressed TIMER MENU during playback. ERROR The USB device is write-protected. The memory of the USB device is finalized incorrectly Discs containing files other than those recorded in music CD format, conforming to the same time. NO FILE There are set . PLS STOP You pressed PLAY MODE during timer operation.
Operating Instructions
Page 31
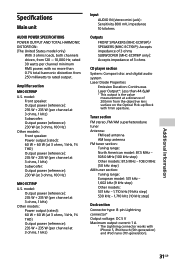
... surface on the Optical Pick-up Block with 7mm aperture. rated 30 watts per channel at 3 ohms, 1 kHz) Input AUDIO IN (stereo mini jack): Sensitivity 800 mV, impedance 10 kilohms Outputs FRONT SPEAKERS (MHC-EC919iP)/ SPEAKERS (MHC-EC719iP): Accepts impedance of 3 ohms SUBWOOFER (MHC-EC919iP only): Accepts impedance of 200mm from 120 10,000 Hz; Amplifier section MHC-EC919iP U.S. Tuner section FM stereo, FM/AM superheterodyne tuner Antenna: FM lead antenna AM loop antenna FM tuner section: Tuning range: North American model: 87.5 MHz...
... surface on the Optical Pick-up Block with 7mm aperture. rated 30 watts per channel at 3 ohms, 1 kHz) Input AUDIO IN (stereo mini jack): Sensitivity 800 mV, impedance 10 kilohms Outputs FRONT SPEAKERS (MHC-EC919iP)/ SPEAKERS (MHC-EC719iP): Accepts impedance of 3 ohms SUBWOOFER (MHC-EC919iP only): Accepts impedance of 200mm from 120 10,000 Hz; Amplifier section MHC-EC919iP U.S. Tuner section FM stereo, FM/AM superheterodyne tuner Antenna: FM lead antenna AM loop antenna FM tuner section: Tuning range: North American model: 87.5 MHz...
Operating Instructions
Page 32
... the main unit: 1 piece Supplied accessories: Remote control (1), R6 (size AA) battery (1), FM lead antenna (1), AM loop antenna (1), Speaker pads MHC-EC919iP (12)/MHC-EC719iP (8) Design and specifications are subject to the (USB) port. Standby power consumption: 0.5 W 32GB USB section (USB) port*: Type A, maximum current 1 A * Use the USB cable supplied with your iPod/iPhone when connecting it to change without notice. speakers): MHC-EC919iP: Approx. 193 mm × 300...
... the main unit: 1 piece Supplied accessories: Remote control (1), R6 (size AA) battery (1), FM lead antenna (1), AM loop antenna (1), Speaker pads MHC-EC919iP (12)/MHC-EC719iP (8) Design and specifications are subject to the (USB) port. Standby power consumption: 0.5 W 32GB USB section (USB) port*: Type A, maximum current 1 A * Use the USB cable supplied with your iPod/iPhone when connecting it to change without notice. speakers): MHC-EC919iP: Approx. 193 mm × 300...
Marketing Specifications
Page 1
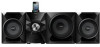
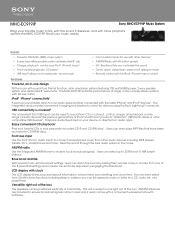
... The LCD display shows source playback information, volume level, sound settings and clock time. MHC-EC919iP Sony MHC-EC919iP Music System Bring your favorite music to rock right out of the box. Enjoy convenient CD playback1 Play your favorite CDs or your device or directly from one of the 8 preset EQ settings and increase low-end bass response by setting their own EQ curve or choose from audio apps. AM/FM radio Use the...
... The LCD display shows source playback information, volume level, sound settings and clock time. MHC-EC919iP Sony MHC-EC919iP Music System Bring your favorite music to rock right out of the box. Enjoy convenient CD playback1 Play your favorite CDs or your device or directly from one of the 8 preset EQ settings and increase low-end bass response by setting their own EQ curve or choose from audio apps. AM/FM radio Use the...


