
Operating Instructions
Page 3
Table of Contents Getting Started Sound Adjustment Step 1: Hooking up the system 4 Step 2: Setting up the speakers 7 Step 3: Setting the time 9 Step 4: Presetting radio stations ........ 10 Saving power in standby mode* ........ 11 Basic Operations Adjusting the sound 30 Selecting the audio emphasis 31 Adjusting the audio emphasis 32 Making a personal audio emphasis file 34 Enjoying Dolby Pro Logic Surround sound 35 Playing a CD 13 Other Features Recording a CD 14 Using the Radio Data System Listening to the radio 15 (RDS 36 Recording...
Table of Contents Getting Started Sound Adjustment Step 1: Hooking up the system 4 Step 2: Setting up the speakers 7 Step 3: Setting the time 9 Step 4: Presetting radio stations ........ 10 Saving power in standby mode* ........ 11 Basic Operations Adjusting the sound 30 Selecting the audio emphasis 31 Adjusting the audio emphasis 32 Making a personal audio emphasis file 34 Enjoying Dolby Pro Logic Surround sound 35 Playing a CD 13 Other Features Recording a CD 14 Using the Radio Data System Listening to the radio 15 (RDS 36 Recording...
Operating Instructions
Page 5
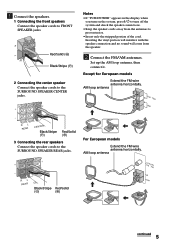
... RL REAR CENTER Black/Stripe (') Red/Solid (') 3 Connecting the rear speakers Connect the speaker cords to the SURROUND SPEAKER CENTER jacks. AM loop antenna CFMOAX75IAL RL REAR CENTER AM Black/Stripe Red/Solid (') (') continued 5 Notes • If "PUSH POWER" appears in the display when you turn on the system, press 1/u to turn off the system and check the speaker connections. • Keep the speaker cords away from the speaker. 2 Connect the FM/AM antennas. Except for European models Extend the FM wire antenna...
... RL REAR CENTER Black/Stripe (') Red/Solid (') 3 Connecting the rear speakers Connect the speaker cords to the SURROUND SPEAKER CENTER jacks. AM loop antenna CFMOAX75IAL RL REAR CENTER AM Black/Stripe Red/Solid (') (') continued 5 Notes • If "PUSH POWER" appears in the display when you turn on the system, press 1/u to turn off the system and check the speaker connections. • Keep the speaker cords away from the speaker. 2 Connect the FM/AM antennas. Except for European models Extend the FM wire antenna...
Operating Instructions
Page 6
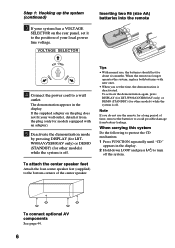
... DISPLAY (for LBT-W900AV/XB800AV only) or DEMO (STANDBY) (for other models) while the system is off the system. Note If you set it from battery leakage. When carrying this system Do the following to protect the CD mechanism. 1 Press FUNCTION repeatedly until "CD" appears in the display. VOLTAGE SELECTOR Inserting two R6 (size AA) batteries into the remote ] } } ] 120V 230 - 240V 4 Connect the power cord to...
... DISPLAY (for LBT-W900AV/XB800AV only) or DEMO (STANDBY) (for other models) while the system is off the system. Note If you set it from battery leakage. When carrying this system Do the following to protect the CD mechanism. 1 Press FUNCTION repeatedly until "CD" appears in the display. VOLTAGE SELECTOR Inserting two R6 (size AA) batteries into the remote ] } } ] 120V 230 - 240V 4 Connect the power cord to...
Operating Instructions
Page 7
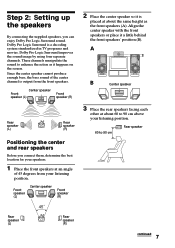
... the screen. A B Center speaker Rear speaker (L) Rear speaker (R) Positioning the center and rear speakers Before you can enjoy Dolby Pro Logic Surround sound. Since the center speaker cannot produce enough bass, the bass sound of 45 degrees from the front speakers. Dolby Pro Logic Surround is placed at an angle of the center channel is output from your listening position. 60 to 90 cm above your listening position. Center speaker Front speaker (L) Front speaker (R) 2 Place the center speaker so it is a decoding system...
... the screen. A B Center speaker Rear speaker (L) Rear speaker (R) Positioning the center and rear speakers Before you can enjoy Dolby Pro Logic Surround sound. Since the center speaker cannot produce enough bass, the bass sound of 45 degrees from the front speakers. Dolby Pro Logic Surround is placed at an angle of the center channel is output from your listening position. 60 to 90 cm above your listening position. Center speaker Front speaker (L) Front speaker (R) 2 Place the center speaker so it is a decoding system...
Operating Instructions
Page 11
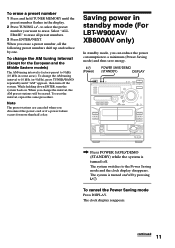
..., then turn the system back on /off the system. Select "ALL ERASE" to a minimum (Power Saving mode) and thus save energy. 1/u (Power) POWER SAVE/DEMO (STANDBY) DISPLAY / Press POWER SAVE/DEMO (STANDBY) while the system is turned off. The clock display reappears. continued 11 When you disconnect the power cord or if a power failure occurs for the European and the Middle Eastern models) The AM tuning interval is turned on . The system is factory-preset to...
..., then turn the system back on /off the system. Select "ALL ERASE" to a minimum (Power Saving mode) and thus save energy. 1/u (Power) POWER SAVE/DEMO (STANDBY) DISPLAY / Press POWER SAVE/DEMO (STANDBY) while the system is turned off. The clock display reappears. continued 11 When you disconnect the power cord or if a power failure occurs for the European and the Middle Eastern models) The AM tuning interval is turned on . The system is factory-preset to...

Operating Instructions
Page 15
Listening to other sources while recording. Preset Tuning Before using this function, preset radio stations in the tuner's memory (see "Step 4: Presetting radio stations" on page 10). 1/u (Power) STEREO/MONO 2 VOLUME 13 To stop recording Press p on deck B or on both sides. 7 Press P. Recording starts. continued 15 The equalizer settings will not be sure to start from the front side. VOL +/- If you start from the reverse side, recording...
Listening to other sources while recording. Preset Tuning Before using this function, preset radio stations in the tuner's memory (see "Step 4: Presetting radio stations" on page 10). 1/u (Power) STEREO/MONO 2 VOLUME 13 To stop recording Press p on deck B or on both sides. 7 Press P. Recording starts. continued 15 The equalizer settings will not be sure to start from the front side. VOL +/- If you start from the reverse side, recording...
Operating Instructions
Page 16
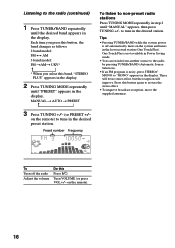
... you select this band, "STEREO PLUS" appears in the display. 2 Press TUNING MODE repeatedly until "MANUAL" appears, then press TUNING +/- One Touch Play is not available in Power Saving mode. • You can switch from another source to tune in the desired station. Preset number Frequency To Turn off automatically turns on the remote) to the radio by pressing TUNER/BAND (Automatic Source Selection). • If an FM program is off the radio Adjust the volume Do this button...
... you select this band, "STEREO PLUS" appears in the display. 2 Press TUNING MODE repeatedly until "MANUAL" appears, then press TUNING +/- One Touch Play is not available in Power Saving mode. • You can switch from another source to tune in the desired station. Preset number Frequency To Turn off automatically turns on the remote) to the radio by pressing TUNER/BAND (Automatic Source Selection). • If an FM program is off the radio Adjust the volume Do this button...
Operating Instructions
Page 17
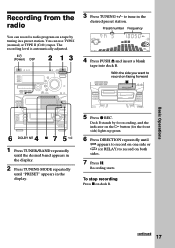
... in the display. 2 Press TUNING MODE repeatedly until A appears to record on one side or ß (or RELAY) to tune in the display. 5 Press r REC. Recording starts. Preset number Frequency 4 Press PUSH 6 and insert a blank tape into deck B. Basic Operations continued 17 to record on both sides. 7 Press P. The recording level is automatically adjusted. 1/u (Power) DSP 2 13 3 Press TUNING +/- Recording from the radio You can use TYPE I (normal...
... in the display. 2 Press TUNING MODE repeatedly until A appears to record on one side or ß (or RELAY) to tune in the display. 5 Press r REC. Recording starts. Preset number Frequency 4 Press PUSH 6 and insert a blank tape into deck B. Basic Operations continued 17 to record on both sides. 7 Press P. The recording level is automatically adjusted. 1/u (Power) DSP 2 13 3 Press TUNING +/- Recording from the radio You can use TYPE I (normal...
Operating Instructions
Page 18
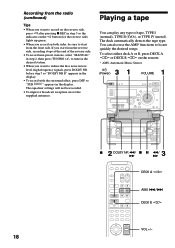
... DSP so "SUR " appears in the display. The equalizer settings will not be sure to locate quickly the desired songs. To select either deck A or B, press DECK A ª· or DECK B ª· on the reverse side, press ª after pressing r REC in step 2, then press TUNING +/- You can play any type of the reverse side. • To record non-preset stations, select "MANUAL...
... DSP so "SUR " appears in the display. The equalizer settings will not be sure to locate quickly the desired songs. To select either deck A or B, press DECK A ª· or DECK B ª· on the reverse side, press ª after pressing r REC in step 2, then press TUNING +/- You can play any type of the reverse side. • To record non-preset stations, select "MANUAL...
Operating Instructions
Page 19
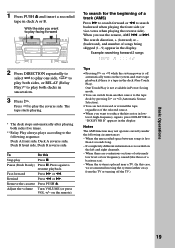
... the cassette Press PUSH 6. Adjust the volume Turn VOLUME (or press VOL +/- Tips • Pressing · or ª while the system power is placed near a TV. (In this Stop play facing forward To search for the beginning of the selected source. • When you use the remote, AMS = or +. When there are continuous sections of extremely low level or low frequency sound (like those of songs...
... the cassette Press PUSH 6. Adjust the volume Turn VOLUME (or press VOL +/- Tips • Pressing · or ª while the system power is placed near a TV. (In this Stop play facing forward To search for the beginning of the selected source. • When you use the remote, AMS = or +. When there are continuous sections of extremely low level or low frequency sound (like those of songs...
Operating Instructions
Page 31
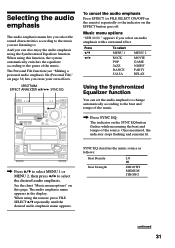
... the EFFECT button goes off. The audio emphasis name appears in the display. SYNC EQ classifies the music source as follows: Beat Density Beat Strength LO HI SMOOTH MEDIUM STRONG continued 31 When using the Synchronized Equalizer function. And you can set the audio emphasis to change automatically according to . When using this page. Music menu options "SUR " appears if you select an audio emphasis with a surround effect...
... the EFFECT button goes off. The audio emphasis name appears in the display. SYNC EQ classifies the music source as follows: Beat Density Beat Strength LO HI SMOOTH MEDIUM STRONG continued 31 When using the Synchronized Equalizer function. And you can set the audio emphasis to change automatically according to . When using this page. Music menu options "SUR " appears if you select an audio emphasis with a surround effect...
Operating Instructions
Page 33
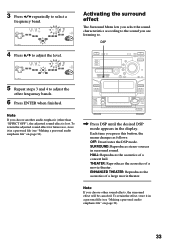
..." on page 34). 33 To retain the adjusted sound effect for future use, store it in surround sound. HALL: Reproduces the acoustics of a movie theater. THEATER: Reproduces the acoustics of a concert hall. 3 Press B/b repeatedly to select a frequency band. 4 Press V/v to adjust the level. ENHANCED THEATER: Reproduces the acoustics of a large movie theater. Note If you press this button, the menu changes as follows: OFF: Deactivates the DSP mode.
..." on page 34). 33 To retain the adjusted sound effect for future use, store it in surround sound. HALL: Reproduces the acoustics of a movie theater. THEATER: Reproduces the acoustics of a concert hall. 3 Press B/b repeatedly to select a frequency band. 4 Press V/v to adjust the level. ENHANCED THEATER: Reproduces the acoustics of a large movie theater. Note If you press this button, the menu changes as follows: OFF: Deactivates the DSP mode.
Operating Instructions
Page 35
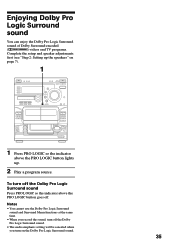
... use the Dolby Pro Logic Surround sound and Surround Menu functions at the same time. • When you record the sound, turn off the Dolby Pro Logic Surround sound. • The audio emphasis setting will be canceled when you turn off the Dolby Pro Logic Surround sound Press PRO LOGIC so the indicator above the PRO LOGIC button lights up the speakers" on the Dolby Pro Logic Surround sound. 35 Enjoying Dolby Pro Logic Surround sound You can enjoy the Dolby Pro Logic Surround sound of Dolby Surround-encoded (q) videos and TV programs...
... use the Dolby Pro Logic Surround sound and Surround Menu functions at the same time. • When you record the sound, turn off the Dolby Pro Logic Surround sound. • The audio emphasis setting will be canceled when you turn off the Dolby Pro Logic Surround sound Press PRO LOGIC so the indicator above the PRO LOGIC button lights up the speakers" on the Dolby Pro Logic Surround sound. 35 Enjoying Dolby Pro Logic Surround sound You can enjoy the Dolby Pro Logic Surround sound of Dolby Surround-encoded (q) videos and TV programs...
Operating Instructions
Page 36
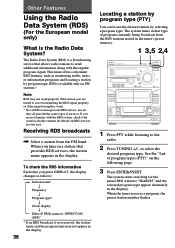
... press DISPLAY, the display changes as monitoring traffic, news, or information programs and locating a station by selecting a program type. To check the RDS information Each time you are tuned to the radio. 2 Press TUNING +/- See the "List of program currently being broadcast from the FM band. to send additional information along with your area. This tuner offers convenient RDS features, such as follows: n Station name* Frequency Program...
... press DISPLAY, the display changes as monitoring traffic, news, or information programs and locating a station by selecting a program type. To check the RDS information Each time you are tuned to the radio. 2 Press TUNING +/- See the "List of program currently being broadcast from the FM band. to send additional information along with your area. This tuner offers convenient RDS features, such as follows: n Station name* Frequency Program...

Operating Instructions
Page 41
... procedure. 7 Press TUNING +/- The 24-hour system model is used for illustration purposes. 9 3 DAILY 4,5,6,7,8 3 Press t/CLOCK SET. "ON" appears and the hour indication flashes in the display. 5 Set the time to adjust the volume. Waking up to stop time, and the music source appear in turn before the original display returns. 9 Turn off the system. The start from a specific track, create a program (see "Programming CD tracks" on page 10). 2 Turn VOLUME to start...
... procedure. 7 Press TUNING +/- The 24-hour system model is used for illustration purposes. 9 3 DAILY 4,5,6,7,8 3 Press t/CLOCK SET. "ON" appears and the hour indication flashes in the display. 5 Set the time to adjust the volume. Waking up to stop time, and the music source appear in turn before the original display returns. 9 Turn off the system. The start from a specific track, create a program (see "Programming CD tracks" on page 10). 2 Turn VOLUME to start...
Operating Instructions
Page 44
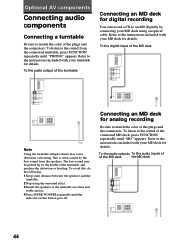
... instructions included with your MD deck for details. To the audio outputs To the audio inputs of of the MD deck Note Using the turntable at high volume may be picked up by the needle of the plugs and the connectors. This is often caused by the bass sound from the connected turntable, press FUNCTION repeatedly until "PHONO" appears. To listen to the sound of the connected...
... instructions included with your MD deck for details. To the audio outputs To the audio inputs of of the MD deck Note Using the turntable at high volume may be picked up by the needle of the plugs and the connectors. This is often caused by the bass sound from the connected turntable, press FUNCTION repeatedly until "PHONO" appears. To listen to the sound of the connected...
Operating Instructions
Page 50
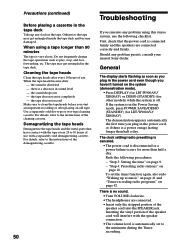
Do not frequently change the tape operations such as you plug in the power cord even though you run into the SPEAKER jack. The tape may get entangled in the tape deck. For details, refer to music" on page 41 and "Timer-recording radio programs" on the system (demonstration mode). •Press DISPLAY (for LBT-W900AV/ XB800AV) or DEMO (STANDBY) (for other models) while the system is very elastic. For details, refer to 30...
Do not frequently change the tape operations such as you plug in the power cord even though you run into the SPEAKER jack. The tape may get entangled in the tape deck. For details, refer to music" on page 41 and "Timer-recording radio programs" on the system (demonstration mode). •Press DISPLAY (for LBT-W900AV/ XB800AV) or DEMO (STANDBY) (for other models) while the system is very elastic. For details, refer to 30...

Operating Instructions
Page 51
... from the speakers except the center speaker. •The source being played back has limited sound effects. Check the volume with the test tone. Press PLAY MODE repeatedly until the moisture evaporates. Tape Deck The tape does not record. •No tape is in the display. • Press 1/u to 30 minutes. Replace the batteries. There is no microphone sound. •Turn VOLUME or MIC LEVEL to adjust the microphone volume. • Make sure the microphone is connected to...
... from the speakers except the center speaker. •The source being played back has limited sound effects. Check the volume with the test tone. Press PLAY MODE repeatedly until the moisture evaporates. Tape Deck The tape does not record. •No tape is in the display. • Press 1/u to 30 minutes. Replace the batteries. There is no microphone sound. •Turn VOLUME or MIC LEVEL to adjust the microphone volume. • Make sure the microphone is connected to...
Operating Instructions
Page 52
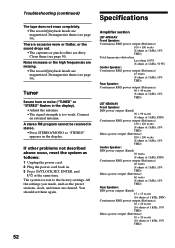
... set them (see page 50). A stereo FM program cannot be received in stereo. •Press STEREO/MONO so "STEREO" appears in the display. Connect an external antenna. Specifications Amplifier section LBT-W900AV Front Speaker: Continuous RMS power output (Reference) 100 + 100 watts (8 ohms at 1 kHz, 10% THD) Total harmonics distortion Less than 0.07% (8 ohms at 1 kHz, 50 W) Center Speaker: Continuous RMS power output (Reference) 45 watts (8 ohms at 1 kHz, 10% THD) Rear Speaker: Continuous RMS power output (Reference) 40 + 40 watts (8 ohms...
... set them (see page 50). A stereo FM program cannot be received in stereo. •Press STEREO/MONO so "STEREO" appears in the display. Connect an external antenna. Specifications Amplifier section LBT-W900AV Front Speaker: Continuous RMS power output (Reference) 100 + 100 watts (8 ohms at 1 kHz, 10% THD) Total harmonics distortion Less than 0.07% (8 ohms at 1 kHz, 50 W) Center Speaker: Continuous RMS power output (Reference) 45 watts (8 ohms at 1 kHz, 10% THD) Rear Speaker: Continuous RMS power output (Reference) 40 + 40 watts (8 ohms...
Operating Instructions
Page 56
... A Adjusting the audio emphasis 32 the sound 30 the volume 14, 16, 19 AMS 14, 18 Antennas 5, 48 Audio emphasis 31, 32 Automatic Source Selection 14, 16, 19 B Batteries 6 C CD player 13, 21 CD Synchro Recording 14 Clock setting 9 Connecting. See Hooking up D, E Daily timer 41 Display 21, 32 Dolby Pro Logic Surround 35 DSP 33 Dubbing 20 DVD 47 F, G Flash 29 H, I, J Hooking up optional components 44 speakers 5 the antennas 5, 48 the power 6 the system...
... A Adjusting the audio emphasis 32 the sound 30 the volume 14, 16, 19 AMS 14, 18 Antennas 5, 48 Audio emphasis 31, 32 Automatic Source Selection 14, 16, 19 B Batteries 6 C CD player 13, 21 CD Synchro Recording 14 Clock setting 9 Connecting. See Hooking up D, E Daily timer 41 Display 21, 32 Dolby Pro Logic Surround 35 DSP 33 Dubbing 20 DVD 47 F, G Flash 29 H, I, J Hooking up optional components 44 speakers 5 the antennas 5, 48 the power 6 the system...


