
Operating Instructions
Page 2
... 2 NO USER-SERVICEABLE PARTS INSIDE. CAUTION To prevent electric shock, do not expose the LCD Projection TV to rain or moisture. These limits are cautioned that any changes or modifications not expressly approved in...Note to CATV system installer This reminder is encouraged to try to correct the interference by turning the equipment off and on a circuit different from the broadcaster/cable company and/or ...: TO REDUCE THE RISK OF ELECTRIC SHOCK, DO NOT REMOVE COVER (OR BACK). MODEL: KF-60DX100 Please keep this equipment. WARNING To prevent fire or shock hazard, do not use of the ...
... 2 NO USER-SERVICEABLE PARTS INSIDE. CAUTION To prevent electric shock, do not expose the LCD Projection TV to rain or moisture. These limits are cautioned that any changes or modifications not expressly approved in...Note to CATV system installer This reminder is encouraged to try to correct the interference by turning the equipment off and on a circuit different from the broadcaster/cable company and/or ...: TO REDUCE THE RISK OF ELECTRIC SHOCK, DO NOT REMOVE COVER (OR BACK). MODEL: KF-60DX100 Please keep this equipment. WARNING To prevent fire or shock hazard, do not use of the ...

Operating Instructions
Page 3
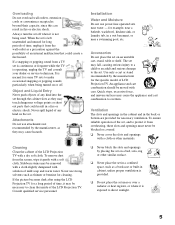
...from the ceiling or to cover the windows that this product. and are trademarks of the LCD Projection TV, below the Sony logo, on the sticker, and also on the TV box (white label). Owner's Record The model and serial numbers are located at temperature below ....turning on the cord. Never pull on the LCD Projection TV. ❑ To obtain the best picture, do not block the ventilation openings. ❑ Do not install the LCD Projection TV in a hot or humid place, or in a place subject to excessive dust or mechanical vibration. ❑ Avoid operating the LCD Projection TV at the rear...
...from the ceiling or to cover the windows that this product. and are trademarks of the LCD Projection TV, below the Sony logo, on the sticker, and also on the TV box (white label). Owner's Record The model and serial numbers are located at temperature below ....turning on the cord. Never pull on the LCD Projection TV. ❑ To obtain the best picture, do not block the ventilation openings. ❑ Do not install the LCD Projection TV in a hot or humid place, or in a place subject to excessive dust or mechanical vibration. ❑ Avoid operating the LCD Projection TV at the rear...
Operating Instructions
Page 5
...in a confined space, such as they may be blocked or covered. ❑ Never cover the slots and openings with solution of the LCD Projection TV. Stubborn stains may cause hazards. Consult qualified service personnel. Ventilation The slots and openings in the cabinet and in a fire or electric shock... can result in a wet basement, or near a swimming pool, etc. It is not being turned on the set . To ensure reliable operation of time, unplug it gently with a soft cloth. Always turn the set on a bed, sofa, rug or other materials. ❑ Never block the slots and...
...in a confined space, such as they may be blocked or covered. ❑ Never cover the slots and openings with solution of the LCD Projection TV. Stubborn stains may cause hazards. Consult qualified service personnel. Ventilation The slots and openings in the cabinet and in a fire or electric shock... can result in a wet basement, or near a swimming pool, etc. It is not being turned on the set . To ensure reliable operation of time, unplug it gently with a soft cloth. Always turn the set on a bed, sofa, rug or other materials. ❑ Never block the slots and...
Operating Instructions
Page 11
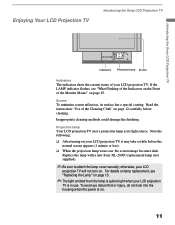
...the lamp with a new Sony XL-2000U replacement lamp (not supplied). ✍ Be sure to attach the lamp cover securely; If the LAMP indicator flashes, see "Replacing the Lamp" on page 13. ✍ The light emitted from the lamp is quite bright when your LCD projection TV will not turn on. Note the following...: ❑ After turning on page 85. To avoid eye discomfort or injury, do not look into the housing when the power is in use...
...the lamp with a new Sony XL-2000U replacement lamp (not supplied). ✍ Be sure to attach the lamp cover securely; If the LAMP indicator flashes, see "Replacing the Lamp" on page 13. ✍ The light emitted from the lamp is quite bright when your LCD projection TV will not turn on. Note the following...: ❑ After turning on page 85. To avoid eye discomfort or injury, do not look into the housing when the power is in use...
Operating Instructions
Page 12
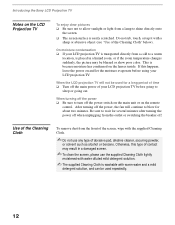
... Do not rub, touch, or tap it with warm water and a mild detergent solution, and can be blurred or show poor color. After turning off . Use of the Cleaning Cloth To remove dust from the front of the screen, wipe with the supplied Cleaning Cloth. ✍ Do ...alcohol or benzene. Otherwise, this happens, leave the power on the lenses inside. On moisture condensation ❑ If your LCD projection TV. Introducing the Sony LCD Projection TV Notes on the LCD Projection TV To enjoy clear pictures ❑ Be sure not to allow sunlight or light from a lamp to a warm location, is ...
... Do not rub, touch, or tap it with warm water and a mild detergent solution, and can be blurred or show poor color. After turning off . Use of the Cleaning Cloth To remove dust from the front of the screen, wipe with the supplied Cleaning Cloth. ✍ Do ...alcohol or benzene. Otherwise, this happens, leave the power on the lenses inside. On moisture condensation ❑ If your LCD projection TV. Introducing the Sony LCD Projection TV Notes on the LCD Projection TV To enjoy clear pictures ❑ Be sure not to allow sunlight or light from a lamp to a warm location, is ...
Operating Instructions
Page 13
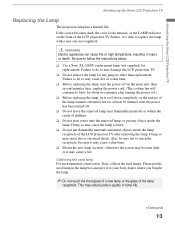
...dark, or it is time to follow the instructions below. ❑ Use a Sony XL-2000U replacement lamp (not supplied) for any object inside the lamp receptacle of the LCD projection TV after the power has been turned off. ❑ Do not leave the removed lamp near flammable materials or within the... reach of the LCD projection TV flashes, it may cause fire or a skin burn. ❑ Before replacing the lamp, turn the power off .) ❑ Before replacing the lamp, let it to your Sony dealer where you bought the lamp. ✍ Do not touch...
...dark, or it is time to follow the instructions below. ❑ Use a Sony XL-2000U replacement lamp (not supplied) for any object inside the lamp receptacle of the LCD projection TV after the power has been turned off. ❑ Do not leave the removed lamp near flammable materials or within the... reach of the LCD projection TV flashes, it may cause fire or a skin burn. ❑ Before replacing the lamp, turn the power off .) ❑ Before replacing the lamp, let it to your Sony dealer where you bought the lamp. ✍ Do not touch...
Operating Instructions
Page 14
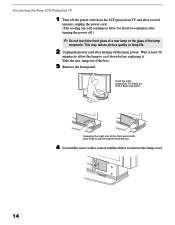
... with a coin or similar object to blow for about two minutes after turning the power off.) ✍ Do not touch the front glass of a new lamp or the glass of the box. 3 Remove the front panel. Hold the LCD projection TV firmly so that it . Wait at least 30 minutes to allow the... lamp to cool down before replacing it does not move. Introducing the Sony LCD Projection TV 1 Turn off the power switch on the LCD projection TV and after several minutes, unplug the power cord. (The cooling fan will continue to remove the lamp cover. 14 This may...
... with a coin or similar object to blow for about two minutes after turning the power off.) ✍ Do not touch the front glass of a new lamp or the glass of the box. 3 Remove the front panel. Hold the LCD projection TV firmly so that it . Wait at least 30 minutes to allow the... lamp to cool down before replacing it does not move. Introducing the Sony LCD Projection TV 1 Turn off the power switch on the LCD projection TV and after several minutes, unplug the power cord. (The cooling fan will continue to remove the lamp cover. 14 This may...
Operating Instructions
Page 15
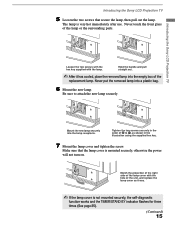
...illustration using the supplied hex key. 7 Mount the lamp cover and tighten the screw. Match the projection of the right side of the lamp cover with the lamp. Introducing the Sony LCD Projection TV Loosen the two screws with the hex key supplied with the hole of the unit, and replace... lamp or the surrounding parts. The lamp is very hot immediately after use. Introducing the Sony LCD Projection TV 5 Loosen the two screws that the lamp cover is mounted securely, otherwise the power will not turn on. Never touch the front glass of 1 to attach the new lamp securely. Never ...
...illustration using the supplied hex key. 7 Mount the lamp cover and tighten the screw. Match the projection of the right side of the lamp cover with the lamp. Introducing the Sony LCD Projection TV Loosen the two screws with the hex key supplied with the hole of the unit, and replace... lamp or the surrounding parts. The lamp is very hot immediately after use. Introducing the Sony LCD Projection TV 5 Loosen the two screws that the lamp cover is mounted securely, otherwise the power will not turn on. Never touch the front glass of 1 to attach the new lamp securely. Never ...
Operating Instructions
Page 26
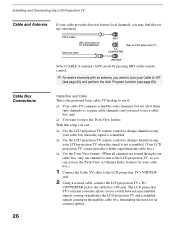
...the Twin View or Channel Index features for an external splitter. Installing and Connecting the LCD Projection TV Cable and Antenna If your cable provider does not feature local channels, you need to turn your Cable to OFF (see page 62) and perform the Auto Program function (see page...cable box, eliminating the need for your cable box.) 1 Connect the Cable TV cable to the LCD projection TV's VHF/UHF jack. 2 Using a coaxial cable, connect the LCD projection TV's TO CONVERTER jack to TO CONVERTER) Antenna cable AUX Rear of them (pay channels vs. CATV cable (No connection to the cable...
...the Twin View or Channel Index features for an external splitter. Installing and Connecting the LCD Projection TV Cable and Antenna If your cable provider does not feature local channels, you need to turn your Cable to OFF (see page 62) and perform the Auto Program function (see page...cable box, eliminating the need for your cable box.) 1 Connect the Cable TV cable to the LCD projection TV's VHF/UHF jack. 2 Using a coaxial cable, connect the LCD projection TV's TO CONVERTER jack to TO CONVERTER) Antenna cable AUX Rear of them (pay channels vs. CATV cable (No connection to the cable...
Operating Instructions
Page 34
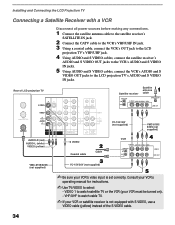
...Rear of the S VIDEO cable. VIDEO 1 to select - Consult your VCR's operating manual for instructions. ✍ Use TV/VIDEO to watch cable TV. ✍ If your VCR or satellite receiver is set correctly. Installing and Connecting the LCD Projection TV Connecting a Satellite Receiver with S VIDEO, use a VIDEO cable (yellow) instead of LCD projection TV... and S VIDEO IN jacks. 5 Using AUDIO and S VIDEO cables, connect the VCR's AUDIO and S VIDEO OUT jacks to the LCD projection TV's AUDIO and S VIDEO IN jacks. VHF/UHF to watch satellite TV or the VCR (your VCR must be turned on). -
...Rear of the S VIDEO cable. VIDEO 1 to select - Consult your VCR's operating manual for instructions. ✍ Use TV/VIDEO to watch cable TV. ✍ If your VCR or satellite receiver is set correctly. Installing and Connecting the LCD Projection TV Connecting a Satellite Receiver with S VIDEO, use a VIDEO cable (yellow) instead of LCD projection TV... and S VIDEO IN jacks. 5 Using AUDIO and S VIDEO cables, connect the VCR's AUDIO and S VIDEO OUT jacks to the LCD projection TV's AUDIO and S VIDEO IN jacks. VHF/UHF to watch satellite TV or the VCR (your VCR must be turned on). -
Operating Instructions
Page 42
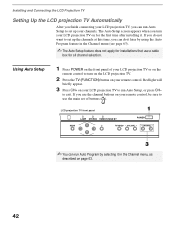
... buttons ( ). If you do it . If you use the channel buttons on your LCD projection TV on the remote control to turn your remote control, be sure to exit. LCD projection TV front panel LAMP STEREO TIMER/STAND BY ✍ You can run Auto Program by selecting it ... CH- Installing and Connecting the LCD Projection TV Setting Up the LCD projection TV Automatically After you finish connecting your LCD projection TV, you can do not want to set up your channels. The Auto Setup screen appears when you turn on the LCD projection TV. 2 Press the TV (FUNCTION) button on page 63. ...
... buttons ( ). If you do it . If you use the channel buttons on your LCD projection TV on the remote control to turn your remote control, be sure to exit. LCD projection TV front panel LAMP STEREO TIMER/STAND BY ✍ You can run Auto Program by selecting it ... CH- Installing and Connecting the LCD Projection TV Setting Up the LCD projection TV Automatically After you finish connecting your LCD projection TV, you can do not want to set up your channels. The Auto Setup screen appears when you turn on the LCD projection TV. 2 Press the TV (FUNCTION) button on page 63. ...
Operating Instructions
Page 43
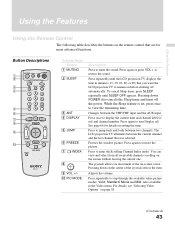
...or press VOL + to enter the Scrolling Channel Index mode. The LCD projection TV alternates between the VHF/UHF input and the AUX input. Press to restore the sound. Pressing down POWER also cancels the Sleep timer and turns off the power. For details, see "Selecting Video Options" on the ...the time in the Video menu. Press repeatedly to restore the picture. Also available in minutes (15, 30, 45, 60, or 90) that you want the LCD projection TV to view the remaining time. PIC MODE Description Press to jump back and forth between two channels. Changes between the ...
...or press VOL + to enter the Scrolling Channel Index mode. The LCD projection TV alternates between the VHF/UHF input and the AUX input. Press to restore the sound. Pressing down POWER also cancels the Sleep timer and turns off the power. For details, see "Selecting Video Options" on the ...the time in the Video menu. Press repeatedly to restore the picture. Also available in minutes (15, 30, 45, 60, or 90) that you want the LCD projection TV to view the remaining time. PIC MODE Description Press to jump back and forth between two channels. Changes between the ...
Operating Instructions
Page 44
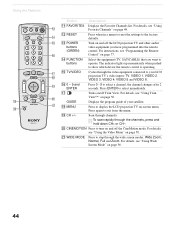
qd POWER buttons (GREEN) Turn on and off the LCD projection TV and other audio/ video equipment you want to your satellite. qh 0 - 9 and ENTER Press 0 - 9 to exit from the menu. qj Turns on and off Twin View. Press again to select a channel, the channel changes after 2 seconds. For instructions, see "Programming the Remote Control...
qd POWER buttons (GREEN) Turn on and off the LCD projection TV and other audio/ video equipment you want to your satellite. qh 0 - 9 and ENTER Press 0 - 9 to exit from the menu. qj Turns on and off Twin View. Press again to select a channel, the channel changes after 2 seconds. For instructions, see "Programming the Remote Control...
Operating Instructions
Page 45
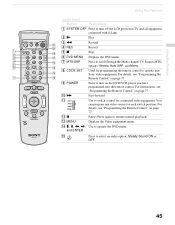
qs X Pause (Press again to turn off the LCD projection TV and all equipment connected with S-Link. 2N Play 3m Rewind 4 REC Record 5x Stop 6 DVD MENU Displays the DVD menu. 7 MTS/SAP Press to scroll through the Multi-channel TV Sound (MTS) options: Stereo, Auto SAP, and Mono.... "Programming the Remote Control" on page 77. qf M, m, Using the Features Using the Features Inside Panel Button Description 1 SYSTEM OFF Press to turn on page 77. q; For details, see "Programming the Remote Control" on page 77. 9 POWER Press to resume normal playback) qd MENU Displays...
qs X Pause (Press again to turn off the LCD projection TV and all equipment connected with S-Link. 2N Play 3m Rewind 4 REC Record 5x Stop 6 DVD MENU Displays the DVD menu. 7 MTS/SAP Press to scroll through the Multi-channel TV Sound (MTS) options: Stereo, Auto SAP, and Mono.... "Programming the Remote Control" on page 77. qf M, m, Using the Features Using the Features Inside Panel Button Description 1 SYSTEM OFF Press to turn on page 77. q; For details, see "Programming the Remote Control" on page 77. 9 POWER Press to resume normal playback) qd MENU Displays...
Operating Instructions
Page 46
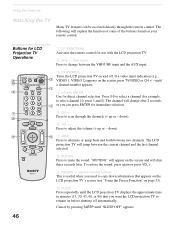
...up or - The LCD projection TV will explain the function of some of the buttons found on and off automatically. down). 7 JUMP Press to alternate or jump back and forth between the VHF/UHF input and the AUX input. 3 TV (POWER) Turns the LCD projection TV on your remote control. ...Cancel by pressing SLEEP until the LCD projection TV displays the approximate time in minutes (15, 30, 45, 60, or 90) that appears on the LCD projection TV's screen (see "Using the Freeze Function" on...
...up or - The LCD projection TV will explain the function of some of the buttons found on and off automatically. down). 7 JUMP Press to alternate or jump back and forth between the VHF/UHF input and the AUX input. 3 TV (POWER) Turns the LCD projection TV on your remote control. ...Cancel by pressing SLEEP until the LCD projection TV displays the approximate time in minutes (15, 30, 45, 60, or 90) that appears on the LCD projection TV's screen (see "Using the Freeze Function" on...
Operating Instructions
Page 47
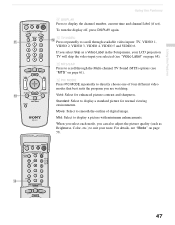
...Standard: Select to scroll through available video inputs: TV, VIDEO 1, VIDEO 2, VIDEO 3, VIDEO 4, VIDEO 5 and VIDEO 6. When you select each mode, you can also adjust the picture quality (such as a Video Label in the Setup menu, your taste. To turn the display off, press DISPLAY again. Mild:... and sharpness. Using the Features Using the Features qa DISPLAY Press to display a picture with minimum enhancements. qs TV/VIDEO Press repeatedly to suit your LCD projection TV will skip the video input you are watching. If you select Skip as Brightness, Color, etc.) to scroll ...
...Standard: Select to scroll through available video inputs: TV, VIDEO 1, VIDEO 2, VIDEO 3, VIDEO 4, VIDEO 5 and VIDEO 6. When you select each mode, you can also adjust the picture quality (such as a Video Label in the Setup menu, your taste. To turn the display off, press DISPLAY again. Mild:... and sharpness. Using the Features Using the Features qa DISPLAY Press to display a picture with minimum enhancements. qs TV/VIDEO Press repeatedly to suit your LCD projection TV will skip the video input you are watching. If you select Skip as Brightness, Color, etc.) to scroll ...
Operating Instructions
Page 59
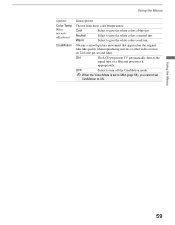
OFF Select to turn off the CineMotion mode. ✍ When the Video Mode is set to Mild (page 58), you cannot set CineMotion to give the white colors a neutral ... picture movement that approaches the original film-like quality when reproducing movies or other video sources on 24 frame per second films. ON The LCD projection TV automatically detects the signal type of a film and processes it appropriately. Warm Select to give the white colors a blue tint. Using the Menus 59 Using...
OFF Select to turn off the CineMotion mode. ✍ When the Video Mode is set to Mild (page 58), you cannot set CineMotion to give the white colors a neutral ... picture movement that approaches the original film-like quality when reproducing movies or other video sources on 24 frame per second films. ON The LCD projection TV automatically detects the signal type of a film and processes it appropriately. Warm Select to give the white colors a blue tint. Using the Menus 59 Using...
Operating Instructions
Page 60
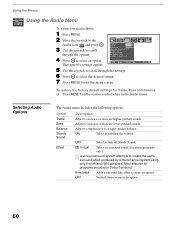
z A virtual surround system attempts to mono programs. OFF Normal stereo or mono reception. 60 Simulated Adds a surround-like effect to create the same surround effect produced by a multichannel system using only the left or right speaker balance. ..., Bass and Balance ❑ Press RESET on the remote control when in Dolby Surround. Virtual Select for surround sound (for stereo programs only). Adjust to turn off Steady Sound. ; ON Select to stabilize the volume. That option's settings appear. 5 Use the joystick to scroll through the options. 4 Press to ...
z A virtual surround system attempts to mono programs. OFF Normal stereo or mono reception. 60 Simulated Adds a surround-like effect to create the same surround effect produced by a multichannel system using only the left or right speaker balance. ..., Bass and Balance ❑ Press RESET on the remote control when in Dolby Surround. Virtual Select for surround sound (for stereo programs only). Adjust to turn off Steady Sound. ; ON Select to stabilize the volume. That option's settings appear. 5 Use the joystick to scroll through the options. 4 Press to ...
Operating Instructions
Page 61
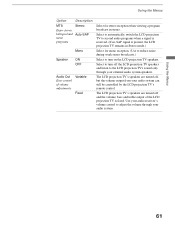
... noise during weak stereo broadcasts.) Select to turn off , but the volume output from your audio system can still be controlled by the LCD projection TV's remote control. The LCD projection TV's speakers are turned off the LCD projection TV speakers and listen to second audio programs when... a signal is received. (If no SAP signal is fixed. Select to automatically switch the LCD projection TV to the LCD projection TV's sound...
... noise during weak stereo broadcasts.) Select to turn off , but the volume output from your audio system can still be controlled by the LCD projection TV's remote control. The LCD projection TV's speakers are turned off the LCD projection TV speakers and listen to second audio programs when... a signal is received. (If no SAP signal is fixed. Select to automatically switch the LCD projection TV to the LCD projection TV's sound...
Operating Instructions
Page 66
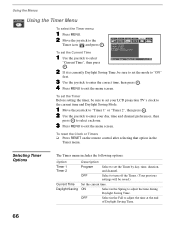
...: Option Timer 1 Timer 2 Current Time Daylight Saving Description Program Select to the Timer icon and press . OFF Select to turn off the Timer. (Your previous settings will be sure to set your LCD projection TV's clock to the current time and Daylight Saving Mode. 1 Move the joystick to "Timer 1" or "Timer 2", then press...
...: Option Timer 1 Timer 2 Current Time Daylight Saving Description Program Select to the Timer icon and press . OFF Select to turn off the Timer. (Your previous settings will be sure to set your LCD projection TV's clock to the current time and Daylight Saving Mode. 1 Move the joystick to "Timer 1" or "Timer 2", then press...


