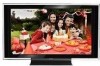
Operating Instructions
Page 2
... generates, uses and can be of sufficient magnitude to constitute a risk of programming and signal provided by pulling the plug itself. s Connect the equipment into the outlet, contact your Sony dealer regarding this equipment does cause harmful interference to moisture condensation. Safety s Operate the TV only on the cord. Sony TV Model No. Owner's Record The model and serial numbers are located at temperatures below . Installing s The TV should...
... generates, uses and can be of sufficient magnitude to constitute a risk of programming and signal provided by pulling the plug itself. s Connect the equipment into the outlet, contact your Sony dealer regarding this equipment does cause harmful interference to moisture condensation. Safety s Operate the TV only on the cord. Sony TV Model No. Owner's Record The model and serial numbers are located at temperatures below . Installing s The TV should...
Operating Instructions
Page 3
... Using HDMI Control for Wall-Mounting 10 2. Installing the TV 10 Preventing the TV from P&P and PIP 31 Using the Menus Adjusting TV Settings 32 Watching TV 32 Accessing the Equipment Connected to Your TV 32 Navigating through TV Home Menu on XMB 33 TV Setting Description 34 Product Support 34 Clock/Timers Settings 34 Picture Settings 34 Sound Settings 36 Screen Settings 37 Video Options Settings 39 Audio Options Settings 40 Channel Settings 40 CC Closed Captions (CC) Settings 41 Parental Lock Settings 42 External Inputs Settings 44 HDMI Settings 44 General Settings...
... Using HDMI Control for Wall-Mounting 10 2. Installing the TV 10 Preventing the TV from P&P and PIP 31 Using the Menus Adjusting TV Settings 32 Watching TV 32 Accessing the Equipment Connected to Your TV 32 Navigating through TV Home Menu on XMB 33 TV Setting Description 34 Product Support 34 Clock/Timers Settings 34 Picture Settings 34 Sound Settings 36 Screen Settings 37 Video Options Settings 39 Audio Options Settings 40 Channel Settings 40 CC Closed Captions (CC) Settings 41 Parental Lock Settings 42 External Inputs Settings 44 HDMI Settings 44 General Settings...
Operating Instructions
Page 4
... the cables. s Use only an original Sony AC power cord, not other equipment. Wall outlet The TV set completely, pull the plug from being damaged. Contact your safety. This will not be connected to an AC power socket outlet with dry cloth. 7) Do not block any ventilation openings. To disconnect the TV set with the apparatus. Picture distortion and/or noisy sound may damage the TV set...
... the cables. s Use only an original Sony AC power cord, not other equipment. Wall outlet The TV set completely, pull the plug from being damaged. Contact your safety. This will not be connected to an AC power socket outlet with dry cloth. 7) Do not block any ventilation openings. To disconnect the TV set with the apparatus. Picture distortion and/or noisy sound may damage the TV set...

Operating Instructions
Page 5
... AC power cord when cleaning this TV. s When carrying the TV, do not subject it can accumulate dust over time. Disposal of used batteries To preserve our environment, dispose of antenna discharge unit, connection to make occasional snapping or popping sounds, particularly when being turned on the LCD panel and the frame around the screen. KDL-40XBR4/ KDL-46XBR4/ KDL-40XBR5/ KDL-46XBR5 KDL-52XBR4/ KDL-52XBR5 Electric service equipment...
... AC power cord when cleaning this TV. s When carrying the TV, do not subject it can accumulate dust over time. Disposal of used batteries To preserve our environment, dispose of antenna discharge unit, connection to make occasional snapping or popping sounds, particularly when being turned on the LCD panel and the frame around the screen. KDL-40XBR4/ KDL-46XBR4/ KDL-40XBR5/ KDL-46XBR5 KDL-52XBR4/ KDL-52XBR5 Electric service equipment...
Operating Instructions
Page 10
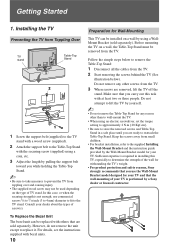
... sure to store the removed screws and Table-Top Stand in installing this TV, especially to the supplied Installing the Wall-Mount Bracket and the instruction guide provided by yourself. ~ • Do not remove the Table-Top Stand for your TV. Consult your TV is not enough, use the Wall-Mount Bracket model designed for Wall-Mounting This TV can be installed on a wall by using a coin, etc. 3 Adjust the length by a Sony dealer or licensed contractor. To Replace the Bezel Unit...
... sure to store the removed screws and Table-Top Stand in installing this TV, especially to the supplied Installing the Wall-Mount Bracket and the instruction guide provided by yourself. ~ • Do not remove the Table-Top Stand for your TV. Consult your TV is not enough, use the Wall-Mount Bracket model designed for Wall-Mounting This TV can be installed on a wall by using a coin, etc. 3 Adjust the length by a Sony dealer or licensed contractor. To Replace the Bezel Unit...
Operating Instructions
Page 11
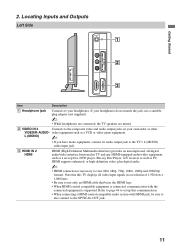
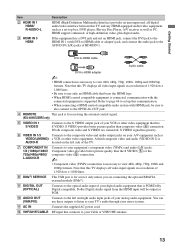
... audio output jack to use a suitable plug adapter (not supplied). ~ • While headphones are connected, the TV speakers are muted. 2 VIDEO IN 2 Connects to the OPTICAL OUT jack. 11 Note that bears the HDMI logo. • When HDMI control compatible equipment is connected, communication with HDMI jack, be sure to also connect to the composite video and audio output jacks on your headphones. HDMI supports enhanced, or high-definition video, plus digital audio. ~ • HDMI connection is supported. Getting Started 2. Locating Inputs...
... audio output jack to use a suitable plug adapter (not supplied). ~ • While headphones are connected, the TV speakers are muted. 2 VIDEO IN 2 Connects to the OPTICAL OUT jack. 11 Note that bears the HDMI logo. • When HDMI control compatible equipment is connected, communication with HDMI jack, be sure to also connect to the composite video and audio output jacks on your headphones. HDMI supports enhanced, or high-definition video, plus digital audio. ~ • HDMI connection is supported. Getting Started 2. Locating Inputs...
Operating Instructions
Page 13
...-HDMI adapter ~ • HDMI connection is necessary to view 480i, 480p, 720p, 1080i, 1080p and 1080/24p formats. S VIDEO provides better picture quality than the S VIDEO (5) or the composite video (6) connection. ~ • Component video (YPBPR) connection is necessary to view 480i, 480p, 720p, 1080i and 1080p formats. qs VHF/UHF/CABLE RF input that this TV displays all video input signals in a resolution of your Cable or VHF/UHF antenna. 13 Note that is for receiving the external control signal. (KDL-40...
...-HDMI adapter ~ • HDMI connection is necessary to view 480i, 480p, 720p, 1080i, 1080p and 1080/24p formats. S VIDEO provides better picture quality than the S VIDEO (5) or the composite video (6) connection. ~ • Component video (YPBPR) connection is necessary to view 480i, 480p, 720p, 1080i and 1080p formats. qs VHF/UHF/CABLE RF input that this TV displays all video input signals in a resolution of your Cable or VHF/UHF antenna. 13 Note that is for receiving the external control signal. (KDL-40...
Operating Instructions
Page 18
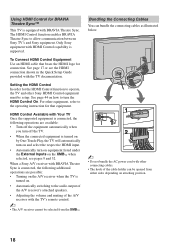
... the HDMI connection shown in the Quick Setup Guide provided with the TV's remote control. ~ • The A/V receiver cannot be setup. To Connect HDMI Control Equipment Use an HDMI cable that equipment. See page 44 on attaching position. 18 Bundling the Connecting Cables You can be opened from the XMB™. Using HDMI Control for BRAVIA Theatre Sync™ This TV is supported. Setting the HDMI Control In order for the HDMI Control function to turn on equipment listed under the External Inputs...
... the HDMI connection shown in the Quick Setup Guide provided with the TV's remote control. ~ • The A/V receiver cannot be setup. To Connect HDMI Control Equipment Use an HDMI cable that equipment. See page 44 on attaching position. 18 Bundling the Connecting Cables You can be opened from the XMB™. Using HDMI Control for BRAVIA Theatre Sync™ This TV is supported. Setting the HDMI Control In order for the HDMI Control function to turn on equipment listed under the External Inputs...
Operating Instructions
Page 19
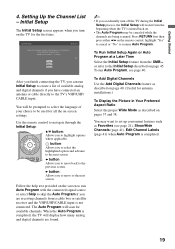
... run Auto Program with the connected signal source or select Skip to skip the Auto Program if you have connected an antenna or cable directly to the next screen. You may be used for antenna installations.) To Display the Picture in Your Preferred Aspect Ratio Select the proper Wide Mode as described on page 40. (Useful for all the on the screen to run Initial Setup to be canceled while the channels...
... run Auto Program with the connected signal source or select Skip to skip the Auto Program if you have connected an antenna or cable directly to the next screen. You may be used for antenna installations.) To Display the Picture in Your Preferred Aspect Ratio Select the proper Wide Mode as described on page 40. (Useful for all the on the screen to run Initial Setup to be canceled while the channels...

Operating Instructions
Page 22
... to advance forward a set period of your TV (see "Using ql Buttons Other Equipment with Your Remote Control" on BD (Blu-ray Disc), DVD or STB or STB, these buttons operate the video equipment you want the TV to your BRAVIA Theatre Sync audio system. qg Buttons X REC PAUSE: Press to adjust the volume. To cancel Sleep Timer, press SLEEP repeatedly until the TV displays the time in fast rewind mode. ADVANCE: Press...
... to advance forward a set period of your TV (see "Using ql Buttons Other Equipment with Your Remote Control" on BD (Blu-ray Disc), DVD or STB or STB, these buttons operate the video equipment you want the TV to your BRAVIA Theatre Sync audio system. qg Buttons X REC PAUSE: Press to adjust the volume. To cancel Sleep Timer, press SLEEP repeatedly until the TV displays the time in fast rewind mode. ADVANCE: Press...
Operating Instructions
Page 24
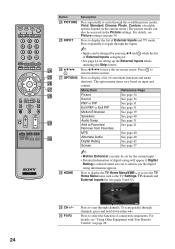
... menu items vary based on page 28. 24 Press to display the TV Home Menu/XMB™ to move the on-screen cursor. To scan quickly through channels. For details, see "Using Other Equipment with Your Remote Control" on input and content. wf wh V/v/B/b Press V/v/B/b to access the TV Home Menu items such as the TV Settings, TV channels and External Inputs list (see Picture settings on page 34. F1/F2 Sound Screen Video Options TV Press to scan through channels...
... menu items vary based on page 28. 24 Press to display the TV Home Menu/XMB™ to move the on-screen cursor. To scan quickly through channels. For details, see "Using Other Equipment with Your Remote Control" on input and content. wf wh V/v/B/b Press V/v/B/b to access the TV Home Menu items such as the TV Settings, TV channels and External Inputs list (see Picture settings on page 34. F1/F2 Sound Screen Video Options TV Press to scan through channels...

Operating Instructions
Page 31
... to change channels. • Inputs with television tuner is not available. To Change Inputs or Channels in P&P mode, use the PIP feature. • For the PIP feature, Closed Caption (CC) is required to watch two simultaneous live television program. 31 P&P Availability In main window In sub window Video 1/2/3 Component 1/2 HDMI IN 1/2/3 (except PC timing) TV Channel (VHF/UHF/ CABLE IN) Video 1/2/3 Component 1/2 PIP Availability In main window In sub window PC HDMI IN 1/2/3 (PC timing) TV Channel (VHF/UHF/ CABLE IN...
... to change channels. • Inputs with television tuner is not available. To Change Inputs or Channels in P&P mode, use the PIP feature. • For the PIP feature, Closed Caption (CC) is required to watch two simultaneous live television program. 31 P&P Availability In main window In sub window Video 1/2/3 Component 1/2 HDMI IN 1/2/3 (except PC timing) TV Channel (VHF/UHF/ CABLE IN) Video 1/2/3 Component 1/2 PIP Availability In main window In sub window PC HDMI IN 1/2/3 (PC timing) TV Channel (VHF/UHF/ CABLE IN...
Operating Instructions
Page 33
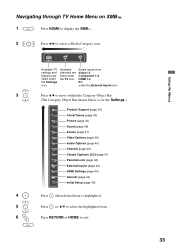
... Settings Available TV settings and features are listed under the External Inputs icon. 3 Press V/v to move within the Category Object Bar. (The Category Object Bar shown below is for the Settings.) Product Support (page 34) Clock/Timers (page 34) Picture (page 34) Sound (page 36) Screen (page 37) Video Options (page 39) Audio Options (page 40) Channel (page 40) CC Closed Captions (CC) (page 41) Parental Lock (page 42) External Inputs (page 44) HDMI Settings...
... Settings Available TV settings and features are listed under the External Inputs icon. 3 Press V/v to move within the Category Object Bar. (The Category Object Bar shown below is for the Settings.) Product Support (page 34) Clock/Timers (page 34) Picture (page 34) Sound (page 36) Screen (page 37) Video Options (page 39) Audio Options (page 40) Channel (page 40) CC Closed Captions (CC) (page 41) Parental Lock (page 42) External Inputs (page 44) HDMI Settings...
Operating Instructions
Page 34
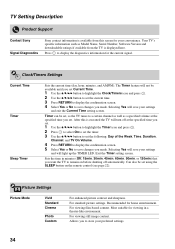
... remain on the remote control (see page 22). Allows you to a certain channel as well as Model Name, Serial Number, Software Version and downloadable ratings if available from this is displayed here. For viewing film-based content. Timer can be set , so the TV tunes to store your convenience. Clock/Timers Settings Current Time Timer Sleep Timer Sets the current time (day, hour, minutes, and AM/PM). Selecting Yes will light up the TIMER LED.
... remain on the remote control (see page 22). Allows you to a certain channel as well as Model Name, Serial Number, Software Version and downloadable ratings if available from this is displayed here. For viewing film-based content. Timer can be set , so the TV tunes to store your convenience. Clock/Timers Settings Current Time Timer Sleep Timer Sets the current time (day, hour, minutes, and AM/PM). Selecting Yes will light up the TIMER LED.

Operating Instructions
Page 37
... the 16:9 screen, displaying as all programs and commercials. Full Enlarges the picture horizontally to display the 16:9 picture in its original aspect ratio. Choose a screen mode from the Wide Mode option. Wide Zoom Enlarges the 4:3 picture to fill the screen. Volume Offset Adjusts the volume level of the current input (TV or video input) relative to other inputs. ~ • Sound settings for PC Timings (HDMI or PC input) are changed . ~ • 4:3 Default is not available...
... the 16:9 screen, displaying as all programs and commercials. Full Enlarges the picture horizontally to display the 16:9 picture in its original aspect ratio. Choose a screen mode from the Wide Mode option. Wide Zoom Enlarges the 4:3 picture to fill the screen. Volume Offset Adjusts the volume level of the current input (TV or video input) relative to other inputs. ~ • Sound settings for PC Timings (HDMI or PC input) are changed . ~ • 4:3 Default is not available...

Operating Instructions
Page 39
... Auto 1 or Auto 2 to disable the detection. Set to Video when the HDMI input signal is 1080/24p, or when Video-A mode is not supported on the input source (video or photograph data). Standard Provides smooth picture movement. Video-A Sets suitable image quality, depending on signal. It is recommended that are input from video game equipment and PCs. Off Use this at the factory default setting. Change the settings only when the luminance tone of the display is...
... Auto 1 or Auto 2 to disable the detection. Set to Video when the HDMI input signal is 1080/24p, or when Video-A mode is not supported on the input source (video or photograph data). Standard Provides smooth picture movement. Video-A Sets suitable image quality, depending on signal. It is recommended that are input from video game equipment and PCs. Off Use this at the factory default setting. Change the settings only when the luminance tone of the display is...
Operating Instructions
Page 40
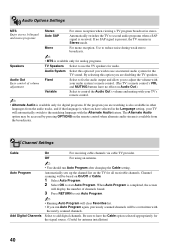
...the TV for the TV sound. Audio Out Easy control of volume adjustment Fixed Select to start Auto Program. Be sure to second audio programs when a SAP signal is present, the TV remains in stereo. Channel Settings Cable Auto Program Add Digital Channels On For receiving cable channels via cable TV provider. When Auto Program is available only for analog programs. Speakers TV Speakers Select to add digital channels. Automatically switches the TV to have the Cable option selected appropriately for the signal source. (Useful for audio. Off For using an antenna. ~ •...
...the TV for the TV sound. Audio Out Easy control of volume adjustment Fixed Select to start Auto Program. Be sure to second audio programs when a SAP signal is present, the TV remains in stereo. Channel Settings Cable Auto Program Add Digital Channels On For receiving cable channels via cable TV provider. When Auto Program is available only for analog programs. Speakers TV Speakers Select to add digital channels. Automatically switches the TV to have the Cable option selected appropriately for the signal source. (Useful for audio. Off For using an antenna. ~ •...
Operating Instructions
Page 42
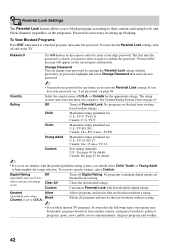
... Young Adult to enter a four-digit password. No programs are not familiar with the previously set password, highlight and select Change Password then enter the new password. ~ • You need your password for any future access into the Parental Lock settings. Unrated Allow (Available only Country is created, you block unrated TV programs, be blocked: programs broadcast from viewing based on the remote control to help simplify the rating selection. Blocks all...
... Young Adult to enter a four-digit password. No programs are not familiar with the previously set password, highlight and select Change Password then enter the new password. ~ • You need your password for any future access into the Parental Lock settings. Unrated Allow (Available only Country is created, you block unrated TV programs, be blocked: programs broadcast from viewing based on the remote control to help simplify the rating selection. Blocks all...
Operating Instructions
Page 47
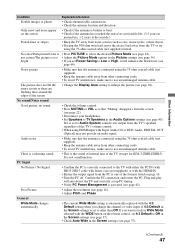
... supplied)) or with the HDMI IN. • Ensure the output signal from the TV's speakers regardless of its serviceable life. (3-5 years in the Picture settings (see page 37). • Check Auto Wide in Wide Mode selected with the WIDE button on the remote control, set up PC timing. • Verify PC Power Management is automatically replaced with Super Audio CD or DVD-Audio, DIGITAL OUT (Optical) may not provide an audio signal. Confirm the PC connection...
... supplied)) or with the HDMI IN. • Ensure the output signal from the TV's speakers regardless of its serviceable life. (3-5 years in the Picture settings (see page 37). • Check Auto Wide in Wide Mode selected with the WIDE button on the remote control, set up PC timing. • Verify PC Power Management is automatically replaced with Super Audio CD or DVD-Audio, DIGITAL OUT (Optical) may not provide an audio signal. Confirm the PC connection...
Operating Instructions
Page 51
.../TIMER LED 25 Picture 35 Settings Audio Options 40 Channel 40 Clock/Timers 34 Closed Captions (CC) 41 External Inputs 44 General 44 HDMI Settings 44 Initial Setup 45 Parental Lock 42 Picture 34 Product Support 34 Screen 37 Sound 36 Video Options 39 Sharpness 35 Show/Hide Channels 41 Signal Diagnostics 34 SLEEP button 22 Sleep Timer 34 Sound Booster 37 SOUND button 21 Sound Mode 36 Speaker 25 Speakers 40 STANDBY LED 25 Steady Sound 37 Surround 36 T THEATER button 22 Timer 34 Treble 36 Troubleshooting 46-48 TV Auto Power On 44 TV POWER button 22 TV...
.../TIMER LED 25 Picture 35 Settings Audio Options 40 Channel 40 Clock/Timers 34 Closed Captions (CC) 41 External Inputs 44 General 44 HDMI Settings 44 Initial Setup 45 Parental Lock 42 Picture 34 Product Support 34 Screen 37 Sound 36 Video Options 39 Sharpness 35 Show/Hide Channels 41 Signal Diagnostics 34 SLEEP button 22 Sleep Timer 34 Sound Booster 37 SOUND button 21 Sound Mode 36 Speaker 25 Speakers 40 STANDBY LED 25 Steady Sound 37 Surround 36 T THEATER button 22 Timer 34 Treble 36 Troubleshooting 46-48 TV Auto Power On 44 TV POWER button 22 TV...

