Operating Instructions
Page 8
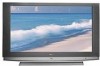
...Sony TV Presenting the Sony TV 8 Package Contents 8 Features 8 Enjoying Your TV 10 Notes on the TV 10 Screen 10 Indicators 11 Projection Lamp 11 Installing the TV 12 Carrying Your TV 12 Take Precaution during Installation 13 To Prevent the TV from Falling 13 When Installing Your TV Against a Wall .....13 Recommended Viewing Area 13 TV... Overview 56 Accessing the Video Settings 58 Selecting Video Options 58 Accessing the Audio Settings 60 Selecting Audio Options 60 Accessing the Screen Settings 62 Selecting Screen Options 62 Accessing the Channel Settings 64 Selecting ...
...Sony TV Presenting the Sony TV 8 Package Contents 8 Features 8 Enjoying Your TV 10 Notes on the TV 10 Screen 10 Indicators 11 Projection Lamp 11 Installing the TV 12 Carrying Your TV 12 Take Precaution during Installation 13 To Prevent the TV from Falling 13 When Installing Your TV Against a Wall .....13 Recommended Viewing Area 13 TV... Overview 56 Accessing the Video Settings 58 Selecting Video Options 58 Accessing the Audio Settings 60 Selecting Audio Options 60 Accessing the Screen Settings 62 Selecting Screen Options 62 Accessing the Channel Settings 64 Selecting ...

Operating Instructions
Page 45
.... qj MENU Press to step through the Wide Screen Mode setting: Wide Zoom, Normal, Full and Zoom. Press again to move the on page 60. Press V/v/B/b to restore the picture. For more details, see page 71. Use the dot as DVD, VCR and others (see "Using the ... 3. Press to turn on page 51. wl CH +/- e; Press to display the disc menu from external equipment such as a reference when operating the TV. Press repeatedly to record. Button Description qg DVD/VCR z REC: Press to step through the available audio effect models: TruSurround XT, Simulated, Off. ...
.... qj MENU Press to step through the Wide Screen Mode setting: Wide Zoom, Normal, Full and Zoom. Press again to move the on page 60. Press V/v/B/b to restore the picture. For more details, see page 71. Use the dot as DVD, VCR and others (see "Using the ... 3. Press to turn on page 51. wl CH +/- e; Press to display the disc menu from external equipment such as a reference when operating the TV. Press repeatedly to record. Button Description qg DVD/VCR z REC: Press to step through the available audio effect models: TruSurround XT, Simulated, Off. ...
Operating Instructions
Page 58
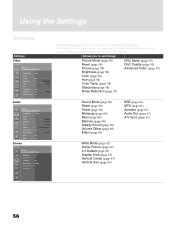
... 59) DRC Mode (page 59) DRC Palette (page 59) Advanced Video (page 59) Sound Mode (page 60) Reset (page 60) Treble (page 60) Midrange (page 60) Bass (page 60) Balance (page 60) Steady Sound (page 60) Volume Offset (page 60) Effect (page 60) BBE (page 61) MTS (page 61) Speaker (page 61) Audio Out (page 61) A/V Sync (page 61...
... 59) DRC Mode (page 59) DRC Palette (page 59) Advanced Video (page 59) Sound Mode (page 60) Reset (page 60) Treble (page 60) Midrange (page 60) Bass (page 60) Balance (page 60) Steady Sound (page 60) Volume Offset (page 60) Effect (page 60) BBE (page 61) MTS (page 61) Speaker (page 61) Audio Out (page 61) A/V Sync (page 61...

Operating Instructions
Page 62
... Settings 3. To exit the Audio, press WEGA GATE . Adjust to increase or decrease the sound level of the current input (TV or video input) relative to enhance treble and bass. Using the Settings Accessing the Audio Settings 1. The Audio settings include the... to other inputs. Simulated Adds a surround-like effect to confirm the selection. Press to mono programs. Off Normal stereo or mono reception. 60 Press WEGA GATE........ Highlight 4. TruSurround Select for surround sound (for the options grayed out). Select OK to change settings, press V v ...
... Settings 3. To exit the Audio, press WEGA GATE . Adjust to increase or decrease the sound level of the current input (TV or video input) relative to enhance treble and bass. Using the Settings Accessing the Audio Settings 1. The Audio settings include the... to other inputs. Simulated Adds a surround-like effect to confirm the selection. Press to mono programs. Off Normal stereo or mono reception. 60 Press WEGA GATE........ Highlight 4. TruSurround Select for surround sound (for the options grayed out). Select OK to change settings, press V v ...
Operating Instructions
Page 75
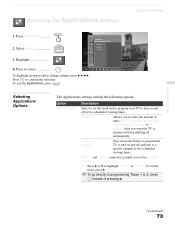
...: Option Clock/Timers Description Select to set the clock and to program your TV to programming Timer 1 or 2, press instead of time (Off, 15 minutes, 30 minutes, 45 minutes, 60 minutes or 90 minutes) that you want the TV to confirm the selection. To set the Current Time. 1 Press V or... or Timer 2. Using the Settings Accessing the Applications Settings Using the Settings 1. Timer 1 Timer 2 You can use the Timers to program the TV to turn on and off at two scheduled viewing times. Press WEGA GATE........ Timer 1 and Timer 2 cannot be set until you to select the...
...: Option Clock/Timers Description Select to set the clock and to program your TV to programming Timer 1 or 2, press instead of time (Off, 15 minutes, 30 minutes, 45 minutes, 60 minutes or 90 minutes) that you want the TV to confirm the selection. To set the Current Time. 1 Press V or... or Timer 2. Using the Settings Accessing the Applications Settings Using the Settings 1. Timer 1 Timer 2 You can use the Timers to program the TV to turn on and off at two scheduled viewing times. Press WEGA GATE........ Timer 1 and Timer 2 cannot be set until you to select the...
Operating Instructions
Page 85
...73. Digital cable box does not work with your digital cable box. This is a natural rise in the Video menu (see page 60). to factory settings Cannot cycle through the other ❏ Be sure the Label Video Inputs option is not available. video equipment connected to the...press the POWER button on the TV. (The TV will remain lit even when the TV is designed to Skip (see page 66), enter the following master password: 4357. The master password clears your cable provider for both KDF-E55A20 and KDF-E60A20). TV cabinet creaks ❏ When the TV is in gray, this may ...
...73. Digital cable box does not work with your digital cable box. This is a natural rise in the Video menu (see page 60). to factory settings Cannot cycle through the other ❏ Be sure the Label Video Inputs option is not available. video equipment connected to the...press the POWER button on the TV. (The TV will remain lit even when the TV is designed to Skip (see page 66), enter the following master password: 4357. The master password clears your cable provider for both KDF-E55A20 and KDF-E60A20). TV cabinet creaks ❏ When the TV is in gray, this may ...
Operating Instructions
Page 86
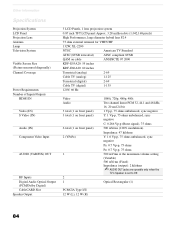
...projection system 0.87 inch TFT LCD panel Approx. 3.28 million dots (1,042,168 pixels) High Performance, large diameter hybrid lens F2.4 75 ohm external terminal for VHF/UHF 132W, XL-2200 NTSC American TV Standard ATSC (8VSB terrestrial) ATSC compliant 8VSB QAM on cable ANSI/SCTE 07 2000 KDF-E55A20: 55 inches KDF-E60A20: 60... inches Terrestrial (analog) 2-69 Cable TV (analog) 1-125 Terrestrial (digital) 2-69 Cable TV (digital) 1-135 120V, 60 Hz Video Audio 3 total (1 on front panel) ...
...projection system 0.87 inch TFT LCD panel Approx. 3.28 million dots (1,042,168 pixels) High Performance, large diameter hybrid lens F2.4 75 ohm external terminal for VHF/UHF 132W, XL-2200 NTSC American TV Standard ATSC (8VSB terrestrial) ATSC compliant 8VSB QAM on cable ANSI/SCTE 07 2000 KDF-E55A20: 55 inches KDF-E60A20: 60... inches Terrestrial (analog) 2-69 Cable TV (analog) 1-125 Terrestrial (digital) 2-69 Cable TV (digital) 1-135 120V, 60 Hz Video Audio 3 total (1 on front panel) ...
Operating Instructions
Page 89
... Video 59 Alternate Audio 49 Alternate Video 49 ANT button 42 Applications Menu 73 Audio Menu 60 Audio receiver, connecting 39 Audio setting 56 B Balance, adjusting 60 Bass, adjusting 60 Batteries, inserting in remote 41 Bilingual audio 61 Brightness, adjusting 58 C Cable with VCR, connecting 32 Cable box connecting ..., 51 FUNCTION button 42 G Game Picture 62 GUIDE button 42, 48 Guide menu 49 H Hue, adjusting 58 I Inputs, labeling 70 Installation of the projection TV 19-39 J JUMP button 42, 51 L Label Channels 30, 65 video inputs 70 Lamp, replacing 76-79 M MENU button 43 Menus Parent 66 Screen...
... Video 59 Alternate Audio 49 Alternate Video 49 ANT button 42 Applications Menu 73 Audio Menu 60 Audio receiver, connecting 39 Audio setting 56 B Balance, adjusting 60 Bass, adjusting 60 Batteries, inserting in remote 41 Bilingual audio 61 Brightness, adjusting 58 C Cable with VCR, connecting 32 Cable box connecting ..., 51 FUNCTION button 42 G Game Picture 62 GUIDE button 42, 48 Guide menu 49 H Hue, adjusting 58 I Inputs, labeling 70 Installation of the projection TV 19-39 J JUMP button 42, 51 L Label Channels 30, 65 video inputs 70 Lamp, replacing 76-79 M MENU button 43 Menus Parent 66 Screen...
Operating Instructions
Page 90
... Sharpness, adjusting 58 Specifications 84-85 Steady Sound adjusting 60 Surround sound 60, 61 T Timer set current 74 TIMER indicator 11, 14 Timer setting 73 Treble, adjusting 60, 62 troubleshooting 80-83 TV FUNCTION button 42 TV POWER button 43 TV/VIDEO button 43 V VCR using with remote control 46... with cable box, connecting 33 with cable, connecting 32 Video inputs, labeling 70 Video Modes, selecting 58 88 Rear panel controls and connections...
... Sharpness, adjusting 58 Specifications 84-85 Steady Sound adjusting 60 Surround sound 60, 61 T Timer set current 74 TIMER indicator 11, 14 Timer setting 73 Treble, adjusting 60, 62 troubleshooting 80-83 TV FUNCTION button 42 TV POWER button 43 TV/VIDEO button 43 V VCR using with remote control 46... with cable box, connecting 33 with cable, connecting 32 Video inputs, labeling 70 Video Modes, selecting 58 88 Rear panel controls and connections...


