Operating Instructions
Page 3
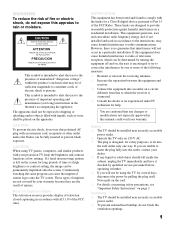
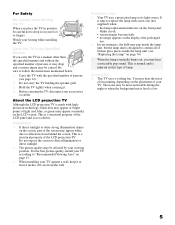
... can be installed near an easily accessible power outlet. ❑ Operate the TV only on , the user is no objects filled with liquids, such as vases, shall be of sufficient magnitude to constitute a risk of electric shock to the instructions, may be placed on Caption Vision This television receiver provides display of television closed captioning in accordance to persons. This equipment generates, uses and can...
... can be installed near an easily accessible power outlet. ❑ Operate the TV only on , the user is no objects filled with liquids, such as vases, shall be of sufficient magnitude to constitute a risk of electric shock to the instructions, may be placed on Caption Vision This television receiver provides display of television closed captioning in accordance to persons. This equipment generates, uses and can...
Operating Instructions
Page 4
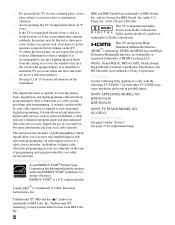
... KDF-E60A20 SONY TV STAND MODEL NO: SU-GW12 Replacement Parts See page 4 under U.S. TruSurround XT technology is transported directly from the ceiling or to a warm location, or if the room temperature changes suddenly, the picture may require the use spot lighting directed down from a cold to cover the windows that this case, please wait a few hours to let the moisture evaporate before turning on the installation...
... KDF-E60A20 SONY TV STAND MODEL NO: SU-GW12 Replacement Parts See page 4 under U.S. TruSurround XT technology is transported directly from the ceiling or to a warm location, or if the room temperature changes suddenly, the picture may require the use spot lighting directed down from a cold to cover the windows that this case, please wait a few hours to let the moisture evaporate before turning on the installation...
Operating Instructions
Page 6
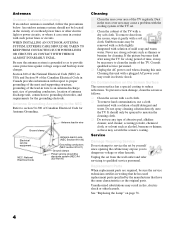
... 250 Part H) Cleaning ❑ Clean the rear cover area of the TV. To remove dust from the wall outlet and refer servicing to grounding electrodes, and requirements for a long period of time, it can come in electric shock. Unplug the set by the manufacturer that have the same characteristics as thinner or benzine for Antenna Grounding. See "Replacing the Lamp" on the Screen Surface The screen...
... 250 Part H) Cleaning ❑ Clean the rear cover area of the TV. To remove dust from the wall outlet and refer servicing to grounding electrodes, and requirements for a long period of time, it can come in electric shock. Unplug the set by the manufacturer that have the same characteristics as thinner or benzine for Antenna Grounding. See "Replacing the Lamp" on the Screen Surface The screen...
Operating Instructions
Page 7
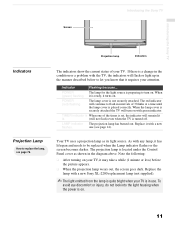
... pop sound. Be sure to follow the instructions mentioned below. ❑ Carry the TV with a new one (not supplied) when: • the lamp replacement indicator on the front panel blinks in red, • screen images become dark, • no image appears on the display after prolonged use. ❑ In rare instances, the bulb may pop inside the lamp unit, but the lamp unit is a structural property of the LCD projection TV. For...
... pop sound. Be sure to follow the instructions mentioned below. ❑ Carry the TV with a new one (not supplied) when: • the lamp replacement indicator on the front panel blinks in red, • screen images become dark, • no image appears on the display after prolonged use. ❑ In rare instances, the bulb may pop inside the lamp unit, but the lamp unit is a structural property of the LCD projection TV. For...
Operating Instructions
Page 8
... Audio Connections .........17 About Using S VIDEO 18 About Using HDMI to DVI Adapter 18 Basic Connections 19 Cable System or VHF/UHF 20 Cable Box and Antenna 21 Cable Box 22 Satellite Receiver 23 Digital Cable Box Or Digital Satellite Receiver 24 Using CableCARDTM Device 25 About Using CableCARDTM Device 25 Activating CableCARD Service 25 Removing the CableCARDTM Device...........26 Equipment with HDMI Connection 27 Equipment with DVI Connection 28 Equipment with Digital Audio (Optical) .......29 Setting Up the TV Channel List 30 Using Initial Setup 30 Connecting...
... Audio Connections .........17 About Using S VIDEO 18 About Using HDMI to DVI Adapter 18 Basic Connections 19 Cable System or VHF/UHF 20 Cable Box and Antenna 21 Cable Box 22 Satellite Receiver 23 Digital Cable Box Or Digital Satellite Receiver 24 Using CableCARDTM Device 25 About Using CableCARDTM Device 25 Activating CableCARD Service 25 Removing the CableCARDTM Device...........26 Equipment with HDMI Connection 27 Equipment with DVI Connection 28 Equipment with Digital Audio (Optical) .......29 Setting Up the TV Channel List 30 Using Initial Setup 30 Connecting...
Operating Instructions
Page 10
... Sony TV Presenting the Sony TV Thank you to receive not only standard definition but also high definition television. Similar controls are this operating manual and a Quick Setup Guide poster. Some of detail (Reality) and smoothness (Clarity) to create up and use the TV. without the need for a set -top box. (Check with access to digitally encrypted cable channels - Also included in this manual are all you will enable you for models KDF-E55A20 and KDF-E60A20. Instructions...
... Sony TV Presenting the Sony TV Thank you to receive not only standard definition but also high definition television. Similar controls are this operating manual and a Quick Setup Guide poster. Some of detail (Reality) and smoothness (Clarity) to create up and use the TV. without the need for a set -top box. (Check with access to digitally encrypted cable channels - Also included in this manual are all you will enable you for models KDF-E55A20 and KDF-E60A20. Instructions...
Operating Instructions
Page 13
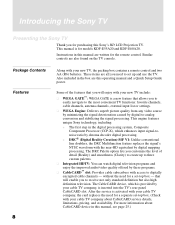
... replacement lamp (not supplied). ✍ The light emitted from the lamp is quite bright when your TV is located under the Control Panel cover as its light source. Replace it may take a while (1 minute or less) before the picture appears. ❑ When the projection lamp wears out, the screen goes dark. When (green) flashing it is not securely attached. one of your attention. Introducing the Sony TV Introducing the Sony TV Screen Projection lamp POWER LAMP TIMER POWER Indicators Indicators Projection Lamp How to replace...
... replacement lamp (not supplied). ✍ The light emitted from the lamp is quite bright when your TV is located under the Control Panel cover as its light source. Replace it may take a while (1 minute or less) before the picture appears. ❑ When the projection lamp wears out, the screen goes dark. When (green) flashing it is not securely attached. one of your attention. Introducing the Sony TV Introducing the Sony TV Screen Projection lamp POWER LAMP TIMER POWER Indicators Indicators Projection Lamp How to replace...
Operating Instructions
Page 18
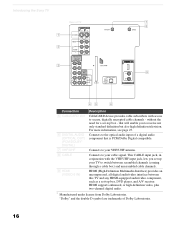
... page 25. This CABLE input jack, in conjunction with access to switch between this TV and any HDMI-equipped audio/video component, such as a set-top box, DVD player, and A/V receiver. Introducing the Sony TV 1 2 3 Rear of TV VIDEO IN 1 3 S VIDEO VHF/UHF VIDEO L (MONO) AUDIO R HD/DVD IN (1080i/720p/ 480p/480i) 4 5 Y PB PR L AUDIO R AUDIO OUT (VAR/FIX) L AUDIO R EJECT PCM/DOLBY DIGITAL DIGITAL AUDIO (OPTICAL) OUT CABLE 6 L R AUDIO IN 7 8 9 16 45 6 Connection 5 CableCARD slot 6 DIGITAL AUDIO (OPTICAL OUT) (PCM/DOLBY* DIGITAL) 7 VHF/UHF 8 CABLE 9 HDMI (VIDEO 6 IN...
... page 25. This CABLE input jack, in conjunction with access to switch between this TV and any HDMI-equipped audio/video component, such as a set-top box, DVD player, and A/V receiver. Introducing the Sony TV 1 2 3 Rear of TV VIDEO IN 1 3 S VIDEO VHF/UHF VIDEO L (MONO) AUDIO R HD/DVD IN (1080i/720p/ 480p/480i) 4 5 Y PB PR L AUDIO R AUDIO OUT (VAR/FIX) L AUDIO R EJECT PCM/DOLBY DIGITAL DIGITAL AUDIO (OPTICAL) OUT CABLE 6 L R AUDIO IN 7 8 9 16 45 6 Connection 5 CableCARD slot 6 DIGITAL AUDIO (OPTICAL OUT) (PCM/DOLBY* DIGITAL) 7 VHF/UHF 8 CABLE 9 HDMI (VIDEO 6 IN...
Operating Instructions
Page 19
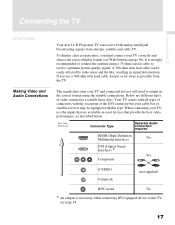
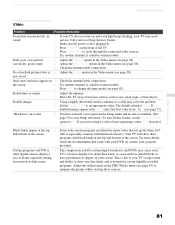
... Video and Audio Connections Your new LCD Projection TV can be equipped with the exception of video connectors available these days. A 300-ohm twin lead cable can receive both analog and digital broadcasting signals from the TV. The signals that provide the best video performance, as possible from antenna, satellite and cable TV. Best Video Performance Connector Type Separate Audio connection required HDMI (High-Definition Multimedia Interface) No DVI (Digital Visual Interface) * Yes Component S VIDEO Composite (not supplied...
... Video and Audio Connections Your new LCD Projection TV can be equipped with the exception of video connectors available these days. A 300-ohm twin lead cable can receive both analog and digital broadcasting signals from the TV. The signals that provide the best video performance, as possible from antenna, satellite and cable TV. Best Video Performance Connector Type Separate Audio connection required HDMI (High-Definition Multimedia Interface) No DVI (Digital Visual Interface) * Yes Component S VIDEO Composite (not supplied...
Operating Instructions
Page 20
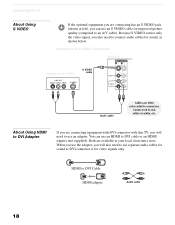
Connect red to red, white to connect audio cables for sound, as DVI connector is for video signals only. Because S VIDEO carries only the video signal, you also need to white, etc. Example of TV VIDEO IN 1 3 S VIDEO VIDEO L (MONO) AUDIO R Audio cable Cables are often color-coded to use separate audio cables for improved picture quality (compared to DVI cable or an HDMI adapter (not supplied). Both are connecting equipment with DVI connector with S VIDEO S VIDEO cable Rear of an S VIDEO Connection Equipment with this TV, you will also need to DVI Cable HDMI ...
Connect red to red, white to connect audio cables for sound, as DVI connector is for video signals only. Because S VIDEO carries only the video signal, you also need to white, etc. Example of TV VIDEO IN 1 3 S VIDEO VIDEO L (MONO) AUDIO R Audio cable Cables are often color-coded to use separate audio cables for improved picture quality (compared to DVI cable or an HDMI adapter (not supplied). Both are connecting equipment with DVI connector with S VIDEO S VIDEO cable Rear of an S VIDEO Connection Equipment with this TV, you will also need to DVI Cable HDMI ...
Operating Instructions
Page 24
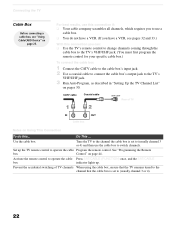
...: ❑ Use the TV's remote control to change channels coming through the cable box to the TV's VHF/UHF jack. (You must first program the remote control for your specific cable box.) To connect the cable box 1 Connect the CATV cable to the cable box's input jack. 2 Use a coaxial cable to connect the cable box's output jack to the TV's VHF/UHF jack. 3 Run Auto Program, as described in "Setting Up the TV Channel List" on pages 30. See "Programming the Remote box Control" on page 44. For best results, use this connection if...
...: ❑ Use the TV's remote control to change channels coming through the cable box to the TV's VHF/UHF jack. (You must first program the remote control for your specific cable box.) To connect the cable box 1 Connect the CATV cable to the cable box's input jack. 2 Use a coaxial cable to connect the cable box's output jack to the TV's VHF/UHF jack. 3 Run Auto Program, as described in "Setting Up the TV Channel List" on pages 30. See "Programming the Remote box Control" on page 44. For best results, use this connection if...

Operating Instructions
Page 26
... video cable (not supplied) AUDIO-L (white) AUDIO-R (red) Rear of your digital cable box or digital satellite receiver to the TV's component jacks. ✍ Component video (YPBPR) connection is necessary to connectors. Connect red to red, white to white, etc. 2 Use a component video cable to connect the YPBPR jacks of TV HD/DVD IN (1080i/720p/ 480p/480i) 4 5 Y PB PR L AUDIO R AUDIO OUT (VAR/FIX) L AUDIO R Audio cable (not supplied) Cables are often color-coded to view digital broadcastings in a resolution of 1,368 dots x 768 lines. 3 Use an audio cable to connect the AUDIO...
... video cable (not supplied) AUDIO-L (white) AUDIO-R (red) Rear of your digital cable box or digital satellite receiver to the TV's component jacks. ✍ Component video (YPBPR) connection is necessary to connectors. Connect red to red, white to white, etc. 2 Use a component video cable to connect the YPBPR jacks of TV HD/DVD IN (1080i/720p/ 480p/480i) 4 5 Y PB PR L AUDIO R AUDIO OUT (VAR/FIX) L AUDIO R Audio cable (not supplied) Cables are often color-coded to view digital broadcastings in a resolution of 1,368 dots x 768 lines. 3 Use an audio cable to connect the AUDIO...
Operating Instructions
Page 29
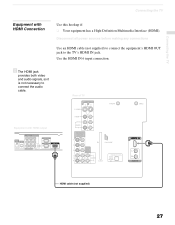
... TV Connecting the TV Equipment with HDMI output Rear of TV VIDEO IN 1 3 S VIDEO VHF/UHF VIDEO L (MONO) AUDIO R HD/DVD IN (1080i/720p/ 480p/480i) 4 5 Y PB PR L AUDIO R AUDIO OUT (VAR/FIX) L AUDIO R EJECT PCM/DOLBY DIGITAL DIGITAL AUDIO (OPTICAL) OUT CABLE 6 L R AUDIO IN HDMI cable (not supplied) 27 Use the HDMI IN 6 input connection. z The HDMI jack provides both video and audio signals, so it is not necessary to the TV's HDMI IN jack. Equipment with HDMI Connection Use this hookup if: ❑ Your equipment has a High...
... TV Connecting the TV Equipment with HDMI output Rear of TV VIDEO IN 1 3 S VIDEO VHF/UHF VIDEO L (MONO) AUDIO R HD/DVD IN (1080i/720p/ 480p/480i) 4 5 Y PB PR L AUDIO R AUDIO OUT (VAR/FIX) L AUDIO R EJECT PCM/DOLBY DIGITAL DIGITAL AUDIO (OPTICAL) OUT CABLE 6 L R AUDIO IN HDMI cable (not supplied) 27 Use the HDMI IN 6 input connection. z The HDMI jack provides both video and audio signals, so it is not necessary to the TV's HDMI IN jack. Equipment with HDMI Connection Use this hookup if: ❑ Your equipment has a High...

Operating Instructions
Page 46
... turns on the remote control and press the button simultaneously. 1 The selected FUNCTION button (DVR, DVD/VCR or SAT/CABLE) will flash twice, and when not, it flashes five times. Reprogramming the codes may cause the programmed codes to be lost and revert back to operate Sony brand video equipment. Watching the TV Programming the Remote Control The remote control is preset to the factory setting. To check if the code works Aim your equipment from the code listed...
... turns on the remote control and press the button simultaneously. 1 The selected FUNCTION button (DVR, DVD/VCR or SAT/CABLE) will flash twice, and when not, it flashes five times. Reprogramming the codes may cause the programmed codes to be lost and revert back to operate Sony brand video equipment. Watching the TV Programming the Remote Control The remote control is preset to the factory setting. To check if the code works Aim your equipment from the code listed...

Operating Instructions
Page 77
... Sony customer support, please write down the model and serial numbers of your TV. Other Information Overview This chapter includes the following topics: Topic Contacting Sony Replacing the Lamp Troubleshooting Specifications Optional Accessories Index Page 75 76 80 84 85 87 Contacting Sony If, after reading these operating instructions, you have additional questions related to the use of your Sony television, please call our Customer Information Services...
... Sony customer support, please write down the model and serial numbers of your TV. Other Information Overview This chapter includes the following topics: Topic Contacting Sony Replacing the Lamp Troubleshooting Specifications Optional Accessories Index Page 75 76 80 84 85 87 Contacting Sony If, after reading these operating instructions, you have additional questions related to the use of your Sony television, please call our Customer Information Services...

Operating Instructions
Page 78
... of the TV flashes, it . Be sure to Replace the Lamp 1 Turn off .) 2 Wait at least 30 minutes after removing the lamp. Doing so may reduce picture quality or lamp life. 76 Other Information Replacing the Lamp The projection lamp, which illuminates the picture, has a limited life. Vibration can cause fire or high temperature, resulting in injury or death. If the screen becomes dark, the color looks unusual...
... of the TV flashes, it . Be sure to Replace the Lamp 1 Turn off .) 2 Wait at least 30 minutes after removing the lamp. Doing so may reduce picture quality or lamp life. 76 Other Information Replacing the Lamp The projection lamp, which illuminates the picture, has a limited life. Vibration can cause fire or high temperature, resulting in injury or death. If the screen becomes dark, the color looks unusual...
Operating Instructions
Page 83
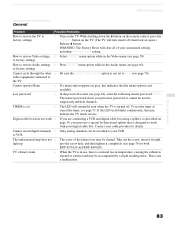
... a red light keeps flashing, your TV may need sound service. "Black box" on the front of the screen. Dotted lines or stripes ❏ Adjust the antenna. ❏ Move the TV away from 1 to an appropriate value. Your TV will show very fine detail, and is normal for certain digitally recorded programs. Adjust the reality/clarity in the DRC Palette menu (see page 59) to reset Setup selections.) To turn on ❏ Check the antenna/cable connections. Other...
... a red light keeps flashing, your TV may need sound service. "Black box" on the front of the screen. Dotted lines or stripes ❏ Adjust the antenna. ❏ Move the TV away from 1 to an appropriate value. Your TV will show very fine detail, and is normal for certain digitally recorded programs. Adjust the reality/clarity in the DRC Palette menu (see page 59) to reset Setup selections.) To turn on ❏ Check the antenna/cable connections. Other...
Operating Instructions
Page 85
... V button. Cannot record digital channels ❏ Only analog channels can be slanted. Other Information 83 to factory settings How to the TV Cannot operate Menu ❏ If a menu option appears in gray, this may indicate the TV needs service. video equipment connected to restore Audio settings ❏ Press RESET menu option while in the Video menu (see page 66), enter the following master password: 4357. TIMER is set to Skip (see page 60). to restore Video settings...
... V button. Cannot record digital channels ❏ Only analog channels can be slanted. Other Information 83 to factory settings How to the TV Cannot operate Menu ❏ If a menu option appears in gray, this may indicate the TV needs service. video equipment connected to restore Audio settings ❏ Press RESET menu option while in the Video menu (see page 66), enter the following master password: 4357. TIMER is set to Skip (see page 60). to restore Video settings...
Operating Instructions
Page 89
... Installation of the projection TV 19-39 J JUMP button 42, 51 L Label Channels 30, 65 video inputs 70 Lamp, replacing 76-79 M MENU button 43 Menus Parent 66 Screen 62 Setup 70 Mode Custom 58 Standard 58 Vivid 58 MTS/SAP 43, 61 MUTING button 42 N Noise Reduction 59 P Parental control, described 9 Parental Lock Settings 66 Password, changing 67 PICTURE button 42 Picture contrast, adjusting 58 POWER LED indicator 14 problems, troubleshooting 80-83 Program Guide 48 Program Options menu 49 R Ratings setting 68 viewing...
... Installation of the projection TV 19-39 J JUMP button 42, 51 L Label Channels 30, 65 video inputs 70 Lamp, replacing 76-79 M MENU button 43 Menus Parent 66 Screen 62 Setup 70 Mode Custom 58 Standard 58 Vivid 58 MTS/SAP 43, 61 MUTING button 42 N Noise Reduction 59 P Parental control, described 9 Parental Lock Settings 66 Password, changing 67 PICTURE button 42 Picture contrast, adjusting 58 POWER LED indicator 14 problems, troubleshooting 80-83 Program Guide 48 Program Options menu 49 R Ratings setting 68 viewing...
Operating Instructions
Page 90
... Lock 57 Screen 56 Setup 57 Video 56 Setup menu 70 Setup setting 57 Sharpness, adjusting 58 Specifications 84-85 Steady Sound adjusting 60 Surround sound 60, 61 T Timer set current 74 TIMER indicator 11, 14 Timer setting 73 Treble, adjusting 60, 62 troubleshooting 80-83 TV FUNCTION button 42 TV POWER button 43 TV/VIDEO button 43 V VCR using with remote control 46 with cable box, connecting 33 with cable, connecting 32 Video inputs, labeling 70 Video Modes, selecting 58 88 Rear panel controls and connections 16 Remote control inserting batteries 41 programming 44-45 Removing channels...
... Lock 57 Screen 56 Setup 57 Video 56 Setup menu 70 Setup setting 57 Sharpness, adjusting 58 Specifications 84-85 Steady Sound adjusting 60 Surround sound 60, 61 T Timer set current 74 TIMER indicator 11, 14 Timer setting 73 Treble, adjusting 60, 62 troubleshooting 80-83 TV FUNCTION button 42 TV POWER button 43 TV/VIDEO button 43 V VCR using with remote control 46 with cable box, connecting 33 with cable, connecting 32 Video inputs, labeling 70 Video Modes, selecting 58 88 Rear panel controls and connections 16 Remote control inserting batteries 41 programming 44-45 Removing channels...


