
Operating Instructions
Page 7
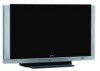
...lamp unit. (See "Replacing the Lamp" on the place you carry the LCD Projection TV in a manner other hazards. Replacement Parts When replacement parts are required, be careful not to drop it at least 2.2 m (approx. 7 ft.) for KDF-60XBR950 or 2.6 m (approx. 8 ft.) for a long period of any service ...screen image becomes dark, or no image will appear on the LCD screen. When the projection lamp wears out after using the LCD projection TV for KDF-70XBR950 away from your LCD projection TV, and within 60° of the vertical viewing area, and 130° of the screen may be affected...
...lamp unit. (See "Replacing the Lamp" on the place you carry the LCD Projection TV in a manner other hazards. Replacement Parts When replacement parts are required, be careful not to drop it at least 2.2 m (approx. 7 ft.) for KDF-60XBR950 or 2.6 m (approx. 8 ft.) for a long period of any service ...screen image becomes dark, or no image will appear on the LCD screen. When the projection lamp wears out after using the LCD projection TV for KDF-70XBR950 away from your LCD projection TV, and within 60° of the vertical viewing area, and 130° of the screen may be affected...

Operating Instructions
Page 8
Contents Introducing the Sony LCD Projection TV Presenting the Sony LCD Projection TV 9 Using This Manual 10 Enjoying Your LCD Projection TV 11 Replacing the Lamp 13 Using Twin View 55 Using the Freeze Function 58 Using Wide Screen Mode 59 Using the Digital Program Guide Displaying the Digital Program Guide 60 Installing and Connecting the LCD Projection TV Contents 17 Inserting...
Contents Introducing the Sony LCD Projection TV Presenting the Sony LCD Projection TV 9 Using This Manual 10 Enjoying Your LCD Projection TV 11 Replacing the Lamp 13 Using Twin View 55 Using the Freeze Function 58 Using Wide Screen Mode 59 Using the Digital Program Guide Displaying the Digital Program Guide 60 Installing and Connecting the LCD Projection TV Contents 17 Inserting...
Operating Instructions
Page 20
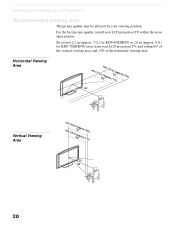
Sit at least 2.2 m (approx. 7 ft.) for KDF-60XBR950 or 2.6 m (approx. 8 ft.) for KDF-70XBR950 away from your LCD projection TV within 60° of the vertical viewing area, and 130° of the horizontal viewing area. Horizontal Viewing Area mmiinn..X2.X2... Area mmmmiinininn....X2X2.X.2X6mm6(7(0a0a"p"ppprrooxx..7X8Xffftftt.t.).).)) 30˚ 30˚ 20 For the best picture quality, install your LCD projection TV, and within the areas shown below. Installing and Connecting the LCD Projection TV Recommended Viewing Area The picture quality may be affected by your viewing position.
Sit at least 2.2 m (approx. 7 ft.) for KDF-60XBR950 or 2.6 m (approx. 8 ft.) for KDF-70XBR950 away from your LCD projection TV within 60° of the vertical viewing area, and 130° of the horizontal viewing area. Horizontal Viewing Area mmiinn..X2.X2... Area mmmmiinininn....X2X2.X.2X6mm6(7(0a0a"p"ppprrooxx..7X8Xffftftt.t.).).)) 30˚ 30˚ 20 For the best picture quality, install your LCD projection TV, and within the areas shown below. Installing and Connecting the LCD Projection TV Recommended Viewing Area The picture quality may be affected by your viewing position.
Operating Instructions
Page 46
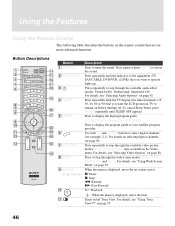
... your satellite program provider. Use with 0-9 and ENTER buttons to mute the sound. Turns on the remote control that you want the LCD projection TV to step through the wide screen modes: Wide Zoom, Normal, Full and Zoom. For details, see "Using Twin View™" on page... 92. For details, see "Selecting Audio Options" on page 55. 46 Press repeatedly until SLEEP OFF appears. For details, see page 60. X: Pause x: Stop m: Rewind M: Fast-Forward H: Playback : When the menu is displayed, move the on selecting digital channels, see "Selecting Video Options...
... your satellite program provider. Use with 0-9 and ENTER buttons to mute the sound. Turns on the remote control that you want the LCD projection TV to step through the wide screen modes: Wide Zoom, Normal, Full and Zoom. For details, see "Using Twin View™" on page... 92. For details, see "Selecting Audio Options" on page 55. 46 Press repeatedly until SLEEP OFF appears. For details, see page 60. X: Pause x: Stop m: Rewind M: Fast-Forward H: Playback : When the menu is displayed, move the on selecting digital channels, see "Selecting Video Options...
Operating Instructions
Page 52
... when you can press ENTER for immediate selection. Using the Features Watching the TV Many TV features can also select digital channels using the digital program guide. down information that appears on the LCD projection TV's screen (see "Using the Freeze Function" on and off. The channel ...will change between the current channel and the last channel selected. 8 MUTING Press to mute the sound. See page 60 for direct channel selection. down). 7 JUMP...
... when you can press ENTER for immediate selection. Using the Features Watching the TV Many TV features can also select digital channels using the digital program guide. down information that appears on the LCD projection TV's screen (see "Using the Freeze Function" on and off. The channel ...will change between the current channel and the last channel selected. 8 MUTING Press to mute the sound. See page 60 for direct channel selection. down). 7 JUMP...

Operating Instructions
Page 53
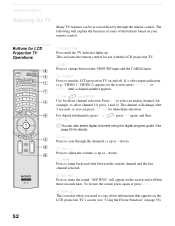
...2, VIDEO 3, VIDEO 4, VIDEO 5, VIDEO 6 and VIDEO 7. For details, see "Video Label" on page 103). See page 83 for enhanced picture contrast and sharpness. qs TV/VIDEO Press repeatedly to display a picture with minimum enhancements. RM-Y1000 When you select each mode, you selected (see "Mode" on before shutting off , press...qf PICTURE Press PICTURE repeatedly to remain on page 88. 53 SLEEP Press repeatedly to display the time in the Setup menu, your LCD projection TV will skip the video input you can also adjust the picture quality (such as a Video Label in minutes (15, 30, 45...
...2, VIDEO 3, VIDEO 4, VIDEO 5, VIDEO 6 and VIDEO 7. For details, see "Video Label" on page 103). See page 83 for enhanced picture contrast and sharpness. qs TV/VIDEO Press repeatedly to display a picture with minimum enhancements. RM-Y1000 When you select each mode, you selected (see "Mode" on before shutting off , press...qf PICTURE Press PICTURE repeatedly to remain on page 88. 53 SLEEP Press repeatedly to display the time in the Setup menu, your LCD projection TV will skip the video input you can also adjust the picture quality (such as a Video Label in minutes (15, 30, 45...
Operating Instructions
Page 60
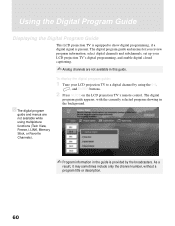
... programming, and enable digital closed captioning. ✍ Analog channels are not available while using the 0-9, , and ENTER buttons. 2 Press GUIDE on the LCD projection TV's remote control. z The digital program guide and menus are not available in the guide is provided by using multipicture functions (Twin View, Freeze, i.LINK, Memory ... showing in the background. ✍ Program information in this guide. As a result, it may sometimes include only the channel number, without a program title or description. 60
... programming, and enable digital closed captioning. ✍ Analog channels are not available while using the 0-9, , and ENTER buttons. 2 Press GUIDE on the LCD projection TV's remote control. z The digital program guide and menus are not available in the guide is provided by using multipicture functions (Twin View, Freeze, i.LINK, Memory ... showing in the background. ✍ Program information in this guide. As a result, it may sometimes include only the channel number, without a program title or description. 60

Operating Instructions
Page 104
... to remain on and off automatically. Current Time 1 Press to select Current Time. 2 Press V and v to set the clock and to program your LCD projection TV to turn on the front panel will light, indicating the timer has been set the Timer by day, time, duration, and channel. Using the Menus... Select to set the current time (day, hour, and minute). Timer 1 and Timer 2 are saved.) 3 If you selected Program in minutes (15, 30, 45, 60 or 90 min) at two scheduled viewing times. Press B to go back to the previous setting. 4 Press MENU to highlight Timer 1 or Timer 2. Press (or...
... to remain on and off automatically. Current Time 1 Press to select Current Time. 2 Press V and v to set the clock and to program your LCD projection TV to turn on the front panel will light, indicating the timer has been set the Timer by day, time, duration, and channel. Using the Menus... Select to set the current time (day, hour, and minute). Timer 1 and Timer 2 are saved.) 3 If you selected Program in minutes (15, 30, 45, 60 or 90 min) at two scheduled viewing times. Press B to go back to the previous setting. 4 Press MENU to highlight Timer 1 or Timer 2. Press (or...

Operating Instructions
Page 115
...215; D) 3 LCD Panels, 1 lens projection system 0.87 inch TFT LCD panel Approx. 3.28 million dots (1,042,168 pixels) High Performance, large diameter hybrid lens F2.4 75 ohm external terminal for VHF/UHF UHP lamp, 120W XL-2100U NTSC, American TV Standard KDF-60XBR950: 60 inches KDF-70XBR950: 70 inches 2-13 14-69 1-...999 1-125 120V, 60 Hz 1 terminal, 3.3 V T.M.D.S., 50 ohms The DVI-HDTV input terminal is compliant with the EIA-...
...215; D) 3 LCD Panels, 1 lens projection system 0.87 inch TFT LCD panel Approx. 3.28 million dots (1,042,168 pixels) High Performance, large diameter hybrid lens F2.4 75 ohm external terminal for VHF/UHF UHP lamp, 120W XL-2100U NTSC, American TV Standard KDF-60XBR950: 60 inches KDF-70XBR950: 70 inches 2-13 14-69 1-...999 1-125 120V, 60 Hz 1 terminal, 3.3 V T.M.D.S., 50 ohms The DVI-HDTV input terminal is compliant with the EIA-...

Operating Instructions
Page 118
Front Panel Controls 21 FUNCTION button 46 G Gamma Corrector 90 GUIDE button 60 Guide menu 61 H Hue, adjusting 88 I i.LINK 10, 80-86 i.LINK Standby 105 Image Shift 105 Inputs, labeling 103 Installation of the projection TV 25-44 interlaced 107 J JUMP button 47 Jump, using 52 L Label ...buttons (GREEN) 47 POWER/STANDBY 114 Presetting channels 45 problems, troubleshooting 108-113 Program Guide 60 Program Options menu 61 progressive 107 R Ratings setting 99 viewing blocked programs 99 Rear panel controls and connections 23 Remote control Function of buttons 52 inserting batteries 17 programming 48 ...
Front Panel Controls 21 FUNCTION button 46 G Gamma Corrector 90 GUIDE button 60 Guide menu 61 H Hue, adjusting 88 I i.LINK 10, 80-86 i.LINK Standby 105 Image Shift 105 Inputs, labeling 103 Installation of the projection TV 25-44 interlaced 107 J JUMP button 47 Jump, using 52 L Label ...buttons (GREEN) 47 POWER/STANDBY 114 Presetting channels 45 problems, troubleshooting 108-113 Program Guide 60 Program Options menu 61 progressive 107 R Ratings setting 99 viewing blocked programs 99 Rear panel controls and connections 23 Remote control Function of buttons 52 inserting batteries 17 programming 48 ...


