Operating Instructions
Page 8
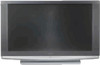
...light (red, blue, or green) may appear constantly on the placement of the horizontal viewing area for KDF-55WF655 or KDF-60WF655. Sit at least 4 inches (10 cm) from your LCD projection TV according to "Recommended Viewing Area" on the front panel blinks in accordance with the apparatus. For the... best picture quality, install your LCD projection TV, and within 60º of the vertical and 130º of ...
...light (red, blue, or green) may appear constantly on the placement of the horizontal viewing area for KDF-55WF655 or KDF-60WF655. Sit at least 4 inches (10 cm) from your LCD projection TV according to "Recommended Viewing Area" on the front panel blinks in accordance with the apparatus. For the... best picture quality, install your LCD projection TV, and within 60º of the vertical and 130º of ...
Operating Instructions
Page 9
...Sony LCD Projection TV Presenting the Sony LCD Projection TV 11 Package Contents 11 Using This Manual 11 Features 12 Enjoying Your LCD Projection TV 14 Notes on the LCD Projection TV 15 Cleaning the Screen Surface 15 Replacing the Lamp 16 Setting Up the LCD Projection TV Overview 23 LCD Projection... ..........59 Button Descriptions 60 Programming the Remote Control 62 Manufacturer's Codes 63 Using Other Equipment with Your LCD Projection TV Remote Control 64...4:3 Source (Standard definition source 70 Changing the Wide Screen Mode for 16:9 Source (High definition source 71 Using Twin ...
...Sony LCD Projection TV Presenting the Sony LCD Projection TV 11 Package Contents 11 Using This Manual 11 Features 12 Enjoying Your LCD Projection TV 14 Notes on the LCD Projection TV 15 Cleaning the Screen Surface 15 Replacing the Lamp 16 Setting Up the LCD Projection TV Overview 23 LCD Projection... ..........59 Button Descriptions 60 Programming the Remote Control 62 Manufacturer's Codes 63 Using Other Equipment with Your LCD Projection TV Remote Control 64...4:3 Source (Standard definition source 70 Changing the Wide Screen Mode for 16:9 Source (High definition source 71 Using Twin ...

Operating Instructions
Page 60
...off the video equipment. For details, see "Programming the Remote Control" on page 62. Press ENT to change channels immediately. 5 Use with Your LCD Projection TV Remote Control" on page 64. For details, see "Selecting Video Options" on page 98. TOP MENU When FUNCTION is switched on DVD/VCR,...operate the video equipment you want. Press to have programmed into the remote control. qs FREEZE Press to clear Label Channels or Favorite Channels. 60 DVD/VCR: Press to turn on and off the satellite receiver or cable box. 2 MUTING Press to mute the sound. The Wide ...
...off the video equipment. For details, see "Programming the Remote Control" on page 62. Press ENT to change channels immediately. 5 Use with Your LCD Projection TV Remote Control" on page 64. For details, see "Selecting Video Options" on page 98. TOP MENU When FUNCTION is switched on DVD/VCR,...operate the video equipment you want. Press to have programmed into the remote control. qs FREEZE Press to clear Label Channels or Favorite Channels. 60 DVD/VCR: Press to turn on and off the satellite receiver or cable box. 2 MUTING Press to mute the sound. The Wide ...

Operating Instructions
Page 61
... 60 or 90) that was selected. F1 wa F2 ws ANT GUIDE wd /TV/SAT wf CH +/- To cancel Sleep Timer, press SLEEP repeatedly until the TV displays the time in the Audio menu. Press to cycle through the video equipment connected to display the program guide of your LCD projection ... remain on page 102. 61 For details, see "Selecting Audio Options" on before shutting off. For details, see "Using Other Equipment with Your LCD Projection TV Remote Control" on setting the time. Press to cycle through channels, press and hold down either CH button. To scan quickly through the Multi...
... 60 or 90) that was selected. F1 wa F2 ws ANT GUIDE wd /TV/SAT wf CH +/- To cancel Sleep Timer, press SLEEP repeatedly until the TV displays the time in the Audio menu. Press to cycle through the video equipment connected to display the program guide of your LCD projection ... remain on page 102. 61 For details, see "Selecting Audio Options" on before shutting off. For details, see "Using Other Equipment with Your LCD Projection TV Remote Control" on setting the time. Press to cycle through channels, press and hold down either CH button. To scan quickly through the Multi...
Operating Instructions
Page 104
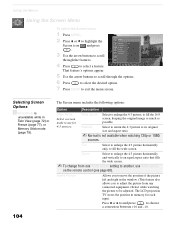
... use Wide Mode on the remote control (see page 60). Antenna Screen Wide Mode Game Picture 4:3 Default Overscan Vertical Center Vertical Size Zoom 0 Off -1 0 -7 4 Press to and press . to fill the 16:9 screen, keeping the original image as much as possible. The LCD projection TV stores the position in Twin View (page 72...
... use Wide Mode on the remote control (see page 60). Antenna Screen Wide Mode Game Picture 4:3 Default Overscan Vertical Center Vertical Size Zoom 0 Off -1 0 -7 4 Press to and press . to fill the 16:9 screen, keeping the original image as much as possible. The LCD projection TV stores the position in Twin View (page 72...

Operating Instructions
Page 115
... buttons to scroll through the features. Start Displays the Memory Stick Viewer. Using the Menus 115 Select to set the clock and to program your LCD projection TV to exit the menu screen. Antenna Applications Memory Stick Clock/Timers Diagnostics CableCARD 4 Press to scroll through the options. 6 Press to select...select a feature. Option Memory Stick Clock/Timers Description Displays... Sleep Allows you to select the amount of time (15 minutes, 30 minutes, 45 minutes, 60 minutes, 90 minutes or Off) that you want the LCD projection TV to remain on and off automatically.
... buttons to scroll through the features. Start Displays the Memory Stick Viewer. Using the Menus 115 Select to set the clock and to program your LCD projection TV to exit the menu screen. Antenna Applications Memory Stick Clock/Timers Diagnostics CableCARD 4 Press to scroll through the options. 6 Press to select...select a feature. Option Memory Stick Clock/Timers Description Displays... Sleep Allows you to select the amount of time (15 minutes, 30 minutes, 45 minutes, 60 minutes, 90 minutes or Off) that you want the LCD projection TV to remain on and off automatically.
Operating Instructions
Page 124
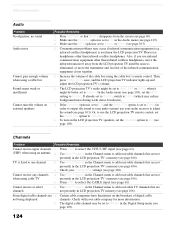
... cordless headphones. Or, to use infrared communication equipment other than infrared cordless headphones, move the infrared transceiver away from the screen (see page 60). ❏ Make sure the Speaker option is set to On in the Audio menu (see page 103). ❏ Make sure the MTS... ❏ Increase the volume of digital cable not being displayed channels. Then press FUNCTION once, and the LCD projection TV indicator lights up and adjust the LCD projection TV's volume. ❏ The LCD projection TV's audio might be set to Auto SAP or Mono, when it might be set to adjust the ...
... cordless headphones. Or, to use infrared communication equipment other than infrared cordless headphones, move the infrared transceiver away from the screen (see page 60). ❏ Make sure the Speaker option is set to On in the Audio menu (see page 103). ❏ Make sure the MTS... ❏ Increase the volume of digital cable not being displayed channels. Then press FUNCTION once, and the LCD projection TV indicator lights up and adjust the LCD projection TV's volume. ❏ The LCD projection TV's audio might be set to Auto SAP or Mono, when it might be set to adjust the ...
Operating Instructions
Page 127
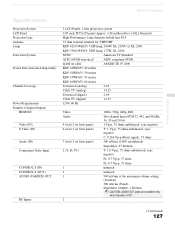
... Inputs 3 LCD Panels, 1 lens projection system 0.87 inch TFT LCD panel Approx. 3.28 million dots (1,042,168 pixels) High Performance, large diameter hybrid lens F2.4 75 ohm external terminal for VHF/UHF KDF-42/50 WE655: UHP lamp, 100W, XL-2100U or XL-2100 KDF-55/60 WF655: UHP...) ATSC compliant 8VSB QAM on cable ANSI/SCTE 07 2000 KDF-42WE655: 42 inches KDF-50WE655: 50 inches KDF-55WF655: 55 inches KDF-60WF655: 60 inches Terrestrial (analog) 2-69 Cable TV (analog) 1-125 Terrestrial (digital) 2-69 Cable TV (digital) 1-135 120V, 60 Hz Video Audio 4 total (1 on front panel) 4 ...
... Inputs 3 LCD Panels, 1 lens projection system 0.87 inch TFT LCD panel Approx. 3.28 million dots (1,042,168 pixels) High Performance, large diameter hybrid lens F2.4 75 ohm external terminal for VHF/UHF KDF-42/50 WE655: UHP lamp, 100W, XL-2100U or XL-2100 KDF-55/60 WF655: UHP...) ATSC compliant 8VSB QAM on cable ANSI/SCTE 07 2000 KDF-42WE655: 42 inches KDF-50WE655: 50 inches KDF-55WF655: 55 inches KDF-60WF655: 60 inches Terrestrial (analog) 2-69 Cable TV (analog) 1-125 Terrestrial (digital) 2-69 Cable TV (digital) 1-135 120V, 60 Hz Video Audio 4 total (1 on front panel) 4 ...
Operating Instructions
Page 130
... 65 with A/V connectors, connecting 47 with TV remote control 64 CableCARD 56 Camcorder, connecting 48 Caption Vision 112 CATV. Index Numerics 0-9 buttons 60 A Activating a Twin View screen 72 Adding channels to the channel list 107 Adjusting audio, Steady Sound 102 Advanced Video 100 Alternate Audio 69 ...Display unit controls 24 Display, turning off 61 DRC Mode 100 DVD player using 77 FUNCTION button 60 G GUIDE button 68 Guide menu 69 H Hue, adjusting 98 I Inputs, labeling 113 Installation of the projection TV 31-55 interlaced 118 J JUMP button 61, 67 L Label Channels 58, 107 video inputs...
... 65 with A/V connectors, connecting 47 with TV remote control 64 CableCARD 56 Camcorder, connecting 48 Caption Vision 112 CATV. Index Numerics 0-9 buttons 60 A Activating a Twin View screen 72 Adding channels to the channel list 107 Adjusting audio, Steady Sound 102 Advanced Video 100 Alternate Audio 69 ...Display unit controls 24 Display, turning off 61 DRC Mode 100 DVD player using 77 FUNCTION button 60 G GUIDE button 68 Guide menu 69 H Hue, adjusting 98 I Inputs, labeling 113 Installation of the projection TV 31-55 interlaced 118 J JUMP button 61, 67 L Label Channels 58, 107 video inputs...

Operating Instructions
Page 131
...programs 109 Rear panel controls and connections 27 Remote control inserting batteries 59 programming 62-63 Removing channels from the channel list 107 RESET button 60 Resetting Audio options 102 Video options 98 S Satellite receiver connecting 43 using with TV remote control 64 Screen Menu 97, 104 setting up... adjusting 102 Surround sound 102 T Timer set current 116 TIMER indicator 25 Timer setting 115 Treble, adjusting 102 troubleshooting 119-125 TV FUNCTION button 60, 67 TV POWER button 61, 67 TV/VIDEO button 61, 67 Twin View using 72-74 Twin View™ activating a picture 72 described...
...programs 109 Rear panel controls and connections 27 Remote control inserting batteries 59 programming 62-63 Removing channels from the channel list 107 RESET button 60 Resetting Audio options 102 Video options 98 S Satellite receiver connecting 43 using with TV remote control 64 Screen Menu 97, 104 setting up... adjusting 102 Surround sound 102 T Timer set current 116 TIMER indicator 25 Timer setting 115 Treble, adjusting 102 troubleshooting 119-125 TV FUNCTION button 60, 67 TV POWER button 61, 67 TV/VIDEO button 61, 67 Twin View using 72-74 Twin View™ activating a picture 72 described...
Quick Setup Guide
Page 1
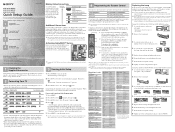
...Service Center (Toll Free): 1-800-222-SONY (7669) for US residents. 1-877-899-SONY (7669) for replacement. directional splitter that equipment. Connector type HDMI (High-Definition Multimedia Interface) Component video S VIDEO Composite ...'ll need to connect speakers. When finished, the lowest numbered channel is completed. Contact your new LCD projection TV, the packing box contains a remote control and two AA (R6) batteries. The surface of.... 2-059-371-12(1) KDF-42/50 WE655 KDF-55/60 WF655 KDF-55/60 XS955 Quick Setup Guide Do not throw away this remote control.
...Service Center (Toll Free): 1-800-222-SONY (7669) for US residents. 1-877-899-SONY (7669) for replacement. directional splitter that equipment. Connector type HDMI (High-Definition Multimedia Interface) Component video S VIDEO Composite ...'ll need to connect speakers. When finished, the lowest numbered channel is completed. Contact your new LCD projection TV, the packing box contains a remote control and two AA (R6) batteries. The surface of.... 2-059-371-12(1) KDF-42/50 WE655 KDF-55/60 WF655 KDF-55/60 XS955 Quick Setup Guide Do not throw away this remote control.


