Operating Guide
Page 8
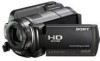
...-ROM "Handycam Application Software" (1) "PMB" (software, including "PMB Guide") "Handycam Handbook" (PDF) "Operating Guide" (This manual) (1) See page 44 for the "Memory Stick" media you repeat recording/deleting images for HDR-XR200/XR200V) A button-type lithium battery is not dustproofed, dripproofed or waterproofed. The camcorder may damage the hard disk drive of the camcorder being activated in such situations. Doing so may not be able to record or play movies and photos. When connecting the camcorder to...
...-ROM "Handycam Application Software" (1) "PMB" (software, including "PMB Guide") "Handycam Handbook" (PDF) "Operating Guide" (This manual) (1) See page 44 for the "Memory Stick" media you repeat recording/deleting images for HDR-XR200/XR200V) A button-type lithium battery is not dustproofed, dripproofed or waterproofed. The camcorder may damage the hard disk drive of the camcorder being activated in such situations. Doing so may not be able to record or play movies and photos. When connecting the camcorder to...
Operating Guide
Page 9
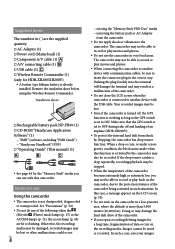
... and/or bright points (white, red, blue, or green in color) that you save the image data on a disc such as "Memory Stick PRO Duo" media. You will find the "Handycam Handbook" (PDF) on the supplied CD-ROM (p. 51). The screenshots are used for the contents of recordings cannot be used in this Operating Guide, both "Memory Stick PRO Duo" media and "Memory Stick PRO-HG Duo" media are referred as DVD-R using your image data using a VCR, or a DVD/HDD recorder. The scenes may...
... and/or bright points (white, red, blue, or green in color) that you save the image data on a disc such as "Memory Stick PRO Duo" media. You will find the "Handycam Handbook" (PDF) on the supplied CD-ROM (p. 51). The screenshots are used for the contents of recordings cannot be used in this Operating Guide, both "Memory Stick PRO Duo" media and "Memory Stick PRO-HG Duo" media are referred as DVD-R using your image data using a VCR, or a DVD/HDD recorder. The scenes may...
Operating Guide
Page 11
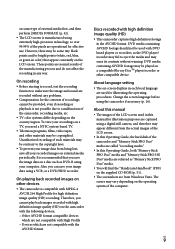
... Step 1: Charging the battery pack 13 Charging the battery pack abroad 14 Step 2: Turning the power on, and setting the date and time 15 Changing the language setting 16 Recording Recording 17 Recording and playing movies and photos easily (Easy Handycam operation 21 Acquiring recording location information using the GPS (HDR-XR200V).. . . . . 21 Playback Playback on the camcorder 22 Playing images on a TV 25 Saving movies and photos with a computer Preparing a computer (Windows 27 When using a Macintosh 27 Selecting the method for creating a disc (computer...
... Step 1: Charging the battery pack 13 Charging the battery pack abroad 14 Step 2: Turning the power on, and setting the date and time 15 Changing the language setting 16 Recording Recording 17 Recording and playing movies and photos easily (Easy Handycam operation 21 Acquiring recording location information using the GPS (HDR-XR200V).. . . . . 21 Playback Playback on the camcorder 22 Playing images on a TV 25 Saving movies and photos with a computer Preparing a computer (Windows 27 When using a Macintosh 27 Selecting the method for creating a disc (computer...

Operating Guide
Page 13
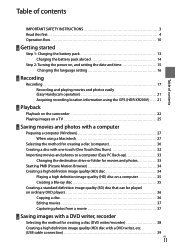
... charge lamp lights up and charging starts. Getting started Step 1: Charging the battery pack Getting started Battery pack AC Adaptor DC IN jack DC plug Power cord (mains lead) Charge lamp ACCESS lamp (hard disk) To the wall outlet (wall socket) You can charge the "InfoLITHIUM" battery pack (H series) after attaching it clicks. 3 Connect the AC Adaptor and the power cord (mains lead) to your camcorder. 1 Turn off when the battery...
... charge lamp lights up and charging starts. Getting started Step 1: Charging the battery pack Getting started Battery pack AC Adaptor DC IN jack DC plug Power cord (mains lead) Charge lamp ACCESS lamp (hard disk) To the wall outlet (wall socket) You can charge the "InfoLITHIUM" battery pack (H series) after attaching it clicks. 3 Connect the AC Adaptor and the power cord (mains lead) to your camcorder. 1 Turn off when the battery...
Operating Guide
Page 17
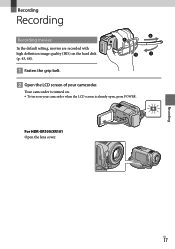
US 17 Recording Recording Recording Recording movies In the default setting, movies are recorded with high definition image quality (HD) on your camcorder. For HDR-XR100/XR101 Open the lens cover. Your camcorder is turned on. To turn on the hard disk (p. 43, 48). Fasten the grip belt. Open the LCD screen of your camcorder when the LCD screen is already open, press POWER.
US 17 Recording Recording Recording Recording movies In the default setting, movies are recorded with high definition image quality (HD) on your camcorder. For HDR-XR100/XR101 Open the lens cover. Your camcorder is turned on. To turn on the hard disk (p. 43, 48). Fasten the grip belt. Open the LCD screen of your camcorder when the LCD screen is already open, press POWER.
Operating Guide
Page 18
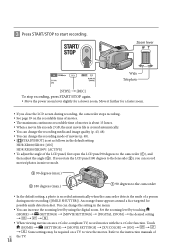
...;. When viewing movies on a TV to the camcorder (), and then adjust the angle (). An orange frame appears around a face targeted for a slower zoom. Some settings may be required on an x.v.Color-compliant TV, record movies with the x.v.Color function. Refer to the instruction manuals of the LCD panel, first open the LCD panel 90 degrees to view the movies. HDR-XR100/XR101: [ON] HDR-XR200/XR200V: [ACTIVE] ...
...;. When viewing movies on a TV to the camcorder (), and then adjust the angle (). An orange frame appears around a face targeted for a slower zoom. Some settings may be required on an x.v.Color-compliant TV, record movies with the x.v.Color function. Refer to the instruction manuals of the LCD panel, first open the LCD panel 90 degrees to view the movies. HDR-XR100/XR101: [ON] HDR-XR200/XR200V: [ACTIVE] ...
Operating Guide
Page 20
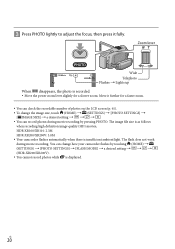
...You can record photos during movie recording. The image file size is insufficient ambient light. The flash does not work during movie recording by touching (HOME) (SETTINGS) [PHOTO SETTINGS] [FLASH MODE] a desired setting HDR-XR200/XR200V). You cannot record photos while is recorded. Move the power zoom lever slightly for a faster zoom. You can check the recordable number of photos on the LCD screen (p. 61). To change the image size, touch (HOME) (SETTINGS) [PHOTO SETTINGS] [ IMAGE SIZE...
...You can record photos during movie recording. The image file size is insufficient ambient light. The flash does not work during movie recording by touching (HOME) (SETTINGS) [PHOTO SETTINGS] [FLASH MODE] a desired setting HDR-XR200/XR200V). You cannot record photos while is recorded. Move the power zoom lever slightly for a faster zoom. You can check the recordable number of photos on the LCD screen (p. 61). To change the image size, touch (HOME) (SETTINGS) [PHOTO SETTINGS] [ IMAGE SIZE...
Operating Guide
Page 21
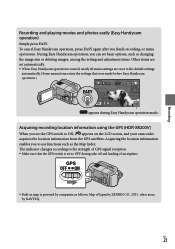
Acquiring recording location information using the GPS (HDR-XR200V) When you to the default settings automatically. (Some menu items retain the settings that were made before Easy Handycam operation.) appears during take off and landing of Japan by ZENRIN CO., LTD., other areas by companies as changing the image size or deleting images, among the setting and adjustment items. Other items are reset to use functions such as the Map...
Acquiring recording location information using the GPS (HDR-XR200V) When you to the default settings automatically. (Some menu items retain the settings that were made before Easy Handycam operation.) appears during take off and landing of Japan by ZENRIN CO., LTD., other areas by companies as changing the image size or deleting images, among the setting and adjustment items. Other items are reset to use functions such as the Map...
Operating Guide
Page 27
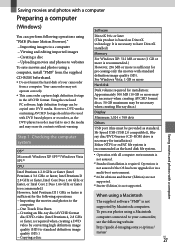
... format. http://guide.d-imaging.sony.co.jp/mac/ ms/us/ US 27 Using the enclosed PC software, high definition footage can be used with a computer (Windows) You can perform following operations using "PMB (Picture Motion Browser)." Importing images to a computer Viewing and editing imported images Creating a disc Uploading movies and photos to websites To save movies and photos using a computer, install "PMB" from the supplied CD-ROM beforehand. Do not format the hard disk of your camcorder...
... format. http://guide.d-imaging.sony.co.jp/mac/ ms/us/ US 27 Using the enclosed PC software, high definition footage can be used with a computer (Windows) You can perform following operations using "PMB (Picture Motion Browser)." Importing images to a computer Viewing and editing imported images Creating a disc Uploading movies and photos to websites To save movies and photos using a computer, install "PMB" from the supplied CD-ROM beforehand. Do not format the hard disk of your camcorder...
Operating Guide
Page 33
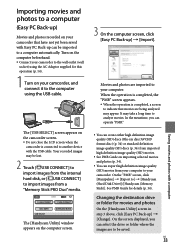
... high definition image quality (HD) movies from a "Memory Stick PRO Duo" media. See PMB Guide for movies and photos On the [Handycam Utility] screen in step 3 above, click [Easy PC Back-up] [Change]. US 33 Saving movies and photos with a computer Your recorded images may be lost. 2 Touch [ USB CONNECT] to import images from the internal hard disk, or [ USB CONNECT] to import images from your computer to your camcorder. In the meantime, you can select the drive or...
... high definition image quality (HD) movies from a "Memory Stick PRO Duo" media. See PMB Guide for movies and photos On the [Handycam Utility] screen in step 3 above, click [Easy PC Back-up] [Change]. US 33 Saving movies and photos with a computer Your recorded images may be lost. 2 Touch [ USB CONNECT] to import images from the internal hard disk, or [ USB CONNECT] to import images from your computer to your camcorder. In the meantime, you can select the drive or...
Operating Guide
Page 48
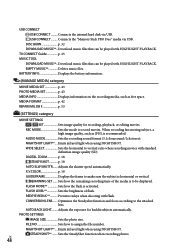
... p. 18 AUTO SLW SHUTTR....... Sets how the remaining recording time of flash. REDEYE REDUC Prevents redeye when shooting with HIGHLIGHT PLAYBACK. FILE NO Sets how to the attached lens. Connects the "Memory Stick PRO Duo" media via USB. FLASH MODE Sets how the flash is to make sure the subject is recommended. Optimizes the Steadyshot function and focus according to assign the file number. PHOTO SETTINGS IMAGE SIZE Sets the photo size. EMPTY MUSIC Deletes music files. BATTERY INFO Displays the battery information. (MANAGE MEDIA) category MOVIE MEDIA SET p. 43 PHOTO MEDIA SET...
... p. 18 AUTO SLW SHUTTR....... Sets how the remaining recording time of flash. REDEYE REDUC Prevents redeye when shooting with HIGHLIGHT PLAYBACK. FILE NO Sets how to the attached lens. Connects the "Memory Stick PRO Duo" media via USB. FLASH MODE Sets how the flash is to make sure the subject is recommended. Optimizes the Steadyshot function and focus according to assign the file number. PHOTO SETTINGS IMAGE SIZE Sets the photo size. EMPTY MUSIC Deletes music files. BATTERY INFO Displays the battery information. (MANAGE MEDIA) category MOVIE MEDIA SET p. 43 PHOTO MEDIA SET...
Operating Guide
Page 50
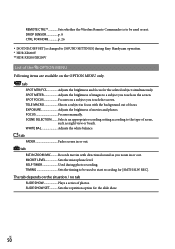
... of images to the type of movies and photos. Selects an appropriate recording setting according to a subject you touch on a subject you zoom in or out. WHITE BAL Adjusts the white balance. tab BLT-IN ZOOM MIC.......... TIMING Sets the timing to be used to be used or not. DROP SENSOR p. 8 CTRL FOR HDMI p. 26 [SOUND/DISP SET] is to start recording for [SMTH SLW REC]. SELF-TIMER Used during Easy Handycam operation. * HDR-XR200V ** HDR-XR200/XR200V...
... of images to the type of movies and photos. Selects an appropriate recording setting according to a subject you touch on a subject you zoom in or out. WHITE BAL Adjusts the white balance. tab BLT-IN ZOOM MIC.......... TIMING Sets the timing to be used to be used or not. DROP SENSOR p. 8 CTRL FOR HDMI p. 26 [SOUND/DISP SET] is to start recording for [SMTH SLW REC]. SELF-TIMER Used during Easy Handycam operation. * HDR-XR200V ** HDR-XR200/XR200V...
Operating Guide
Page 52
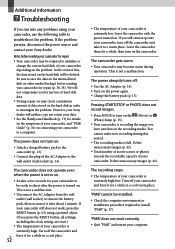
... camcorder is turned on. Leave the camcorder with the power turned on the power again. Charge the battery pack (p. 13). If the problem persists, disconnect the power source and contact your computer. We will be ready to shoot after about 1 minute. This is full. "PMB" does not work , press the RESET button (p. 63) using your camcorder, use the following table to save the data on the internal hard disk on other media...
... camcorder is turned on. Leave the camcorder with the power turned on the power again. Charge the battery pack (p. 13). If the problem persists, disconnect the power source and contact your computer. We will be ready to shoot after about 1 minute. This is full. "PMB" does not work , press the RESET button (p. 63) using your camcorder, use the following table to save the data on the internal hard disk on other media...
Operating Guide
Page 54
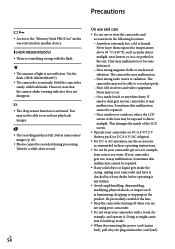
... LCD screen or the lens may not be able to record nor play back images. The recording media is activated. Sometimes this malfunction cannot be recorded during processing. Be particularly careful of the lens. Keep the camcorder turning off when you are not using your camcorder. Do not wrap your camcorder and have it checked by the plug and not the cord (lead). Use the flash. (HDR-XR200/XR200V...
... LCD screen or the lens may not be able to record nor play back images. The recording media is activated. Sometimes this malfunction cannot be recorded during processing. Be particularly careful of the lens. Keep the camcorder turning off when you are not using your camcorder. Do not wrap your camcorder and have it checked by the plug and not the cord (lead). Use the flash. (HDR-XR200/XR200V...
Operating Guide
Page 55
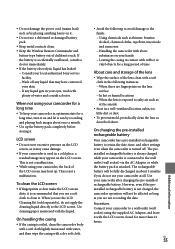
..., periodically clean the lens as described above. On charging the pre-installed rechargeable battery Your camcorder has a pre-installed rechargeable battery to retain the date, time, and other settings even when the camcorder is attached. Procedures Connect your camcorder to the wall outlet (wall socket) via the AC Adaptor or while the battery pack is turned off any liquid that you use a soft cloth to the LCD screen. LCD screen ...
..., periodically clean the lens as described above. On charging the pre-installed rechargeable battery Your camcorder has a pre-installed rechargeable battery to retain the date, time, and other settings even when the camcorder is attached. Procedures Connect your camcorder to the wall outlet (wall socket) via the AC Adaptor or while the battery pack is turned off any liquid that you use a soft cloth to the LCD screen. LCD screen ...
Operating Guide
Page 57
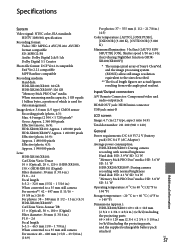
... Component/video and audio output jack HDMI OUT jack: HDMI mini connector USB jack: mini-B LCD screen Image: 6.7 cm (2.7 type, aspect ratio 16:9) Total dot number: 211 200 (960 220) General Power requirements: DC 6.8 V/7.2 V (battery pack) DC 8.4 V (AC Adaptor) Average power consumption: HDR-XR100/XR101: During camera recording with normal brightness: Hard disk: HD: 3.9 W SD: 3.2 W "Memory Stick PRO Duo" media: HD: 3.6 W SD: 3.1 W HDR-XR200/XR200V: During camera recording with normal brightness: Hard disk: HD: 4.1 W SD: 3.4 W "Memory Stick PRO Duo" media: HD: 3.8 W SD: 3.1 W Operating...
... Component/video and audio output jack HDMI OUT jack: HDMI mini connector USB jack: mini-B LCD screen Image: 6.7 cm (2.7 type, aspect ratio 16:9) Total dot number: 211 200 (960 220) General Power requirements: DC 6.8 V/7.2 V (battery pack) DC 8.4 V (AC Adaptor) Average power consumption: HDR-XR100/XR101: During camera recording with normal brightness: Hard disk: HD: 3.9 W SD: 3.2 W "Memory Stick PRO Duo" media: HD: 3.6 W SD: 3.1 W HDR-XR200/XR200V: During camera recording with normal brightness: Hard disk: HD: 4.1 W SD: 3.4 W "Memory Stick PRO Duo" media: HD: 3.8 W SD: 3.1 W Operating...
Operating Guide
Page 58
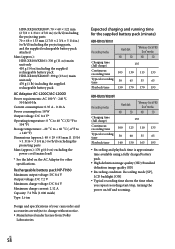
.../XR200V Recording media Charging time (full charge) Continuous recording time Typical recording time Playback time Hard disk HD SD "Memory Stick PRO Duo" media HD SD 135 100 125 110 135 50 60 55 65 140 150 165 195 Recording and playback time is approximate time available using a fully charged battery pack. High definition image quality (HD)/Standard definition image quality (SD) Recording condition: Recording mode [SP], LCD backlight [ON] Typical recording time shows the time when you repeat recording start/stop, turning...
.../XR200V Recording media Charging time (full charge) Continuous recording time Typical recording time Playback time Hard disk HD SD "Memory Stick PRO Duo" media HD SD 135 100 125 110 135 50 60 55 65 140 150 165 195 Recording and playback time is approximate time available using a fully charged battery pack. High definition image quality (HD)/Standard definition image quality (SD) Recording condition: Recording mode [SP], LCD backlight [ON] Typical recording time shows the time when you repeat recording start/stop, turning...
Operating Guide
Page 59
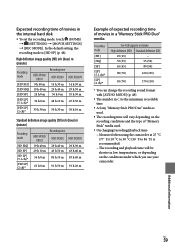
... recording time of movies in a "Memory Stick PRO Duo" media Recording mode [FH] [HQ] [SP] [LP] (5.1 ch)* [LP] (2 ch)* For 4 GB capacity in minute High definition (HD) Standard definition (SD) 25 (25) -- 55 (35) 55 (50) 65 (45) 80 (50) 90 (70) 160 (105) 95 (70) 170 (110) * You can change the recording sound format with [AUDIO MODE] (p. 48). The number in the internal hard disk To set...
... recording time of movies in a "Memory Stick PRO Duo" media Recording mode [FH] [HQ] [SP] [LP] (5.1 ch)* [LP] (2 ch)* For 4 GB capacity in minute High definition (HD) Standard definition (SD) 25 (25) -- 55 (35) 55 (50) 65 (45) 80 (50) 90 (70) 160 (105) 95 (70) 170 (110) * You can change the recording sound format with [AUDIO MODE] (p. 48). The number in the internal hard disk To set...
Operating Guide
Page 63
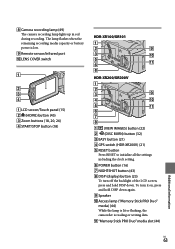
... camera recording lamp lights up in red during recording. The lamp flashes when the remaining recording media capacity or battery power is low. Remote sensor/Infrared port LENS COVER switch HDR-XR100/XR101 HDR-XR200/XR200V Additional information LCD screen/Touch panel (15) (HOME) button (45) Zoom buttons (18, 20, 24) START/STOP button (18) (VIEW IMAGES) button (22) (DISC BURN) button (32) EASY button (21) GPS switch (HDR-XR200V) (21) RESET button...
... camera recording lamp lights up in red during recording. The lamp flashes when the remaining recording media capacity or battery power is low. Remote sensor/Infrared port LENS COVER switch HDR-XR100/XR101 HDR-XR200/XR200V Additional information LCD screen/Touch panel (15) (HOME) button (45) Zoom buttons (18, 20, 24) START/STOP button (18) (VIEW IMAGES) button (22) (DISC BURN) button (32) EASY button (21) GPS switch (HDR-XR200V) (21) RESET button...
Operating Guide
Page 65
... "Memory Stick 44 "Memory Stick PRO Duo".........44 Menu 45 Movies 17, 22 N NightShot 43 O One Touch Disc Burn 32 Operation beeps 15 Operation flow 10 OPTION MENU 46, 50 P Parts and controls 62 Photos 19, 24 Playback 22 Playing a high definition image quality (HD) disc 35 PMB (Picture Motion Browser 27, 28 PMB Guide 34 Precautions 54 R Recording 17 Recording and playback time....58 Recording media 43 Repair 52 RESET 63 S Screen indicators 61 Self-diagnosis display 53 Setting the date and time...
... "Memory Stick 44 "Memory Stick PRO Duo".........44 Menu 45 Movies 17, 22 N NightShot 43 O One Touch Disc Burn 32 Operation beeps 15 Operation flow 10 OPTION MENU 46, 50 P Parts and controls 62 Photos 19, 24 Playback 22 Playing a high definition image quality (HD) disc 35 PMB (Picture Motion Browser 27, 28 PMB Guide 34 Precautions 54 R Recording 17 Recording and playback time....58 Recording media 43 Repair 52 RESET 63 S Screen indicators 61 Self-diagnosis display 53 Setting the date and time...


