Operating Guide
Page 8
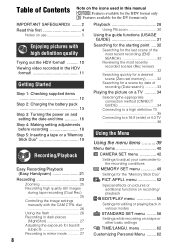
... 4: Making setting adjustments before recording 18 Step 5: Inserting a tape or a "Memory Stick Duo 19 Recording/Playback Easy Recording/Playback (Easy Handycam 21 Recording 23 Zooming 25 Recording high quality still images during tape recording (Dual Rec 25 Controlling the image settings manually with the CAM CTRL... (wide) or 4:3 TV 36 Using the Menu Using the menu items ..........39 Menu items 40 CAMERA SET menu 42 Settings to adjust your camcorder to the recording conditions MEMORY SET menu 49 Settings for a scene by date of recording (Date search 33 Playing the picture on a tape ...
... 4: Making setting adjustments before recording 18 Step 5: Inserting a tape or a "Memory Stick Duo 19 Recording/Playback Easy Recording/Playback (Easy Handycam 21 Recording 23 Zooming 25 Recording high quality still images during tape recording (Dual Rec 25 Controlling the image settings manually with the CAM CTRL... (wide) or 4:3 TV 36 Using the Menu Using the menu items ..........39 Menu items 40 CAMERA SET menu 42 Settings to adjust your camcorder to the recording conditions MEMORY SET menu 49 Settings for a scene by date of recording (Date search 33 Playing the picture on a tape ...
Operating Guide
Page 12
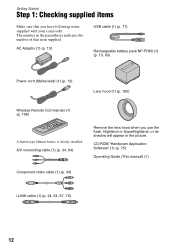
... the flash, Nightshot or SuperNightshot, or its shadow will appear in the parentheses indicates the number of that you have following items supplied with your camcorder. CD-ROM "Handycam Application Software" (1) (p. 75) Operating Guide (This manual) (1) Component video cable (1) (p. 34) i.LINK cable (1) (p. 34, 64, 67, 75) 12...
... the flash, Nightshot or SuperNightshot, or its shadow will appear in the parentheses indicates the number of that you have following items supplied with your camcorder. CD-ROM "Handycam Application Software" (1) (p. 75) Operating Guide (This manual) (1) Component video cable (1) (p. 34) i.LINK cable (1) (p. 34, 64, 67, 75) 12...
Operating Guide
Page 16
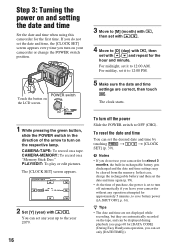
... switch Touch the button on and setting the date and time Set the date and time when using this camcorder for about 3 months, the built-in the direction of purchase, the power is set the date and ...tape, and can be displayed during playback (see page 60 for [DATA CODE] (During Easy Handycam operation, you do not use your camcorder for the first time. CAMERA-TAPE: To record on a "Memory Stick Duo." Y MD ..., then touch . If you do not set to turn off automatically if you leave your camcorder or change the POWER switch position. For midday, set any year up to the year 2079...
... switch Touch the button on and setting the date and time Set the date and time when using this camcorder for about 3 months, the built-in the direction of purchase, the power is set the date and ...tape, and can be displayed during playback (see page 60 for [DATA CODE] (During Easy Handycam operation, you do not use your camcorder for the first time. CAMERA-TAPE: To record on a "Memory Stick Duo." Y MD ..., then touch . If you do not set to turn off automatically if you leave your camcorder or change the POWER switch position. For midday, set any year up to the year 2079...

Operating Guide
Page 21
... t Lit Press and hold lightly Press fully to turn on the CAMERA-TAPE lamp. 2 Press EASY C. Recording/Playback Recording/Playback Easy Recording/Playback (Easy Handycam) With this Easy Handycam operation, most of the camera settings are recorded in [FINE] quality on a "Memory Stick Duo." Still images 1 Slide the POWER switch E to record...
... t Lit Press and hold lightly Press fully to turn on the CAMERA-TAPE lamp. 2 Press EASY C. Recording/Playback Recording/Playback Easy Recording/Playback (Easy Handycam) With this Easy Handycam operation, most of the camera settings are recorded in [FINE] quality on a "Memory Stick Duo." Still images 1 Slide the POWER switch E to record...

Operating Guide
Page 22
...settings. • Almost all the settings return to their default settings automatically (p. 40). • is not displayed during Easy Handycam operation Touch [MENU] to display adjustable menu settings. Touch the buttons on the PLAY/EDIT lamp. disappears from the screen....rewind, then touch to select a picture. x Unavailable buttons during Easy Handycam During Easy Handycam operation, the following buttons/dial are unavailable. [Invalid during Easy Handycam operation] may appear if operations not available during Easy Handycam are attempted. • . (back light) button (p. 27) &#...
...settings. • Almost all the settings return to their default settings automatically (p. 40). • is not displayed during Easy Handycam operation Touch [MENU] to display adjustable menu settings. Touch the buttons on the PLAY/EDIT lamp. disappears from the screen....rewind, then touch to select a picture. x Unavailable buttons during Easy Handycam During Easy Handycam operation, the following buttons/dial are unavailable. [Invalid during Easy Handycam operation] may appear if operations not available during Easy Handycam are attempted. • . (back light) button (p. 27) &#...
Operating Guide
Page 31
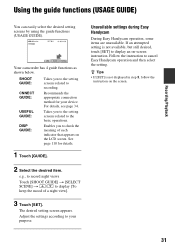
...(USAGE GUIDE) You can easily select the desired setting screens by using the guide functions (USAGE GUIDE). 60min STBY GUIDE P-MENU Your camcorder has 4 guide functions as shown below. Takes you to the setting screens related to display an on-screen instruction. e.g., to record...SELECT SCENE] t / to display [To keep the mood of each indicator that appears on the screen. 31 Unavailable settings during Easy Handycam During Easy Handycam operation, some items are unavailable. If an attempted setting is not displayed in step 3, follow the instruction on the LCD screen. Enables...
...(USAGE GUIDE) You can easily select the desired setting screens by using the guide functions (USAGE GUIDE). 60min STBY GUIDE P-MENU Your camcorder has 4 guide functions as shown below. Takes you to the setting screens related to display an on-screen instruction. e.g., to record...SELECT SCENE] t / to display [To keep the mood of each indicator that appears on the screen. 31 Unavailable settings during Easy Handycam During Easy Handycam operation, some items are unavailable. If an attempted setting is not displayed in step 3, follow the instruction on the LCD screen. Enables...

Operating Guide
Page 39
...previous screen. Using the Menu 39 After finishing the settings, touch t (close) to select the menu item. x To use menu items during Easy Handycam operation is displayed. 3 Select the desired setting, then touch . CAMERA-TAPE lamp: settings on a tape CAMERA-MEMORY lamp: Duo" settings on ...1 Touch t [MENU]. 2 Select the desired menu. Touch / to turn on the screen, touch / until the item is not displayed during Easy Handycam operation. z Tips • You can customize menu items that in step 2). 3 Select the desired item. 4 Customize the item. If the desired ...
...previous screen. Using the Menu 39 After finishing the settings, touch t (close) to select the menu item. x To use menu items during Easy Handycam operation is displayed. 3 Select the desired setting, then touch . CAMERA-TAPE lamp: settings on a tape CAMERA-MEMORY lamp: Duo" settings on ...1 Touch t [MENU]. 2 Select the desired menu. Touch / to turn on the screen, touch / until the item is not displayed during Easy Handycam operation. z Tips • You can customize menu items that in step 2). 3 Select the desired item. 4 Customize the item. If the desired ...
Operating Guide
Page 40
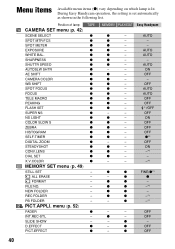
... AUTO - z z -*1 - z - OFF OFF 40 z - z - Menu items Available menu items (z) vary depending on which lamp is set automatically as shown in the following list. During Easy Handycam operation, the setting is lit. Position of lamp: CAMERA SET menu (p. 42) SCENE SELECT SPOT MTR·FCS SPOT METER EXPOSURE WHITE BAL. z z MEMORY PLAY...
... AUTO - z z -*1 - z - OFF OFF 40 z - z - Menu items Available menu items (z) vary depending on which lamp is set automatically as shown in the following list. During Easy Handycam operation, the setting is lit. Position of lamp: CAMERA SET menu (p. 42) SCENE SELECT SPOT MTR·FCS SPOT METER EXPOSURE WHITE BAL. z z MEMORY PLAY...
Operating Guide
Page 41
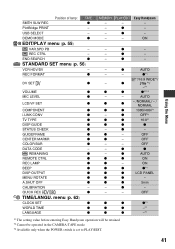
...CALIBRATION - PLAY/EDIT - z - - REC CTRL - Easy Handycam - - - OFF z z z*1 z z -*1 z z -*1 *1 The setting value before entering Easy Handycam operation will be retained. *2 Cannot be operated in the CAMERA-TAPE... mode. *3 Available only when the POWER switch is set to PLAY/EDIT. 41 z - - z AUTO - - OFF - - END SEARCH z STANDARD SET menu (p. 56) VCR HDV/DV - ON - z z - z AUTO z z ON z - z - - - AUTO z z - /NORMAL/ - / NORMAL z z 1080i...
...CALIBRATION - PLAY/EDIT - z - - REC CTRL - Easy Handycam - - - OFF z z z*1 z z -*1 z z -*1 *1 The setting value before entering Easy Handycam operation will be retained. *2 Cannot be operated in the CAMERA-TAPE... mode. *3 Available only when the POWER switch is set to PLAY/EDIT. 41 z - - z AUTO - - OFF - - END SEARCH z STANDARD SET menu (p. 56) VCR HDV/DV - ON - z z - z AUTO z z ON z - z - - - AUTO z z - /NORMAL/ - / NORMAL z z 1080i...

Operating Guide
Page 49
... each lens. WIDE CONV. ( ) Select this function [ON] is not used. b Notes • [ IMAGE SIZE] can select a menu item to assign to [FINE] during Easy Handycam operation. MEMORY SET menu Settings for the "Memory Stick Duo" The default settings are selected. b Notes • Image quality is automatically fixed to the CAM...
... each lens. WIDE CONV. ( ) Select this function [ON] is not used. b Notes • [ IMAGE SIZE] can select a menu item to assign to [FINE] during Easy Handycam operation. MEMORY SET menu Settings for the "Memory Stick Duo" The default settings are selected. b Notes • Image quality is automatically fixed to the CAM...
Operating Guide
Page 60
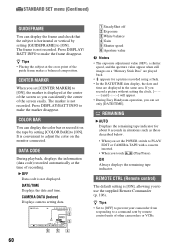
... appears for about 8 seconds in the same area. If you record a picture without setting the clock and [--:--:--] will appear. • During Easy Handycam operation, you touch (Play/Pause). Press DISPLAY/BATT INFO to a command sent by remote control units of the screen easily. z Tips • ...Set to [OFF] to prevent your camcorder from responding to make the frame disappear. DATA CODE During playback, displays the information (data code) recorded automatically at the cross point of ...
... appears for about 8 seconds in the same area. If you record a picture without setting the clock and [--:--:--] will appear. • During Easy Handycam operation, you touch (Play/Pause). Press DISPLAY/BATT INFO to a command sent by remote control units of the screen easily. z Tips • ...Set to [OFF] to prevent your camcorder from responding to make the frame disappear. DATA CODE During playback, displays the information (data code) recorded automatically at the cross point of ...
Operating Guide
Page 78
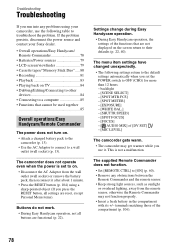
...8226; Connecting to a computer 85 • Functions that are functional (p. 22). If the problem persists, disconnect the power source and contact your camcorder, use it after about 1 minute. • Press the RESET button (p. 104) using a sharp-pointed object (If you press the RESET ...button, all buttons are not displayed on the screen return to [ON] (p. 60). • Remove any problems using your Sony dealer. • Overall operations/Easy Handycam/ Remote Commander 78 • Batteries/Power sources 79 • LCD screen/viewfinder 79 • Cassette tapes/"Memory Stick Duo...
...8226; Connecting to a computer 85 • Functions that are functional (p. 22). If the problem persists, disconnect the power source and contact your camcorder, use it after about 1 minute. • Press the RESET button (p. 104) using a sharp-pointed object (If you press the RESET ...button, all buttons are not displayed on the screen return to [ON] (p. 60). • Remove any problems using your Sony dealer. • Overall operations/Easy Handycam/ Remote Commander 78 • Batteries/Power sources 79 • LCD screen/viewfinder 79 • Cassette tapes/"Memory Stick Duo...
Operating Guide
Page 79
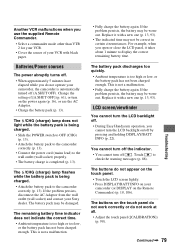
...been charged enough. If the problem persists, disconnect the AC Adaptor from the wall outlet (wall socket) and contact your camcorder, the camcorder is automatically turned off . • During Easy Handycam operation, you do not work at all. • Adjust the touch panel ([CALIBRATION]) (p. 98). The battery pack...touch panel. • Touch the LCD screen lightly. • Press DISPLAY/BATT INFO on your camcorder (or DISPLAY on the touch panel do not work correctly or do not operate your Sony dealer. Replace it takes about 1 minute to check the warning messages (p. 88). For example,...
...been charged enough. If the problem persists, disconnect the AC Adaptor from the wall outlet (wall socket) and contact your camcorder, the camcorder is automatically turned off . • During Easy Handycam operation, you do not work at all. • Adjust the touch panel ([CALIBRATION]) (p. 98). The battery pack...touch panel. • Touch the LCD screen lightly. • Press DISPLAY/BATT INFO on your camcorder (or DISPLAY on the touch panel do not work correctly or do not operate your Sony dealer. Replace it takes about 1 minute to check the warning messages (p. 88). For example,...
Operating Guide
Page 80
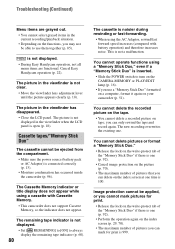
... • Perform the operation again on the index screen at one . you can mark for print is not displayed. • During Easy Handycam operation, not all menu items are grayed out. • You cannot select grayed items in the viewfinder is not clear. • Move ... viewfinder lens adjustment lever until the picture appears clearly (p. 18). This is connected correctly (p. 13). • Moisture condensation has occurred inside the camcorder (p. 96). The picture is not displayed in the viewfinder has disappeared. • Close the LCD panel. Cassette tapes/"Memory Stick Duo" The ...
... • Perform the operation again on the index screen at one . you can mark for print is not displayed. • During Easy Handycam operation, not all menu items are grayed out. • You cannot select grayed items in the viewfinder is not clear. • Move ... viewfinder lens adjustment lever until the picture appears clearly (p. 18). This is connected correctly (p. 13). • Moisture condensation has occurred inside the camcorder (p. 96). The picture is not displayed in the viewfinder has disappeared. • Close the LCD panel. Cassette tapes/"Memory Stick Duo" The ...

Operating Guide
Page 82
... suitable for a few seconds to turn on the recording conditions. The backlight function does not function. • The backlight function does not work during Easy Handycam operation. The subjects passing fast by adjusting the shutter speed (p. 44). This is not set to [AUTO] (p. 45). • The recording conditions are recording in... S] does not operate correctly. • [COLOR SLOW S] may not operate correctly in [SUPER NS] or [COLOR SLOW S]. The [FLASH LEVEL] cannot be changed during Easy Handycam operation (p. 22).
... suitable for a few seconds to turn on the recording conditions. The backlight function does not function. • The backlight function does not work during Easy Handycam operation. The subjects passing fast by adjusting the shutter speed (p. 44). This is not set to [AUTO] (p. 45). • The recording conditions are recording in... S] does not operate correctly. • [COLOR SLOW S] may not operate correctly in [SUPER NS] or [COLOR SLOW S]. The [FLASH LEVEL] cannot be changed during Easy Handycam operation (p. 22).
Operating Guide
Page 102
Specifications (Continued) On trademarks • "Handycam" and are registered trademarks of Sony Corporation. • HDV and the HDV logo are trademarks of Sony Corporation and Victor Company of Japan, Ltd. • "Memory Stick," " ," "Memory Stick Duo," " ," "Memory ... and "MagicGate Memory Stick Duo" are trademarks of Sony Corporation. • "InfoLITHIUM" is a trademark of Sony Corporation. • i.LINK and are trademarks of Sony Corporation. • is a trademark. • "x.v.Color" is a trademark of Sony Corporation. • Microsoft, Windows, Windows Media, ...
Specifications (Continued) On trademarks • "Handycam" and are registered trademarks of Sony Corporation. • HDV and the HDV logo are trademarks of Sony Corporation and Victor Company of Japan, Ltd. • "Memory Stick," " ," "Memory Stick Duo," " ," "Memory ... and "MagicGate Memory Stick Duo" are trademarks of Sony Corporation. • "InfoLITHIUM" is a trademark of Sony Corporation. • i.LINK and are trademarks of Sony Corporation. • is a trademark. • "x.v.Color" is a trademark of Sony Corporation. • Microsoft, Windows, Windows Media, ...

Operating Guide
Page 106
... sheet before using the Remote Commander. • Aim the Remote Commander towards the remote sensor to pull out the battery case. 2 Place a new battery with a Sony CR2025 lithium battery. Use of another battery may present a risk of fire or explosion. Identifying parts and controls (Continued) To remove the lens hood Loosen... SET MEMORY button* (32) G Transmitter H START/STOP button (21, 23) I Power zoom buttons (25, 30) J DISPLAY button (18) * These buttons are not available during Easy Handycam operation. Tab A PHOTO button (24) The on the tab, inset your camcorder (p. 105).
... sheet before using the Remote Commander. • Aim the Remote Commander towards the remote sensor to pull out the battery case. 2 Place a new battery with a Sony CR2025 lithium battery. Use of another battery may present a risk of fire or explosion. Identifying parts and controls (Continued) To remove the lens hood Loosen... SET MEMORY button* (32) G Transmitter H START/STOP button (21, 23) I Power zoom buttons (25, 30) J DISPLAY button (18) * These buttons are not available during Easy Handycam operation. Tab A PHOTO button (24) The on the tab, inset your camcorder (p. 105).
Operating Guide
Page 111
Index Numeric 1080i/480i 59 12BIT 57 16BIT 57 480i 59 A AC Adaptor 13 AE SHIFT 45, 86 ALL ERASE 51 AUDIO MIX 57 AUDIO MODE 57 AUTOSLW ... 61 Display indicators 107 Down convert function......... 10 Dual Rec 25 Dubbing 64 DV format 56 DV SET 57 D.EFFECT (Digital effect 53, 86 E Easy Handycam 21, 39 EDIT/PLAY menu 55 END SEARCH 32, 56 EXPOSURE 43, 86 F FADER 52, 86 FILE NO. (File number) ...... 51 FIREWORKS 42 First Step...
Index Numeric 1080i/480i 59 12BIT 57 16BIT 57 480i 59 A AC Adaptor 13 AE SHIFT 45, 86 ALL ERASE 51 AUDIO MIX 57 AUDIO MODE 57 AUTOSLW ... 61 Display indicators 107 Down convert function......... 10 Dual Rec 25 Dubbing 64 DV format 56 DV SET 57 D.EFFECT (Digital effect 53, 86 E Easy Handycam 21, 39 EDIT/PLAY menu 55 END SEARCH 32, 56 EXPOSURE 43, 86 F FADER 52, 86 FILE NO. (File number) ...... 51 FIREWORKS 42 First Step...


