Operating Guide
Page 6
..."Memory Stick" compatible equipment Be sure to insert the "Memory Stick Duo" into an outlet on a "Memory Stick Duo" or a Memory Stick Duo adaptor. Types of "Memory Stick" you can use in your camcorder You can use any type of memory card except "Memory Stick Duo." • "Memory Stick PRO" and "Memory Stick ... interference to radio communications. The supplied interface cable must be used with your camcorder.) "Memory Stick" (You cannot use with your camcorder.) • You cannot use "Memory Stick Duo" marked with the limits for help. Read this equipment does cause harmful...
..."Memory Stick" compatible equipment Be sure to insert the "Memory Stick Duo" into an outlet on a "Memory Stick Duo" or a Memory Stick Duo adaptor. Types of "Memory Stick" you can use in your camcorder You can use any type of memory card except "Memory Stick Duo." • "Memory Stick PRO" and "Memory Stick ... interference to radio communications. The supplied interface cable must be used with your camcorder.) "Memory Stick" (You cannot use with your camcorder.) • You cannot use "Memory Stick Duo" marked with the limits for help. Read this equipment does cause harmful...
Operating Guide
Page 7
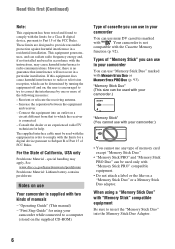
...NTSC system-based TV. • Television programs, films, video tapes, and other materials may be copyrighted. Continued , 7 To view your camcorder. On recording • Before starting to record, test the recording function to make sure the picture and sound are recorded without any way.... provided, even if recording or playback is not dustproof, dripproof or waterproof. Memory Stick Duo Adaptor Using the camcorder • Do not hold the camcorder by the following parts. See "On using your camcorder to another device with an HDMI cable, component video cable, USB or i....
...NTSC system-based TV. • Television programs, films, video tapes, and other materials may be copyrighted. Continued , 7 To view your camcorder. On recording • Before starting to record, test the recording function to make sure the picture and sound are recorded without any way.... provided, even if recording or playback is not dustproof, dripproof or waterproof. Memory Stick Duo Adaptor Using the camcorder • Do not hold the camcorder by the following parts. See "On using your camcorder to another device with an HDMI cable, component video cable, USB or i....

Operating Guide
Page 9
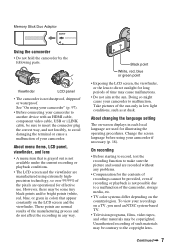
... before recording 19 Step 5: Inserting a tape or a "Memory Stick Duo 20 Playback 29 Using PB zoom 31 Using the guide...Handycam 22 Recording 24 Zooming 26 Recording high quality still images during tape recording (Dual Rec 26 Controlling the image settings manually with the CAM CTRL dial (HDR-HC7... 27 Using the flash 27 Recording in dark places (NightShot 28 Adjusting the exposure for backlit subjects 28 Recording in mirror mode 28 Using the menu items .......... 40 Menu items 41 CAMERA SET menu 43 Settings to adjust your camcorder to the recording conditions MEMORY...
... before recording 19 Step 5: Inserting a tape or a "Memory Stick Duo 20 Playback 29 Using PB zoom 31 Using the guide...Handycam 22 Recording 24 Zooming 26 Recording high quality still images during tape recording (Dual Rec 26 Controlling the image settings manually with the CAM CTRL dial (HDR-HC7... 27 Using the flash 27 Recording in dark places (NightShot 28 Adjusting the exposure for backlit subjects 28 Recording in mirror mode 28 Using the menu items .......... 40 Menu items 41 CAMERA SET menu 43 Settings to adjust your camcorder to the recording conditions MEMORY...
Operating Guide
Page 10
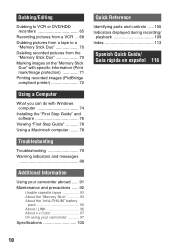
........... 78 Troubleshooting Troubleshooting 79 Warning indicators and messages 88 Additional Information Using your camcorder abroad ...... 91 Maintenance and precautions ...... 92 Usable cassette tapes 92 About the "Memory Stick 93 About the "InfoLITHIUM" battery pack 95 About i.LINK 96 About x.v.Color ...97 On using your camcorder 97 Specifications 100 Quick Reference Identifying parts and controls ..... 105 Indicators...
........... 78 Troubleshooting Troubleshooting 79 Warning indicators and messages 88 Additional Information Using your camcorder abroad ...... 91 Maintenance and precautions ...... 92 Usable cassette tapes 92 About the "Memory Stick 93 About the "InfoLITHIUM" battery pack 95 About i.LINK 96 About x.v.Color ...97 On using your camcorder 97 Specifications 100 Quick Reference Identifying parts and controls ..... 105 Indicators...

Operating Guide
Page 12
Connecting to an HDV1080i non-compliant device Your camcorder can import movies from a tape or still images from a "Memory Stick Duo" to copy pictures in the HDV format to enable copying. Connecting to a computer (p. 74) Using the supplied software, you to the computer. Dubbing ... format can be played back as crisp HD (high definition) pictures on a high definition TV. • For details on a 16:9 (wide)/4:3 TV (p. 37) Your camcorder can also edit the imported movies and create a DVD-video in the HDV format! Viewing video recorded in SD (standard definition) image quality. 12
Connecting to an HDV1080i non-compliant device Your camcorder can import movies from a tape or still images from a "Memory Stick Duo" to copy pictures in the HDV format to enable copying. Connecting to a computer (p. 74) Using the supplied software, you to the computer. Dubbing ... format can be played back as crisp HD (high definition) pictures on a high definition TV. • For details on a 16:9 (wide)/4:3 TV (p. 37) Your camcorder can also edit the imported movies and create a DVD-video in the HDV format! Viewing video recorded in SD (standard definition) image quality. 12
Operating Guide
Page 17
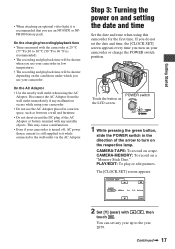
...with touch . / , then You can set the date and time, the [CLOCK SET] screen appears every time you use your camcorder or change the POWER switch position. CAMERA-TAPE: To record on a "Memory Stick Duo." The [CLOCK SET] screen appears. CLOCK SET DATE 2007Y JAN M 1D 12: 00 AM OK 2 Set [Y] (year...outlet via the AC Adaptor. On the AC Adaptor • Use the nearby wall outlet when using this camcorder for the first time. If you use an NP-FH70 or NPFH100 battery pack. CAMERA-MEMORY: To record on a tape. On the charging/recording/playback time • Times measured with the...
...with touch . / , then You can set the date and time, the [CLOCK SET] screen appears every time you use your camcorder or change the POWER switch position. CAMERA-TAPE: To record on a "Memory Stick Duo." The [CLOCK SET] screen appears. CLOCK SET DATE 2007Y JAN M 1D 12: 00 AM OK 2 Set [Y] (year...outlet via the AC Adaptor. On the AC Adaptor • Use the nearby wall outlet when using this camcorder for the first time. If you use an NP-FH70 or NPFH100 battery pack. CAMERA-MEMORY: To record on a tape. On the charging/recording/playback time • Times measured with the...
Operating Guide
Page 20
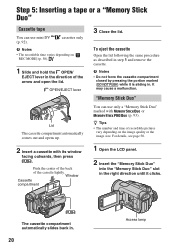
...depending on the image quality or the image size. For details, see page 50. 1 Open the LCD panel. 2 Insert the "Memory Stick Duo" into the "Memory Stick Duo" slot in . 20 Access lamp OPEN/EJECT lever Lid The cassette compartment automatically comes out and opens up. 2 Insert a ...or (p. 93). It may cause a malfunction. Push the center of the back of the arrow and open the lid. "Memory Stick Duo" You can use only a "Memory Stick Duo" marked with its window facing outwards, then press . The cassette compartment automatically slides back in the right direction until it...
...depending on the image quality or the image size. For details, see page 50. 1 Open the LCD panel. 2 Insert the "Memory Stick Duo" into the "Memory Stick Duo" slot in . 20 Access lamp OPEN/EJECT lever Lid The cassette compartment automatically comes out and opens up. 2 Insert a ...or (p. 93). It may cause a malfunction. Push the center of the back of the arrow and open the lid. "Memory Stick Duo" You can use only a "Memory Stick Duo" marked with its window facing outwards, then press . The cassette compartment automatically slides back in the right direction until it...
Operating Guide
Page 21
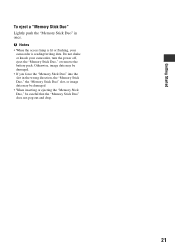
...camcorder is lit or flashing, your camcorder, turn the power off, eject the "Memory Stick Duo," or remove the battery pack. b Notes • When the access lamp is reading/writing data. Otherwise, image data may be damaged. • When inserting or ejecting the "Memory Stick Duo," be careful that the "Memory Stick... Duo" does not pop out and drop. 21 Getting Started To eject a "Memory Stick Duo" Lightly push the "Memory Stick Duo" in the wrong direction, the "Memory Stick Duo," the "Memory Stick Duo" slot, or ...
...camcorder is lit or flashing, your camcorder, turn the power off, eject the "Memory Stick Duo," or remove the battery pack. b Notes • When the access lamp is reading/writing data. Otherwise, image data may be damaged. • When inserting or ejecting the "Memory Stick Duo," be careful that the "Memory Stick... Duo" does not pop out and drop. 21 Getting Started To eject a "Memory Stick Duo" Lightly push the "Memory Stick Duo" in the wrong direction, the "Memory Stick Duo," the "Memory Stick Duo" slot, or ...
Operating Guide
Page 22
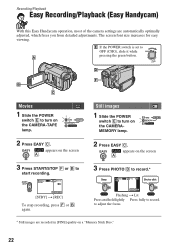
... B to start recording. 60min EASY REC GUIDE MENU [STBY] t [REC] To stop recording, press F or B again. to turn on a "Memory Stick Duo." 22 Recording/Playback Easy Recording/Playback (Easy Handycam) With this Easy Handycam operation, most of the camera settings are recorded in [FINE] quality on the CAMERAMEMORY lamp. 2 Press EASY C. D F B C Movies 1 Slide the...
... B to start recording. 60min EASY REC GUIDE MENU [STBY] t [REC] To stop recording, press F or B again. to turn on a "Memory Stick Duo." 22 Recording/Playback Easy Recording/Playback (Easy Handycam) With this Easy Handycam operation, most of the camera settings are recorded in [FINE] quality on the CAMERAMEMORY lamp. 2 Press EASY C. D F B C Movies 1 Slide the...
Operating Guide
Page 25
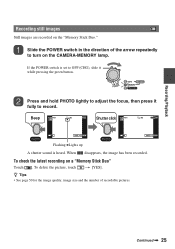
... GUIDE P-MENU Flashing bLights up A shutter sound is set to OFF (CHG), slide it fully to turn on the CAMERA-MEMORY lamp. Recording/Playback Recording still images Still images are recorded on a "Memory Stick Duo" Touch . z Tips • See page 50 for the image quality, image size and the number of the arrow...
... GUIDE P-MENU Flashing bLights up A shutter sound is set to OFF (CHG), slide it fully to turn on the CAMERA-MEMORY lamp. Recording/Playback Recording still images Still images are recorded on a "Memory Stick Duo" Touch . z Tips • See page 50 for the image quality, image size and the number of the arrow...
Operating Guide
Page 26
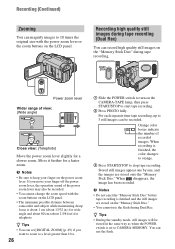
...are stored onto the "Memory Stick Duo." Recording high quality still images during Dual Rec. Recording (Continued) Zooming You can magnify images to 10 times the original size with the zoom buttons on the LCD panel. • The minimum possible distance between camcorder and subject while maintaining... sharp focus is about 1 cm (about 13/32 in the same way as when the POWER switch is set [DIGITAL ZOOM] (p. 49) if you move your finger on the "Memory Stick Duo" during tape recording.
...are stored onto the "Memory Stick Duo." Recording high quality still images during Dual Rec. Recording (Continued) Zooming You can magnify images to 10 times the original size with the zoom buttons on the LCD panel. • The minimum possible distance between camcorder and subject while maintaining... sharp focus is about 1 cm (about 13/32 in the same way as when the POWER switch is set [DIGITAL ZOOM] (p. 49) if you move your finger on the "Memory Stick Duo" during tape recording.
Operating Guide
Page 29
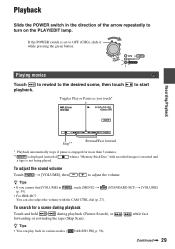
..., then touch playback. Toggles Play or Pause as you cannot find [VOLUME] in (p. 59). , touch [MENU] t • For HDR-HC7: You can play back in the direction of a tape is not being played. when a "Memory Stick Duo" with the CAM CTRL dial (p. 27). (STANDARD SET) t [VOLUME] To search for more than 3 minutes. ** is inserted...
..., then touch playback. Toggles Play or Pause as you cannot find [VOLUME] in (p. 59). , touch [MENU] t • For HDR-HC7: You can play back in the direction of a tape is not being played. when a "Memory Stick Duo" with the CAM CTRL dial (p. 27). (STANDARD SET) t [VOLUME] To search for more than 3 minutes. ** is inserted...
Operating Guide
Page 30
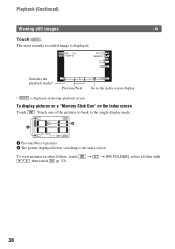
... other folders, touch / , then touch (p. 52). Playback (Continued) Viewing still images Touch . To display pictures on a "Memory Stick Duo" on the tape playback screen. The most recently recorded image is displayed. 60min 6.1M 10/10 MEMORY PLAY GUIDE Switches the playback media* Previous/Next P-MENU Go to the index screen display * is displayed...
... other folders, touch / , then touch (p. 52). Playback (Continued) Viewing still images Touch . To display pictures on a "Memory Stick Duo" on the tape playback screen. The most recently recorded image is displayed. 60min 6.1M 10/10 MEMORY PLAY GUIDE Switches the playback media* Previous/Next P-MENU Go to the index screen display * is displayed...
Operating Guide
Page 40
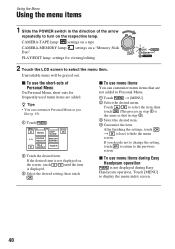
... on the screen, touch / until the item is not displayed on a "Memory Stick PLAY/EDIT lamp: settings for frequently used menu items are not added to turn on the respective lamp. x To use menu items during Easy Handycam operation is the same as you decide not to change the setting, touch... to return to hide the menu screen. Touch / to select the item, then touch (The process in step 3 is not displayed during Easy Handycam operation.
... on the screen, touch / until the item is not displayed on a "Memory Stick PLAY/EDIT lamp: settings for frequently used menu items are not added to turn on the respective lamp. x To use menu items during Easy Handycam operation is the same as you decide not to change the setting, touch... to return to hide the menu screen. Touch / to select the item, then touch (The process in step 3 is not displayed during Easy Handycam operation.
Operating Guide
Page 48
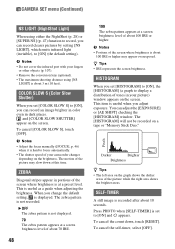
...slow down , touch [RESET]. To cancel the count down at a preset level. b Notes • Do not cover the infrared port with your camcorder changes depending on the screen. COLOR SLOW S (Color Slow Shutter) When you set to focus automatically. • The shutter speed of the picture...in portions of about 3 m (10 feet). Press PHOTO when [SELF-TIMER] is displayed. The [HISTOGRAM] will not be recorded on a tape or "Memory Stick Duo." 80 Pixels Darker Brighter Brightness z Tips • The left area on the screen. You can adjust the [EXPOSURE] or [AE SHIFT] checking the...
...slow down , touch [RESET]. To cancel the count down at a preset level. b Notes • Do not cover the infrared port with your camcorder changes depending on the screen. COLOR SLOW S (Color Slow Shutter) When you set to focus automatically. • The shutter speed of the picture...in portions of about 3 m (10 feet). Press PHOTO when [SELF-TIMER] is displayed. The [HISTOGRAM] will not be recorded on a tape or "Memory Stick Duo." 80 Pixels Darker Brighter Brightness z Tips • The left area on the screen. You can adjust the [EXPOSURE] or [AE SHIFT] checking the...
Operating Guide
Page 50
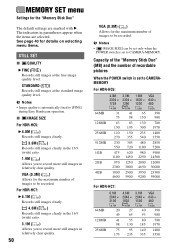
... "Memory Stick Duo" (MB) and the number of recordable pictures When the POWER switch is set to CAMERAMEMORY For HDR-HC5... 2500 3950 23500 4600 5900 9200 59000 For HDR-HC7: 6.1M 4.6M 3.1M VGA 2848 ×... maximum number of images to be recorded. x IMAGE SIZE For HDR-HC5: B 4.0M ( 4.0M ) Records still images clearly...QUALITY B FINE ( ) Records still images at the standard image quality level. For HDR-HC7: B 6.1M ( 6.1M ) Records still images clearly. 4.6M ( 4.6M ...to CAMERA-MEMORY. VGA (0.3M) ( ) Allows for the "Memory Stick Duo" The default settings are selected. MEMORY SET menu ...
... "Memory Stick Duo" (MB) and the number of recordable pictures When the POWER switch is set to CAMERAMEMORY For HDR-HC5... 2500 3950 23500 4600 5900 9200 59000 For HDR-HC7: 6.1M 4.6M 3.1M VGA 2848 ×... maximum number of images to be recorded. x IMAGE SIZE For HDR-HC5: B 4.0M ( 4.0M ) Records still images clearly...QUALITY B FINE ( ) Records still images at the standard image quality level. For HDR-HC7: B 6.1M ( 6.1M ) Records still images clearly. 4.6M ( 4.6M ...to CAMERA-MEMORY. VGA (0.3M) ( ) Allows for the "Memory Stick Duo" The default settings are selected. MEMORY SET menu ...
Operating Guide
Page 51
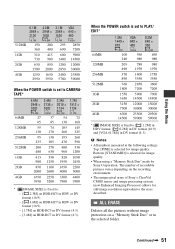
... 59000 59000 * [ IMAGE SIZE] is selected for image quality. ALL ERASE Deletes all the pictures without image protection on a "Memory Stick Duo" or in DV format (4:3). When the POWER switch is set to CAMERATAPE* 64MB 128MB 256MB 512MB 1GB 2GB 4GB 4.6M ...HDR-HC7 in HDV or DV format (16:9) - [1.7M] on HDR-HC5 in DV format (4:3) - [3.4M] on the recording environment. • The unique pixel array of recordable pictures varies depending on HDR-HC7 in the selected folder. Continued , 51 Bottom: [STANDARD] is selected for image quality. • When using a "Memory Stick Duo" made by Sony...
... 59000 59000 * [ IMAGE SIZE] is selected for image quality. ALL ERASE Deletes all the pictures without image protection on a "Memory Stick Duo" or in DV format (4:3). When the POWER switch is set to CAMERATAPE* 64MB 128MB 256MB 512MB 1GB 2GB 4GB 4.6M ...HDR-HC7 in HDV or DV format (16:9) - [1.7M] on HDR-HC5 in DV format (4:3) - [3.4M] on the recording environment. • The unique pixel array of recordable pictures varies depending on HDR-HC7 in the selected folder. Continued , 51 Bottom: [STANDARD] is selected for image quality. • When using a "Memory Stick Duo" made by Sony...
Operating Guide
Page 52
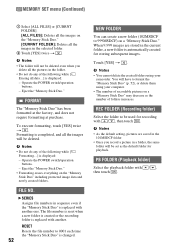
...You cannot delete the created folders using your camcorder. Eject the "Memory Stick Duo." Formatting is completed, and all the images will be used for recording with / , then touch . Eject the "Memory Stick Duo." • Formatting erases everything on a "Memory Stick Duo." RESET Resets the file number to ..., touch [YES] twice t . Operate the POWER switch/operation buttons. - Operate the POWER switch/operation buttons. - FORMAT The "Memory Stick Duo" has been formatted at the factory, and does not require formatting at purchase. b Notes • Do not do any of...
...You cannot delete the created folders using your camcorder. Eject the "Memory Stick Duo." Formatting is completed, and all the images will be used for recording with / , then touch . Eject the "Memory Stick Duo." • Formatting erases everything on a "Memory Stick Duo." RESET Resets the file number to ..., touch [YES] twice t . Operate the POWER switch/operation buttons. - Operate the POWER switch/operation buttons. - FORMAT The "Memory Stick Duo" has been formatted at the factory, and does not require formatting at purchase. b Notes • Do not do any of...
Operating Guide
Page 53
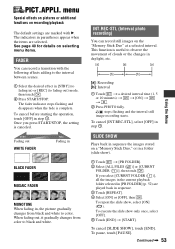
... The default settings are selected. See page 40 for details on selecting menu items. FADER You can record still images on a "Memory Stick Duo," or in sequence the images stored on the "Memory Stick Duo" at a selected interval. SLIDE SHOW Plays back in a folder (slide show). 1 Touch t [PB FOLDER]. 2 Select [ALL FILES ( )] or [CURRNT...
... The default settings are selected. See page 40 for details on selecting menu items. FADER You can record still images on a "Memory Stick Duo," or in sequence the images stored on the "Memory Stick Duo" at a selected interval. SLIDE SHOW Plays back in a folder (slide show). 1 Touch t [PB FOLDER]. 2 Select [ALL FILES ( )] or [CURRNT...
Operating Guide
Page 54
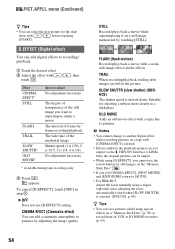
...STILL]. B OFF Does not use the review button for the slide show with a sepia hue to [AUTO]. • For HDR-HC5: Adjust the focus manually using special effects on a "Memory Stick Duo" (p. 70) or record them on a tape with a serialstill-image effect (strobe effect). STILL Records/plays back a... movie while superimposing it on the "Memory Stick Duo" . • If you want to superimpose under a movie The interval of frame-byframe recording/playback The fade time of the still ...
...STILL]. B OFF Does not use the review button for the slide show with a sepia hue to [AUTO]. • For HDR-HC5: Adjust the focus manually using special effects on a "Memory Stick Duo" (p. 70) or record them on a tape with a serialstill-image effect (strobe effect). STILL Records/plays back a... movie while superimposing it on the "Memory Stick Duo" . • If you want to superimpose under a movie The interval of frame-byframe recording/playback The fade time of the still ...


