
Operating Instructions
Page 1
Operating Instructions Read this first Digital HD Video Camera Recorder HDR-FX1 2-178-348-11(1) © 2004 Sony Corporation
Operating Instructions Read this first Digital HD Video Camera Recorder HDR-FX1 2-178-348-11(1) © 2004 Sony Corporation
Operating Instructions
Page 3
...TV color systems differ depending on the LCD screen and the viewfinder. You can use . The HDV standards • Digital high-definition (HD) video signals are recorded and played back on a DV format cassette. • HDV signals are compressed in MPEG2 format, which can radiate radio frequency ... - Connect the equipment to an outlet on , the user is encouraged to try to provide reasonable protection against harmful interference in your camcorder. Recording • Before starting to record, test the recording function to make sure the picture and sound are designed to correct the ...
...TV color systems differ depending on the LCD screen and the viewfinder. You can use . The HDV standards • Digital high-definition (HD) video signals are recorded and played back on a DV format cassette. • HDV signals are compressed in MPEG2 format, which can radiate radio frequency ... - Connect the equipment to an outlet on , the user is encouraged to try to provide reasonable protection against harmful interference in your camcorder. Recording • Before starting to record, test the recording function to make sure the picture and sound are designed to correct the ...
Operating Instructions
Page 6
... Fading in 16:9 wide rec mode 40 Reviewing the most recent recording - Zero set memory 49 Searching for a desired scene - Data code 44 Displaying the video information - Status check 45 Playing the picture on a TV 46 Viewing the picture on a high definition TV 46 Viewing the picture on a 16:9 TV or...
... Fading in 16:9 wide rec mode 40 Reviewing the most recent recording - Zero set memory 49 Searching for a desired scene - Data code 44 Displaying the video information - Status check 45 Playing the picture on a TV 46 Viewing the picture on a high definition TV 46 Viewing the picture on a 16:9 TV or...
Operating Instructions
Page 10
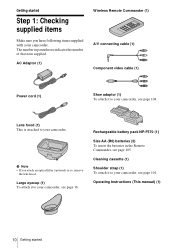
b Note • If you have following items supplied with your camcorder. Cleaning cassette (1) Shoulder strap (1) To attach it to your camcorder, see page 104. Rechargeable battery pack NP-F570 (1) Size AA (R6) batteries (2) To insert the batteries in parentheses indicates the... sure you attach an optical filter (optional) or so, remove the lens hood. Lens hood (1) This is attached to your camcorder. Large eyecup (1) To attach it to your camcorder, see page 101. The number in the Remote Commander, see page 16. AC Adaptor (1) Wireless Remote Commander (1) A/V connecting...
b Note • If you have following items supplied with your camcorder. Cleaning cassette (1) Shoulder strap (1) To attach it to your camcorder, see page 104. Rechargeable battery pack NP-F570 (1) Size AA (R6) batteries (2) To insert the batteries in parentheses indicates the... sure you attach an optical filter (optional) or so, remove the lens hood. Lens hood (1) This is attached to your camcorder. Large eyecup (1) To attach it to your camcorder, see page 101. The number in the Remote Commander, see page 16. AC Adaptor (1) Wireless Remote Commander (1) A/V connecting...
Operating Instructions
Page 27
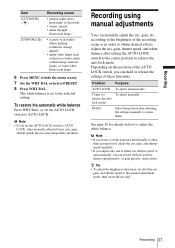
... the AUTO LOCK switch to the center position to AUTO LOCK. z Tip • To adjust the brightness of the recording scene or in a studio, under video lamps such as those in order to PRESET. 8 Press WHT BAL. Position Purpose AUTO LOCK To adjust automatically. b Note • If you can manually adjust...
... the AUTO LOCK switch to the center position to AUTO LOCK. z Tip • To adjust the brightness of the recording scene or in a studio, under video lamps such as those in order to PRESET. 8 Press WHT BAL. Position Purpose AUTO LOCK To adjust automatically. b Note • If you can manually adjust...
Operating Instructions
Page 30
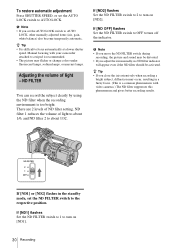
... 1 reduces the volume of light - If [ND2] flashes Set the ND FILTER switch to 2 to a tripod is a common phenomenon with your camcorder attached to turn on [ND2]. b Note • If you move the ND FILTER switch during recording, the picture and sound may occur, resulting in...focus. (This is recommended. • The picture may flicker or change colors under fluorescent lamps, sodium lamps, or mercury lamps. Manual focusing with video cameras.) The ND filter suppresses this phenomenon and gives better recording results. z Tip • It is too bright. If [ND OFF] flashes Set...
... 1 reduces the volume of light - If [ND2] flashes Set the ND FILTER switch to 2 to a tripod is a common phenomenon with your camcorder attached to turn on [ND2]. b Note • If you move the ND FILTER switch during recording, the picture and sound may occur, resulting in...focus. (This is recommended. • The picture may flicker or change colors under fluorescent lamps, sodium lamps, or mercury lamps. Manual focusing with video cameras.) The ND filter suppresses this phenomenon and gives better recording results. z Tip • It is too bright. If [ND OFF] flashes Set...
Operating Instructions
Page 36
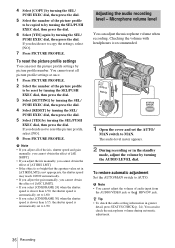
.... You can also check the microphone volume during automatic adjustment. 36 Recording b Note • You cannot adjust the volume of audio input from the AUDIO/VIDEO jack or the HDV/DV jack. 4 Select [COPY] by turning the SEL/ PUSH EXEC dial, then press the dial. 5 Select the number of the picture...
.... You can also check the microphone volume during automatic adjustment. 36 Recording b Note • You cannot adjust the volume of audio input from the AUDIO/VIDEO jack or the HDV/DV jack. 4 Select [COPY] by turning the SEL/ PUSH EXEC dial, then press the dial. 5 Select the number of the picture...
Operating Instructions
Page 43
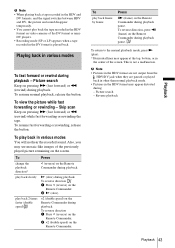
... back the tape recorded in the HDV format on the screen. Also, you may see mosaic-like images of the previously played picture remaining on video cameras of the screen.
... back the tape recorded in the HDV format on the screen. Also, you may see mosaic-like images of the previously played picture remaining on video cameras of the screen.
Operating Instructions
Page 45
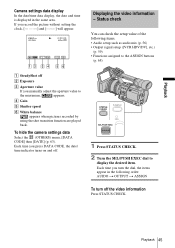
... order: AUIDO t OUTPUT t ASSIGN To turn the dial, the items appear in the same area. Each time you turn off the video information Press STATUS CHECK. To hide the camera settings data Select the (OTHERS) menu, [DATA CODE] then [DATE] (p. 63). ... the picture without setting the clock and [--:--:--] will appear. 6 0min HDV1080i 0:00:00 6 0min AUTO F 1 . 7 6 dB 1 0 0 Displaying the video information - Playback 45 D Gain E Shutter speed F White balance appears when pictures recorded by using the shot transition function are played back. Playback Camera settings data...
... order: AUIDO t OUTPUT t ASSIGN To turn the dial, the items appear in the same area. Each time you turn off the video information Press STATUS CHECK. To hide the camera settings data Select the (OTHERS) menu, [DATA CODE] then [DATE] (p. 63). ... the picture without setting the clock and [--:--:--] will appear. 6 0min HDV1080i 0:00:00 6 0min AUTO F 1 . 7 6 dB 1 0 0 Displaying the video information - Playback 45 D Gain E Shutter speed F White balance appears when pictures recorded by using the shot transition function are played back. Playback Camera settings data...
Operating Instructions
Page 46
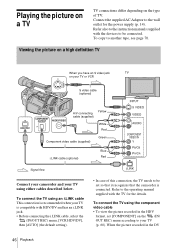
... case of TV. Refer also to be set [COMPONENT] on your TV or VCR S video cable (optional) Yellow A/V connecting cable (supplied) White Red Component video cable (supplied) Green i.LINK cable (optional) Blue Red Signal flow Connect your camcorder and your TV (p. 60). To connect the TV using an i.LINK cable This connection is...
... case of TV. Refer also to be set [COMPONENT] on your TV or VCR S video cable (optional) Yellow A/V connecting cable (supplied) White Red Component video cable (supplied) Green i.LINK cable (optional) Blue Red Signal flow Connect your camcorder and your TV (p. 60). To connect the TV using an i.LINK cable This connection is...
Operating Instructions
Page 47
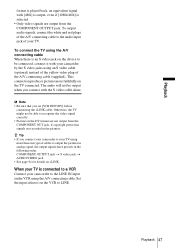
... cable. Otherwise, the TV might not be able to LINE. z Tip • If you connect your camcorder to your camcorder by the S video jacks using an S video cable (optional) instead of the yellow video plug of cables to be output when you set [VCR HDV/DV] before connecting the i.LINK cable. Set... are output from the COMPONENT OUTPUT jack. b Note • Be sure that you connect with [480i] is output, even if [1080i/480i] is an S video jack on the device to output the pictures in analog signal, the output signals have priority in the following order: COMPONENT OUTPUT jack...
... cable. Otherwise, the TV might not be able to LINE. z Tip • If you connect your camcorder to your camcorder by the S video jacks using an S video cable (optional) instead of the yellow video plug of cables to be output when you set [VCR HDV/DV] before connecting the i.LINK cable. Set... are output from the COMPONENT OUTPUT jack. b Note • Be sure that you connect with [480i] is output, even if [1080i/480i] is an S video jack on the device to output the pictures in analog signal, the output signals have priority in the following order: COMPONENT OUTPUT jack...
Operating Instructions
Page 48
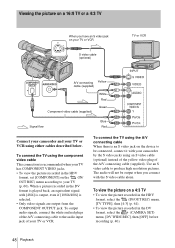
...] is output, even if [1080i/480i] is played back, an equivalent signal with your TV or VCR using an S video cable (optional) instead of the yellow video plug of your TV (p. 60). Use an S video cable to be output when you have an S video jack on a 4:3 TV •...To view the picture on your TV or VCR S video cable (optional) TV or VCR A/V connecting Yellow cable (supplied) Component video cable (supplied) White Red Green Signal flow Blue Red Connect your camcorder and your camcorder by the S video jacks using either cables described below. When a picture recorded...
...] is output, even if [1080i/480i] is played back, an equivalent signal with your TV or VCR using an S video cable (optional) instead of the yellow video plug of your TV (p. 60). Use an S video cable to be output when you have an S video jack on a 4:3 TV •...To view the picture on your TV or VCR S video cable (optional) TV or VCR A/V connecting Yellow cable (supplied) Component video cable (supplied) White Red Green Signal flow Blue Red Connect your camcorder and your camcorder by the S video jacks using either cables described below. When a picture recorded...

Operating Instructions
Page 49
... screen. The tape counter is monaural (When your TV has only one audio input jack) Connect the yellow plug of the A/V connecting cable to the video input jack and connect the white or the red plug to the audio input jack of your TV or VCR. When your TV is reset... a tape for playback Searching quickly for that purpose. When you want to play ). Zero set memory Playback 1 During playback, press ZERO SET MEMORY on your camcorder to locate later on the VCR using the A/V connecting cable. If the tape counter is connected to a VCR Connect your...
... screen. The tape counter is monaural (When your TV has only one audio input jack) Connect the yellow plug of the A/V connecting cable to the video input jack and connect the white or the red plug to the audio input jack of your TV or VCR. When your TV is reset... a tape for playback Searching quickly for that purpose. When you want to play ). Zero set memory Playback 1 During playback, press ZERO SET MEMORY on your camcorder to locate later on the VCR using the A/V connecting cable. If the tape counter is connected to a VCR Connect your...

Operating Instructions
Page 59
Unavailable items will be able to recognize the video signal from the HDV/DV jack. Select this to the... record/play back the input/ output signals in the HDV format only. • For an i.LINK connection, select this camcorder. • When [AUTO] is selected and the signal switches between HDV and DV, the picture and sound disappear temporarily.... • When [i.LINK CONV] is ; REC FORMAT/TV TYPE, etc. Select this when connecting the camcorder to a computer, etc. (p. 77). • Select this to [ON], pictures are marked with G. at [HDV], an ...
Unavailable items will be able to recognize the video signal from the HDV/DV jack. Select this to the... record/play back the input/ output signals in the HDV format only. • For an i.LINK connection, select this camcorder. • When [AUTO] is selected and the signal switches between HDV and DV, the picture and sound disappear temporarily.... • When [i.LINK CONV] is ; REC FORMAT/TV TYPE, etc. Select this when connecting the camcorder to a computer, etc. (p. 77). • Select this to [ON], pictures are marked with G. at [HDV], an ...
Operating Instructions
Page 61
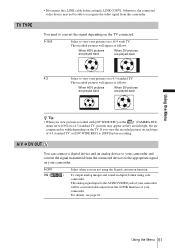
...] on the (CAMERA SET) menu set [DV WIDE REC] to view your pictures on your camcorder. You need to recognize the video signal from the i.LINK Interface of your camcorder will appear as they are in digital format using your pictures on the TV connected. The analog signal... input to view your camcorder. G16:9 Select to the AUDIO/VIDEO jack of your camcorder. Using the Menu TV ...
...] on the (CAMERA SET) menu set [DV WIDE REC] to view your pictures on your camcorder. You need to recognize the video signal from the i.LINK Interface of your camcorder will appear as they are in digital format using your pictures on the TV connected. The analog signal... input to view your camcorder. G16:9 Select to the AUDIO/VIDEO jack of your camcorder. Using the Menu TV ...
Operating Instructions
Page 70
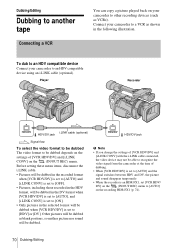
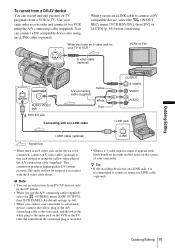
... pictures will be dubbed as blank portions, so neither picture nor sound will be dubbed The video format to [AUTO] on the recording HDR-FX1 (p. 74). 70 Dubbing/Editing To dub to an HDV compatible device Connect your camcorder to [HDV] or [DV]. Before setting these menu items, disconnect the i.LINK cable.... sound disappear temporarily. • When the recorder is an HDR-FX1, set to an HDV compatible device using an i.LINK cable (optional). Player Recorder i.LINK cable (optional) HDV/DV jack HDV/DV jack Signal flow To select the video format to be dubbed when [VCR HDV/DV] is set...
... pictures will be dubbed as blank portions, so neither picture nor sound will be dubbed The video format to [AUTO] on the recording HDR-FX1 (p. 74). 70 Dubbing/Editing To dub to an HDV compatible device Connect your camcorder to [HDV] or [DV]. Before setting these menu items, disconnect the i.LINK cable.... sound disappear temporarily. • When the recorder is an HDR-FX1, set to an HDV compatible device using an i.LINK cable (optional). Player Recorder i.LINK cable (optional) HDV/DV jack HDV/DV jack Signal flow To select the video format to be dubbed when [VCR HDV/DV] is set...

Operating Instructions
Page 71
...HDV/DV] to [DV] to dub only pictures in the DV format. To dub to a DV device Connect your camcorder to be dubbed. b Note • If you change the settings of [VCR HDV/DV] and [i.LINK CONV] with... the HDV and DV formats mixed, set to recognize the video signal from the camcorder at the time of [VCR HDV/DV] (p. 59) and [i.LINK CONV] (p. 60) in the HDV .../DV] is set to [ON]. • If the tape was recorded with the i.LINK cable connected, the video device may not be able to [AUTO] and the signal switches between HDV and DV, the picture and sound ...
...HDV/DV] to [DV] to dub only pictures in the DV format. To dub to a DV device Connect your camcorder to be dubbed. b Note • If you change the settings of [VCR HDV/DV] and [i.LINK CONV] with... the HDV and DV formats mixed, set to recognize the video signal from the camcorder at the time of [VCR HDV/DV] (p. 59) and [i.LINK CONV] (p. 60) in the HDV .../DV] is set to [ON]. • If the tape was recorded with the i.LINK cable connected, the video device may not be able to [AUTO] and the signal switches between HDV and DV, the picture and sound ...
Operating Instructions
Page 72
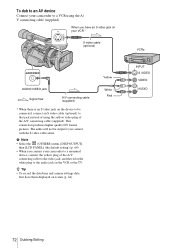
...) (p. 64). • When you connect with the S video cable alone. To dub to an AV device Connect your VCR * S video cable (optional) VCRs AUDIO/VIDEO jack Signal flow A/V connecting cable (supplied) * When there is an S video jack on the device to be output if you connect your camcorder to a monaural device, connect the yellow plug...
...) (p. 64). • When you connect with the S video cable alone. To dub to an AV device Connect your VCR * S video cable (optional) VCRs AUDIO/VIDEO jack Signal flow A/V connecting cable (supplied) * When there is an S video jack on the device to be output if you connect your camcorder to a monaural device, connect the yellow plug...
Operating Instructions
Page 73
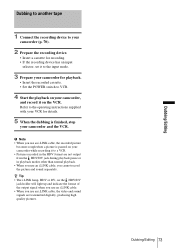
... details. 5 When the dubbing is paused on your camcorder while recording it on the VCR. Dubbing/Editing 73 Dubbing/Editing b Note • When you use an i.LINK cable, the video and sound signals are transmitted digitally, producing high quality pictures. Refer to a VCR. • Pictures ... than normal playback. • When you use an i.LINK cable, the recorded picture becomes rough when a picture is finished, stop your camcorder, and record it to the operating instructions supplied with your VCR for playback. • Insert the recorded cassette. • Set the POWER...
... details. 5 When the dubbing is paused on your camcorder while recording it on the VCR. Dubbing/Editing 73 Dubbing/Editing b Note • When you use an i.LINK cable, the video and sound signals are transmitted digitally, producing high quality pictures. Refer to a VCR. • Pictures ... than normal playback. • When you use an i.LINK cable, the recorded picture becomes rough when a picture is finished, stop your camcorder, and record it to the operating instructions supplied with your VCR for playback. • Insert the recorded cassette. • Set the POWER...
Operating Instructions
Page 75
... from DV/AV devices only in the DV format. • When you use an i.LINK cable to that jack instead of using the yellow video plug of your camcorder as a recorder and connect it using the A/V connecting cable (supplied). You can record and edit pictures or TV programs from a VCR or... the sound from the connected plug is recorded. • When a 4:3 video signal is an S video jack on the device to be output if you connect your camcorder to a monaural device, connect the yellow plug of the A/V connecting cable to the video jack, and the red or the white plug to a VCR using an...
... from DV/AV devices only in the DV format. • When you use an i.LINK cable to that jack instead of using the yellow video plug of your camcorder as a recorder and connect it using the A/V connecting cable (supplied). You can record and edit pictures or TV programs from a VCR or... the sound from the connected plug is recorded. • When a 4:3 video signal is an S video jack on the device to be output if you connect your camcorder to a monaural device, connect the yellow plug of the A/V connecting cable to the video jack, and the red or the white plug to a VCR using an...


