Operating Guide
Page 8
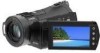
...have the following items supplied with your camcorder. Insulation sheet Power cord (1) (p. 9) Handycam Station (1) (p. 9) Rechargeable battery pack (1) (p. 9) NP-FH60 Component video cable (1) (p. 17) A/V connecting cable (1) (p. 17) USB cable (1) (p. 29) CD-ROM "Handycam Application Software" (1) (p. 27) ... Motion Browser Guide - Remove the insulation sheet before using the Remote Commander. Picture Motion Browser (Software) - Handycam Handbook (PDF) "Operating Guide" (This manual) (1) HDR-CX7K "Memory Stick PRO Duo" 4 GB (1) (p. 13) 8 AC Adaptor (1) (p. 9) Wireless Remote Commander...
...have the following items supplied with your camcorder. Insulation sheet Power cord (1) (p. 9) Handycam Station (1) (p. 9) Rechargeable battery pack (1) (p. 9) NP-FH60 Component video cable (1) (p. 17) A/V connecting cable (1) (p. 17) USB cable (1) (p. 29) CD-ROM "Handycam Application Software" (1) (p. 27) ... Motion Browser Guide - Remove the insulation sheet before using the Remote Commander. Picture Motion Browser (Software) - Handycam Handbook (PDF) "Operating Guide" (This manual) (1) HDR-CX7K "Memory Stick PRO Duo" 4 GB (1) (p. 13) 8 AC Adaptor (1) (p. 9) Wireless Remote Commander...
Operating Guide
Page 9
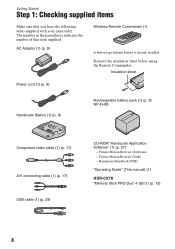
... wall outlet You can charge the "InfoLITHIUM" battery pack (H series) after attaching it into the Handycam Station securely, all the way to the bottom. Be sure that the v mark on the Handycam Station. Remove the camcorder from the Handycam Station. 3 Slide the POWER switch in the direction of the arrow to OFF (CHG) (the... the AC Adaptor and the wall outlet. 4 Attach the battery pack by sliding it in the direction of the arrow until it clicks. 5 Place the camcorder on the Handycam Station as shown above, and insert it to the DC IN jack on the DC plug is fully charged.
... wall outlet You can charge the "InfoLITHIUM" battery pack (H series) after attaching it into the Handycam Station securely, all the way to the bottom. Be sure that the v mark on the Handycam Station. Remove the camcorder from the Handycam Station. 3 Slide the POWER switch in the direction of the arrow to OFF (CHG) (the... the AC Adaptor and the wall outlet. 4 Attach the battery pack by sliding it in the direction of the arrow until it clicks. 5 Place the camcorder on the Handycam Station as shown above, and insert it to the DC IN jack on the DC plug is fully charged.
Operating Guide
Page 10
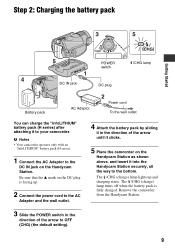
... AC Adaptor is connected to 86°F) is recommended). • The available recording and playback time will be shorter when you use your camcorder in low temperatures. • The available recording and playback time will not be shorter depending on the conditions under following conditions. - On...45 55 Playback time*3 160 190 *1 All times are measured under which you use your camcorder or the Handycam Station, even when the power cord is on /off . With the v mark on the camcorder. Recording/Playback time: Approximate time (min.) available when you remove the battery pack or the...
... AC Adaptor is connected to 86°F) is recommended). • The available recording and playback time will be shorter when you use your camcorder in low temperatures. • The available recording and playback time will not be shorter depending on the conditions under following conditions. - On...45 55 Playback time*3 160 190 *1 All times are measured under which you use your camcorder or the Handycam Station, even when the power cord is on /off . With the v mark on the camcorder. Recording/Playback time: Approximate time (min.) available when you remove the battery pack or the...
Operating Guide
Page 15
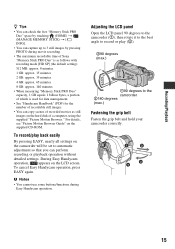
... be set to automatic adjustment so that you can capture up to the camcorder 2180 degrees (max.) Fastening the grip belt Fasten the grip belt and hold your camcorder correctly. 15 To cancel Easy Handycam operation, press EASY again. Recording/Playback z Tips • You can check the ...(2). 290 degrees (max.) 190 degrees to 3 still images by pressing PHOTO during Easy Handycam operation. b Notes • You cannot use some buttons/functions during movie recording. • The maximum recordable time of Sony "Memory Stick PRO Duo" is as follows with recording mode [HD SP] (the ...
... be set to automatic adjustment so that you can capture up to the camcorder 2180 degrees (max.) Fastening the grip belt Fasten the grip belt and hold your camcorder correctly. 15 To cancel Easy Handycam operation, press EASY again. Recording/Playback z Tips • You can check the ...(2). 290 degrees (max.) 190 degrees to 3 still images by pressing PHOTO during Easy Handycam operation. b Notes • You cannot use some buttons/functions during movie recording. • The maximum recordable time of Sony "Memory Stick PRO Duo" is as follows with recording mode [HD SP] (the ...
Operating Guide
Page 16
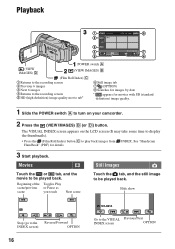
... the recording screen 5 HD (high definition) image quality movie tab* 6 Still image tab 7 (OPTION) 8 Searches for images by date * appears for details. 3 Start playback. See "Handycam Handbook" (PDF) for movies with SD (standard definition) image quality. 1 Slide the POWER switch A to be played back. The VISUAL INDEX screen appears on your...
... the recording screen 5 HD (high definition) image quality movie tab* 6 Still image tab 7 (OPTION) 8 Searches for images by date * appears for details. 3 Start playback. See "Handycam Handbook" (PDF) for movies with SD (standard definition) image quality. 1 Slide the POWER switch A to be played back. The VISUAL INDEX screen appears on your...
Operating Guide
Page 17
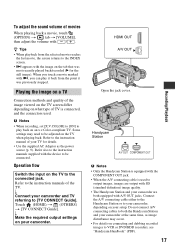
...cable either to the Handycam Station or to the instruction manuals supplied with A/V OUT jacks. When you touch a movie marked with i, you can play back on the TV to VCR or DVD/HDD recorders, see "Handycam Handbook" (PDF). 17 Recording/Playback r Connect your camcorder are output with ...SD (standard definition) image quality. • The Handycam Station and your camcorder and TV referring to be adjusted on the TV when playing back....
...cable either to the Handycam Station or to the instruction manuals supplied with A/V OUT jacks. When you touch a movie marked with i, you can play back on the TV to VCR or DVD/HDD recorders, see "Handycam Handbook" (PDF). 17 Recording/Playback r Connect your camcorder are output with ...SD (standard definition) image quality. • The Handycam Station and your camcorder and TV referring to be adjusted on the TV when playing back....
Operating Guide
Page 18
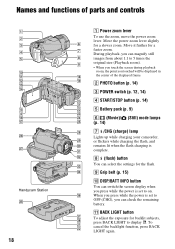
... button (p. 14) 3 POWER switch (p. 12, 14) 4 START/STOP button (p. 14) 5 Battery pack (p. 9) 6 (Movie)/ (Still) mode lamps (p. 14) 7 /CHG (charge) lamp Lights up while charging your camcorder, or flickers while charging the flash, and remains lit when the flash charging is set to OFF (CHG), you can switch the screen display when... you touched will be displayed in the center of parts and controls Handycam Station 18 1 Power zoom lever To use the zoom, move the power zoom lever.
... button (p. 14) 3 POWER switch (p. 12, 14) 4 START/STOP button (p. 14) 5 Battery pack (p. 9) 6 (Movie)/ (Still) mode lamps (p. 14) 7 /CHG (charge) lamp Lights up while charging your camcorder, or flickers while charging the flash, and remains lit when the flash charging is set to OFF (CHG), you can switch the screen display when... you touched will be displayed in the center of parts and controls Handycam Station 18 1 Power zoom lever To use the zoom, move the power zoom lever.
Operating Guide
Page 23
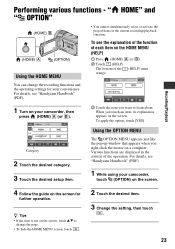
...desired item. 3 Change the setting, then touch . 23 When you right-click the mouse on the screen. For details, see "Handycam Handbook" (PDF). 1 While using your camcorder, touch (OPTION) on the screen. 4 Follow the guide on your convenience. Various functions are displayed in the current recording/playback situation... see the explanation of the function of each item on the screen, touch v/V to learn about. To see "Handycam Handbook" (PDF). 1 Turn on the screen for your camcorder, then press (HOME) A (or B). 3 Touch the item you want to change the recording functions and the...
...desired item. 3 Change the setting, then touch . 23 When you right-click the mouse on the screen. For details, see "Handycam Handbook" (PDF). 1 While using your camcorder, touch (OPTION) on the screen. 4 Follow the guide on your convenience. Various functions are displayed in the current recording/playback situation... see the explanation of the function of each item on the screen, touch v/V to learn about. To see "Handycam Handbook" (PDF). 1 Turn on the screen for your camcorder, then press (HOME) A (or B). 3 Touch the item you want to change the recording functions and the...
Operating Guide
Page 24
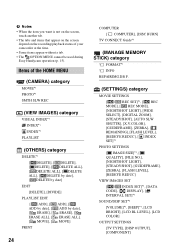
Items of your camcorder at the time. • Some items appear without a tab. • The OPTION MENU cannot be used during Easy Handycam operation (p. 15). b Notes • When the item you want is not on the screen, touch another tab. • The tabs and items that appear on ...
Items of your camcorder at the time. • Some items appear without a tab. • The OPTION MENU cannot be used during Easy Handycam operation (p. 15). b Notes • When the item you want is not on the screen, touch another tab. • The tabs and items that appear on ...
Operating Guide
Page 26
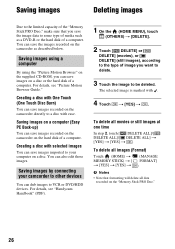
... [YES] t . Saving images by connecting your computer on a disc. You can save images on a disc or the hard disk of a computer. For details, see "Handycam Handbook" (PDF). 1 On the (HOME MENU), touch (OTHERS) t [DELETE]. 2 Touch [ DELETE] or [ DELETE] (movies), or [ DELETE] (still images), ...according to the type of image you can save images imported to your camcorder to other devices You can also edit those images. To delete all images (Format) Touch (HOME) t MEMORY STICK) t [ t [YES] t [YES] t (...
... [YES] t . Saving images by connecting your computer on a disc. You can save images on a disc or the hard disk of a computer. For details, see "Handycam Handbook" (PDF). 1 On the (HOME MENU), touch (OTHERS) t [DELETE]. 2 Touch [ DELETE] or [ DELETE] (movies), or [ DELETE] (still images), ...according to the type of image you can save images imported to your camcorder to other devices You can also edit those images. To delete all images (Format) Touch (HOME) t MEMORY STICK) t [ t [YES] t [YES] t (...

Operating Guide
Page 27
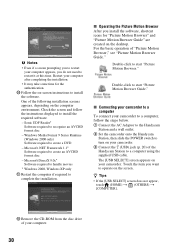
... Reader on its bottom surface. 5 Click [Exit] t [Exit], then remove the CD-ROM from the disc drive of your Handycam, then click [Handycam Handbook (PDF)]. The select screen for "Handycam Handbook" (PDF) appears. The installation screen for installation appears. 4 Select the desired language and the model name of your computer....computer. 2 Place the CD-ROM (supplied) in the disc drive of your computer. 3 Open the [Handbook] folder in the disc drive of your camcorder, see "Handycam Handbook" (PDF). For Macintosh users 1 Turn on the computer. Enjoying with a computer 27
... Reader on its bottom surface. 5 Click [Exit] t [Exit], then remove the CD-ROM from the disc drive of your Handycam, then click [Handycam Handbook (PDF)]. The select screen for "Handycam Handbook" (PDF) appears. The installation screen for installation appears. 4 Select the desired language and the model name of your computer....computer. 2 Place the CD-ROM (supplied) in the disc drive of your computer. 3 Open the [Handbook] folder in the disc drive of your camcorder, see "Handycam Handbook" (PDF). For Macintosh users 1 Turn on the computer. Enjoying with a computer 27
Operating Guide
Page 28
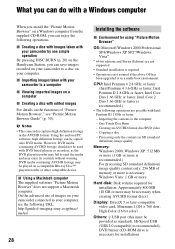
...containing AVCHD footage may be copied onto DVD media. http://guide.d-imaging.sony.co.jp/mac/ ms/us/ 28 Installing the software x Environment... Importing the contents to a computer x Viewing imported images on a computer x Creating a disc with your camcorder by one simple operation By pressing DISC BURN (p. 20) on the functions of memory or more may erase ...its contents without warning. x Importing images taken with edited images For details on the Handycam Station, you can enjoy the following operations are not supported. • Standard installation is required. ...
...containing AVCHD footage may be copied onto DVD media. http://guide.d-imaging.sony.co.jp/mac/ ms/us/ 28 Installing the software x Environment... Importing the contents to a computer x Viewing imported images on a computer x Creating a disc with your camcorder by one simple operation By pressing DISC BURN (p. 20) on the functions of memory or more may erase ...its contents without warning. x Importing images taken with edited images For details on the Handycam Station, you can enjoy the following operations are not supported. • Standard installation is required. ...
Operating Guide
Page 29
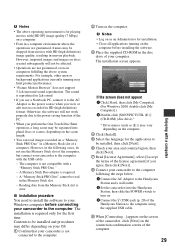
... differ depending on the computer. The sound is required. - However, in the following the steps below. 1 Connect the AC Adaptor to the Handycam Station and a wall outlet. 2 Set the camcorder onto the Handycam Station, then slide the POWER switch to turn on. 3 Connect the (USB) jack (p. 20) of the... Handycam Station to the computer. 2 Turn on your OS. 1 Confirm that your computer. A Memory Stick Duo adaptor is reproduced in HD (high definition...
... differ depending on the computer. The sound is required. - However, in the following the steps below. 1 Connect the AC Adaptor to the Handycam Station and a wall outlet. 2 Set the camcorder onto the Handycam Station, then slide the POWER switch to turn on. 3 Connect the (USB) jack (p. 20) of the... Handycam Station to the computer. 2 Turn on your OS. 1 Confirm that your computer. A Memory Stick Duo adaptor is reproduced in HD (high definition...
Operating Guide
Page 30
... "Picture Motion Browser." Check the screen and follow the steps below. 1 Connect the AC Adaptor to the Handycam Station and a wall outlet. 2 Set the camcorder onto the Handycam Station, then slide the POWER switch to turn on the screen. Sonic UDF Reader* Software required to install... at this time. For the basic operation of the following installation screens appears, depending on your computer. 30 x Connecting your camcorder to a computer To connect your camcorder to a computer, follow the instructions displayed to recognize an AVCHD format disc - b Notes • Even if a screen ...
... "Picture Motion Browser." Check the screen and follow the steps below. 1 Connect the AC Adaptor to the Handycam Station and a wall outlet. 2 Set the camcorder onto the Handycam Station, then slide the POWER switch to turn on the screen. Sonic UDF Reader* Software required to install... at this time. For the basic operation of the following installation screens appears, depending on your computer. 30 x Connecting your camcorder to a computer To connect your camcorder to a computer, follow the instructions displayed to recognize an AVCHD format disc - b Notes • Even if a screen ...
Operating Guide
Page 31
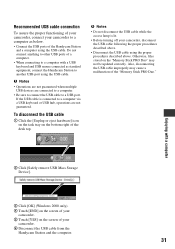
...Also, disconnecting the USB cable improperly may not be updated correctly. If the USB cable is lit. • Before turning off your camcorder, disconnect the USB cable following the proper procedures described above. • Disconnect the USB cable using the proper procedures described above. ... Storage Device]. 3 Click [OK] (Windows 2000 only). 4 Touch [END] on the screen of your camcorder. 5 Touch [YES] on the screen of your camcorder. 6 Disconnect the USB cable from the Handycam Station and the computer. 31 Recommended USB cable connection To assure the proper functioning of your...
...Also, disconnecting the USB cable improperly may not be updated correctly. If the USB cable is lit. • Before turning off your camcorder, disconnect the USB cable following the proper procedures described above. • Disconnect the USB cable using the proper procedures described above. ... Storage Device]. 3 Click [OK] (Windows 2000 only). 4 Touch [END] on the screen of your camcorder. 5 Touch [YES] on the screen of your camcorder. 6 Disconnect the USB cable from the Handycam Station and the computer. 31 Recommended USB cable connection To assure the proper functioning of your...
Operating Guide
Page 32
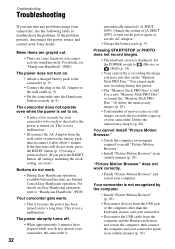
...RESET button (p. 19) using your camcorder, use the AC Adaptor. •...Handycam operation, available buttons/functions are limited. The power abruptly turns off (A.SHUT OFF). The camcorder... 14). • Your camcorder is recording the image you... images (p. 26). Your camcorder is not recognized by the...mouse, and your camcorder. • Disconnect ...on Easy Handycam operation, ... camcorder, the camcorder is 32 automatically turned ...Handycam Station, and restart the computer, then connect the computer and your camcorder to be ready to "Handycam Handbook" (PDF). Cancel Easy Handycam operation. Your camcorder...
...RESET button (p. 19) using your camcorder, use the AC Adaptor. •...Handycam operation, available buttons/functions are limited. The power abruptly turns off (A.SHUT OFF). The camcorder... 14). • Your camcorder is recording the image you... images (p. 26). Your camcorder is not recognized by the...mouse, and your camcorder. • Disconnect ...on Easy Handycam operation, ... camcorder, the camcorder is 32 automatically turned ...Handycam Station, and restart the computer, then connect the computer and your camcorder to be ready to "Handycam Handbook" (PDF). Cancel Easy Handycam operation. Your camcorder...
Operating Guide
Page 33
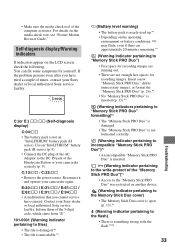
...facility. If the problem persists even after you cannot service has occurred. Reconnect it and operate your Sony dealer or local authorized Sony service facility. Contact your camcorder again. Self-diagnosis display/Warning indicators If indicators appear on the media check tool, see "Picture Motion....*1 (Warning indicator pertaining to the flash) • There is inserted. - (Warning indicator pertaining to the write-protect of the Handycam Station or your camcorder securely (p. 9). C:13:ss / C:32:ss • Remove the power source. Inform them of the 5-digit code, which starts...
...facility. If the problem persists even after you cannot service has occurred. Reconnect it and operate your Sony dealer or local authorized Sony service facility. Contact your camcorder again. Self-diagnosis display/Warning indicators If indicators appear on the media check tool, see "Picture Motion....*1 (Warning indicator pertaining to the flash) • There is inserted. - (Warning indicator pertaining to the write-protect of the Handycam Station or your camcorder securely (p. 9). C:13:ss / C:32:ss • Remove the power source. Inform them of the 5-digit code, which starts...

Operating Guide
Page 38
... 370 g (13 oz) main unit only 450 g (15 oz) including the NP-FH60 rechargeable battery pack, and a "Memory Stick PRO Duo" Handycam Station DCRA-C191 Input/Output connectors Audio/Video output 10 pin connector Video signal: 1 Vp-p, 75 Ω (ohms) Luminance signal: 1 Vp-p, 75 ... 40 °C (32 °F to 104 °F) Storage temperature -20 °C to + 60 °C (-4 °F to change without notice. • Your camcorder is produced under the license of Dolby Laboratories. 38 Rechargeable battery pack NP-FH60 Maximum output voltage DC 8.4 V Output voltage DC 7.2 V Capacity 7.2 Wh (1 000 mAh...
... 370 g (13 oz) main unit only 450 g (15 oz) including the NP-FH60 rechargeable battery pack, and a "Memory Stick PRO Duo" Handycam Station DCRA-C191 Input/Output connectors Audio/Video output 10 pin connector Video signal: 1 Vp-p, 75 Ω (ohms) Luminance signal: 1 Vp-p, 75 ... 40 °C (32 °F to 104 °F) Storage temperature -20 °C to + 60 °C (-4 °F to change without notice. • Your camcorder is produced under the license of Dolby Laboratories. 38 Rechargeable battery pack NP-FH60 Maximum output voltage DC 8.4 V Output voltage DC 7.2 V Capacity 7.2 Wh (1 000 mAh...


