Operating Guide
Page 2
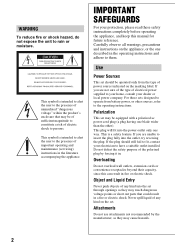
.... If the plug should be of sufficient magnitude to constitute a risk of the polarized plug by the manufacturer, as they may be operated only from battery power, or other ). Polarization This set . This is intended to alert the user to fit, contact your protection, please read these safety instructions completely before...
.... If the plug should be of sufficient magnitude to constitute a risk of the polarized plug by the manufacturer, as they may be operated only from battery power, or other ). Polarization This set . This is intended to alert the user to fit, contact your protection, please read these safety instructions completely before...
Operating Guide
Page 4
and CANADA RECYCLING LITHIUM-ION BATTERIES Lithium-Ion batteries are located on the bottom. You can radiate radio frequency energy and, if not installed and used with the Handycam Station Model DCRA-C191 and AC Adaptor Model AC-L200/L200B. For more information regarding this...942-2230 This device complies with the specified type only. Notes HDR-CX7 is to be used in this manual could void your Sony dealer regarding recycling of rechargeable batteries, call : Sony Customer Information Center 1-800222-SONY (7669). CAUTION You are designed to provide reasonable protection against harmful...
and CANADA RECYCLING LITHIUM-ION BATTERIES Lithium-Ion batteries are located on the bottom. You can radiate radio frequency energy and, if not installed and used with the Handycam Station Model DCRA-C191 and AC Adaptor Model AC-L200/L200B. For more information regarding this...942-2230 This device complies with the specified type only. Notes HDR-CX7 is to be used in this manual could void your Sony dealer regarding recycling of rechargeable batteries, call : Sony Customer Information Center 1-800222-SONY (7669). CAUTION You are designed to provide reasonable protection against harmful...
Operating Guide
Page 5
...PRO Duo" of 512 MB or larger marked with this manual. Using the camcorder • The camcorder is no guarantee that to Subpart B of Part 15 of "Memory Stick" you can be contrary to remove the battery pack or AC Adaptor from being lost, do not do the following measures: ... PRO Duo," be careful so that you use Types of FCC Rules. To view your camcorder. For the State of such materials may apply, See www.dtsc.ca.gov/hazardouswaste/perchlorate Perchlorate Material: Lithium battery contains perchlorate. See "Precautions" (p. 35). • To prevent the "Memory Stick PRO...
...PRO Duo" of 512 MB or larger marked with this manual. Using the camcorder • The camcorder is no guarantee that to Subpart B of Part 15 of "Memory Stick" you can be contrary to remove the battery pack or AC Adaptor from being lost, do not do the following measures: ... PRO Duo," be careful so that you use Types of FCC Rules. To view your camcorder. For the State of such materials may apply, See www.dtsc.ca.gov/hazardouswaste/perchlorate Perchlorate Material: Lithium battery contains perchlorate. See "Precautions" (p. 35). • To prevent the "Memory Stick PRO...
Operating Guide
Page 7
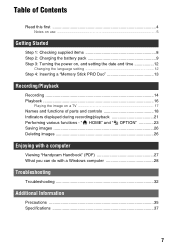
Table of Contents Read this first 4 Notes on use 5 Getting Started Step 1: Checking supplied items 8 Step 2: Charging the battery pack 9 Step 3: Turning the power on, and setting the date and time 12 Changing the language setting 12 Step 4: Inserting a "Memory ... during recording/playback 21 Performing various functions - " HOME" and " OPTION 23 Saving images 26 Deleting images 26 Enjoying with a computer Viewing "Handycam Handbook" (PDF 27 What you can do with a Windows computer 28 Troubleshooting Troubleshooting 32 Additional Information Precautions 35 Specifications 37 7
Table of Contents Read this first 4 Notes on use 5 Getting Started Step 1: Checking supplied items 8 Step 2: Charging the battery pack 9 Step 3: Turning the power on, and setting the date and time 12 Changing the language setting 12 Step 4: Inserting a "Memory ... during recording/playback 21 Performing various functions - " HOME" and " OPTION 23 Saving images 26 Deleting images 26 Enjoying with a computer Viewing "Handycam Handbook" (PDF 27 What you can do with a Windows computer 28 Troubleshooting Troubleshooting 32 Additional Information Precautions 35 Specifications 37 7
Operating Guide
Page 8
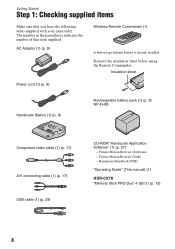
... cable (1) (p. 17) USB cable (1) (p. 29) CD-ROM "Handycam Application Software" (1) (p. 27) - Getting Started Step 1: Checking supplied items Make sure that item supplied. The number in the parentheses indicates the number of that you have the following items supplied with your camcorder. AC Adaptor (1) (p. 9) Wireless Remote Commander (1) A button-type lithium battery is already installed.
... cable (1) (p. 17) USB cable (1) (p. 29) CD-ROM "Handycam Application Software" (1) (p. 27) - Getting Started Step 1: Checking supplied items Make sure that item supplied. The number in the parentheses indicates the number of that you have the following items supplied with your camcorder. AC Adaptor (1) (p. 9) Wireless Remote Commander (1) A button-type lithium battery is already installed.
Operating Guide
Page 9
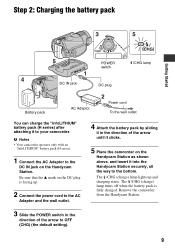
...cord to the AC Adaptor and the wall outlet. 4 Attach the battery pack by sliding it in the direction of the arrow until it clicks. 5 Place the camcorder on the Handycam Station as shown above, and insert it into the Handycam Station securely, all the way to the DC IN jack on ...the DC plug is fully charged. Remove the camcorder from the Handycam Station. 3 Slide the POWER switch in the direction of the arrow to your camcorder. Step 2: Charging the battery pack Getting Started DC IN jack POWER switch DC plug /CHG lamp Battery pack AC Adaptor Power cord To the wall outlet ...
...cord to the AC Adaptor and the wall outlet. 4 Attach the battery pack by sliding it in the direction of the arrow until it clicks. 5 Place the camcorder on the Handycam Station as shown above, and insert it into the Handycam Station securely, all the way to the DC IN jack on ...the DC plug is fully charged. Remove the camcorder from the Handycam Station. 3 Slide the POWER switch in the direction of the arrow to your camcorder. Step 2: Charging the battery pack Getting Started DC IN jack POWER switch DC plug /CHG lamp Battery pack AC Adaptor Power cord To the wall outlet ...
Operating Guide
Page 10
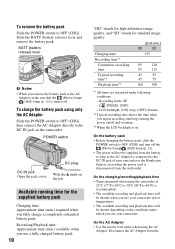
... time 95 115 Typical recording time*2 45 55 45 55 Playback time*3 160 190 *1 All times are measured under which you use your camcorder or the Handycam Station, even when the power cord is disconnected from the wall outlet. On the AC Adaptor • Use the nearby wall outlet when... AC Adaptor Slide the POWER switch to OFF (CHG), then connect the AC Adaptor directly to the DC IN jack of your camcorder. Slide the BATT (battery release) lever and remove the battery pack. On the charging/recording/playback time • Times measured when using the AC Adaptor. To remove the...
... time 95 115 Typical recording time*2 45 55 45 55 Playback time*3 160 190 *1 All times are measured under which you use your camcorder or the Handycam Station, even when the power cord is disconnected from the wall outlet. On the AC Adaptor • Use the nearby wall outlet when... AC Adaptor Slide the POWER switch to OFF (CHG), then connect the AC Adaptor directly to the DC IN jack of your camcorder. Slide the BATT (battery release) lever and remove the battery pack. On the charging/recording/playback time • Times measured when using the AC Adaptor. To remove the...
Operating Guide
Page 11
Getting Started wall outlet immediately if any metallic objects. This may cause a malfunction. • Even if your camcorder. • Do not use the AC Adaptor placed in a narrow space, such as between a wall and furniture. • Do not short-circuit the DC plug of the AC Adaptor or battery terminal with any malfunction occurs while using your camcorder is turned off, AC power (house current) is still supplied to it while connected to the wall outlet via the AC Adaptor. 11
Getting Started wall outlet immediately if any metallic objects. This may cause a malfunction. • Even if your camcorder. • Do not use the AC Adaptor placed in a narrow space, such as between a wall and furniture. • Do not short-circuit the DC plug of the AC Adaptor or battery terminal with any malfunction occurs while using your camcorder is turned off, AC power (house current) is still supplied to it while connected to the wall outlet via the AC Adaptor. 11
Operating Guide
Page 13
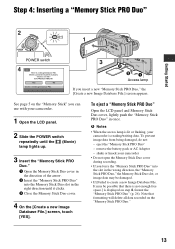
... Stick PRO Duo," the [Create a new Image Database File.] screen appears. eject the "Memory Stick PRO Duo" - shake or knock your camcorder is lit or flashing, your camcorder • Do not open the Memory Stick Duo cover during recording. • If you force the "Memory Stick PRO Duo" into the Memory...data may be damaged. • If [Failed to create a new Image Database File. See page 5 on the "Memory Stick PRO Duo." 13 remove the battery pack or AC Adaptor - To eject a "Memory Stick PRO Duo" Open the LCD panel and Memory Stick Duo cover, lightly push the "Memory Stick PRO...
... Stick PRO Duo," the [Create a new Image Database File.] screen appears. eject the "Memory Stick PRO Duo" - shake or knock your camcorder is lit or flashing, your camcorder • Do not open the Memory Stick Duo cover during recording. • If you force the "Memory Stick PRO Duo" into the Memory...data may be damaged. • If [Failed to create a new Image Database File. See page 5 on the "Memory Stick PRO Duo." 13 remove the battery pack or AC Adaptor - To eject a "Memory Stick PRO Duo" Open the LCD panel and Memory Stick Duo cover, lightly push the "Memory Stick PRO...
Operating Guide
Page 18
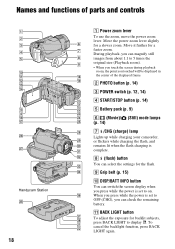
... displayed frame. 2 PHOTO button (p. 14) 3 POWER switch (p. 12, 14) 4 START/STOP button (p. 14) 5 Battery pack (p. 9) 6 (Movie)/ (Still) mode lamps (p. 14) 7 /CHG (charge) lamp Lights up while charging your camcorder, or flickers while charging the flash, and remains lit when the flash charging is set to 5 times the... and controls Handycam Station 18 1 Power zoom lever To use the zoom, move the power zoom lever. During playback, you can magnify still images from about 1.1 to OFF (CHG), you press while the power is complete. 8 (flash) button You can check the remaining battery. Move it...
... displayed frame. 2 PHOTO button (p. 14) 3 POWER switch (p. 12, 14) 4 START/STOP button (p. 14) 5 Battery pack (p. 9) 6 (Movie)/ (Still) mode lamps (p. 14) 7 /CHG (charge) lamp Lights up while charging your camcorder, or flickers while charging the flash, and remains lit when the flash charging is set to 5 times the... and controls Handycam Station 18 1 Power zoom lever To use the zoom, move the power zoom lever. During playback, you can magnify still images from about 1.1 to OFF (CHG), you press while the power is complete. 8 (flash) button You can check the remaining battery. Move it...

Operating Guide
Page 19
...by the internal microphone is low. ed Tripod receptacle (Bottom surface) Attach the tripod (optional: the length of the displayed frame. ef BATT (battery release) lever (p. 10) 19 Recording/Playback qs RESET button To initialize the settings (Reset), press RESET to initialize all the settings, including settings... red during playback zoom, the point you touched will be less than 5.5 mm (7/32 in mirror mode, open the LCD screen 90 degrees to the camcorder (1), then rotate it 180 degrees to the lens side (2). qk (Film Roll Index) button (p. 16) ql (VIEW IMAGES) button (p. 16) wd...
...by the internal microphone is low. ed Tripod receptacle (Bottom surface) Attach the tripod (optional: the length of the displayed frame. ef BATT (battery release) lever (p. 10) 19 Recording/Playback qs RESET button To initialize the settings (Reset), press RESET to initialize all the settings, including settings... red during playback zoom, the point you touched will be less than 5.5 mm (7/32 in mirror mode, open the LCD screen 90 degrees to the camcorder (1), then rotate it 180 degrees to the lens side (2). qk (Film Roll Index) button (p. 16) ql (VIEW IMAGES) button (p. 16) wd...
Operating Guide
Page 21
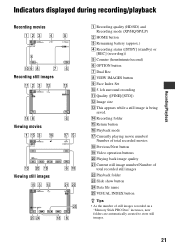
.../playback Recording movies Recording still images Viewing movies Viewing still images A Recording quality (HD/SD) and Recording mode (XP/HQ/SP/LP) B HOME button C Remaining battery (approx.) D Recording status ([STBY] (standby) or [REC] (recording)) E Counter (hour/minute/second) F OPTION button G Dual Rec H VIEW IMAGES button I Face Index Set J 5.1ch surround recording...
.../playback Recording movies Recording still images Viewing movies Viewing still images A Recording quality (HD/SD) and Recording mode (XP/HQ/SP/LP) B HOME button C Remaining battery (approx.) D Recording status ([STBY] (standby) or [REC] (recording)) E Counter (hour/minute/second) F OPTION button G Dual Rec H VIEW IMAGES button I Face Index Set J 5.1ch surround recording...
Operating Guide
Page 32
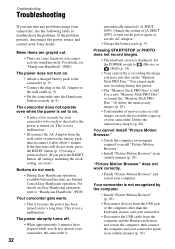
If the functions still do not work, press the RESET button (p. 19) using your Sony dealer. For details on Easy Handycam operation, refer to install "Picture Motion Browser." • Install "Picture Motion Browser" in an orderly manner (p. 30). You...8226; When approximately 5 minutes have just shot on . • Attach a charged battery pack to the camcorder (p. 9). • Connect the plug of your camcorder to be ready to the wall outlet (p. 9). • Set the camcorder onto the Handycam Station securely (p. 9). You cannot install "Picture Motion Browser." • Check the ...
If the functions still do not work, press the RESET button (p. 19) using your Sony dealer. For details on Easy Handycam operation, refer to install "Picture Motion Browser." • Install "Picture Motion Browser" in an orderly manner (p. 30). You...8226; When approximately 5 minutes have just shot on . • Attach a charged battery pack to the camcorder (p. 9). • Connect the plug of your camcorder to be ready to the wall outlet (p. 9). • Set the camcorder onto the Handycam Station securely (p. 9). You cannot install "Picture Motion Browser." • Check the ...
Operating Guide
Page 33
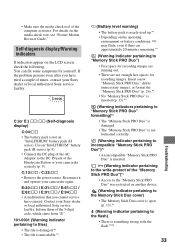
...occurred. Reconnect it and operate your Sony dealer or local authorized Sony service facility. Contact your camcorder again. Use an "InfoLITHIUM" battery pack (H series) (p. 9). • Connect the DC plug of the AC Adaptor to the DC IN jack of times, contact your camcorder securely (p. 9). Insert a new...:ss / E:62:ss / E:91:ss / E:94:ss • A malfunction that you have tried a couple of the Handycam Station or your Sony dealer or local authorized Sony service facility. • Make sure the media check tool of the 5-digit code, which starts from "E." 101-0001 (Warning indicator...
...occurred. Reconnect it and operate your Sony dealer or local authorized Sony service facility. Contact your camcorder again. Use an "InfoLITHIUM" battery pack (H series) (p. 9). • Connect the DC plug of the AC Adaptor to the DC IN jack of times, contact your camcorder securely (p. 9). Insert a new...:ss / E:62:ss / E:91:ss / E:94:ss • A malfunction that you have tried a couple of the Handycam Station or your Sony dealer or local authorized Sony service facility. • Make sure the media check tool of the 5-digit code, which starts from "E." 101-0001 (Warning indicator...
Operating Guide
Page 35
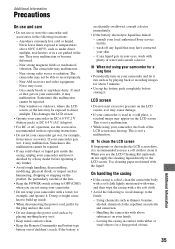
...local authorized Sony service facility. - Using chemicals such as by placing anything heavy on it. • Keep metal contacts clean. • Keep the Remote Commander and button-type battery out of the lens. • Keep the POWER switch setting to OFF (CHG) when you are not using your camcorder for ...exert excessive pressure on the LCD screen, as hammering, dropping or stepping on your skin. - This is used in your camcorder, the back of the LCD screen may appear on DC 6.8 V/7.2 V (battery pack) or DC 8.4 V (AC Adaptor). • For DC or AC operation, use a soft cloth to clean it...
...local authorized Sony service facility. - Using chemicals such as by placing anything heavy on it. • Keep metal contacts clean. • Keep the Remote Commander and button-type battery out of the lens. • Keep the POWER switch setting to OFF (CHG) when you are not using your camcorder for ...exert excessive pressure on the LCD screen, as hammering, dropping or stepping on your skin. - This is used in your camcorder, the back of the LCD screen may appear on DC 6.8 V/7.2 V (battery pack) or DC 8.4 V (AC Adaptor). • For DC or AC operation, use a soft cloth to clean it...
Operating Guide
Page 36
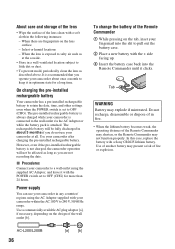
... AC-L200/L200B 36 [a] [b] The rechargeable battery will not be fully discharged in the following instances: - About care and storage of the lens • Wipe the surface of the lens clean with a Sony CR2025 lithium battery. Use your camcorder is connected to the wall outlet via the AC... Adaptor or while the battery pack is set to keep it clicks. x Procedures Connect your camcorder about 3 months if you operate your camcorder to a wall outlet using the AC...
... AC-L200/L200B 36 [a] [b] The rechargeable battery will not be fully discharged in the following instances: - About care and storage of the lens • Wipe the surface of the lens clean with a Sony CR2025 lithium battery. Use your camcorder is connected to the wall outlet via the AC... Adaptor or while the battery pack is set to keep it clicks. x Procedures Connect your camcorder about 3 months if you operate your camcorder to a wall outlet using the AC...
Operating Guide
Page 37
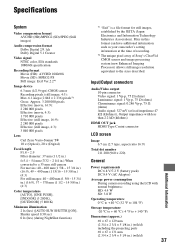
... mV (at the time of recording. *2 The unique pixel array of Sony's ClearVid CMOS sensor and image processing system (new Enhanced Imaging Processor) allows...5/8 in .) (w/h/d) 37 Additional Information Files in this format can have additional information such as your camcorder's setting information at load impedance 47 kΩ (kilohms)), Output impedance with less than 2.2 kΩ...16:9) Total dot number 211 200 (960 × 220) General Power requirements DC 6.8 V/7.2 V (battery pack) DC 8.4 V (AC Adaptor) Average power consumption During camera recording using the LCD with normal brightness...
... mV (at the time of recording. *2 The unique pixel array of Sony's ClearVid CMOS sensor and image processing system (new Enhanced Imaging Processor) allows...5/8 in .) (w/h/d) 37 Additional Information Files in this format can have additional information such as your camcorder's setting information at load impedance 47 kΩ (kilohms)), Output impedance with less than 2.2 kΩ...16:9) Total dot number 211 200 (960 × 220) General Power requirements DC 6.8 V/7.2 V (battery pack) DC 8.4 V (AC Adaptor) Average power consumption During camera recording using the LCD with normal brightness...

Operating Guide
Page 38
...attached Mass (approx.) 370 g (13 oz) main unit only 450 g (15 oz) including the NP-FH60 rechargeable battery pack, and a "Memory Stick PRO Duo" Handycam Station DCRA-C191 Input/Output connectors Audio/Video output 10 pin connector Video signal: 1 Vp-p, 75 Ω (ohms) ...to 104 °F) Storage temperature -20 °C to + 60 °C (-4 °F to change without notice. • Your camcorder is produced under the license of Dolby Laboratories. 38 Rechargeable battery pack NP-FH60 Maximum output voltage DC 8.4 V Output voltage DC 7.2 V Capacity 7.2 Wh (1 000 mAh) Dimensions (approx.) 31.8...
...attached Mass (approx.) 370 g (13 oz) main unit only 450 g (15 oz) including the NP-FH60 rechargeable battery pack, and a "Memory Stick PRO Duo" Handycam Station DCRA-C191 Input/Output connectors Audio/Video output 10 pin connector Video signal: 1 Vp-p, 75 Ω (ohms) ...to 104 °F) Storage temperature -20 °C to + 60 °C (-4 °F to change without notice. • Your camcorder is produced under the license of Dolby Laboratories. 38 Rechargeable battery pack NP-FH60 Maximum output voltage DC 8.4 V Output voltage DC 7.2 V Capacity 7.2 Wh (1 000 mAh) Dimensions (approx.) 31.8...


