Operating Guide
Page 3
...; Never place the set in a confined space, such as opening or removing covers may result in a wet basement, or near water - Power-Cord Protection Route the power cord so that are specified in the cabinet are required, be sure the service technician has used replacement parts specified by items placed upon or against them, paying particular attention to the plugs, receptacles, and...
...; Never place the set in a confined space, such as opening or removing covers may result in a wet basement, or near water - Power-Cord Protection Route the power cord so that are specified in the cabinet are required, be sure the service technician has used replacement parts specified by items placed upon or against them, paying particular attention to the plugs, receptacles, and...
Operating Guide
Page 4
... U.S.A. "Memory Stick PRO Duo" This device complies with Part 15 of the FCC Rules. Regulatory Information Declaration of rechargeable batteries, call your used with the Handycam Station Model DCRA-C240 and AC Adaptor Model AC-L200/L200B. Model No. You can help preserve our environment by returning your Sony dealer regarding recycling of Conformity Trade Name: SONY Model No.: HDR-CX12 Responsible Party: Sony Electronics Inc. This Class B digital...
... U.S.A. "Memory Stick PRO Duo" This device complies with Part 15 of the FCC Rules. Regulatory Information Declaration of rechargeable batteries, call your used with the Handycam Station Model DCRA-C240 and AC Adaptor Model AC-L200/L200B. Model No. You can help preserve our environment by returning your Sony dealer regarding recycling of Conformity Trade Name: SONY Model No.: HDR-CX12 Responsible Party: Sony Electronics Inc. This Class B digital...
Operating Guide
Page 5
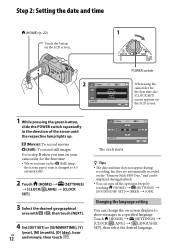
... Component A/V cable (1) A/V connecting cable (1) USB cable (1) Wireless Remote Commander (1) A button-type lithium battery is already installed. Rechargeable battery pack NP-FH60 (1) CD-ROM "Handycam Application Software" (1) (p. 27) PMB PMB Guide Handycam Handbook (PDF) "Operating Guide" (This manual) (1) Types of "Memory Stick" you can use with your camcorder For recording movies, it is recommended that you use a "Memory Stick PRO Duo" of 1 GB or...
... Component A/V cable (1) A/V connecting cable (1) USB cable (1) Wireless Remote Commander (1) A button-type lithium battery is already installed. Rechargeable battery pack NP-FH60 (1) CD-ROM "Handycam Application Software" (1) (p. 27) PMB PMB Guide Handycam Handbook (PDF) "Operating Guide" (This manual) (1) Types of "Memory Stick" you can use with your camcorder For recording movies, it is recommended that you use a "Memory Stick PRO Duo" of 1 GB or...
Operating Guide
Page 6
... points (white, red, blue, or green in color) that the "Memory Stick PRO Duo" does not pop out and drop. When connecting your camcorder correctly, then fasten the grip belt as shown in any problems. Compensation for effective use. To view your images on a TV, you repeat recording/deleting images for a long time, fragmentation of the following when the (Movie)/ (Still) mode lamp (p. 12), Access lamp (p. 13...
... points (white, red, blue, or green in color) that the "Memory Stick PRO Duo" does not pop out and drop. When connecting your camcorder correctly, then fasten the grip belt as shown in any problems. Compensation for effective use. To view your images on a TV, you repeat recording/deleting images for a long time, fragmentation of the following when the (Movie)/ (Still) mode lamp (p. 12), Access lamp (p. 13...
Operating Guide
Page 7
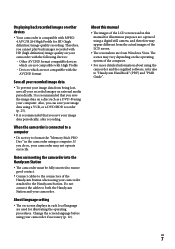
...) image quality recording. About language setting The on-screen displays in each local language are used in the camcorder using your camcorder attached to format the "Memory Stick PRO Duo" in this manual The images of the LCD screen used for illustrating the operating procedures. Do not connect the cables to "Handycam Handbook" (PDF) and "PMB Guide". The scenes may not operate correctly. If you save your image data using your camcorder if necessary (p. 12). On playing back recorded images on other devices Your camcorder...
...) image quality recording. About language setting The on-screen displays in each local language are used in the camcorder using your camcorder attached to format the "Memory Stick PRO Duo" in this manual The images of the LCD screen used for illustrating the operating procedures. Do not connect the cables to "Handycam Handbook" (PDF) and "PMB Guide". The scenes may not operate correctly. If you save your image data using your camcorder if necessary (p. 12). On playing back recorded images on other devices Your camcorder...
Operating Guide
Page 10
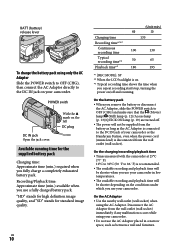
... 65 180 195 *1 [REC MODE]: SP *2 When the LCD backlight is recommended. The available recording and playback time will be shorter depending on the left DC plug DC IN jack Open the jack cover. BATT (battery) release lever To charge the battery pack using only the AC Adaptor Slide the POWER switch to OFF (CHG), then connect the AC Adaptor directly to the DC IN...
... 65 180 195 *1 [REC MODE]: SP *2 When the LCD backlight is recommended. The available recording and playback time will be shorter depending on the left DC plug DC IN jack Open the jack cover. BATT (battery) release lever To charge the battery pack using only the AC Adaptor Slide the POWER switch to OFF (CHG), then connect the AC Adaptor directly to the DC IN...
Operating Guide
Page 12
... recording, but they are automatically recorded on the "Memory Stick PRO Duo," and can be displayed during playback. You can change the on the (Still) lamp, the screen aspect ratio is changed to step 3 when you turn off the operation beeps by touching (HOME) (SETTINGS) [SOUND/DISP SET] [BEEP] [OFF]. POWER switch When using the camcorder for the first time. When you turn on the LCD screen...
... recording, but they are automatically recorded on the "Memory Stick PRO Duo," and can be displayed during playback. You can change the on the (Still) lamp, the screen aspect ratio is changed to step 3 when you turn off the operation beeps by touching (HOME) (SETTINGS) [SOUND/DISP SET] [BEEP] [OFF]. POWER switch When using the camcorder for the first time. When you turn on the LCD screen...
Operating Guide
Page 13
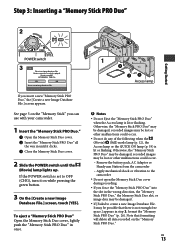
... (Movie)/ (Still) mode lamp (p. 12), the Access lamp or the QUICK ON lamp (p. 19) is set to create a new Image Database File. US 13 Step 3: Inserting a "Memory Stick PRO Duo" Getting Started POWER switch Access lamp If you can use with your camcorder. 1 Insert the "Memory Stick PRO Duo." Open the Memory Stick Duo cover. Insert the "Memory Stick PRO Duo" all data recorded on while pressing the green button. 3 On the [Create a new Image Database File.] screen...
... (Movie)/ (Still) mode lamp (p. 12), the Access lamp or the QUICK ON lamp (p. 19) is set to create a new Image Database File. US 13 Step 3: Inserting a "Memory Stick PRO Duo" Getting Started POWER switch Access lamp If you can use with your camcorder. 1 Insert the "Memory Stick PRO Duo." Open the Memory Stick Duo cover. Insert the "Memory Stick PRO Duo" all data recorded on while pressing the green button. 3 On the [Create a new Image Database File.] screen...

Operating Guide
Page 14
... can check the recordable time and the remaining capacity by pressing (HOME) (MANAGE MEDIA) [MEDIA INFO]. You can capture still images by pressing PHOTO during movie recording. When a movie file exceeds 2 GB, the next movie file is created automatically. Recording/Playback/Saving images Recording POWER switch : To record movies : To record still images (HOME) (p. 22) START/STOP [STBY] [REC] PHOTO START/STOP Flashing Lights up 1 Slide the POWER switch ...
... can check the recordable time and the remaining capacity by pressing (HOME) (MANAGE MEDIA) [MEDIA INFO]. You can capture still images by pressing PHOTO during movie recording. When a movie file exceeds 2 GB, the next movie file is created automatically. Recording/Playback/Saving images Recording POWER switch : To record movies : To record still images (HOME) (p. 22) START/STOP [STBY] [REC] PHOTO START/STOP Flashing Lights up 1 Slide the POWER switch ...
Operating Guide
Page 17
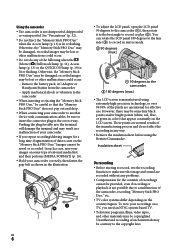
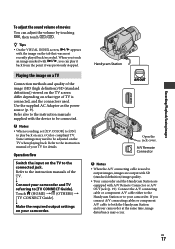
... that was previously stopped. Handycam Station A/V OUT Open the jack cover. Connect the A/V connecting cable or component A/V cable either to the Handycam Station or to both the Handycam Station and your camcorder. Recording/Playback/Saving images To adjust the sound volume of movies You can play back on an x.v.Color-compliant TV. Use the supplied AC Adaptor as the power source (p. 9). Refer to the instruction manuals of the TV. Connect your camcorder and TV referring...
... that was previously stopped. Handycam Station A/V OUT Open the jack cover. Connect the A/V connecting cable or component A/V cable either to the Handycam Station or to both the Handycam Station and your camcorder. Recording/Playback/Saving images To adjust the sound volume of movies You can play back on an x.v.Color-compliant TV. Use the supplied AC Adaptor as the power source (p. 9). Refer to the instruction manuals of the TV. Connect your camcorder and TV referring...
Operating Guide
Page 19
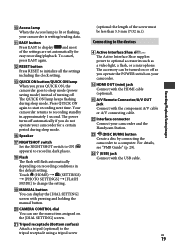
... operate the POWER switch on recording conditions in the default setting. US 19 Recording/Playback/Saving images Your camcorder returns to recording standby in .)). For details, see "PMB Guide" (p. 29). (USB) jack Connect with pressing and holding the manual button. CAMERA CONTROL dial You can use the menu item assigned on or off as a video light, a flash, or a microphone. The QUICK ON lamp keeps flashing during sleep mode. Speaker NIGHTSHOT switch Set the NIGHTSHOT switch...
... operate the POWER switch on recording conditions in the default setting. US 19 Recording/Playback/Saving images Your camcorder returns to recording standby in .)). For details, see "PMB Guide" (p. 29). (USB) jack Connect with pressing and holding the manual button. CAMERA CONTROL dial You can use the menu item assigned on or off as a video light, a flash, or a microphone. The QUICK ON lamp keeps flashing during sleep mode. Speaker NIGHTSHOT switch Set the NIGHTSHOT switch...
Operating Guide
Page 20
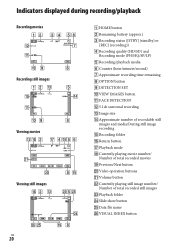
...DETECTION SET VIEW IMAGES button FACE DETECTION 5.1ch surround recording Image size Approximate number of recordable still images and media/During still image recording Recording folder Return button Playback mode Currently playing movie number/ Number of total recorded movies Previous/Next button Video operation buttons Volume button Currently playing still image number/ Number of total recorded still images Playback folder Slide show button Data file...
...DETECTION SET VIEW IMAGES button FACE DETECTION 5.1ch surround recording Image size Approximate number of recordable still images and media/During still image recording Recording folder Return button Playback mode Currently playing movie number/ Number of total recorded movies Previous/Next button Video operation buttons Volume button Currently playing still image number/ Number of total recorded still images Playback folder Slide show button Data file...
Operating Guide
Page 21
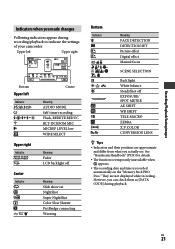
... Super NightShot Color Slow Shutter PictBridge connecting Warning Bottom Indicator Meaning FACE DETECTION DETECTION SET Picture effect Digital effect Manual focus SCENE SELECTION Back light White balance SteadyShot off EXPOSURE/ SPOT METER AE SHIFT WB SHIFT TELE MACRO ZEBRA X.V.COLOR CONVERSION LENS Tips Indicators and their positions are not displayed while recording. Recording/Playback/Saving images Indicators when you can check them as [DATA CODE] during recording/playback to indicate...
... Super NightShot Color Slow Shutter PictBridge connecting Warning Bottom Indicator Meaning FACE DETECTION DETECTION SET Picture effect Digital effect Manual focus SCENE SELECTION Back light White balance SteadyShot off EXPOSURE/ SPOT METER AE SHIFT WB SHIFT TELE MACRO ZEBRA X.V.COLOR CONVERSION LENS Tips Indicators and their positions are not displayed while recording. Recording/Playback/Saving images Indicators when you can check them as [DATA CODE] during recording/playback to indicate...
Operating Guide
Page 23
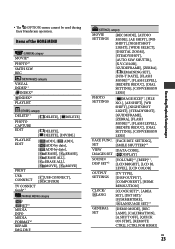
...]*1, [FLASH LEVEL], [REDEYE REDUC], [DIAL SETTING], [CONVERSION LENS] FACE FUNC. [FACE DET. SETTING], SET [SMILE SHUTTER]*3 VIEW [DATA CODE], IMAGES SET [ DISPLAY] SOUND/ DISP SET*2 [VOLUME]*1, [BEEP]*1, [LCD BRIGHT], [LCD BL LEVEL], [LCD COLOR] OUTPUT SETTINGS [TV TYPE], [DISP OUTPUT], [COMPONENT], [HDMI RESOLUTION] CLOCK/ LANG [CLOCK SET]*1, [AREA SET], [DST SET]/ [SUMMERTIME], [ LANGUAGE SET]*1 GENERAL SET [DEMO MODE], [REC LAMP], [CALIBRATION], [A.SHUT OFF], [QUICK ON STBY], [REMOTE CTRL], [CTRL FOR HDMI] US 23 Recording/Playback/Saving images The (OPTION) menu...
...]*1, [FLASH LEVEL], [REDEYE REDUC], [DIAL SETTING], [CONVERSION LENS] FACE FUNC. [FACE DET. SETTING], SET [SMILE SHUTTER]*3 VIEW [DATA CODE], IMAGES SET [ DISPLAY] SOUND/ DISP SET*2 [VOLUME]*1, [BEEP]*1, [LCD BRIGHT], [LCD BL LEVEL], [LCD COLOR] OUTPUT SETTINGS [TV TYPE], [DISP OUTPUT], [COMPONENT], [HDMI RESOLUTION] CLOCK/ LANG [CLOCK SET]*1, [AREA SET], [DST SET]/ [SUMMERTIME], [ LANGUAGE SET]*1 GENERAL SET [DEMO MODE], [REC LAMP], [CALIBRATION], [A.SHUT OFF], [QUICK ON STBY], [REMOTE CTRL], [CTRL FOR HDMI] US 23 Recording/Playback/Saving images The (OPTION) menu...
Operating Guide
Page 25
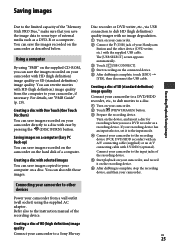
... pressing the (DISC BURN) button. If your recording device has an input selector, set it on the recording device. After dubbing is complete, touch [END] [YES], then disconnect the USB cable. Creating a disc of SD (standard definition) image quality Connect your camcorder to a DVD/HDD recorder, etc., to dub movies to some type of external media such as a DVD-R or a computer. Saving images Recording/Playback/Saving images Due to the limited capacity of the "Memory Stick PRO Duo," make...
... pressing the (DISC BURN) button. If your recording device has an input selector, set it on the recording device. After dubbing is complete, touch [END] [YES], then disconnect the USB cable. Creating a disc of SD (standard definition) image quality Connect your camcorder to a DVD/HDD recorder, etc., to dub movies to some type of external media such as a DVD-R or a computer. Saving images Recording/Playback/Saving images Due to the limited capacity of the "Memory Stick PRO Duo," make...
Operating Guide
Page 28
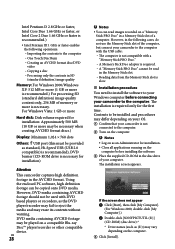
... before connecting your camcorder to your Windows computer before installing the software. Place the supplied CD-ROM in the disc drive of your camcorder to the computer with the USB cable: The computer is not compatible with DVD based players or recorders, as (E:)) may be necessary when creating AVCHD format discs.) Display: Minimum 1,024 × 768 dots Others: USB port (this must be copied onto DVD media. For Windows...
... before connecting your camcorder to your Windows computer before installing the software. Place the supplied CD-ROM in the disc drive of your camcorder to the computer with the USB cable: The computer is not compatible with DVD based players or recorders, as (E:)) may be necessary when creating AVCHD format discs.) Display: Minimum 1,024 × 768 dots Others: USB port (this must be copied onto DVD media. For Windows...
Operating Guide
Page 30
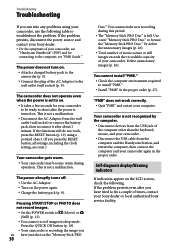
.... Turn on the LCD screen, check the following table to install "PMB." Install "PMB" in the proper order (p. 27). Pressing START/STOP or PHOTO does not record images. Set the POWER switch to fix a couple of times, contact your Sony dealer or local authorized Sony service facility. Delete unnecessary images (p. 26). Self-diagnosis display/Warning indicators If indicators appear on the power again. Charge the battery pack (p. 9). If the problem persists...
.... Turn on the LCD screen, check the following table to install "PMB." Install "PMB" in the proper order (p. 27). Pressing START/STOP or PHOTO does not record images. Set the POWER switch to fix a couple of times, contact your Sony dealer or local authorized Sony service facility. Delete unnecessary images (p. 26). Self-diagnosis display/Warning indicators If indicators appear on the power again. Charge the battery pack (p. 9). If the problem persists...
Operating Guide
Page 31
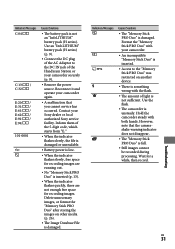
... battery pack is damaged. Delete unnecessary images, or format the "Memory Stick PRO Duo" after storing the images on another device. There is not sufficient. Wait for recording images. Reconnect it and operate your Sony dealer or local authorized Sony service facility. Use an "InfoLITHIUM" battery pack (H series) (p. 9). Connect the DC plug of the AC Adaptor to the "Memory Stick PRO Duo" was restricted on other media (p. 26). The Image Database File...
... battery pack is damaged. Delete unnecessary images, or format the "Memory Stick PRO Duo" after storing the images on another device. There is not sufficient. Wait for recording images. Reconnect it and operate your Sony dealer or local authorized Sony service facility. Use an "InfoLITHIUM" battery pack (H series) (p. 9). Connect the DC plug of the AC Adaptor to the "Memory Stick PRO Duo" was restricted on other media (p. 26). The Image Database File...

Operating Guide
Page 32
... substances on your camcorder with plenty of time The camcorder may be repaired. Near windows or outdoors, where the LCD screen or the lens may malfunction. Near strong radio waves or radiation. This damages the inside . When disconnecting the power cord (mains lead), pull it . US Keep the Remote Commander and button-type 32 battery out of the LCD screen may malfunction...
... substances on your camcorder with plenty of time The camcorder may be repaired. Near windows or outdoors, where the LCD screen or the lens may malfunction. Near strong radio waves or radiation. This damages the inside . When disconnecting the power cord (mains lead), pull it . US Keep the Remote Commander and button-type 32 battery out of the LCD screen may malfunction...
Operating Guide
Page 34
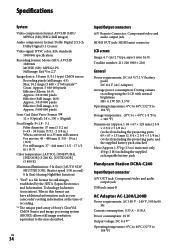
...], Shutter speed 1/30 second) 0 lx (lux) (during NightShot function) * "Exif" is a file format for still images, established by the JEITA (Japan Electronics and Information Technology Industries Association). Specifications System Video compression format: AVCHD (HD)/ MPEG2 (SD)/JPEG (Still images) Audio compression format: Dolby Digital 2/5.1ch Dolby Digital 5.1 Creator Video signal: NTSC color, EIA standards 1080/60i specification Recording format: Movie (HD): AVCHD 1080/60i MOVIE (SD): MPEG2-PS Still image: Exif Ver.2.2* Image device: 5.8 mm...
...], Shutter speed 1/30 second) 0 lx (lux) (during NightShot function) * "Exif" is a file format for still images, established by the JEITA (Japan Electronics and Information Technology Industries Association). Specifications System Video compression format: AVCHD (HD)/ MPEG2 (SD)/JPEG (Still images) Audio compression format: Dolby Digital 2/5.1ch Dolby Digital 5.1 Creator Video signal: NTSC color, EIA standards 1080/60i specification Recording format: Movie (HD): AVCHD 1080/60i MOVIE (SD): MPEG2-PS Still image: Exif Ver.2.2* Image device: 5.8 mm...


