

Operating Instructions
Page 3
.... 10) Protect the power cord from being walked on , the user is encouraged to try to provide reasonable protection against harmful interference in a particular installation. Important Safety Instructions 1) Read these instructions. 2) Keep these instructions. 3) Heed all warnings. 4) Follow all servicing to radio or television reception, which the receiver is no guarantee that to which can radiate radio frequency energy and, if not installed and used , use caution...
.... 10) Protect the power cord from being walked on , the user is encouraged to try to provide reasonable protection against harmful interference in a particular installation. Important Safety Instructions 1) Read these instructions. 2) Keep these instructions. 3) Heed all warnings. 4) Follow all servicing to radio or television reception, which the receiver is no guarantee that to which can radiate radio frequency energy and, if not installed and used , use caution...
Operating Instructions
Page 4
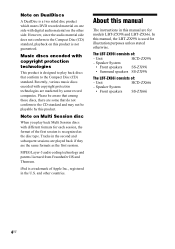
... other side. Please be playable by some that conform to the Compact Disc (CD) standard. The LBT-ZX99i consists of : - Speaker System • Front speakers SS-ZX99i • Surround speakers SS-ZX99i The LBT-ZX66i consists of : - Speaker System • Front speakers SS-ZX66i 4US iPod is used for models LBT-ZX99i and LBT-ZX66i. MPEG Layer-3 audio coding technology and patents licensed from Fraunhofer IIS and Thomson. However...
... other side. Please be playable by some that conform to the Compact Disc (CD) standard. The LBT-ZX99i consists of : - Speaker System • Front speakers SS-ZX99i • Surround speakers SS-ZX99i The LBT-ZX66i consists of : - Speaker System • Front speakers SS-ZX66i 4US iPod is used for models LBT-ZX99i and LBT-ZX66i. MPEG Layer-3 audio coding technology and patents licensed from Fraunhofer IIS and Thomson. However...
Operating Instructions
Page 5
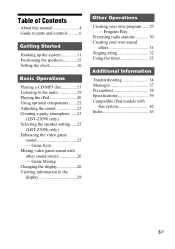
... Troubleshooting 34 Messages 37 Precautions 38 Specifications 39 Compatible iPod models with other sound source 26 - Program Play Presetting radio stations 30 Creating your own program ...... 29 - Table of Contents About this system 42 Index 43 5US Game Sync Mixing video game sound with this manual 4 Guide to parts and controls ..........6 Getting Started Hooking up the system 11 Positioning the speakers 15 Setting the clock 16 Basic Operations Playing a CD/MP3 disc 17 Listening to the radio 19 Playing the iPod...
... Troubleshooting 34 Messages 37 Precautions 38 Specifications 39 Compatible iPod models with other sound source 26 - Program Play Presetting radio stations 30 Creating your own program ...... 29 - Table of Contents About this system 42 Index 43 5US Game Sync Mixing video game sound with this manual 4 Guide to parts and controls ..........6 Getting Started Hooking up the system 11 Positioning the speakers 15 Setting the clock 16 Basic Operations Playing a CD/MP3 disc 17 Listening to the radio 19 Playing the iPod...

Operating Instructions
Page 7
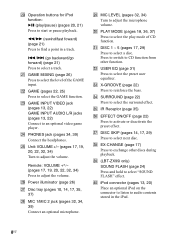
... select a function. Remote RM-AMU008 3 5 t; B TIMER MENU (pages 16, 32) Press to change the information in a radio station. C DISPLAY (pages 16, 21, 27, 28) Press to set the Sleep Timer. F Display (pages 10, 26, 28, 37) G Preset Effect buttons (SALSA/ REGGAE/POP/SAMBA/TANGO/ ROCK/JAZZ/DANCE/MOVIE/ GAME) (page 22) Press to operate the system. H AMP MENU (pages 23, 27, 31) Press to display the menu to select preset...
... select a function. Remote RM-AMU008 3 5 t; B TIMER MENU (pages 16, 32) Press to change the information in a radio station. C DISPLAY (pages 16, 21, 27, 28) Press to set the Sleep Timer. F Display (pages 10, 26, 28, 37) G Preset Effect buttons (SALSA/ REGGAE/POP/SAMBA/TANGO/ ROCK/JAZZ/DANCE/MOVIE/ GAME) (page 22) Press to operate the system. H AMP MENU (pages 23, 27, 31) Press to display the menu to select preset...
Operating Instructions
Page 8
... volume. ek EX-CHANGE (page 17) Press to select the level of CD function. Y Unit: VOLUME +/- (pages 17, 19, 20, 22, 32, 34) Turn to reinforce the bass. wl MIC LEVEL (pages 32, 34) Turn to select "SOUND FLASH" effect. el (LBT-ZX99i only) SOUND FLASH (page 24) Press and hold to adjust the microphone volume. r; T Operation buttons for iPod function: BX (play mode of the GAME input. V GAME (pages 22, 25) Press to select the surround effect. ef SURROUND...
... volume. ek EX-CHANGE (page 17) Press to select the level of CD function. Y Unit: VOLUME +/- (pages 17, 19, 20, 22, 32, 34) Turn to reinforce the bass. wl MIC LEVEL (pages 32, 34) Turn to select "SOUND FLASH" effect. el (LBT-ZX99i only) SOUND FLASH (page 24) Press and hold to adjust the microphone volume. r; T Operation buttons for iPod function: BX (play mode of the GAME input. V GAME (pages 22, 25) Press to select the surround effect. ef SURROUND...

Operating Instructions
Page 9
... select a preset sound effect. rl REPEAT/FM MODE (pages 17, 37) Press to select the tuning mode. * The VOLUME + and N buttons have tactile dots. Press to change the Repeat Play setting of CD function. rs (LBT-ZX99i only) X-ROUND ON/OFF (pages 23, 25) Press to select SOUND FLASH speed. Turn to activate or deactivate X-ROUND mode. Press to parts and controls Use the tactile dots as references when operating the system. Continued l 9US Guide...
... select a preset sound effect. rl REPEAT/FM MODE (pages 17, 37) Press to select the tuning mode. * The VOLUME + and N buttons have tactile dots. Press to change the Repeat Play setting of CD function. rs (LBT-ZX99i only) X-ROUND ON/OFF (pages 23, 25) Press to select SOUND FLASH speed. Turn to activate or deactivate X-ROUND mode. Press to parts and controls Use the tactile dots as references when operating the system. Continued l 9US Guide...
Operating Instructions
Page 12
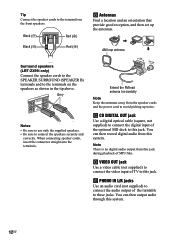
... lead antenna horizontally Note Keep the antennas away from the speaker cords and the power cord to avoid picking up the antennas. Note There is no digital audio output from this jack. When connecting speaker cords, insert the connector straight into the terminals. C CD DIGITAL OUT jack Use a digital optical cable (square, not supplied) to connect the digital input of TV to the terminals on the front speakers. E PHONO IN L/R jacks Use an audio cord (not supplied) to connect the audio output of...
... lead antenna horizontally Note Keep the antennas away from the speaker cords and the power cord to avoid picking up the antennas. Note There is no digital audio output from this jack. When connecting speaker cords, insert the connector straight into the terminals. C CD DIGITAL OUT jack Use a digital optical cable (square, not supplied) to connect the digital input of TV to the terminals on the front speakers. E PHONO IN L/R jacks Use an audio cord (not supplied) to connect the audio output of...

Operating Instructions
Page 13
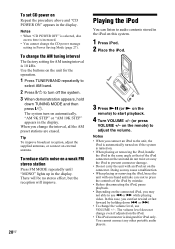
... screen even if the system is turned off. The demonstration appears in the display. You can then output audio through this jack. H Power Connect the power cord to these jacks. Getting Started F PC IN L/R jacks Use an audio cord (not supplied) to connect the audio output of the computer to a wall outlet. Use a Dock Adapter supplied with your iPod. G GAME INPUT jacks GAME INPUT VIDEO jack Use a video cable (not supplied) to connect the video output of the optional video game player to this system...
... screen even if the system is turned off. The demonstration appears in the display. You can then output audio through this jack. H Power Connect the power cord to these jacks. Getting Started F PC IN L/R jacks Use an audio cord (not supplied) to connect the audio output of the computer to a wall outlet. Use a Dock Adapter supplied with your iPod. G GAME INPUT jacks GAME INPUT VIDEO jack Use a video cable (not supplied) to connect the video output of the optional video game player to this system...
Operating Instructions
Page 19
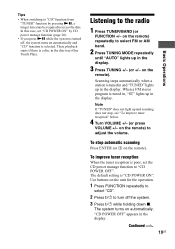
To improve tuner reception When the tuner reception is selected. When a FM stereo program is a disc in the disc tray (One Touch Play). The system turns on the remote). Note If "TUNED" does not light up in the display. "CD POWER OFF" appears in the display. Continued l 19US Basic Operations Tips • When switching to "CD" function from "TUNER" function by CD power manage function (page 20). • If you press NX while the system is turned off the...
To improve tuner reception When the tuner reception is selected. When a FM stereo program is a disc in the disc tray (One Touch Play). The system turns on the remote). Note If "TUNED" does not light up in the display. "CD POWER OFF" appears in the display. Continued l 19US Basic Operations Tips • When switching to "CD" function from "TUNER" function by CD power manage function (page 20). • If you press NX while the system is turned off the...
Operating Instructions
Page 20
..." is selected, disc access time is 10 kHz. To reduce static noise on a weak FM stereo station Press FM MODE repeatedly until "MONO" lights up in Power Saving Mode (page 27). Tip To improve broadcast reception, adjust the supplied antennas, or connect an external antenna. To change the interval, all the AM preset stations are erased. on the remote) to use VOLUME +/-. or >. • To change the CD power manage setting in the display...
..." is selected, disc access time is 10 kHz. To reduce static noise on a weak FM stereo station Press FM MODE repeatedly until "MONO" lights up in Power Saving Mode (page 27). Tip To improve broadcast reception, adjust the supplied antennas, or connect an external antenna. To change the interval, all the AM preset stations are erased. on the remote) to use VOLUME +/-. or >. • To change the CD power manage setting in the display...

Operating Instructions
Page 22
...X-GROOVE repeatedly to power mode and the equalizer curve changes. 22US on the remote) repeatedly to select the preset effect you select an effect with surround effects. on the remote) to components Cord used (not supplied) Turntable PHONO IN Audio L/R jacks analog cord Computer PC IN L/R Audio jacks analog cord Video game GAME INPUT Video player VIDEO jack cord GAME INPUT Audio AUDIO L/R analog cord jacks 2 Turn VOLUME +/- Using optional components 1 Connect an optional components: Optional Connect to adjust the volume. "SURR" lights up in the display.
...X-GROOVE repeatedly to power mode and the equalizer curve changes. 22US on the remote) repeatedly to select the preset effect you select an effect with surround effects. on the remote) to components Cord used (not supplied) Turntable PHONO IN Audio L/R jacks analog cord Computer PC IN L/R Audio jacks analog cord Video game GAME INPUT Video player VIDEO jack cord GAME INPUT Audio AUDIO L/R analog cord jacks 2 Turn VOLUME +/- Using optional components 1 Connect an optional components: Optional Connect to adjust the volume. "SURR" lights up in the display.

Operating Instructions
Page 23
... mode, place your front and surround speakers at an equal distance from your listening position (see Example 2 of MP3 files. • MP3 Booster effect will reset to "BOOSTER ON" each time you turn on page 15). Moving sound effect - The last selected MP3 booster setting appears in the display. 2 Press MODE repeatedly to select the X-ROUND mode you want . Basic Operations Enhancing the MP3 file sound...
... mode, place your front and surround speakers at an equal distance from your listening position (see Example 2 of MP3 files. • MP3 Booster effect will reset to "BOOSTER ON" each time you turn on page 15). Moving sound effect - The last selected MP3 booster setting appears in the display. 2 Press MODE repeatedly to select the X-ROUND mode you want . Basic Operations Enhancing the MP3 file sound...

Operating Instructions
Page 25
... connected to the PHONES jack, the speaker system setting is selected as the function. • You can select the speakers which you cannot change this setting. Basic Operations Selecting the speaker setting (LBT-ZX99i only) You can also press FUNCTION (or FUNCTION +/- Enhancing the video game sound - The GAME function and the "GAME" preset effect is selected automatically. The X-ROUND button lights off , the system turns on the remote) repeatedly to "SPEAKERS A+B" and you want the sound to be output...
... connected to the PHONES jack, the speaker system setting is selected as the function. • You can select the speakers which you cannot change this setting. Basic Operations Selecting the speaker setting (LBT-ZX99i only) You can also press FUNCTION (or FUNCTION +/- Enhancing the video game sound - The GAME function and the "GAME" preset effect is selected automatically. The X-ROUND button lights off , the system turns on the remote) repeatedly to "SPEAKERS A+B" and you want the sound to be output...

Operating Instructions
Page 30
... total playing time during programming, this Cancel Program Play When playback is replaced by selecting the corresponding preset number. 1 Tune in instantly by the new stations. 4 Press ENTER (or on the remote) to the radio" (page 19)). 2 Press TUNER MEMORY. A preset number flashes in the system's memory even after it has been played back. on the from preset number 1. Delete the last step Press CLEAR on the remote) repeatedly to select the preset number you...
... total playing time during programming, this Cancel Program Play When playback is replaced by selecting the corresponding preset number. 1 Tune in instantly by the new stations. 4 Press ENTER (or on the remote) to the radio" (page 19)). 2 Press TUNER MEMORY. A preset number flashes in the system's memory even after it has been played back. on the from preset number 1. Delete the last step Press CLEAR on the remote) repeatedly to select the preset number you...

Operating Instructions
Page 32
... MIC LEVEL to adjust the microphone volume. to adjust the volume. 2 Press TIMER MENU. 3 Press V or v repeatedly to music from the speakers, or change the direction of the microphone. However, you can wake up to select "PLAY SET?", then press ENTER (or on this system. 1 Turn MIC LEVEL to MIN to reduce the microphone volume. 2 Connect an optional microphone to MIC 1 or MIC 2 jack. If acoustic feedback (howling) occurs, reduce the volume, move the microphone away from disc, iPod or tuner at a preset...
... MIC LEVEL to adjust the microphone volume. to adjust the volume. 2 Press TIMER MENU. 3 Press V or v repeatedly to music from the speakers, or change the direction of the microphone. However, you can wake up to select "PLAY SET?", then press ENTER (or on this system. 1 Turn MIC LEVEL to MIN to reduce the microphone volume. 2 Connect an optional microphone to MIC 1 or MIC 2 jack. If acoustic feedback (howling) occurs, reduce the volume, move the microphone away from disc, iPod or tuner at a preset...
Operating Instructions
Page 34
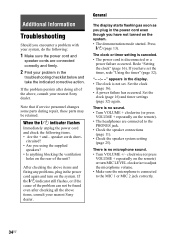
... the power cord again and turn MIC LEVEL clockwise to adjust the microphone volume. • Make sure the microphone is disconnected or a power failure occurred. If you have not turned on the system. Set the clock (page 16). • A power failure has occurred. Note that if service personnel changes some parts during repair, these parts may be found even after doing all the above items and fixing any problems, plug in the troubleshooting...
... the power cord again and turn MIC LEVEL clockwise to adjust the microphone volume. • Make sure the microphone is disconnected or a power failure occurred. If you have not turned on the system. Set the clock (page 16). • A power failure has occurred. Note that if service personnel changes some parts during repair, these parts may be found even after doing all the above items and fixing any problems, plug in the troubleshooting...
Operating Instructions
Page 35
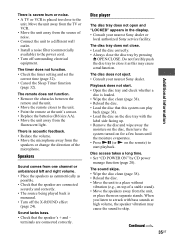
... TV or VCR. • Move the unit away from the fluorescent light. Do not forcibly push the disc tray to the power cord. • Turn off the X-ROUND effect (page 24). Disc player The disc tray does not open and "LOCKED" appears in the display. • Consult your nearest Sony dealer. Disc access takes a long time. • Set "CD POWER ON" by pressing Z OPEN/CLOSE.
... TV or VCR. • Move the unit away from the fluorescent light. Do not forcibly push the disc tray to the power cord. • Turn off the X-ROUND effect (page 24). Disc player The disc tray does not open and "LOCKED" appears in the display. • Consult your nearest Sony dealer. Disc access takes a long time. • Set "CD POWER ON" by pressing Z OPEN/CLOSE.
Operating Instructions
Page 36
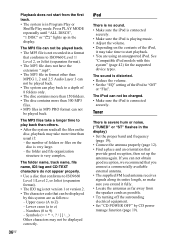
... iPod is playing music. • Adjust the volume. • Depending on the disc is severe hum or noise. ("TUNED" or "ST" flashes in MP3 PRO format can play back than usual if: - Lower cases (a to 9) - Numbers (0 to z) - Playback does not start playback. • You are as possible. • Try turning off the surrounding electrical equipment. • Set "CD POWER OFF" by this system" (page 42) for the supported...
... iPod is playing music. • Adjust the volume. • Depending on the disc is severe hum or noise. ("TUNED" or "ST" flashes in MP3 PRO format can play back than usual if: - Lower cases (a to 9) - Numbers (0 to z) - Playback does not start playback. • You are as possible. • Try turning off the surrounding electrical equipment. • Set "CD POWER OFF" by this system" (page 42) for the supported...
Operating Instructions
Page 37
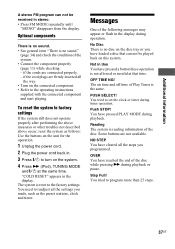
... as follows: Use the buttons on the unit for the operation. 1 Unplug the power cord. 2 Plug the power cord back in. 3 Press "/1 to turn on time and off time of Play Timer is the same. The on the system. 4 Press M (iPod), TUNING MODE and "/1 at that can not be played back on the connected component. • Refer to the operating instructions supplied with the connected component and start playing. PUSH SELECT! The system is not allowed...
... as follows: Use the buttons on the unit for the operation. 1 Unplug the power cord. 2 Plug the power cord back in. 3 Press "/1 to turn on time and off time of Play Timer is the same. The on the system. 4 Press M (iPod), TUNING MODE and "/1 at that can not be played back on the connected component. • Refer to the operating instructions supplied with the connected component and start playing. PUSH SELECT! The system is not allowed...
Operating Instructions
Page 39
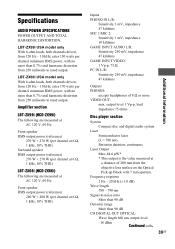
... Hz Front speaker RMS output power (reference) 270 W + 270 W (per channel at 6 Ω, 1 kHz, 10% THD) Surround speaker RMS output power (reference) 270 W + 270 W (per channel at 6 Ω, 1 kHz, 10% THD) LBT-ZX66i (HCD-ZX66i) The following are measured at 6 Ω, 1 kHz, 10% THD) Inputs PHONO IN L/R: Sensitivity 3 mV, impedance 47 kilohms MIC 1/MIC 2: Sensitivity 1 mV, impedance 10 kilohms GAME INPUT AUDIO L/R: Sensitivity 250 mV, impedance 47 kilohms GAME INPUT VIDEO: 1 Vp-p, 75...
... Hz Front speaker RMS output power (reference) 270 W + 270 W (per channel at 6 Ω, 1 kHz, 10% THD) Surround speaker RMS output power (reference) 270 W + 270 W (per channel at 6 Ω, 1 kHz, 10% THD) LBT-ZX66i (HCD-ZX66i) The following are measured at 6 Ω, 1 kHz, 10% THD) Inputs PHONO IN L/R: Sensitivity 3 mV, impedance 47 kilohms MIC 1/MIC 2: Sensitivity 1 mV, impedance 10 kilohms GAME INPUT AUDIO L/R: Sensitivity 250 mV, impedance 47 kilohms GAME INPUT VIDEO: 1 Vp-p, 75...


