Operating Instructions
Page 1
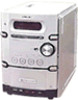
Refer to them whenever you call upon your Sony dealer regarding this product. Model No Serial No CMT-HPX10W CMT-HPX9 CMT-HPX7 ©2004 Sony Corporation 4-255-291-11(2) Micro Hi-Fi Component System Operating Instructions Owner's Record The model and serial numbers are located on the rear of the unit. Record the serial number in the space provided below.
Refer to them whenever you call upon your Sony dealer regarding this product. Model No Serial No CMT-HPX10W CMT-HPX9 CMT-HPX7 ©2004 Sony Corporation 4-255-291-11(2) Micro Hi-Fi Component System Operating Instructions Owner's Record The model and serial numbers are located on the rear of the unit. Record the serial number in the space provided below.
Operating Instructions
Page 2
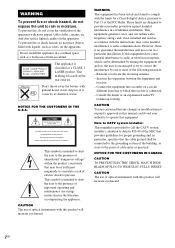
...product will increase eye hazard. 2GB Reorient or relocate the receiving antenna. - CAUTION The use of important operating and maintenance (servicing) instructions in the literature accompanying the appliance. To prevent fire or shock hazard, do not place objects filled with general house waste, dispose .... Increase the separation between the equipment and receiver. - To prevent fire, do not cover the ventilation of the apparatus with the instructions, may be connected to the grounding system of the NEC that provides guidelines for help. WARNING To prevent fire or shock hazard, ...
...product will increase eye hazard. 2GB Reorient or relocate the receiving antenna. - CAUTION The use of important operating and maintenance (servicing) instructions in the literature accompanying the appliance. To prevent fire or shock hazard, do not place objects filled with general house waste, dispose .... Increase the separation between the equipment and receiver. - To prevent fire, do not cover the ventilation of the apparatus with the instructions, may be connected to the grounding system of the NEC that provides guidelines for help. WARNING To prevent fire or shock hazard, ...
Operating Instructions
Page 5
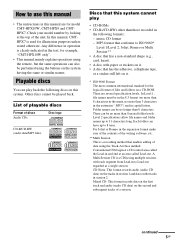
... Mixed CD: This format records data on the first track and audio (audio CD data) on a CD-ROM. How to use this manual • The instructions in this manual are several specification levels. Check your model number by looking at an area called the Lead-in session 2. MP3 format that conforms... has the adhesive, cellophane tape, or a sticker still left on it. * ISO 9660 Format The most common international standard for model CMT-HPX10W, CMT-HPX9 and CMTHPX7. CD-Extra: This format records audio (audio CD data) on the tracks in session 1 and data on the tracks in and end at...
... Mixed CD: This format records data on the first track and audio (audio CD data) on a CD-ROM. How to use this manual • The instructions in this manual are several specification levels. Check your model number by looking at an area called the Lead-in session 2. MP3 format that conforms... has the adhesive, cellophane tape, or a sticker still left on it. * ISO 9660 Format The most common international standard for model CMT-HPX10W, CMT-HPX9 and CMTHPX7. CD-Extra: This format records audio (audio CD data) on the tracks in session 1 and data on the tracks in and end at...

Operating Instructions
Page 6
... data can be added (nonfinalized disc). a disc recorded with copyright protection technologies This product is recorded in Multi Session. - For more information, see the operating instructions for the recording device. • Discs recorded on this product. Notes on CD-R and CD-RW • Some CD-Rs or CD-RWs cannot be...
... data can be added (nonfinalized disc). a disc recorded with copyright protection technologies This product is recorded in Multi Session. - For more information, see the operating instructions for the recording device. • Discs recorded on this product. Notes on CD-R and CD-RW • Some CD-Rs or CD-RWs cannot be...

Operating Instructions
Page 10
... Z. DISC 1 - 5 slot (for 12 cm disc only) DISC 1 DISC 2 DISC 3 DISC 4 DISC 5 DISC +1 slot (for the operation. 1 Press Z. 2 Insert discs with your other hand. For instructions on how to malfunction. • When you do not insert a disc in any of the respective slot to elevate the disc, then lift it out...
... Z. DISC 1 - 5 slot (for 12 cm disc only) DISC 1 DISC 2 DISC 3 DISC 4 DISC 5 DISC +1 slot (for the operation. 1 Press Z. 2 Insert discs with your other hand. For instructions on how to malfunction. • When you do not insert a disc in any of the respective slot to elevate the disc, then lift it out...

Operating Instructions
Page 23
... the unit while holding down FUNCTION on the unit. Tip If you can then listen to audio from a connected component 1 Connect audio cords. Listening to the sound from "MD" to "MD", repeat the same procedure. To change from the... display. From the audio output jacks of an optional analog component Optional analog component Display/Optional Components A MD/VIDEO jacks Use audio cords (not supplied) to connect an optional analog component (MD deck, etc.) to the operating instructions provided with each component. See the illustration above. 2 Press FUNCTION repeatedly until "MD...
... the unit while holding down FUNCTION on the unit. Tip If you can then listen to audio from a connected component 1 Connect audio cords. Listening to the sound from "MD" to "MD", repeat the same procedure. To change from the... display. From the audio output jacks of an optional analog component Optional analog component Display/Optional Components A MD/VIDEO jacks Use audio cords (not supplied) to connect an optional analog component (MD deck, etc.) to the operating instructions provided with each component. See the illustration above. 2 Press FUNCTION repeatedly until "MD...

Operating Instructions
Page 28
...Check the connection of an audio reproducer, make sure that the NOISE FILTER switch is set to OFF. • Make sure that the optional component is set these function to the factory settings. Noise increases or the high frequencies are erased. • The record/playback heads are connected properly...the CHANNEL selector on the unit for the operation. 1 Disconnect the power cord. 2 Reconnect the power cord. 3 Press ?/1 to the operating instructions supplied with adhesive tape (page 31). • The tape has wound to either ON or OFF (If the switch gets stuck between the transmitter...
...Check the connection of an audio reproducer, make sure that the NOISE FILTER switch is set to OFF. • Make sure that the optional component is set these function to the factory settings. Noise increases or the high frequencies are erased. • The record/playback heads are connected properly...the CHANNEL selector on the unit for the operation. 1 Disconnect the power cord. 2 Reconnect the power cord. 3 Press ?/1 to the operating instructions supplied with adhesive tape (page 31). • The tape has wound to either ON or OFF (If the switch gets stuck between the transmitter...
Operating Instructions
Page 31
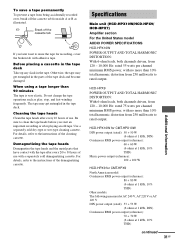
... contact with the tape after every 20 to 30 hours of use . Specifications Main unit (HCD-HPX10W/HCD-HPX9/ HCD-HPX7) Amplifier section For the United States model AUDIO POWER SPECIFICATIONS HCD-HPX10W POWER OUTPUT AND TOTAL HARMONIC DISTORTION: With 6-ohm loads, both channels driven, from 120...in the parts of the tape deck and become damaged. For details, refer to the instructions of the demagnetizing cassette. Use a separately sold demagnetizing cassette. For details, refer to the instructions of the cleaning cassette. Break off the cassette tab from side A or B as...
... contact with the tape after every 20 to 30 hours of use . Specifications Main unit (HCD-HPX10W/HCD-HPX9/ HCD-HPX7) Amplifier section For the United States model AUDIO POWER SPECIFICATIONS HCD-HPX10W POWER OUTPUT AND TOTAL HARMONIC DISTORTION: With 6-ohm loads, both channels driven, from 120...in the parts of the tape deck and become damaged. For details, refer to the instructions of the demagnetizing cassette. Use a separately sold demagnetizing cassette. For details, refer to the instructions of the cleaning cassette. Break off the cassette tab from side A or B as...


